Wooden railings
Any staircase structures, regardless of their installation location, purpose and material from which they are made, must be equipped with railings that ensure the safety of people on the stairs and decorate them. Let's consider how railings for wooden stairs can be constructed, methods for installing them, as well as commercially available models and the possibility of making fencing elements with your own hands.
Types of stairs on which wooden railings can be installed
Let's consider the options for stairs on which you need to install fences. Stairs are all around us.
There are many types of structures located indoors and outdoors:
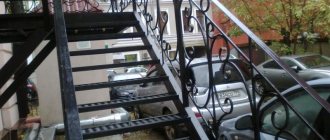
- Stairs installed to enter the building.
Wooden railings on the stairs at the entrance to the house
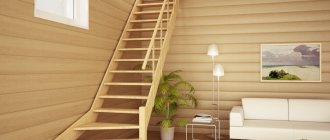
- Designs for moving to different floors, going up to the attic, going down to the basement.
Interfloor staircase railings
- Fire structures . Wood is not used in these structures; evacuation systems are made of metal (read more here).
- Structures used to move between different levels in gardens, squares, squares, embankments, observation platforms, etc.
Wooden railings for stairs in the park
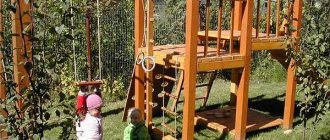
- Stairs installed on children's playgrounds.
All stairs according to the type of their structure are divided into marching and spiral:
- Marching structures are a structure of one or several spans, called marches, which can be connected to each other by means of a rectangular platform or winder steps.
They can be straight or rotary, and the rotation can be made at any degree. Despite the fact that these stairs themselves are very reliable, durable and comfortable, they should be equipped with guardrails, unless they consist of two steps.
Fences for the flight of stairs
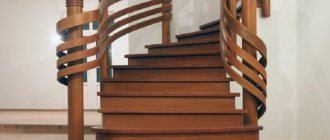
- Spiral staircases are a design in which the steps are installed on guides at an angle. These structures save space for installation. However, they are absolutely inconvenient to use, especially for categories of people with limited mobility and the risk of falls and injuries is quite high. Fences in such systems must be installed.
Wooden spiral staircase railings
Also, all stairs differ in the type of fastening of the steps:
- Designs on guides. The steps can be mounted on one or more supports installed at a certain angle. Such supports are called stringers, on which the steps are fixed from above, or bowstrings; with this method of installation, the steps are located between two guides.
Wooden railings for stairs on bowstrings
- Stairs on a vertical support. The steps in such systems are located along a vertically installed column. You should move along them with great care, so guards must be present.
Stair railing on a support pillar
- Stairs on rails. Despite the fact that the steps are very firmly fixed with the help of reliable pins, which are called bolts, outwardly they give the impression of weightlessness, and many step on them with a feeling of anxiety. To add confidence to people using the structures, it is advisable to install handrails.
Stair railings on rails
On which staircases are wooden railings installed?
- First of all, structures made from wood are equipped with wooden fencing.
- To decorate the structure and ensure its safety, wooden railings or individual elements made of this material are mounted on metal stairs.
- Concrete models are also equipped with wooden balusters and handrails.
Concrete staircase with wooden railings
How to make a drawing of a metal staircase
Making a drawing of a metal staircase with your own hands is quite simple. To do this, you need to take measurements of the space in which the steps leading to the second floor will be located.
Required materials for measuring
In order to measure space, you should have the following accessories on hand:
- Tape measure with maximum length;
- Surface level meter;
- Chalk or a special felt-tip pen that can be used to make the necessary marks on the wall, floor and ceiling.
This is a minimum set of accessories that will help you carry out the measurement process efficiently and quickly.
Required materials for the drawing
To make the diagram as accurate and correct as possible, you should also prepare a number of stationery items. Namely:
- A sharpened pencil or black marker with a thin tip;
- A sheet of paper or whatman paper;
- Ruler;
- Compass.
You should draw the diagram carefully and carefully so that during the actual installation process you do not make errors that are difficult to correct.
What parameters need to be measured
In order not to make a mistake and correctly make a drawing with your own hands, you will need to make the following measurements:
- The height from the floor to the beginning of the second floor level at the selected angle of inclination.
- Distance from floor to steps. If you plan to install a solid structure, strengthening it on the floor, then this measurement can be omitted.
After taking measurements, you can transfer the recorded parameters onto a sheet of paper, forming a diagram of future gangways.
What nuances must be taken into account during the process?
When taking measurements, be sure to pay special attention to the following factors:
- Be sure to measure the height at the required angle;
- It is also worth considering that the height of the future gangway should be at the level of the beginning of the second floor, and not at the level of the ceiling of the first tier of the apartment;
- When installing metal stairs in your house, you should take into account that these structures weigh quite a lot. Therefore, it is necessary to strengthen the walls before starting work or simply make sure of their strength if the house was built recently.
Return to contents
then one x.. 50 kg. Now, if it’s not difficult, what is the thickness of the wall on your profile, because I’m leaning towards your option, but I’m not going to weld pieces between the profiles, but the steps themselves. Here I found a profile of 25/25 and a wall of 1.5, so I can use it as a test version and build it.
I think the only posts you need are something like this, and a 20 x 20 cross member is enough. At home there is a staircase made entirely of profile 20 by 20 meters 5, the infection is strong but strong, it does not lead.
vanomur wrote: I think you only need racks like this, and a 20 by 20 cross member is enough.
the old man wrote: The people have an urgent need for a six-meter ladder.
make a prefabricated assembly of 3 steps of 2m each, as they do with prefabricated scaffolding..
Countryman, you go to the merchants where they sell this profile and just take this profile of different sections and watch how it bends at 6 meters. You don’t buy the one that doesn’t bend at all, but the one that plays acceptable. At the same time, you estimate how much that profile weighs, try how much two of them will weigh, and how much will they weigh together with the one that will go on the steps. Also keep in mind that when you weld all the troubles, the rigidity will increase in bending, I don’t know why, but it’s a FACT. And when you do it, don’t forget a photo report, maybe someone will find it useful.
Maybe cook it with a farm? The vein of two belts is 20*20*1.5. The maximum deflection is in the middle - increase the distance between the belts there.
Z,Y, I don’t know all the features of what you need a ladder for, but I splurged on a three-section aluminum one and I don’t know the hassle. Now their prices are quite humane. I'm still thinking about buying a transformer.
mahmut wrote: Can I cook it with a farm? The vein of two belts is 20*20*1.5. The maximum deflection is in the middle - increase the distance between the belts there.
I have exactly such a thing, if necessary I can show you tomorrow. There is also a luminous one of three sections. I like Luminka more. There is also a transformer. It’s a very convenient thing, you know?
Mikael wrote: I have exactly such a thing, if necessary I can show you tomorrow.
If it's not too much trouble, take a photo
mahmut wrote: I don’t know all the features of what you need a ladder for, but I splurged on a three-section aluminum one and I don’t know the hassle.
there, any corner or channel indicates the cross-section, the weight of one meter and all the loads that it will withstand. It’s interesting that no one has come across such a table with a profile.
mahmut wrote: Can I cook it with a farm? The vein of two belts is 20*20*1.5. The maximum deflection is in the middle - increase the distance between the belts there.
I made exactly the same one 15 years ago, and it’s exactly the same dimensions, it still stands in the attic crawl space, it’s very strong and doesn’t vibrate, then I separated it into two halves of 3 meters each, it’s bolted through the eyes, the weight of the ladder is about 25- 30 kg, one person can do it
mahmut wrote: The maximum deflection is in the middle - increase the distance between the belts there.
Oh, I forgot, the distance in the middle is about 20 cm, the truss is welded one meter away from the ends, the length of the truss is 4 m, there is only one jumper
If you want something light, reinforce it with cables so that they can take tensile loads. In the middle of the stairs (bottom) there are racks, cables pass through them, one on each side. Stretching - with tanders (turnbuckles).
Technotron wrote: If you want something light, reinforce it with cables so that they can take tensile loads.
or even make it completely rope...
why not make the staircase vertical (then a 20x40 profile behind the eyes and 20x20 crossbars) with a offset of 30 centimeters and an intermediate fastening in the middle to the wall (like fire escapes on buildings)
johnlc wrote: why not make a vertical ladder (then a 20x40 profile behind the eyes and 20x20 crossbars) with a offset of 30 centimeters and an intermediate fastening in the middle to the wall (like fire escapes on buildings)
It is not so convenient to travel along the vertical one, and it will be STATIONARY. But I would like it to be portable, even if I don’t need it (maybe), but anything can happen in life.
Ylektrik wrote: Countryman, you go to traders where they sell this profile and just take this profile of different sections and watch how it bends at 6 meters.
here is my ladder. Profile 20-20. Length 4 meters. Under my weight it does not bend or play at all
Mikael wrote: here is my ladder. Profile 20-20. Length 4 meters. Under my weight it does not bend or play at all
Smirnoff wrote: I forgot, the distance in the middle is about 20 cm, the truss is welded one meter away from the ends, the length of the truss is 4 m, there is only one jumper
then one x.. 50 kg. Now, if it’s not difficult, what is the thickness of the wall on your profile, because I’m leaning towards your option, but I’m not going to weld pieces between the profiles, but the steps themselves. Here I found a profile of 25/25 and a wall of 1.5, so I can use it as a test version and build it.
the old man wrote: . It’s interesting that no one has come across such a table with a profile.
Here » > you can download an excellent calculator of all types of metal profiles.
Buiny wrote: Here » > you can download an excellent calculator of all types of metal profiles.
Then you need to draw up a drawing in which you indicate the following data and parameters:
Types of wood for railings
Several types of wood can be used to make railings. When choosing, you should take into account the conditions in which the staircase will be used and the visual appeal of a certain type of wood.
- Coniferous species. The most budget-friendly options for fencing production are pine and spruce. The most popular material is pine. It lends itself well to processing; resinous wood resists fungus well. The not too dense structure of pine allows protective compounds to penetrate deep inside, which increases the durability of the material. Spruce is not so pliable to process, and it usually has a lot of knots. The advantage of spruce products is their resistance to warping. Larch tolerates temperature changes and moisture well, it is resistant to fungi and rotting, but will be more expensive.
Pine handrail
- Hardwood. Oak wood has a high content of tannins, which allows it to resist rotting and fungus. Structures made from this dense and durable wood do not deform and have a long service life. However, their price is significant. In terms of resistance to fungi, beech is somewhat inferior to it, however, it is also actively used in manufacturing due to its durability and beautiful texture. Fences are also made from birch. It is durable, but susceptible to rotting. In addition, its natural pattern is not particularly attractive.
Oak handrails
Materials used
Finishing the stairs to the second floor
It is obvious that the material of wooden balusters is wood. Balusters can be made of oak, ash or beech. Accordingly, metal ones - made of steel, iron, chromium and even aluminum.
But more and more often combined balusters are appearing on sale. One of their advantages is that they are suitable for almost all types of stairs. The most common combination is metal and wood.
Based on the type of combination of these materials, balusters can be divided into two types:
- metal stand with wooden decor;
- wooden baluster with metal decor (most often stainless steel).
Both options are elegant, the only difference is in price due to the different consumption of materials. Wood in combination with metal in the interior will always look advantageous, regardless of whether the wooden stand is decorated with metal parts or, conversely, the metal stand is decorated with wood.
Of the two types of combined balusters, models with a metal core and a wooden attachment have gained popularity. The price for one piece fluctuates around 300 rubles. The core is usually made of chrome or stainless steel, and the wooden head can be made from pine, oak or ash upon request and to order. The thickness of the metal, as a rule, is not large - only 1–2 mm. But at the same time, consumers note that such models are durable.
Production of fencing elements
You can make handrails for wooden stairs with your own hands if you have the necessary tools at hand.
To produce fencing elements you will need:
Independent production of railings for wooden stairs requires experience with the listed tools. Vertical fencing posts consist of a base that is attached to the floor or steps; body, which is the main decorative element; and the supporting part on which the handrails are attached.
Balusters can be: flat, carved, turned and milled.
Flat parts are quite easy to make with your own hands. To do this, you need to use a jigsaw to cut out blanks from bars or boards according to the applied stencil. After which a grinding procedure is required. You can round the workpieces using a router or plane.
Flat balusters
Making figured railings for a wooden staircase with your own hands is no longer so easy. To make them, the bars are processed on a lathe with suitable cutters.
Figured baluster elements and tools for their manufacture
To make handrails, bars are used, which are rounded on three sides and must be polished. That's it - the wooden handrails for the stairs are ready.
Wooden stairs and railings: making rounded parts
As you can see, if you want to solve the problem of how to make a railing for a wooden staircase, it is quite possible.
Installation of balusters
Detailed instructions for installing balusters will help you perform high-quality work. It consists of two important stages:
- fastening the lower part to the ladder structure;
- fixation to the top.
First of all, it is recommended to fix the wooden baluster element in the area of the lower steps. To do this, make a support with places for fastenings. Each part is installed in grooves. Next, tap the top of the product with a rubber hammer.
The upper parts of the baluster are installed in the same way. To do this, grooves are made in the inner part to tightly fix each element.
It is important to maintain particular precision during the assembly process. This will allow you to make a high-quality structure that will last a long time.
When all the details are fixed, we move on to painting the stair balusters. To do this, we use a primer. When it dries, it can be coated with protective varnish or paint for wooden surfaces. The photo of balusters for stairs shows popular models of products for arranging interior space.
Installation of railings
When the problem arises of how to assemble a railing on a wooden staircase, you can go the simple route. The railings are installed on the sides of the guides, but the strength of such a structure leaves much to be desired.
The simplest installation of railings on a wooden staircase
We will look at how to attach railings to a wooden staircase in a more reliable way.
Important! Fencing parts must be treated with protective compounds.
For clarity, we suggest watching how to install railings on a wooden staircase: video:
Brief instructions for installing railings: You should begin attaching the railings of a wooden staircase by marking them.
Installation of support pillars
The question of how to secure a railing on a wooden staircase is by no means an idle one. The safety and strength of the structure depends on how well the connections are made.
The process looks like this:
- The cabinets are installed first. For fastening to steps or floors, stud screws are used.
- At the base of the post, holes are made for the pin rod and for screwing in the removable gearbox.
- The pin is screwed into the base using an open-end wrench.
- The pole is being installed. The hexagon socket is used to tighten the support.
- The side hole is closed with a decorative plug.
Attaching railings to wooden stairs: installing pillars using a hairpin
Installation of balusters
The balusters are fixed to the steps using furniture dowels. In the center of the end of the rack and the installation site, holes are cut out for installing dowels (the size of half the length of the dowel at the base and in the baluster). The dowels are inserted into the holes filled with wood glue: first, the lower dowel, after it has set, the stand is mounted.
Furniture dowels
After securing the balusters, you should create a slope for installing handrails. To do this, a guide is attached using clamps, an angle is marked along it, which is sawed off.
Forming baluster bevels
Handrail manufacturing process
Before you start gluing the boards, they need to be processed and prepared. They need to be cleaned on both sides. For this, a grinder with a grinding attachment is used. We create a flat surface, while only the bumps need to be removed and the depressions not rubbed.
We start creating the railings from the initial base, which is made from a sheet of plywood 6 mm thick. It must be attached to the handrail using self-tapping screws along the entire profile of the stairs. The width of the plywood sheet should be equal to the width of the railing. The preliminary base should follow all surfaces of the staircase, as well as turns. On top you need to lay newsprint, which is attached to a sheet of plywood using masking tape in several areas.
The paper is necessary to prevent the boards from sticking to the plywood base. In the future, this layer will be deleted. Trimming is done with a jigsaw and miter saw.
The first finishing layer must be laid on plywood, which is secured using clamps for fastening. We repeat this procedure along the entire contour of the flight of stairs. It is necessary to tightly connect each board to each other from the end. To do this, you will need to trim the boards using a miter saw.
This link will introduce you to the design features of a two-flight staircase.
Then we create the second layer of the handrail. This stage will be more difficult. First, you need to cut the boards again, which should overlap the underlying joints by at least 50 mm.
After trimming is completed, we begin gluing. To do this, we use PVA glue, which has a high concentration of binders. It dries quickly, so gluing must be done quickly.
The glue is applied only to two planes: the upper part of the board, on which the lower part of the board to be glued is applied. The thickness of the glue layer should not be large, because it will be visible if you look at the railing from the side.
It is better to apply glue with a brush. To prevent it from drying out, the brush must be placed in a container of water while working. Before use, shake off excess water. Having coated the areas to be glued, the planes are connected to each other, they should be pressed tightly. For this, metal clamps or wooden blocks are used, which are twisted together using self-tapping screws.
You may also be interested in material about interesting cantilever staircases.
The gluing procedure itself can take a long time if the railing is long, so you should not rush to wring out the clamps from the bottom layer. The work must be done sequentially in individual areas: you need to press the clamps in one area, then lay a new layer, clamp it again, moving to the side, and repeat the entire cycle.
Therefore, the railing is constantly pressed to the base, it will not move and will not break in the future. During the process of squeezing and clamping the clamps, it is necessary to control that the railing does not move away from the plywood sketch. After the glue has set, the joints of the boards must be sanded and excess edges cut off. Before grinding, you also do not need to remove all the clamps to avoid deformation of the structure. The fastener should be left in several areas.
Subsequent layers of boards are glued identically. The adhesive layer during the gluing process can be of varying thickness, so the thickness of the entire railing should be checked using a caliper. If there are differences, the bumps should be sanded.
After gluing all the layers of wood, the final stage of work begins to create railings for your own staircase. At the final stage, a milling machine is taken and a special attachment is put on it. Then you need to use this tool to process the railing on both sides. As a result of this procedure, the square section will become round.
Once this stage is complete, the original plywood base is removed. To do this, you need to carefully lift the railing and unscrew the sample. Then, a milled handrail is screwed into the handrail at the attachment points with self-tapping screws. It is necessary to accurately hit the screw in the very middle of the railing.
In addition, you may be interested in wood-effect facade panels, which you can read about here.
The work of creating a railing ends with cosmetic procedures:
- the railings need to be puttied. For this purpose, a special composition is used for wood of the desired color range. This is necessary to eliminate defects that arose during the creation process;
- the railings should be sanded using fine sandpaper;
- the handrail is varnished or painted;