The internal structure of the cisterns of many modern toilets, at first glance, is completely different from what was used 30-40 years ago. Therefore, when many questions arise related to the maintenance of sanitary fittings, for example, how to adjust the float in the toilet or adjust the outlet valve, apartment owners sometimes have uncertainty - should they solve the problem themselves or invite a third-party specialist? However, the functionality of current devices is based on the same principles as before. Their understanding, as well as knowledge of plumbing maintenance algorithms, makes it possible to maintain it in working condition on your own.
Picture 1
float gets stuck
Good day everyone. The problem is this: after releasing the water, the float does not go down with the water. This prevents the mechanism for releasing water into the tank from opening. To fill it you have to hit the tank a little. The system is as follows: the float is placed on a bracket along which it moves up and down. After inspection, I discovered the following reason: the water is hard, which causes plaque to form on the surface of the bracket, and the gap between the float decreases. Question: since replacing the system will help for a short time, tell me what to do so as not to drum on the tank every time?
How and how to defrost a sewer in a private house
There are different ways and means to warm up a frozen sewer (than to melt the ice in a pipe). All methods can be combined into two large groups:
thermal method. Provides for the organization of heat supply to the freezing point. The work is progressing slowly, but there is no risk of causing damage to the pipeline system. This method is most suitable at home, when special means are not at hand, and calling specialists is impossible or too expensive;
chemical method. Currently, chemical defrosting is rarely practiced. Firstly, because not every chemical can cope with icing. Secondly, because this is a costly method. And thirdly, because many users prefer local sewers, i.e. systems that are capable of performing partial wastewater treatment.
Mellerud pipe cleaner, chemical defrosting One of the components of local systems is the presence of biological treatment, and chemistry can negatively affect the life of bacteria. However, its simplest variety, a steep saline solution, is still used, according to reviews.
A more technologically advanced option is to use a drug like Mellerud. The components of Mellerud pipe cleaner react with water to produce heat.
Note
You should carefully use a chemical method to defrost plastic sewer pipes. Because
Severe overheating can cause them to deform.
Toilet float: device, adjustment rules and replacement example
Over time, outdated plumbing fixtures are replaced by new, more comfortable and functional ones, but some details remain the same, practically without changing their purpose.
For example, one of the most important elements of the flush cistern - the toilet float - continues to perform its main function of adjusting the water level, although it has also undergone external changes.
Agree, understanding the structure of the float mechanism is useful to any home handyman. Calling a plumber at the slightest problem with the toilet is not the best option. Moreover, most valve malfunctions can be eliminated independently.
We suggest understanding the design and operating principle of different types of floats. Detailed instructions will help you adjust the mechanism and restore the toilet flush system.
Useful tips
And some recommendations from experts:
- Before purchasing pumping equipment, it is necessary to carry out calculations for consumers. That is, calculate the optimal ratio of pump performance and total consumer consumption.
- A preliminary piping scheme is developed, which takes into account all consumers, regardless of their seasonal or off-season use.
- It is necessary to correctly connect the pump to the power supply network. There are many nuances here, so a professional electrician is involved in this matter.
- The owner of the dacha must first decide whether to buy all materials and equipment separately or purchase a ready-made pumping station. It cannot be said that one of the proposed options is better than the other. Therefore, it is better to consult with specialists who will study the features of the dacha and the source of water intake.
Place of the float in the design of the cistern
The float mechanism itself is just a small part with a simple device, but together with the rest of the tank fittings it performs a significant mission - it is responsible for flushing. More precisely, it is an intermediary between two internal systems: bulk and drain.
To understand what role is assigned to this simple device, let’s figure out how the toilet flush cistern works.
We will not consider elements of a built-in installation or retro models suspended from the wall, but will focus on the most popular solutions - cisterns, which are part of compact toilets and are installed on the back shelf of the bowl.
Externally, it is a faience (porcelain, plastic) tank, closed on top with a lid with a hole for a control lever, which is increasingly being replaced by a button (single or double). In addition to this hole, there are two more: for the flow of water from the cold water system and for draining liquid from the tank into the toilet bowl.
The fittings are installed inside the tank - a collapsible system of plastic, metal and rubber parts. The configuration, dimensions, and materials used to manufacture the elements differ from one manufacturer to another. In addition, there are several types of mechanisms.
However, they are all united by a common principle of operation: water flows into the tank through the inlet hole (through a flexible pipe connected to the cold water pipe) in the required volume (on average 4.5-6 liters).
Along with the level of water filling the tank, the float also rises. When the liquid level reaches the desired level, the float device blocks the flow of water. This state persists until flushing.
During the flushing process, other elements of the system are activated. A button (or lever) moves a rod, to the end of which a membrane (or gasket) is attached. The flush valve opens and water rushes into the toilet.
The function of the float is obvious - adjusting the volume of water entering the tank. If the mechanism fails, water will flow continuously, and the apartment will be saved from flooding by another important element of the system - the overflow.
Repair of valve faults
Troubles usually happen unexpectedly, when there is no way to call a specialist or seek help from more knowledgeable people, so you always need to be prepared to act independently.
Failures of the float mechanism can disable the operation of the drain tank, and flushing it off with water from buckets every time is not an interesting task. Let's figure out how to quickly change or repair the float in the toilet if it has become unusable.
Violation of the tightness of the plastic ball
When the old float wears out, a crack may appear, which over time will turn into a hole. Liquid will begin to flow through the hole into the plastic ball, and it will no longer be able to float up and block the inlet valve. A problem arises - a constant flow of water in the toilet. Water losses quickly turn into financial costs.
Let's find out how to avoid this:
- turn off the water;
- remove the float;
- wipe it dry;
- cover the crack with waterproof sealant;
- dry;
- fix the float in the tank;
- We check his work.
There is no point in repairing a float with a large hole or completely leaky plastic; in this case, we rush to the store and purchase a new part to replace it.
If the float valve fills with water due to a ruptured membrane or a crack in the valve, this sealing device must be replaced:
Image gallery
Photo from
Step 1: Removing the toilet float valve
Step 2: Disassemble the float head
Step 3: Diaphragm rupture - cause of problem
Step 4: Reassemble the Float Device
Skewed float structure
Due to wear of the rubber (silicone) seals or due to poor water quality, the glass-type float device may become misaligned.
Does the plastic float “stick” with each release of water or does it even stop moving up and down relative to the guide “sliders”. Depending on its position, either the flow of water into the tank stops, or, on the contrary, it constantly pours, flowing straight into the sewer.
A common cause of breakdowns is poor quality tap water. It is characterized by a high content of lime and rust, which settle on the walls of the “glass” and on the rods (holders, guides)
First, try cleaning the mechanism without disassembling the entire structure. Perhaps the movement of the float is slowed down by debris that has fallen into the water. If this does not help, you will have to turn off the water, remove the tank, and then the float block. The drainage device may not be touched.
Then we carry out diagnostics and act on the results: we correct the position of the float and install it in place or completely change the block responsible for the water inlet.
Most often, breakdowns associated with changes in the position of the structure are corrected quickly, while it is better not to repair worn-out devices, but to replace them with new ones.
Brief installation instructions
Sometimes it is necessary to repair, replace or simply install a new float model - separately or as part of a valve block. Let's consider all the solutions in order. Installation of new spare parts is easiest, since there is no need to disassemble old mechanisms, and the tank and the parts themselves are in perfect condition.
Option #1 – installation of a spherical model
Let us immediately make a reservation that it is necessary to install a new spherical-type device in the only case - if the old element fails. It is unlikely that a new toilet model is equipped with a fill/flush system with this type of float.
A plastic ball or other shaped part can be purchased separately, since the advantage of the outdated mechanism is that the “rocker arm” is easy to install or change without replacing the rod-shaped water drainage system.
The float is usually sold with a metal holder and a fill valve. The latter is inserted into the water inlet hole (located in the upper part of the tank, on the left or right) and fixed, the “yoke” is positioned horizontally.
Approximately in the middle part it is attached to the “pear” - a rod-type exhaust valve. When pouring liquid into the tank, the plastic ball should lie freely on the surface of the water.
Option #2 – glass-shaped installation
Kits designed for containers with bottom connections are usually fixed in the tank even before it is installed in its rightful place - the toilet shelf. This is necessary since both valves - drain and inlet - are located at the bottom of the tank, and during installation, the parts must be tightened and tightened on both sides.
If the tank is already installed, this will be difficult to deal with.
First, install a larger drain mechanism, making sure to use the gaskets and washers that come with the kit. Align the device along the axis and tighten the nut from the outside. It is important that the O-ring seals tightly in the hole area.
Then, using the same scheme, the filling valve with a float device is fixed. It is usually allowed for the parts to touch each other or the walls of the tank, but it is better to try to secure them strictly vertically.
Particular attention should be paid to sealing the junctions of devices and openings. It is necessary to use all seals, washers and gaskets that are recommended by the manufacturer and supplied with the kit, with the exception of spare parts. If difficulties arise, just look at the installation instructions.
The float device is replaced using the same scheme, only before installing a new one it is necessary to dismantle the old one. For repairs, you will have to disassemble the toilet cistern.
Air lock is the cause of stagnation of drains
An air lock formed in the sewer system of a house can also disable the operation of the sewer collector. The air that has stopped in the system simply prevents the drains from leaving through the riser and either returns them back or passes them through, but very slowly and at the same time throws sharp unpleasant odors into the room.
The reasons for the formation of an air lock in the sewer can be as follows:
- Mistakes made when installing a plastic manifold (insufficient tightness of the pipeline, lack of connecting fittings, etc.);
- Excessive manifold turns, incorrect pipeline drops or incorrectly selected elbow angles;
- Lack of a water seal in the installed sewage system;
- Possible blockage or icing of the drain pipe in the attic or roof area.
Manual float adjustment
Let's move on to information that often worries owners of both old models and new units. Let's try to figure out how to independently adjust the float in the toilet in order to raise/lower the water level in the tank.
A larger volume of water is needed if what is available in the container is not enough for a high-quality flush, and they reduce the amount of water collected if they want to save money.
The adjustment process differs for different models. The outdated “yoke” can be adjusted in a very simple way, without even turning off the water. We remove the tank lid, find the float holder wire and simply bend it.
Due to the bend, the inlet valve blocking device is activated earlier, therefore, the volume of water entering the reservoir is also reduced.
If the float holder is assembled from two rigid metal strips connected with a bolt, the adjustment process is somewhat more complicated:
Plumbing diagram
And a few words about how to properly organize an autonomous water supply network at your dacha. First of all, the issue of the source of water supply is resolved. After which the pump is selected according to its installation type. That is, these two criteria are inextricably linked. And the second comes out of the first.
And now about the layout. If submersible or borehole models of pumping equipment are used in the water supply system, then surveying the location of the devices will not be necessary. As for surface aggregates, there are two options:
Layout of a surface pump in the basement of a house Source moikolodets.ru
Sometimes a special room is allocated for a surface pump, which is built on the street next to the cottage. It must be insulated.
As for the pipework, these are plastic pipes that are laid at a shallow depth, but must be insulated. Fortunately, you can find special thermal insulation materials for pipes on the market
Particular attention is paid to laying pipes inside the house. Typically, such a passage is planned at the stage of forming a country house project
Because the shorter the distance from the source of water intake to the cottage, the better: less material consumption, the pressure and productivity of the water supply does not decrease. Usually the installation inside the house is carried out either through the foundation of the building or through the wall.
float sticks in toilet tank
After draining the water, the float in the toilet tank gets stuck, either in the uppermost one, and the tank does not fill up, or in the lowest one, and the water continues to flow. Installed incorrectly? Float Jollyfill FL150. The instructions are:
The couple, as established, is very hard to see.
Marozoff, Of course, I could take a photo of the float, but it’s unlikely that you’ll see anything interesting there. Unless I put the float upside down. Or outside the tank
. But then the symptoms of the disease would be different. I meant some kind of adjustments. There are only pictures on the instructions, but I didn’t understand their meaning.
andrei186 wrote: The instructions have only pictures, but I didn’t understand their meaning
If such basic comics are incomprehensible, call a specialist
Judging by the picture, it should be wedged. The design is strange, the float is on guides like runners?
Where is the photo of the “living structure”?
GidroMS wrote: judging by the picture, it should wedge. The design is strange, the float is on guides like runners?
The float, when viewed from above, has a cross-section like rails (see picture). Accordingly, the cylinder has protrusions. The gaps between the float and the cylinder are approximately a millimeter. Perhaps at the slightest misalignment it will jam. Should I install it plumb? Or lubricate with something? Or wait for it to become overgrown with mucus itself?
Reasons for the formation of air jams
The finished closed-type heating system is sealed, but this does not guarantee the absence of air bubbles. Where does the gas in pipes and radiators come from?
Air appears in the heating system for the following reasons:
:
- The coolant is tap water that has not undergone special preparation - when heated, air dissolved in the water begins to release, and plugs form from small bubbles.
- The tightness of the system is broken, and air is gradually sucked in through loose connections.
- During the repair work, part of the circuit was disconnected by shut-off valves, some elements were replaced or cleaned, and then the coolant was again supplied to the repaired circuit.
- The pipeline was laid in violation of standards - the small angle of inclination of the pipes and improper installation of kinks prevent gas bubbles from entering special devices - air vents. As a result, gas accumulates in problem areas and interferes with the normal circulation of the coolant.
- If the heating system of a private home fills up very quickly (or when the coolant supply is not at the lowest point), the liquid is not able to completely displace air from complexly configured places in the pipeline and radiators.
- Air vents are missing or incorrectly positioned. Also, the reason for the incorrect operation of the air bleed device is its contamination by mechanical inclusions in the unfiltered coolant.
Separately, it is worth considering gas formation in aluminum radiators. When metal comes into contact with a slightly alkaline coolant, hydrogen is released, which accumulates at the highest point of the heating device. If the radiator is not equipped with an air vent, over time the gas lock will not allow the coolant to pass freely through the internal channels of the heating device.
What to do if the toilet cistern button sticks
Most modern toilets are equipped with push-button flush mechanisms. They are easy to use and quite practical.
However, during intensive use, any mechanism can fail and begin to work incorrectly.
As a rule, this is expressed in the form of constant leaks (the shutter stops holding water in the tank) and jamming/sticking of the flush button. There can be two reasons for such troubles.
- Firstly, some elements of the drain mechanism wear out and become unusable.
- Secondly, during the operation of the toilet, the settings of the flush tank fittings may become confused, which is why the entire mechanism begins to work intermittently.
Methods for eliminating air locks
Removing plugs using an installed air vent
Before removing the air lock in the heating, you need to find out its properties. The main one is density, which will always be lower than the same indicator of water. Accordingly, the liquid will displace air upward and in the direction of circulation.
Therefore, to remove air, it is necessary to ensure the release of steam. To do this, you should install special devices - air vents and Mayevsky taps. They work on the principle of a check valve. When a certain pressure is exceeded, steam acts on the valve seat. The rod moves, releasing air from the radiator or pipe. After the pressure normalizes under the action of the spring, the rod takes its old position.
An air lock in a cast iron or aluminum radiator can damage the housing. Therefore, when such a situation arises, you need to solve the problem immediately.
Instructions - how to fix a stuck toilet button
To eliminate the cause of the malfunction you must:
- Remove the reservoir cap. In most cases, it does not have additional fasteners and is held directly by the plastic housing of the flush button, which must be unscrewed (counterclockwise). To unscrew the toilet cistern flush button, you do not need a special key - this is done by hand.
- Carry out an inspection. Having gained access to the “filling” of the tank, you should carefully inspect the drain mechanism drive for damage and distortions. Often the problem with a button sticking occurs due to accidental displacement of the pressing rod. Excessive force when pressing the button can also provoke a shift in the adjustment mechanism.
- Adjust the drain mechanism. If the cistern button has failed , the height of the drainage device (flush valve) may need to be adjusted. Many modern models of push-button toilets use a two-level flush system - in this case, it is necessary to adjust the low and full flush. To do this, you need to move the lock on the rod several positions up or down (this is determined logically depending on the specific model of the valve).
- Often the cause of drain failure is rust and other mechanical suspensions, which are deposited over time on the working parts of the fittings, complicating its normal functioning. In this case, the problem is eliminated by simply cleaning the working units from these deposits.
Removable toilet flush buttons
If the malfunction is caused by mechanical damage (breakage) of parts of the drain fittings, the simplest and surest solution would be to completely replace the fittings (it is unlikely that it will be possible to glue plastic parts together).
Replacing the drain mechanism is not difficult, since it has a standard design and is sold assembled, moreover, it is already adjusted.
The main thing is to choose the right method of supplying water (bottom supply or side supply). If any questions arise during the replacement process, then just refer to the instructions that are included in each kit. You should not buy cheap Chinese drain mechanisms; a high-quality set costs from 600 rubles.
VIDEO INSTRUCTIONS » alt=»»>
The answer to a frequently asked question: why are there two buttons on the toilet cistern?
The toilet flush cistern is one of the most active consumers of water in the house. When you press the button each time, all the water accumulated in the tank goes down the drain.
In order to save money, manufacturers of plumbing equipment have developed two-button drain fittings, which are designed to minimize water consumption. This system involves two drainage options: small and large.
When you press one (small) button, part of the water from the tank is drained (the volume of water supply is adjustable), when you press the second button, all the water is released.
Defrosting sewerage work procedure
If a problem arises and the sewer system in a private house is frozen, you must first determine the location of the ice jam.
Craftsmen note the importance of following the order of work, and it is better to start from the place where the water exits the septic tank. This order of work is due to the fact that the sewer pipe system is designed with the obligatory condition of ensuring unhindered flow of water
This means that all pipes, incl. The drain pipe is located at a slope to the exit point.
Ice plugs must be melted so that the water can drain naturally. Otherwise (when performing work outside), you need to be prepared for the drains to flow in the opposite direction, which will necessitate pumping them out. This convincingly proves that work should begin in the direction from the septic tank to the internal pipes.
But there are exceptions to this rule. Ultimately, the order of work will be determined by factors such as:
the location where the ice plug forms. If the water is frozen in the inside of the sewer (unheated house), then it will be much easier to defrost;
cork sizes. Perhaps the size of the ice plug will be only a few centimeters, then the volume of water that needs to be pumped out can be neglected;
geometry of the sewer system. The more straight sections in the system, the easier it is to remove the ice plug;
laying method. Typically, sewerage is located underground. And if ice has formed in pipes located at a sufficient depth under a layer of frozen earth, the number of options for use is sharply reduced. You can’t get through the septic tank - you have to carry out work from inside the house.
The easiest way to organize the winter functioning of the sewer system is to contact specialists who provide sewer defrosting services. The craftsmen not only know how to defrost a frozen sewer, but also have special equipment and also provide a guarantee on their work. However, for various reasons, many people prefer to solve the problem on their own. And as reviews from forum members testify, it was quite successful and fast.
Required tools and materials
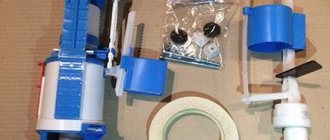
To repair a toilet float, you will need a set of tools, which will have to be supplemented based on the identified problem. The main things needed will be:
- adjustable wrench or open-end wrenches;
- screwdriver;
- pliers;
- adhesive tape for insulation.
If the float itself or its membrane breaks down, they will need to be replaced, which means new parts will be needed.