It is not for nothing that the failure of toilet fittings is recognized as one of the most unpleasant situations that occurs at home, in the office, at an enterprise, etc. Agree, neither a broken faucet nor a burnt-out lamp will create so much noticeable inconvenience.
This problem can be immediately eliminated if you know how to choose and correctly install a toilet valve. We will tell you in great detail which device is needed to close the flow of water into the tank, and which one is needed to drain it from there.
Here you will find complete information about the types of plumbing valves, the rules for their selection depending on the design of the tanks and installation methods. The article we offer contains reliable information, supplemented with useful diagrams, photos and videos.
Types of float valves
Float valves for toilets are divided according to the type of locking mechanism into the following types:
In a piston device, a floating float, when rising, presses on a piston moving towards the flow of water until it rests against the saddle. Piston locking mechanisms are already outdated; they do not have any unique design features.
The disadvantages of such devices include noise during filling and the constant sound of falling drops due to the loss of tight pressure to the inlet over time.
The membrane locking mechanism is activated by the action of the pusher on the rubber or silicone membrane. Among the advantages of membrane devices are fast water collection, less noise, and constant flow intensity. Disadvantage: good constant water pressure is required.
Selecting a solenoid valve: device prices and popular brands
When selecting shut-off valves for a water supply system, you must carefully study the specifications and descriptions provided by the manufacturer. This information will allow you to determine under what conditions the installation of a particular valve model is permissible.
When choosing a valve for a water supply system, you need to pay attention to the dimensions of the outlet and inlet holes.
When choosing a device, you need to take into account the following points:
- system type;
- temperature regime;
- pressure level;
- chemical composition of the liquid;
- current speed, etc.
The dimensions of the outlet and inlet openings are of considerable importance. These parameters must correspond to the diameter of the pipes. It is very important that the characteristics of the system and shut-off valves match, otherwise disruptions in the hydraulics of communications may occur. This outcome is possible if, in the area where the valve is installed, the flow of liquid slows down due to a narrow hole, which will inevitably affect the pressure level and temperature in the entire pipeline.
Solenoid valve prices:
| Device model | Price, rub./piece |
| Ceme Solenoid Valves | |
| D20 G3/4 | 3200 |
| D25 G1″ | 4750 |
| 87 G 2 1/2 D65 | 33200 |
| 87 G 3 D75 | 38650 |
| D75 G 3 D75 | 46850 |
| Shut-off solenoid valves ZSK | |
| ZSK-15 DU 15 | 12500 |
| ZSK-25 DU 25 | 13200 |
| ZSK-32 DU 32 | 14000 |
| Danfoss solenoid valves | |
| EV210B solenoid valves | |
| EV210B G 3/8 NC | 2850 |
| EV210B DN8 G 3/8 NC | 3350 |
| EV210B G 1/4 | 4200 |
| EV210B | 4850 |
| EV220B solenoid valves | |
| EV 220B 6B | 2800 |
| EV220B NC G1/2 | 5500 |
| EV220B NO G1/2 | 6450 |
| EV220B 20B | 11150 |
| EV220B 32B | 16550 |
What types can there be?
Before deciding how to choose fittings for a toilet, let’s try to understand what should be understood by the word “fittings”. This word should be understood as all the constituent elements that are aimed at ensuring the operation of plumbing, which includes, among other things, the toilet.
According to the functions performed, the following types can be distinguished:
- fittings that block the flow of water after the tank is filled;
- fittings that provide drainage of liquid.
Each type constitutes separate mechanisms, which, nevertheless, are closely related to each other. The latter circumstance leads to the fact that if one of them breaks down, the second one stops working too.
General characteristics of Tork solenoid valves
The valves manufactured under the Tork brand name are manufactured by SMS. The high quality of products is appreciated by many countries in Asia, America and Europe, so about 40% of goods are exported. The production process is fully automated. In the manufacture of valves, virtually no manual labor is used, which eliminates the possibility of defects caused by the human factor.
The company's product range includes the following types of valves:
When manufacturing Tork valves, the possibility of defects is eliminated, since manual labor is not used in production.
- bistable and monostable;
- for gases and liquids that have aggressive and neutral effects;
- for water and steam at elevated temperatures;
- for light petroleum products and gasoline;
- for vacuum;
- for piston compressors, etc.
Before going on sale, the fittings are examined for leaks, and the strength characteristics of the body are tested (for this, the product is exposed to five times the pressure). Using a non-contact tester, the functionality of the solenoid coils is checked.
All of the listed companies involved in the production of solenoid valves produce products of the highest quality. Thanks to these devices, the process of operating equipment and communication systems becomes completely controlled and safe. The service life of the valve and its efficiency will depend on how correctly the valve model is selected, as well as on its characteristics.
Types of drain mechanisms
Today you can find two types of drainage devices on sale:
- Single-mode;
- Dual-mode.
In the first case, draining is carried out by emptying the entire tank; the second has two buttons in its design - they are responsible for pouring out a certain amount of water. This volume can be adjusted; in addition, the use of such systems is completely justified, since water is seriously saved here.
Although the type of drain mechanism may be different, it operates on the same principle. A little differently, the impulse of movement occurs to the valve, which either opens or closes the hole through which the water leaves.
The principle of its operation depends on how this valve is designed. Sometimes this valve is placed at the end of tubular drains that act as an overflow. In other cases, a similar structure opens and closes thanks to special chains made of metal or plastic. The last type of design is far from the most successful, since such a system often fails.
Depending on who the manufacturer of this device is, the design can have quite significant differences. However, all these systems can be divided into two key components:
- Water drainage system;
- Water collection system.
Due to the water collection system, the tank is filled. It can be either side or bottom. If the design has a bottom feed, then they are very convenient for several reasons. First of all, the main positive side is the almost silent operation, but the design of this system is very complex.
It includes the following elements:
- Vertical rod float;
- Traction;
- Buoy.
The water supply shutoff unit begins to operate due to the traction, which is connected to the buoy into one common structure, which at the same time represents a water level limiter.
If water is supplied from the side, then this design will be more reliable, but when filling the tank it will make quite a lot of noise. Here the operating principle of the entire system will be much simpler. The tank contains a special membrane, thanks to which water flows into and stops the tank, as well as a small float connected to the supply tap using a lever.
When the tank is filled, the float rises and the lever begins to move, gradually cutting off the water supply when the required volume of water is collected.
Drain water from the tank from above or from the side. The side design is used mainly for hanging tanks, which are almost never used today. Most modern products use a drainage system with an upper water drainage principle.
As a rule, the trigger structure is a bulb made of rubber or rubberized plastic. This equipment is not too expensive, but at the same time very reliable.
In order for water to pass from the flush cistern directly into the toilet, a rod or a special button is placed on the lid, which will move the lever. As mentioned earlier, modern systems for draining water in tanks can have one or two operating modes.
The second type has two buttons, which release either half of the tank or the full one. This option is most suitable for people for whom saving water is not just empty words.
How to preserve an Abyssinian well for the winter
The peculiarity of such structures is that the water in them lies below the freezing level and nothing threatens them
But it is important for the site owner to prepare the source and the system that serves it for winter. To do this, drain the water from the system and close the mouth from the cold.
The algorithm of actions is simple:
- It is necessary to remove the pump, drain the water from the hose, turn it off and hide it for the winter, while the storage location should be dry and warm.
- It is necessary to drain the water from the pipes and, if necessary, blow them with air.
- Screw the head onto the previously prepared thread. This is done in order to protect the well neck from troubles that threaten an aggressive external environment - dust, snow, ice, wind, and various contaminants. The part itself must be tightly closed with a plastic cap or at least film material.
It is recommended to disinfect the well for the winter using dry bleach (35-40 g of the substance per 10-12 liters of water - this amount should be enough for 1 m of the well). Chlorine is needed to disinfect water and destroy pathogenic microbes. In the spring, this liquid must be pumped out before operating the well.
Adjustment and repair
When using the toilet, problems periodically arise - sometimes it flows, sometimes, on the contrary, water does not fill into it. Sometimes, tired of the inconvenience, people buy new toilets. But in vain. Most faults are resolved in 10-20 minutes. Moreover, everything is so simple that anyone can do it. You don't have to call a plumber. You can do everything yourself.
Adjusting the water level
We will talk about devices with bottom water supply. After installation, the toilet cistern must be adjusted. By default, they come from the factory set to the maximum amount of water in the container. This amount is often excessive. With the help of simple adjustments we can reduce the volume of water in the tank. For this:
- Turn off the water supply and drain the water.
- Unscrew the button.
- Remove the cover.
- There is a plastic screw on the float mechanism. By unscrewing/twisting it we change the amount of water. If you need to reduce the amount of water, tighten the screw, lowering the float down. The next time you fill (you can turn on the water), the water level should drop.
- Reinstall the cover and button.
The same procedure is necessary if water is constantly leaking from the tank. One of the reasons is that the float is raised too high. Because of this, water flows through the overflow system.
With a side water supply and a float mechanism, adjustment is even simpler - we change the position of the float by bending its lever. On the one hand it is simpler, but on the other hand it is more difficult. You have to bend it many times to achieve the required level.
By bending the float lever we change the water level in the drain tank
Toilet tank is leaking
If the water in the toilet constantly leaks and its level is normal, we move on. There are several reasons for this leak. And if so, then the methods of elimination will be different.
- The rubber seal under the drain valve in the tank has silted up, dirt has gotten under it, and a groove (or several) has appeared on its surface. The method of treatment is to clean the existing gasket or replace it with a new one. To resuscitate the old one, you need to: turn off the water, drain it,
- remove the drain mechanism by unscrewing the plastic nut from below;
- pull out the drain valve, remove and examine the gasket, clean it of settled particles, if necessary (there are grooves), sand it with very fine sandpaper until smooth;
- install it in place, connect everything and check operation.
The trigger mechanism itself was demolished. To check whether this is the case, you can lightly press the mechanism with the cover removed. If the leak stops, that means this is the problem. If it still leaks, you should try cleaning the gasket (described above) or replacing it. If the flow stops when pressed, you can replace the fittings or make the glass heavier.
Where to put the weighting agent
To do this, remove the release mechanism and place something heavy in its lower part. This could be several pieces of metal, a sock filled with pennies, sand, etc. We install the device in place and check the operation.
https://youtube.com/watch?v=OE_lWt7Xqp8
Water does not fill
Another problem that you can fix yourself is that water does not fill into the drain tank. Most likely the problem is a blockage - the filter or tubes are clogged. It's a long story, better watch the video.
https://youtube.com/watch?v=U_6q_MFVt5U
Model range of solenoid valves for water
| Model | Diameter | Thread | Bandwidth | |
| Pressure up to 7 bar, NC version, operating temperature 0…+65°C coil voltage 220V AC, 24V AC, 24V DC, 12V DC | ||||
| SF62321 | DN10 | G⅜" | 4.86 m3/h | |
| SF62322 | DN15 | G ½" | 5.04 m3/h | |
| SF62323 | DN20 | G ¾" | 8.57 m3/h | |
| SF62324 | DN25 | G 1″ | 12.54 m3/h | |
| SF62325 | DN32 | G 1¼" | 23.12 m3/h | |
| SF62326 | DN40 | G 1½" | 31.59 m3/h | |
| Pressure up to 10 bar, NC version, operating temperature 0…+80°C coil voltage 220V AC, 24V AC, 24V DC, 12V DC | ||||
| SF62522 | DN15 | G ½" | 5.22 m3/h | |
| SF62523 | DN20 | G ¾" | 8.82 m3/h | |
| SF62524 | DN25 | G 1″ | 13.92 m3/h | |
| Pressure up to 10 bar, NO version, operating temperature 0…+80°C coil voltage 220V AC, 24V AC, 24V DC, 12V DC | ||||
| SF62542 | DN15 | G ½" | 5.22 m3/h | |
| SF62543 | DN20 | G ¾" | 8.82 m3/h | |
| SF62544 | DN25 | G 1″ | 13.92 m3/h | |
| Pressure up to 16 bar, NC version, operating temperature -20…+130°С coil voltage 220V AC, 110V AC, 24V AC, 24V DC, 12V DC | ||||
| SG55324 | DN15 | G ½" | 5.22 m3/h | |
| SG55325 | DN20 | G ¾" | 8.82 m3/h | |
| SG55326 | DN25 | G 1″ | 13.92 m3/h | |
| SG55327 | DN32 | G 1¼" | 25.52 m3/h | |
| SG55328 | DN40 | G 1½" | 34.80 m3/h | |
| SG55329 | DN50 | G 2″ | 55.68 m3/h | |
| Pressure up to 16 bar, NO version, operating temperature -20...+130°C coil voltage 220V AC, 110V AC, 24V AC, 24V DC, 12V DC | ||||
| SG55344 | DN15 | G ½" | 5.22 m3/h | |
| SG55345 | DN20 | G ¾" | 8.82 m3/h | |
| SG55346 | DN25 | G 1″ | 13.92 m3/h | |
| SG55347 | DN32 | G 1¼" | 25.52 m3/h | |
| SG55348 | DN40 | G 1½" | 34.80 m3/h | |
| SG55349 | DN50 | G 2″ | 55.68 m3/h | |
How are shut-off and drain valves adjusted?
If the tank and fittings set were purchased separately, the drain and shut-off valves require adjustment: the user determines the volume of water entering the container and the installation height of the drain valve.
Adjusting the Float Stop Valve
The products are available in two versions:
- with metal lever for float. To increase the volume of incoming water, it is bent so that the float is higher. To reduce the amount of liquid, do the opposite: bend the lever so that the float is lower;
- with plastic float lever. This lever does not bend. The position of the float is adjusted with a special screw.
Usually inside the tank there is a mark for the optimal water level - you should follow it.
Sometimes it is not possible to adjust the filling level of the tank by moving the float; possible reasons:
- The shut-off valve is clogged. In this case, less water is supplied than the required volume. Having shut off the water supply to the apartment or on the branch to the tank, the valve is dismantled, disassembled and washed;
- The shut-off valve diaphragm is worn. Water flows continuously and flows through the overflow pipe into the toilet. Valve replacement required.
Adjusting the drain mechanism
It is necessary to install the bulb valve at the required height.
The procedure depends on the design and is described in the manual. When setting up a drain mechanism with a button, the button assembly is set so that it is located at a distance of 3-7 mm in relation to the lid. This ensures reliable fastening of the cover.
Then the flush button is screwed into the hole in the lid. To center the thread, first make a couple of turns counterclockwise and only then screw the element clockwise. No tools are required - just tighten by hand. The installation is completed by checking the drain mechanism.
When making adjustments, it is important to prevent the moving parts of the water filling valve and the drain mechanism from coming into contact. It is also necessary to ensure that none of the elements touch the wall of the tank
Relief via safety check valve
This method is recommended to be used by all well-known manufacturers of water heating tanks - Ariston, Thermex, Gorenje, Electrolux and so on. The household appliance is connected to the water supply networks according to the diagram (shown above) from the operating instructions:
- a safety group for boilers is installed at the inlet pipe;
- A shut-off valve is placed in front of the group;
- no fittings are provided at the outlet pipe or a ball valve is installed.
Sometimes there are valves without a lever - you can’t drain water through such a valve.
How to drain water through a valve:
- We shut off the water main at the entrance to the apartment and disconnect the heater from the power supply.
- We release 1-2 liters through the nearest mixer, opening the DHW valve all the way. We leave the plumbing fixture in the open position so that air can fill the void in the tank.
- We place a bucket under the “spout” of the valve, turn the lever and slowly empty the tank.
Before emptying, the heating device does not need to be disassembled and wait for the water to cool. Disadvantages of the method:
- due to the small flow area of the spout (5...8 mm), the water drains too slowly, a boiler of 80-100 liters will be emptied in about 2 hours;
- the valve often becomes clogged and does not allow liquid to pass through well;
- sometimes the security group turns sour, the drain does not work at all.
The method is suitable for small water heaters of 25-50 liters, provided that the valve valve functions normally. It will take too long to release large volumes.
On the left in the photo is a clogged poppet valve, on the right is a measurement of the drain passage (5 mm)
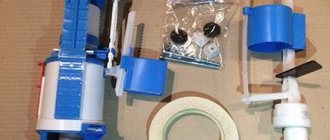
How to install new fittings
Included with the new fittings are instructions for use. First of all, let's get acquainted with the instructions.
- 1. We install a valve that regulates filling using gaskets and adapters. There are plumbing models in which the inlet and filler mechanisms are installed simultaneously.
- 2. The fittings can be inserted into the tank before installing the toilet; we place the gasket on the upper surface of the drainage system and place the device in the tank, fastening it with nuts.
- 3. Rubber gaskets are used for internal fasteners, and plastic gaskets for external fasteners. The internal gaskets can be lubricated with silicone sealant for sealing. We replace old gaskets after disassembling the device.
- 4.If possible, the gasket connecting the tank and toilet bowl is also lubricated with sealant.
- 5. The fittings must be located at a distance of at least half a centimeter from the walls of the drain container.
- 6. Having completed the installation, the tank is attached to the toilet bowl.
- 7. Close the tank with a lid by screwing on the drain button.
- 8.Connect the water and perform a test drain.
Preservation of a well with an installed adapter
An adapter is a device that is used to ensure a tight connection between a well and water pipes. If such a device is installed, then a well of this type is also used in the cold season. But in this case, the branches that lead into the house must be laid in a trench at a depth of at least 1.6 m. At the same time, the hydraulic tank of such a system and the automation unit are installed indoors.
The algorithm is simple. You need to disconnect the pump from the electricity and open any of the water taps installed in the house. In such cases, an automatic relief valve is installed in the well. Under conditions when the pressure drops to 0.5 bar, it should open and water will drain from the system.
Setting up plumbing toilet cisterns
The completion of the assembly of plumbing does not mean the end of all work on its installation. Often the toilet cistern fittings need to be adjusted, after which the filling, overflow and flushing functions must be performed flawlessly. Also, sometimes it is necessary to adjust mechanisms during their long-term operation or replacement.
Adjusting the cistern with a button
What should you pay attention to when setting up modern “push-button” plumbing?
Figure No. 2
- The height of the flush valve is set (Figure 2). Its design must correspond to the dimensions of the storage container under the lid, taking into account the button (1). Disconnect the rod (2) from the latch of the overflow tube. Release the rack clamps (3) on both sides. Move the racks (5) in the required vertical direction, guided by the scale marked on them. Secure the clamps and rod in the new position.
- The height of fixation of the overflow tube is adjustable. There are two requirements for this parameter: the surface of the water in the toilet tank should be 15-20 mm below the overflow edge, but at the same time, the fully pressed button should not touch the top of the tube. To do this: Set the size of the gap between the edge of the overflow and the top (4) of the rack (5), (Figure 2). To perform this operation, you will have to release the rod (2) and the pressure ring or clamp on the tube. Lower or raise it to the required height. Fix overflow and draft.
- The functionality of the filling fittings is configured in accordance with the requirements of the previous paragraph regarding the filling volume. In order for the inlet valve to ensure the optimal water level in the cistern, the position of its float must be set. If you need to set an early cut-off of the supply, then the float is lowered lower or fixed higher if the volume of liquid is insufficient. Changing its position is carried out by rearranging the rod similar to the rod on the drain valve.
Adjusting the two-level drain
In modern push-button toilet sets, it is not uncommon to have a two-level water discharge. Such models require small and full drain settings.
Adjustment of two-button drain mechanism.
We regulate the discharge of the entire volume of liquid by using a damper, increasing this parameter, moving it down and, decreasing, moving it up. The partial discharge of water is set by a small flush float, which, after opening the lock, we move down or up, respectively increasing or decreasing the flow rate.
You can learn more about adjusting the two-button release mechanism from the video:
Adjustment of old models
In conclusion, it is worth mentioning the adjustment of “classic” systems with lateral water supply. The design of an old-style toilet cistern involves only adjusting the inlet valve.
Its work depends on the position of the float, which is lowered or raised. For this purpose, if the rocker arm is brass (steel), then it is simply bent into the desired position, and if it is plastic, then the geometry of the lever changes after loosening and then tightening the mounting screw.
Adjustment of the overflow and exhaust valve is not provided in such models, and problems arising with them, as a rule, lead to repair work or complete replacement of the mechanisms.
A simple way to install a summer water supply
The entire process of laying a summer water pipeline will not take much time. First of all, decide on its location by choosing from the following options:
- Ground, in which the line is drawn directly along the surface of the soil. You will appreciate the advantages of this solution during installation and dismantling, as they are carried out very quickly and easily. But at the same time, there is always the possibility of system failure due to direct mechanical impact.
- Recessed, which is distinguished by the location of the pipeline itself at a shallow depth in the ground, but all the valves for regulating the water supply remain on the surface. This option is more acceptable due to its reliability. Free access to all elements remains.
Technology
To assemble such a system, follow these steps:
- Design a laying line in advance - a water supply diagram at the dacha, so that the system does not interfere and at the same time is located with a slight slope.
- Install the pumping system.
- Connect it to a water source.
- Place hoses or plastic pipes along the entire fluid supply line to the desired object.
- Connect them using pipes and fittings.
- At a certain distance along the entire length of the pipeline, install shut-off valves to be able to regulate the intensity and supply area.
Drain mechanism device
The tank fittings include two components:
- water supply valve;
- flush mechanism for flushing water into the toilet.
The fittings can be separate or combined.
Separate fittings
This is the most common option. Both components are not connected to each other. At the entrance to the tank, a valve with a membrane is installed, connected to a lever with a float at the end. When the water rises to the desired level, the float will be at the same level and the membrane will block the flow area of the valve. The drainage mechanism is a vertical rod with a bulb valve at the bottom.
By lifting the rod by the handle (outdated version), the user removes the bulb from the saddle and opens the drain hole. In modern models, this requires pressing the button at the top. The most practical version of the drain mechanism has a double button: one part empties the tank only half, the second completely.
The bulb valve is made of buoyant material, therefore, after being removed from the seat, it is held in the body of water and does not block the drain hole. After the tank is emptied, it falls back onto the saddle and, when the tank is filled, remains in this position, since the water presses on it only from above.
Advantages of the solution:
- low cost;
- ease of adjustment;
- cheap repairs: if damaged, only the failed component is replaced.
Combined reinforcement
This is a more expensive option, used in luxury plumbing fixtures.
Both components are combined into one system. The advantage is significant reliability. Disadvantages: high cost both in purchase and in repair - if it breaks down, you have to replace the entire complex. The design of the fittings depends on the method of supplying water to the tank - from the side or from below.
But the adjustment of both options is carried out almost identically.
Operating principle and device
The operating principle of the drain device is as follows:
- Shutting off the pumping equipment leads to a drop in pressure in the pipeline. When the mark reaches 0.6-0.7 bar, the drain valve is activated and naturally drains the remaining liquid from the pipeline back into the well.
- After starting the pumping equipment, the pressure in the system rises to 1.5 bar, and the valve closes.
This principle of operation effectively prevents unwanted stagnation of the water column in the pipeline system.
Drain valve design
The automatic device is a small device in a brass body, the internal cavity is equipped with a plastic valve. When the pressure in the line drops, the valve drain hole opens. Stainless steel is usually used to make the body. Main structural elements:
- A composite type of housing, the parts of which are connected using threads.
- A locking mechanism consisting of two movable spool plates mounted on a special rod and a sealing gasket.
- Plastic valve installed at the outlet of the throughput connector.
When purchasing a device, you should not give preference to the most budget-friendly ones, since, as a rule, low-quality materials with a short service life are used in production.
Types of drainage system
In addition to the internal configuration, the shut-off valves of the flush tank differ significantly in the material of manufacture, which affects the quality and service life of the toilet itself.
Material options for the production of toilet fittings:
- Plastic: Due to the low cost and availability of the material, polymers have rapidly conquered the market in absolutely every industry. However, plastic is a fickle material; the quality and durability of the components, as well as the direct operation of the drainage system, depend on its composition. Previously, the quality of shut-off valves could be judged by the cost of the product itself, however, today there are too many new young manufacturers on the market offering high-quality products at low prices. And established well-known brands allow defects, which leads consumers to doubts. Therefore, today it is very difficult to distinguish reliable toilet fittings from fake ones. Unfortunately, this difference is revealed only during the operation of the toilet.
- Metal: a material that provides high strength and significant service life of shut-off valves. To produce drain systems, modern manufacturers use brass and bronze compounds, because they are truly resistant to mechanical damage and the effects of water. The fittings of the cistern, made of similar metals, do not corrode for several years, maintaining all functional qualities. Metal shut-off valves are typical only for expensive models produced in the appropriate style.
As practice shows, toilets with plastic fittings are in greatest demand, which is understandable. Affordable cost and the ability to repair at any time determine our choice.
The cistern fittings are the basis for the operation of the entire toilet. Water is supplied in two ways: side or bottom. Side water supply is characteristic of our domestic plumbing and is characterized by rather high noise. The lower water supply is much quieter than the upper mechanism.
Before you begin repairing a toilet, you need to familiarize yourself with its design.
Both with side and bottom water supply, the valve closes under the influence of a control rod connected to the float. A float is a kind of plastic container or a small foam element.
Regardless of the type of water supply, the float is carefully balanced during installation of the fittings. Such work is necessary for the efficient and reliable operation of the cistern, which directly depends on a certain water level in the system.
Winter water supply at the dacha
November 5, 2015
Winter water supply is necessary at the dacha if you are going to be there regularly or live there.
It can be used not only in winter, it will be relevant at any time of the year.
It is also noteworthy that such a device at the dacha will not stop functioning, even if you do not visit it.
If you have to drain water from pipes in your dacha every time to prevent them from freezing, winter water supply is the best solution.
The main devices are:
- pipes;
- surface or submersible pump;
- drain valve;
- pressure switch;
- hydraulic accumulator;
- water heating cable.
We suggest you familiarize yourself with How to grow chestnuts from walnuts at home
Pipes for winter water supply
It is better to choose polypropylene pipes, because they have a number of advantages:
- do not rust;
- durable (up to 50 years);
- low thermal conductivity;
- low weight;
- easy to install;
- acoustically isolated.
Installation is performed by thermal welding, which ensures the integrity and safety of the entire system.
The best option would be to use a submersible pump. It supplies water well to the system and is economical.
You need to choose the brand yourself, which depends on the depth of the water source and the type.
Natural cooling of the engine is carried out automatically, and during operation it does not create any noise.
Drain valve for winter water supply
The valve is installed after the pump, and the water can be drained into a source or into a well.
The device is necessary to maintain the pressure in the water supply within a certain range.
When the maximum pressure is reached, the relay will turn off the pump. If the pressure drops to a minimum, the relay will close the contacts and the pump will resume operation.
This device will protect the water supply from water hammer and stabilize the pressure.
It is better to use a hydraulic storage tank with a membrane.
Winter water heater
In practice, storage water heaters cope best with this process.
The power and volume of the boiler must be selected based on your water consumption. Typically, for a family of 5 people, 100 liters with a power of 2.5 kW is enough.
There are only three options here:
- from a well;
- when connecting to the central highway;
- from the well.
The most convenient and easiest way is winter water supply from a well. It has a number of advantages over the above:
- with inadequate care, water-bearing canals rarely become silted;
- no need for a powerful pump;
- during conservation, water can be drained directly into the well.
To drill a well, you need a decent amount of money, and its maintenance costs even more; therefore, winter water supply from a well is a profitable way to obtain hot water.
Winter water supply project
Without a project and diagrams, it is almost impossible to create a proper water supply system.
It is important to consider when creating a route design and the location of connections to the plumbing. If you want to do it yourself, then you need to stock up on basic tools:
If you want to do it yourself, then you need to stock up on basic tools:
- soldering iron (iron) for pipes;
- gas wrench No. 2 (for assembly using fittings);
- grinder or metal saw;
- cutter (hacksaw);
- shovels and bayonet shovels;
- scrap.
Laying pipes for winter water supply
It is imperative to make a slope in the direction of the well.
Next, we level the trench and pour at least 15 cm of sand onto the bottom to create a cushion.
We lay the polypropylene pipe in the trench and connect it to the pump.
We seal the pipe coming out of the well with cement mortar and liquid glass. This will prevent your well from flooding with groundwater.
Fill with sand or soil and compact.
Now you will always have warm water!
A few words about the design of the tank fittings
Before I tell you why a toilet tank may leak, I will introduce you to the design of the fittings so that you understand the principle of its operation.
Of course, there are currently a great many options for mechanisms.
However, the principle of operation of the tank always remains the same, since any fittings include three main elements:
shut-off mechanism - is a tap that automatically shuts off the water as it enters the tank. The float is responsible for the water level at which the shut-off valve is activated;
Tank fitting options
- discharge system - is a valve that closes the drain hole. The valve is controlled by a button or lever;
- overflow system - prevents flooding of the apartment in case of failure of the locking mechanism. If the water in the tank rises above a certain level, the overflow system ensures that it is drained into the toilet.
Features of the tank
The mechanism for draining water from the tank is of two types. In the first, all the water is drained when you press a button or when you lift the handle up. The first option provides two buttons for rational use of water. When you press one of them, the water is partially drained, and using the second you can remove all the water from the tank.
If the flush works normally, then water flows into the toilet bowl quickly and without delay with a characteristic sound. If problems arise, the flow of water either does not stop and the walls of the toilet are constantly wet, or the water overflows from the tank.
This kind of breakdown can cause flooding of the toilet room, or provoke the formation of limescale on the walls of the toilet and, undoubtedly, lead to high water consumption due to its constant supply. Another sign of a malfunction may be the appearance of condensation on the cold water pipe that leads to the toilet.
Sometimes, to eliminate a leak, it is enough to clean the tank and parts from plaque and rust. They appear due to poor quality water and failure to follow simple plumbing hygiene rules.
To avoid further problems and eliminate the leak, it is important to find out the cause of the leak and determine in which part of the tank the breakdown occurred and check all the parts. To do this, you need to turn off the water in the riser, then clean the tank and study the design
Flush design device
If previously the tank body was made of cast iron, today ceramics, earthenware or special plastic are used. All the main elements of the tank are connected to each other.
There are only three key mechanisms: inlet, adjustable float, flush and overflow systems:
- The inlet or fill valve stops the flow of water into the tank after it is filled. The required water level is “measured” by the float.
- Locking or drain mechanism. This is the flapper/valve that opens during flushing.
Modern models have buttons for this. They can be single or double to adjust the amount of water flushed. Old Soviet toilets use a chain, lever or rope that is attached to a lever with a bulb. These elements are connected by traction. And the pear is at the bottom of the tank.
The standard tank design is quite simple. In some models, the flushing mechanism consists of a siphon. Its membrane is the weak link and often fails, as do the spokes connecting the flush and the float
The toilet float regulates the operation of the locking mechanism and controls the level of water drawn in, the design of which depends on the type of water supply to the tank (bottom or side).
There are several types of floats, but each one has air inside:
- The first, hollow, is made of rubber. It is located at the bottom of the reservoir and functions as a rocker arm.
- The second, plastic, glass-like float. Located at the top of the tank. When the tank is filled with water, it rises up and works almost silently. The latter type is used only in older models; the first type is installed in modern toilets.
The overflow system protects the entire toilet room from flooding if the filling mechanism does not work for some reason. When more than normal water gets into the tank, it is the flush tank fittings that drain it into the toilet. If you find a leak, then do not panic, but remove the toilet lid and figure out what the problem is.
How to run hot water
If you have a hot water supply line, then there should be no problems with hot water in the bathhouse in winter. Of course, if the highway is functioning normally.
Everyone else will have to fend for themselves. At worst, there is a stove in the bathhouse, the heat of which in large quantities simply “flies down the chimney” in the literal sense - the gases in the chimney do not have time to give off heat and escape too hot.
But you can also install a boiler so as not to wait for the stove to heat the water in the tank. However, first things first.
How to install plumbing in a bathhouse so it doesn't freeze
Well, the method itself and the necessary set of elements for wiring hot water supply do not differ from those for cold water.
The only difference will be in the pipes - after all, pipes for hot water should not be deformed from high temperatures, so polyethylene ones are not suitable. Take those marked for hot water supply.
Polypropylene pipe for hot water supply. Photo by Petrovich.
But since we are talking about a bathhouse, that is, about a building with periodic use, then with the taps closed, of course, the water in the system will cool down, and in cold weather it will turn into ice and burst the pipes.
Therefore, the owner must decide exactly how he is going to supply water to the bathhouse and ensure complete drainage of water from the bathhouse in winter.
There are two options: on top and underground. In both cases, the water is shut off in the house or at the point of connection with the main line, and what remains in the system must be drained.
IMPORTANT! The slope of the pipeline towards the drain should be 0.02-0.05 degrees.
In order not to repeat ourselves, we will not describe the drainage device in detail here (it is common to all water supply systems); instead, we suggest going down to the corresponding heading in this article.
Boiler or water heater in a bath without heating
We have already said that an alternative to the main hot water supply can be an autonomous boiler or water heater. Moreover, in this case, you don’t even have to wait for the stove to heat the water, because gas or electricity does it for it in a separate installation.
However, any water heaters are now called boilers. In fact, the choice is made between three options:
- wood-burning water heater of instantaneous or storage type;
- gas water heater of instantaneous or storage type;
- electric water heater of instantaneous or storage type.
As you can see, the difference lies in what kind of fuel will be used, and whether it will be a storage tank, or water will only flow through it.
In a large bathhouse, a boiler is a necessary thing in winter. However, we can immediately say that at this time of year, instantaneous boilers may simply not cope with the task. Therefore, in a bathhouse without heating in winter, it is better to use a storage type water heater.
ADVICE! Pay attention to the instructions for the water heater - there is often a warning there that the unit is not intended for operation at temperatures below 5 degrees Celsius. Consequently, it can be started in cold weather only by warming up the bathhouse with a stove.
Since we are talking about rooms with periodic use, it is important to know how to protect equipment from low temperatures during the cold season
Since we are talking about rooms with periodic use, it is important to know how to protect equipment from low temperatures during the cold season. So, you can purchase a water heater with the function of constantly heating water, but this is convenient for those who use the bathhouse quite often in the winter
Because if during the period of absence the air temperature in the bathhouse drops below plus 5 degrees, then heating will occur under conditions for which the manufacturer is not responsible
So, you can purchase a water heater with the function of constantly heating water, but this is convenient for those who use the bathhouse quite often in the winter. Because if during the period of absence the air temperature in the bathhouse drops below plus 5 degrees, then heating will occur under conditions for which the manufacturer is not responsible.
Draining water before leaving the site is the rule for all elements of the water supply system in unheated rooms in winter. It also applies to the boiler. For greater convenience, you can drain it directly into the sewer.
A dry heating element in a boiler is better than a wet one - the dry one is not affected by the fact that you periodically drain the liquid from the tank, and this causes the wet one to deteriorate; its corrosion protection only works if the anode is in water.
Sunsystem indirect heating boiler. Photo by Leroy Merlin
Here is such a set of facts, but, as usual, what is better turns out to be more expensive.
Types of fittings for flush cisterns
The principle of operation of a regular tank is not complicated: it has a hole through which water flows and a place where water is discharged into the toilet. The first is closed with a special valve, the second with a flap. When you press a lever or button, the flap rises and the water, in whole or in part, flows into the toilet, and then into the sewer.
After this, the valve returns to its place and closes the drain point. Immediately after this, the drain valve mechanism is activated, which opens a hole for water to enter. The tank is filled to a certain level, after which the inlet is closed. The water supply and shut-off are regulated using a special valve.
The fittings for the flush tank are a simple mechanical device that allows water to be drawn into a sanitary container and drained by pressing a lever or button.
There are separate and combined designs of fittings that collect the volume of water required for flushing and drain it after activating the flushing device.
Separate and combined options
The separate option has been used for many decades. It is considered cheaper and easier to repair and configure. With this design, the fill valve and damper are installed separately, they are not connected to each other.
The shut-off valve for the tank is designed in such a way that it is easy to install, remove or change its height
To control the flow and shutdown of water, a float sensor is used, in which sometimes even a piece of ordinary foam is used. In addition to a mechanical damper, an air valve can be used for the drain hole.
A rope or chain can be used as a lever to lift the damper or open the valve. This is a typical option for retro-style models, when the tank is placed quite high.
In compact toilet models, control is most often carried out using a button that needs to be pressed. For those with special needs, a foot pedal may be installed, but this is a rare option.
In recent years, models with double buttons have been very popular, which allow you to empty the tank not only completely, but also halfway, in order to save some water.
The separate version of the fittings is convenient because you can repair and configure individual parts of the system separately.
Combined type fittings are used in high-class plumbing; here the drain and water supply are connected into a common system. This option is considered more reliable, convenient and expensive. If this mechanism breaks down, repairs will require completely dismantling the system. Setup can also be a bit tricky.
The fittings for a toilet cistern with side and bottom water supply differ in design, but the principles of setup and repair are very similar.
Materials for making devices
Most often, toilet fittings are made of polymer materials. Typically, the more expensive such a system is, the more reliable it is, but this method does not provide clear guarantees. There are also counterfeits of well-known brands, as well as quite reliable and inexpensive domestically produced products. The average buyer can only try to find a good seller and hope for luck.
Fittings made of bronze and brass alloys are considered much more reliable, and such devices are much more difficult to counterfeit. But the cost of these mechanisms will be significantly higher than that of plastic products.
Metal filling is usually used in luxury plumbing fixtures. With proper configuration and installation, such a mechanism functions smoothly for many years.
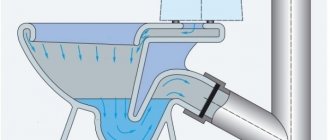
In bottom-fed toilets, the inlet and shut-off valves are very close. When setting up the fittings, you need to make sure that the moving parts do not touch
Water supply point
An important point is where water enters the toilet. It can be done from the side or from below. When water is poured from the side hole, it produces a certain amount of noise, which is not always pleasant to others.
If water comes from below, it happens almost silently. The lower water supply to the tank is more typical for new models produced abroad.
But traditional domestically produced tanks usually have a side water supply. The advantage of this option is its relatively low price. Installation also differs. Bottom water supply elements can be installed in the tank before it is installed. But the side supply is installed only after the tank is installed on the toilet bowl.
For replacement, the fittings are selected taking into account the option of supplying water to the plumbing tank; it can be side or bottom
Solenoid valve installation process (220V, 12V): practical tips
Before proceeding with direct installation, you need to determine what type of connection will be used for this.
With a threaded connection, the outlet and inlet pipes have internal or external threads. By using fittings of the appropriate size and configuration, the fittings can be integrated into the pipeline system. This option is considered the most convenient if the valve is installed by yourself.
With a flange connection, pipes are used that have flanges at the ends. The same elements must be present on the pipes. The parts are tightened using bolts. The flange connection allows you to create a high flow rate in the system, as well as a considerable pressure. Most often it is found on highways with medium and high pressure.
Instructions with a detailed description of the installation process are included with each package containing the valve. If everything is done correctly, the device will work properly, providing protection against leaks. When installing the device, you need to leave a little extra space in the installation area. This is necessary so that, if necessary, the solenoid can be removed and replaced. In addition, the presence of free space will allow you to control the operation of the valve, using a mechanism that allows you to manually lift the rod.
Each solenoid valve is supplied with detailed instructions for installing the device.
It is advisable to install a filter at the inlet of the valve. It will trap solid particles larger than 800 microns. Only a normally closed valve should be installed in front of the expansion valve. To eliminate the possibility of water hammer when opening the shut-off device, as little space as possible should be left between it and the expansion valve.
Note! Installation of solenoid valves on water is carried out exclusively with the coil facing upwards.
It is not recommended to use adapters in the section before and after the valve. These elements can narrow the diameter of the pipeline, increasing the risk of water hammer. It is better to place adapters in front of the expansion valve. If you install a T-shaped tube vertically into the solenoid valve, which will act as a damper, you can reduce the force of the water hammer that occurs when closing. In addition, the presence of such a tube will increase the service life of the device. A damper is extremely necessary if the pipeline is long and has a small diameter.
Operating principle of shut-off valves
During operation of shut-off valves, the following parts are involved:
- Float
- Lever design
- Valve
- Union
At the inlet there is a fitting through which water can enter from the system. When filling the cistern, the water level rises, causing the float to act on the lever system. She, in turn, presses the valve to the fitting and blocks access, blocking the liquid.
When filling, three types of location of the filling fitting are used:
- Top position
- With side water supply
- Bottom position
Each of them has its own subtleties in the operation of the system as a whole.
Toilet fittings with top connection
This type is used quite rarely. Due to the peculiarity of this design, filling the tank with water was accompanied by a high noise level. Subsequently, manufacturers abandoned production with such filling.
Toilet fittings with side connection
For lateral connection, the shut-off valve has two versions:
- Rod
- Membrane
The operating principle remains unchanged. The main difference is that the membrane is not able to block the access of water gradually, so when filled, access is blocked instantly.
The rod valve has the ability to close smoothly. At the moment when the float rises, the lever system gradually acts on the rod, thereby smoothly closing the access to water.
Fittings for toilet bowl with bottom connection
This method has a number of advantages over other supply connections:
- Silent filling
- Convenient location
- Possibility to hide water supply systems
- Large selection of varieties
- Availability of components
Due to the fact that the connection is made at the bottom, the toilet allows you to hide all water supply systems. It is for this reason that overhead tank designs are no longer used in apartments and residential buildings.
Such systems, in turn, have also been modernized over time. In order to reduce water consumption, two-button fittings began to be used, which include 2 drain modes. The first mode allows you to slightly open the drain valve of the fittings and release water gradually.
The second mode is designed to drain a large amount of water in a short time. The model range with a bottom connection is equipped with a two-button fitting at the manufacturer’s factory, but if desired, it can always be replaced.
Types of wells for private water supply
The undrinkable water is quite suitable for watering the garden, cleaning and similar needs. It is easier and cheaper to obtain it by constructing a needle well, also called an Abyssinian well. It is a column of thick-walled VGP pipes Ø from 25 to 40 mm.
The Abyssinian well is the easiest and cheapest way to obtain water for the temporary supply of a summer cottage
This is the cheapest and easiest way to obtain water for temporary water supply. For summer residents who need exclusively technical water and only in the summer.
- An igloo well, otherwise known as an Abyssinian well, is the simplest and cheapest way to create a water source for a private home.
- You can drill an Abyssinian well in one day. The only drawback is the average depth of 10 - 12 m, which rarely allows the water to be used for drinking purposes.
- An Abyssinian well can be installed within the house by placing pumping equipment in the basement or utility room.
- The igloo well is excellent for extracting water for watering a garden and maintaining a suburban area.
- Sand wells can supply water for both technical and drinking purposes. It all depends on the specific hydrogeological situation in the suburban area.
- If the water carrier covers a layer of waterproof soil on top, then the water may well be potable.
Aquitard soils that prevent the penetration of water prevent the penetration of domestic wastewater. If the sand containing water does not have natural protection in the form of loam or hard sandy loam, its drinking purpose will most likely have to be forgotten.
The walls of the well are reinforced with a column of steel casing pipes connected to each other by couplings or welds. Recently, polymer casing has been actively used, in demand by private owners due to its affordable price and corrosion resistance.
The design of a well in sand provides for the installation of a filter that prevents gravel and large sand suspension from penetrating into the wellbore.
Constructing a well for sand will cost much more than an Abyssinian well, but is cheaper than drilling a mine in rocky soils
The working part of the well filter must protrude beyond the aquifer at the top and bottom by at least 50 cm. That is. its length must be equal to the sum of the thickness of the aquifer and at least 1 m of reserve.
The diameter of the filter should be 50 mm smaller than the diameter of the casing so that it can be freely immersed and removed from the shaft for cleaning or repair.
Wells whose trunk is buried in rocky limestone can do without a filter and partially without casing. These are the deepest water intake workings, extracting water from cracks in the bedrock.
They last longer than their counterparts buried in sand. They are not characterized by the process of siltation, because There is no clay suspension or small grains of sand in the thickness of the water-bearing soils.
The risk of drilling an artesian well is that a fracture zone with underground water may not be detected
At a depth of more than 100 m, it is permissible to use asbestos-cement pipes or drill a well without casing at all, if there is no need to strengthen the rock walls of the hydraulic structure.
If an artesian well penetrates more than 10 m of fractured rock containing groundwater, then a filter is installed. Its working part must cover the entire thickness supplying water.
The water supply system for an autonomous house with one filter is typical for artesian wells that do not require multi-stage water purification
Main problems with drain fittings
From time to time, small malfunctions arise in the operation of the toilet flushing system, which, if desired, can be easily fixed with your own hands.
- Systematic flow of water into the toilet bowl;
- Water constantly flows into the flush tank.
A systematic stream of water that flows into the toilet indicates damage to the bulb in the system. The pear stops sealing the drain hole in the initial stage. To solve this problem, you can attach some kind of weight, thus weighing the pear down and returning it to its normal position. If the drain system fittings are equipped with a membrane, then in this case only replacement of this spare part is necessary.
Installation of drain fittings
If water constantly enters the tank, it means the float is deformed. If the float is skewed, it is quite easy to correct it. There is a more severe version of such a breakdown - depressurization of the float; to check it, you need to remove it and lower it into a container of water; if it sinks, it means it is unsuitable for further use and needs to be replaced.
Structure of a standard normally closed solenoid valve (220V)
Valves with the simplest design usually have one inlet and one outlet, although options with multiple ports exist.
Most locking devices include the following parts:
- armature spring;
- hole responsible for adjustment;
- coil;
- valve plate;
- main hole;
- diaphragm;
- hole responsible for alignment.
Most solenoid valves include the following parts: armature spring, coil, valve plate, diaphragm.
Normally closed 220V solenoid valves have many useful advantages, including convenience, high response speed, and the ability to control the operation of the system remotely. They are more accurate than manual devices, save time and effort, and improve the safety and efficiency of household appliances.
There are no worm or gear drives in the design. Unlike a gearbox and an electric motor, valves have a simplified structure and a minimum number of moving components, so they are more reliable, have a long service life and are subject to minimal wear.
The high reliability of normally closed solenoid valves for water is also due to other design features. If the remote control fails or the power goes out, you can still use the device, which in this case will act like a regular water tap. To do this, simply turn the control solenoid ¼ turn to the “off” or “on” position.
On a note! The smaller the distance between the electromagnetic core and the stopper, the stronger the electromagnetic field. Moreover, this statement remains unchanged, regardless of the type of voltage and its magnitude.
Solenoid valves have a simplified structure and a minimum number of moving parts.
Common Applications and Problems
Selecting Active Foam for Touchless Cleaning
The solenoid valve is the most effective means of automatically controlling flow for many liquids and gases. It will require the least amount of piping, electrical wiring, expense and effort. In contrast, many ball valve installations, for example, require not only the ball valve itself, but also an automatic control actuator and a solenoid valve. Users should consider key indicators. These are valve type, electrical service, operating environment, valve size, line pressure, environment, operating temperature, required voltage, and additional requirements such as special solenoid housings. Let's look at some of the most common problems that arise.
Exceeding the nominal pressure. A higher operating pressure rating does not mean that the valve is better. You simply need to select a valve whose specifications best suit the operating conditions of your specific application. A higher parameter value may not only be a waste of money; it may, in fact, impair the operation of the valve due to insufficient pressure drop (see below) or other problems.
Two-way does not mean bidirectional. Two-way valves are only suitable for flow in one direction. Install them only to serve flow in the direction specified by the manufacturer; otherwise, operation may be unstable or impossible. Contaminated work environment. Contamination of the operating fluid in the pipeline line is one of the most common causes of solenoid valve problems. Most valves are designed to use a clean working environment. Refer to manufacturer's recommendations for any exceptions. Whenever possible, install valves with their solenoids in a vertical position to prevent foreign matter from accumulating in the core tube. If contamination is likely to occur, install a filter or strainer upstream of the valve inlet and perform preventive maintenance based on the actual application and maintenance results first.
Low or high voltage. Solenoid valves are typically designed to operate at rated voltage, plus or minus 10%. If your power supply is not strong enough, the low voltage may result in the valve not being able to open or close fully, causing excessive noise, vibration, and shortened service life. (Check for sufficient voltage by applying power to the coil and listening for a click when the core hits the lock nut.) Increased voltage will lead to overheating, premature valve failure and reduced service life. Inappropriate size. An oversized valve will result in unnecessary costs in the first place. Oversizing, as well as undersizing, can result in insufficient performance. Factors such as flow area and valve configuration are taken into account by the flow coefficient Cv. Calculate the Cv value required in your application or consult the manufacturer. Inappropriate original equipment manufacturer (OEM) replacement. Many OEM solenoid valves are designed for a specific operating environment and type of operation. Inappropriate replacement may result in reduced valve life, equipment damage, or even personal injury. Always refer to the OEM manufacturer's maintenance instructions, or contact the valve manufacturer's technical support team for specific application specifics.
Installation and operation rules
Thanks to the manufacturer's instructions on the device body, installation of the solenoid valve is as simple as possible. It will be easy for someone with engineering skills to install the valve on a section of pipeline. Key recommendations for installing the device:
the valve must be positioned strictly in accordance with the arrows on the device body indicating the direction of water flow; It is recommended to install a dirt filter on the supply section of the pipe in front of the valve itself to catch particles (they should not get into the valve device, because
they cause the device to quickly fail); the device is connected to the power source only after installing it in the pipeline and checking the tightness of the connection; it is important to ensure that there is no weight load from the pipes on the device; when installing outdoors, it is necessary to insulate the device or select a model of the appropriate IP level. Otherwise, the installation of the valve is no different in principle from other types of shut-off valves
For example, when using a device with a threaded connection, you need to make a thread on the pipe using a special tool. Immediately before installation, the pipe must be prepared - cleaned of dirt and burrs, degreased with solvents
Otherwise, the installation of the valve is no different in principle from other types of shut-off valves. For example, when using a device with a threaded connection, you need to make a thread on the pipe using a special tool. Immediately before installation, the pipe must be prepared - cleaned of dirt and burrs, and degreased with solvents.