Plumbing in the bathroom breaks down quite often. There may be many reasons for this, but the outcome is always the same - the equipment must be replaced. This is where the main question arises: how to replace a toilet with your own hands efficiently and without unnecessary movements?
Good preparation is the key to successful work. Get the necessary set of tools, related materials and detailed instructions for beginners. By following the recommendations outlined in the article and taking into account possible mistakes, you will be able to cope with replacing the toilet yourself.
How do you know when it's time to change the toilet?
At first glance, the wording may seem strange. Anyone understands that the toilet needs to be replaced when it is out of order. But in fact, most problems associated with malfunctions of the sewer system and the toilet in particular can be eliminated without replacing the plumbing.
The most common problems that occur are:
- leaks from the tank;
- flows from under the bowl;
- cracks on ceramics;
- unpleasant smell from the sewer.
If water is constantly leaking from your tank, this is a serious reason to think about it. This wasteful use of water contradicts the modern trend of protecting the environment and saving natural resources. If the tank drips onto the floor and you are tired of replacing basins, but all pipe connections are normal, most likely the culprit is a chip or crack.
In this case, you can only temporarily solve the problem, but replacing the toilet should be done as soon as possible. But if water from the tank flows down the wall of the bowl into the sewer, good news, most likely there is no need to change the plumbing.
The cause of this malfunction is often a leaky valve. Luckily, the entire interior of the cistern is sold separately and can simply be replaced.
Plumbing faience and porcelain are fragile materials that are not resistant to sudden temperature changes. The enamel can become covered with a network of cracks, which not only spoil the aesthetic appearance, but also threaten to destroy the entire product.
Such a crack is a bad sign. It could have appeared as a result of something heavy falling or simply from a temperature change
If cracks or chips appear on the toilet, try to replace it as soon as possible. You never know at what point ceramics will not hold up and will burst under the weight of a person, exposure to water, or simply from internal stress.
It’s good if someone is nearby at this moment and can quickly eliminate the consequences of the disaster, otherwise you can count on the upcoming repairs in the toilet of the neighbors below.
In this case, everything is already clear - there will be a replacement! Unfortunately, this happens very often and not only with old toilets.
An unpleasant sewer smell in the toilet is another bad sign. This is often caused by improper placement of pipes when wastewater is retained in the sewer system. But if you are convinced that everything is in order with the pipeline and you can be sure that the earthenware is clean, look for the reason in the destruction of the glossy coating of the ceramics.
If the enamel has corroded and porous sanitaryware begins to come into contact with dirty drains, it will soon begin to absorb and absorb unpleasant odors. It is no longer possible to remove them; such destruction is an irreversible process. Here you cannot do without a complete replacement of plumbing.
Replacing a toilet during a complete bathroom refurbishment is just one of the stages. Think in advance about a place for new plumbing to remove water supply and sewerage
Another reason to change the toilet is renovation of the toilet. Few people want to leave the old plumbing when completely redesigning their bathroom. This is certainly a pleasant occasion.
New models of plumbing appear regularly, and it is difficult to keep up with fashion. Whether you choose a classic model or an unusual piece from a fashion catalog, the replacement will be carried out according to the same principle.
Installation of a hanging bowl and a hidden tank
It should be noted that the work on how to change a toilet of a conventional design to a wall-hung product with a hidden drain container yourself differs from the previous option in greater complexity. In this case, it will be necessary not only to replace the plumbing equipment, but also to repair the floor covering, build a false wall with its further finishing with tiles or other modern materials.
You have to attach the hanging bowl to a durable installation. After finishing the walls, the fixed metal frame will not be visible. When carrying out renovations in a combined bathroom, when decorating the interior, it is advisable to install a wall-mounted washbasin and a bidet of a similar design.
A detailed description of how to change a regular toilet to a wall-mounted one is as follows:
- Mark the location of the plumbing fixture. A sewer pipe with a diameter of 110 millimeters and an inlet is connected to it.
- Try on the purchased installation, which is a rigid frame for installation. You need to decide on the height. The standard placement is 450 millimeters from the floor to the seat and 100 millimeters from the floor covering to the bottom edge of the seat.
- Using a marker, mark the places of fixation to the floor and wall of the bathroom so that they exactly coincide with the mounting holes.
- They are prepared using a hammer drill and the frame is installed. Using a level, check the correctness of the installation work.
- Water is connected to the drain tank.
- The installation kit includes a diagram for cutting plasterboard sheets to cover the installation site. GCR is attached to the metal profile and to the installation. It is better if they are moisture resistant.
- Finishing is carried out taking into account the personal preferences of residents.
- When replacing a toilet bowl, it is connected to a corrugated sewer pipe and a drainage system, not forgetting the need for sealing.
- The bowl is screwed directly to the installation frame through drywall and tile using pins.
- The device is connected to the sewer system and the drain tank.
Despite the fact that the process of replacing an old toilet with a wall-mounted product takes a lot of time, the result of such a repair looks stylish and expensive. The work of installing an electronic plumbing fixture with the addition of automatic hygiene functions has much in common with fastening and connecting a conventional product, but there are still some nuances.
The fact is that to connect a smart wall-hung toilet, you need to provide it with power. For this purpose, a separate line is usually laid, since smart equipment is sensitive to voltage drops in the network.
What should you prepare in advance?
Before you replace an old toilet with your own hands, you need to prepare for the work. You need to think through everything especially carefully if the replacement is carried out in a toilet that continues to be used. In this situation, you need to replace the plumbing quickly, and without proper organization this is impossible.
Choose the appropriate model, prepare all the necessary tools and supplies, and then you can get to work.
Choosing the type of new toilet
The most important thing is to buy a new toilet. Then, depending on your choice, a set of tools and materials for replacement will be selected.
The following types are distinguished:
- floor;
- hanging.
Floor models . Such bowls are more common and their choice is very wide. Replacing an old floor-standing toilet with a new one is the most common story. There are floor-standing models such as “monoblock”, “compact”, separate bowl and tank, as well as with a hidden drain system.
The monoblock toilet is stylish, but not practical. If the tank fails, the entire system will have to be replaced. This won't happen with a compact.
A monoblock is a product that combines both a bowl and a tank. A compact toilet is when the tank and bowl are supplied as a set and are connected during installation. This is the most popular option in our plumbing products market.
The retro model, when the tank is located under the ceiling and connected to the toilet by a pipeline, and to flush it you need to “pull the string,” is becoming less and less common. It looks good in an interior of the appropriate style.
A modern option is a hidden drain system. To replace a regular toilet with this one, you will need to build a false wall, behind which the cistern with the installation system will be hidden. Externally, such models look very neat; only the drain button is located on the wall, and all communications are hidden.
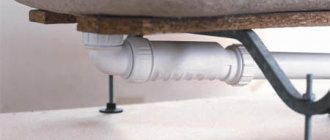
Thanks to its placement on the wall, the toilet appears to float in the air. But it is not attached to the wall, but to a steel frame that is hidden in the wall. Withstands weight up to 400 kg
Hanging bowls . Such toilets are not installed on the floor; they are hung on special anchor bolts on the wall. This leaves free space under the bowl that can be put to good use.
And from a hygienic point of view, this design wins. Cleaning the floor under a wall-mounted toilet is easy, but dirt often collects around the floor-mounted toilet.
Another detail that is important to consider when replacing a toilet with your own hands is the direction of release.
There are 3 varieties:
- release at an angle;
- straight;
- vertical.
A popular option is direct horizontal release. The toilet is connected to the sewer pipe at the same level. Oblique release was used in Soviet multi-story construction, but is still found today.
Externally, toilets may look exactly the same, but due to the different location of the outlet, you need to be careful when choosing
But devices with vertical drainage are installed more often in America and China. The convenience lies in the fact that the toilet can be placed at any point; communications are provided inside the interfloor ceiling. With us this is possible in private homes.
Practical tips for choosing a toilet are outlined in this article.
A set of necessary tools for work
The set of plumbing tools for replacing an old toilet is standard. Depending on the condition of the old equipment that will have to be dismantled and the sewer pipes, as well as the chosen method of attaching the new plumbing fixture, the set of tools needed may vary slightly.
Prepare the following necessary items:
- perforator;
- adjustable wrench;
- screwdriver;
- a hacksaw or grinder;
- sealant gun;
- hammer and chisel;
- rubber spatula;
- building level;
- personal protective equipment – glasses, gloves.
A hammer drill will be needed to knock out holes in the concrete for the dowels on which the new toilet will be attached. Work on connecting the water supply is carried out using an adjustable wrench. To tighten the screws, you will need a flat-head or Phillips screwdriver, and to seal the joints, you will need a gun for a can of sealant.
When disassembled, a modern compact toilet looks like this. A set of fasteners, rubber O-rings and a tank drain mechanism can be packaged separately. No need to be scared, it all comes together like a construction set
A hammer and chisel may come in handy if the equipment was connected to an old Soviet cast iron sewer riser. To ensure that the bowl is level, use a building level.
List of required materials
In addition to a set of tools for replacing a toilet with your own hands, you need to purchase additional materials that will be needed during installation:
- sealant;
- corrugation for connection to the riser;
- pipe for connecting to the water supply;
- FUM tape;
- tap;
- mounting kit
In any plumbing issue, the moment of sealing is the most important. Any gap or loose connection threatens leakage.
Silicone sealant in a bottle is your best friend when replacing a toilet. They fill all the cracks and gaps, process connections
To connect a plumbing fixture to the sewer, you need to buy a special plastic corrugated pipe. This is convenient because the pipe is flexible and fits in most cases. It can be bent to any position, stretched and compressed.
The corrugated pipe for connecting the toilet to the sewer is universal. It is suitable for both horizontal and angled release. Bowls with vertical drainage are connected in a special way - using a special elastic cuff
To seal the joints, use sealing tape or tow - the old fashioned way. The mounting kit for replacing a toilet includes dowels, screws, bolts, washers, nuts, plugs for connecting all components and installation. Don't be alarmed if something is missing, you can buy it all separately.
Features of installing a new product
After you have managed to remove the toilet with your own hands, you can begin installing the new product. Depending on the model purchased, the installation process will differ. Installation of a plumbing bowl with a floor mounting option and an attachment with a hidden tank is carried out in different ways. Detailed instructions will help the home handyman to cope with the installation of the toilet.
Removing an old toilet
To replace an old toilet with a new one, you must first dismantle the equipment. If the plumbing is not too old, most likely there will be no problems with dismantling.
It’s another matter if the plumbing is actually very old, and the sewer pipes are cast iron, Soviet-style. This is where you have to work hard. But first things first.
If the old plumbing fixtures are not concreted into the floor, consider yourself lucky. A toilet mounted on a wooden stand is easier to remove. The remains of the wood will need to be removed and the hole in the floor will need to be filled with screed
If everything is not so bad, and the toilet is not that old, replacing it will be easier:
- Shut off the water supply. Drain the water from the tank.
- Prepare a bucket and rags.
- Disconnect the tank by unscrewing the bolts from below.
- Remove the corrugation or plastic eccentric that connects the bowl outlet to the sewer.
- Remove any remaining water from the bowl using a regular sponge.
- Look at the fasteners on the sides of the base. There should be 2 or 4 of them. Unscrew them with a wrench.
- Use a knife to remove the silicone sealant from under the base.
- Remove the bowl from the tile.
In the last century, they tried to make repairs “for centuries”, thoroughly. And plumbing installation was no exception.
You can often find toilets in apartments mounted on mortar, embedded in a screed, wrapped with rags at the base and covered with several layers of paint. In this case, the connection with the pipe is covered with a thick layer of cement. Now it seems funny, until you personally encounter the replacement of such a rarity.
If you can't unscrew it, you'll have to beat it. Be careful, do not forget to protect your eyes and hands from fragments of earthenware
If you don’t mind the ceramics, you can dismantle it in parts. This is where a hammer and chisel come in handy. Tap the area where the bowl meets the pipe while rocking the mount.
If it doesn’t give in, hit the neck of the toilet more boldly, it will crack. Now it can be removed. Just don’t hit the cast iron pipe with a hammer, it is also very fragile and can crack.
Image gallery
Photo from
Old plumbing fixtures on tile floor
Using taffeta with concrete screed
Connection to the sewer with a cast iron pipe
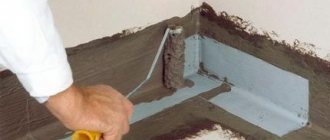
Repairing the floor before installing a new toilet
Removing old plumbing fixtures
The dismantling of a dilapidated toilet itself is carried out in a couple of stages.
- First, remove the seat and cover.
- After this, the lid is removed. This is done in different ways, depending on the model of the tank. Much more often it is enough to unscrew the plastic nut that holds the release button (or lever).
- Then the drain tank is removed. The process of removing it also depends on the model. If the toilet is more or less modern, then the tank is located on a special protrusion on the plumbing unit, and the nuts are under it. In older models, the tank can be attached to the wall using bolts and nuts or screws. If this is the case, then we dismantle this fastening.
Advice! It is often possible to notice completely rusty bolts. Under such conditions, it will be virtually impossible to unscrew the nut. Here a grinder or a hacksaw will help you. Enough bolt. This must be done with caution so that the tank does not fall to the floor and damage the floor covering.
Then carefully familiarize yourself with the method used to attach the old toilet to the floor. In the case of changing more modern plumbing fixtures, such fastening is made with a screwdriver, screws (or bolts) and sealant. If this is the case, then the upcoming work will look like this:
- Using a suitable tool (wrench or fasteners), unscrew the bolts.
- We take a knife in our hands. With its help, we trim the layer of sealant along the entire accessible perimeter of the toilet.
- After completing this work, we slip a blade under the plumbing fixtures and lift it up a little. You shouldn’t strain too hard to avoid breaking the knife.
- We grab the toilet with both hands and carefully try to loosen it. This must be done until you notice a shift in the plumbing relative to the sewer pipe.
After the toilet has moved from its place, its connection to the sewer is dismantled. To do this, you just need to shake the plumbing a little. In most cases, this disconnection occurs quite easily. It is especially convenient to remove it if corrugation was used during installation.
Advice! Once the toilet has been disconnected from the sewer, it should not be moved immediately. The fact is that there is water left in the plumbing unit, in the siphon. To remove the container, slightly lift the front edge of the toilet, first placing a basin or other suitable container under its outlet.
After draining the remaining liquid from the toilet, pour it into the sewer pipe. Then, the entrance to the sewer system must be plugged with a rag so that the unpleasant odor does not penetrate into the room. If you don’t have a suitable rag at hand, you can use a simple one and a half liter plastic bottle.
At this point, the dismantling of the dilapidated toilet can be considered complete. It is enough to take the plumbing equipment to a landfill (or to the garage, as a spare) and you can start installing a new one. But this dismantling option is considered the easiest. In most cases, such a case is not uncommon only in buildings where plumbing has been installed recently. If the toilet has been standing in its place for 20 years or more, various difficulties may arise.
Release forms for flushing
Oblique drainage is the best option of all existing ones. Sewer structures for such models can be found in any city high-rise building that was put into operation from the 60s to the 90s and beyond. Installing and reinstalling such a toilet yourself is as easy as shelling pears! Even making a mistake in the process is not scary, because it will probably be easily corrected.
Vertical drain. These structures are installed, as a rule, in “Stalinka” houses, which were actively built in Russia until the mid-twentieth century. Structurally, such a sewer system is quite complex, since the socket is installed directly under the base of the toilet bowl, and the main pipe is lowered into the ceiling to connect to the neighbor’s riser. Performing a vertical descent yourself is a problem, so it is better to invite a specialist.
Horizontal drain. A modern option, which is a little more difficult to handle on your own than with an “oblique drain,” but still possible.
Self-installation or replacement of a toilet involves several work steps that must be performed sequentially. And first of all, if we are talking about replacing plumbing, you need to get rid of the old equipment.
Types of waterproofing materials
Modern materials that can provide good waterproofing of bathroom floors and walls are distinguished by application method and composition:
- Coating compositions - the most widely used materials are those based on bitumen (bitumen-rubber, bitumen-polymer) and cement-based (cement-polymer mastics), others, for example, acrylic ones, are used less frequently.
- Pasting or roll materials are made on a polymer or fiberglass base.
Coating waterproofing composition
Typical faults and methods for their elimination
According to the principle of operation, all mixers are divided into the following types:
valve devices. The mixer is based on two taps designed to supply cold and hot water. Such devices are considered the most common and most reliable;
The most popular type of mixers with two valves
single lever. At the heart of the device is a rotary lever, which regulates both the amount of cold or hot water supply and the overall liquid pressure. Single-lever faucets are more demanding of water quality, so when choosing such a device, it is recommended to install additional filters;
Single lever device
sensory. A relatively new type of mixer. The device is turned on thanks to the installed photocell, which reacts to the raising of hands.
Automatic plumbing fixture with sensor
Touch-type faucets cannot be repaired at home.
Valve mixer repair
The most common failures of a valve mixer in a bathroom are:
- Faucet leaking. The cause of the malfunction may be natural wear of the gasket or damage to the crane axle box. Repair of a ball valve is carried out according to the following scheme:
- shut off the water supply to the plumbing fixture;
- remove the decorative cap (plug) from the leaking faucet, which is most often simply inserted into the groove;
- unscrew the screw located under the plug;
- Unscrew the valve axle (use an adjustable wrench or wrench of the appropriate size);
- replace the gasket or valve axle (if there is visible damage to this device);
- reassemble in reverse order.
Repair sequence
- Shower switch leaking. Causes also include natural wear and tear or poor quality water. Repair of this malfunction is carried out in the following order:
- the water supply to the mixer is cut off;
- the decorative cap and switch are removed;
- use an adjustable wrench to unscrew the shower nut;
- The sealing gasket is replaced and reassembled in the reverse order.
Technology for replacing shower diverter gasket
- Leakage at the connection point of the shower hose, shower head or shower head. Repairs should be carried out in the following order:
- unscrew the nut securing the hose (shower head or gander, respectively);
- The gasket is replaced and the mixer assembly is assembled.
In some faucet models, in addition to replacing the gasket, additional sealing of the threads with FUM tape or other similar materials is required.
Fixing a leak at the shower hose connection
Operational period of cast iron pipes
Cast iron pipes are often used for the construction of external networks and the distribution of wastewater disposal systems. Elements of sewer networks are manufactured using centrifugal casting. The raw material that is used for this is #8211 gray cast iron.
When installing sewer networks, cast iron pipes are often used. They are excellent for laying external pipelines.
A bitumen-based coating is applied to the inner and outer surface of the pipe, which protects them from corrosion and increases the service life of cast iron sewer pipes. But such a coating serves not only to protect the metal from corrosion processes, but also to make the inner surface smooth. This helps improve throughput.
Advantages and disadvantages of cast iron sewer pipes
Let's start with the advantages. Today, cast iron pipes made using modern technologies are distinguished by their high strength and reliability of use. They can withstand long-term exposure to high temperatures, are immune to frequent temperature changes and are more resistant to corrosion. An undoubted and important advantage of cast iron sewers is that they are more affordable than steel ones. At the same time, they are more durable to use, their service life is approximately 80-100 years. The operation of cast iron pipes is environmentally friendly.
Diagram of the installation of cast iron pipes.
Cast iron pipes are most often used if it is necessary to install a sewerage system that must operate under constant high load.
Due to their heaviness, cast iron pipes are transported using special equipment.
Disadvantages of use include the complexity and cost of installation. Transporting cast iron pipes #8211 is not an easy task. This material is heavy and can only be transferred using special construction equipment. Connecting parts made of cast iron #8211 is a rather complex and labor-intensive task, on which their effective service depends.
There are two main methods for connecting sewer pipes. The first #8211 is caulking joints. To caulk the joints, heel or other materials are used. In this case, the joints are connected with a cable impregnated with self-expanding cement mortar. The second method #8211 is to pour molten sulfur into the joint, but you need to be extremely careful when using this method.
Preparation of communications
- Sewerage. The place where we will connect the toilet flush must be thoroughly cleaned of various salt formations and debris. Otherwise, the corrugation or corner that will connect the toilet to the sewer riser will not fit tightly in the sewer outlet and the leak will have to be repaired.
- Water pipes. In the place where we will connect the cistern, it is necessary to install a tap in order to be able to repair or clean the toilet without completely turning off the water.