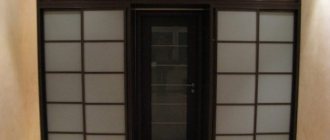
Sliding wardrobes made of MDF occupy a fairly impressive niche in the furniture market. They are roomy, comfortable and functional, but buying such a product in a specialized store, as well as ordering from a furniture company, is a very expensive undertaking.
However, the fairly simple design of such cabinets allows you to make them yourself, minimizing costs. Not long ago I decided to master this technology, and in the article below I will tell you what I did.
To turn this set of parts into a piece of furniture, you will have to try
Advantages and disadvantages
A plastic cabinet can be large or small. Certain models can even be hung on the wall, and they are usually used in the kitchen or balcony to store numerous small items.
The main advantages of choosing plastic furniture include:
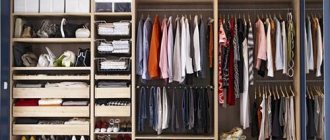
- cabinets are multifunctional, so they have numerous cells and compartments, each of which has its own purpose, and the number of storage systems depends on the purpose of the structure, its size and installation location;
- plastic has excellent resistance to ultraviolet radiation, so this material is often used when creating a cabinet intended for garden tools, since even with prolonged exposure to the sun the product does not lose its attractive appearance and bright colors;
- mold, mildew or rust does not begin to develop on the surfaces of such models;
- assembling and disassembling a plastic cabinet is a simple job, so buyers often cope with it on their own, so there is no need to spend money on paying employees;
- the weight of such a cabinet is considered small, especially if it is intended for a small number of things, and also if the cells in it are small in size;
- caring for the products is considered incredibly simple, so they are practical and ideal for different operating conditions;
- Such cabinets are produced in many models, differing in dimensions, colors, textures, filling and other parameters, so for each individual room or area it is possible to choose the most optimal model that fits perfectly into the exterior or interior;
- if you choose cast furniture, then it is compact, so you can hang it on the wall, install it in a corner, or choose another place for installation that will be convenient and practical;
- plastic structures are resistant to moisture, so they can be installed in the bathroom, kitchen or street;
- if you provide proper care for the structures, then plastic cabinets will last quite a long time, and they will retain their unsurpassed appearance throughout the entire period of use;
- plastic products have an acceptable cost, and it is much lower than the price of elements made of wood or metal;
- Fire safety is considered an important advantage of structures, since they do not burn, but emit substances that are dangerous to humans when heated strongly.
Plastic cabinets have not only advantages, but also disadvantages, these include:
- if you choose the cheapest plastic, then its quality will be low, so products made from it will be fragile, quickly fade in the sun and short-lived;
- when exposed to high temperatures, plastic furniture begins to melt, which leads to the release of hazardous substances into the air, so being in the room is deadly for people, so it is necessary to install the products in such a way that they are located at a considerable distance from heating appliances or the stove;
- plastic products cannot withstand significant loads, so they are not allowed to be used for storing large or heavy items;
- the cells and various surfaces of such cabinets are scratched quite easily, and it is almost impossible to remove scratches using any restoration methods;
- It is undesirable to leave inexpensive garden furniture in the sun all day long in the summer, as it may begin to melt and deform.
Thus, cabinets made of plastic have both pros and cons. They are usually chosen for the street or balcony, but are often installed even in a children's room or in the kitchen.
Getting ready for work
Cabinet dimensions
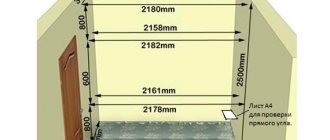
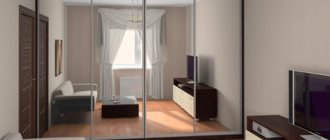
The dimensions of the wardrobe are largely determined by the size of the room in which we will install it. If you have your eye on a niche for this purpose, then in principle there will be no problems: just measure the width, height and depth of the recess in the wall, and make a 20-30 mm gap on each side for installing the structure.
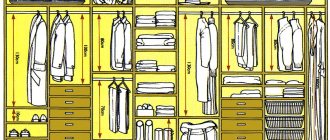
Cabinet drawing with dimensions
With a wall cabinet everything is a little more complicated. Its dimensions can be any, but after analyzing the advice of professional furniture makers, I came to the conclusion that it is better not to go beyond the standard dimensions. If we make this or that element larger or smaller than recommended, then using the design will not be so convenient.
I usually focus on this list of sizes:
- Height - from 2.4 to 2.6 m. You can make it higher (as long as the ceiling in the apartment allows it), but then you will have to build a separate mezzanine, and to access it use a stepladder or a high stool.
- Width – from 800 mm. Less is a pencil case, which will fit well if you have one set of clothes. The maximum width of the structure that I had to assemble was slightly less than 3 m.
- Base (distance from the floor to the bottom) – from 70 to 100 mm. If you install the bottom directly on the floor, then problems with opening the swing door will inevitably arise: even with a perfectly level installation, sooner or later a slight misalignment of the hinges will appear, and the door will catch, if not the floor, then the carpet.
- The width of the swing door is from 600 to 700 mm. Sliding wardrobe systems may have a little more.
Special programs can be used for design
- Depth (distance from the front to the back wall) – 600 mm. About 100 mm will be occupied by the sliding system, so the shelves will need to be made taking this fact into account.
- The width of the shelves is up to a meter. If you make it wider, you will have to attach a stiffening rib made of timber to the underside of each shelf, otherwise they will sag and may break under the weight of clothing.
- Shelf height – from 30 to 50 cm.
Another design option
In addition, drawers can be included in the cabinet design. Their height is usually up to 30 cm, and their width is from 40 to 80 cm. The bottom of a cabinet up to half a meter wide can be made of fiberboard (so the price of the product will be slightly lower), but for wider models I use only MDF to avoid sagging and jamming in a cabinet compartment.
We make a drawing based on these dimensions. If you are not computer friendly, then you can build a diagram the old fashioned way, on graph paper indicating all the dimensions. I prefer to work with special programs (WOODY, K3-Furniture, etc.): yes, some of them apply to on a paid basis, but even the demo version will be quite enough for one-time work.
Furniture maker tools
When the drawing is ready, we need to think about the material support of our project. Without a doubt, the main tool here will be a smart assistant: a sliding wardrobe made of MDF is a fairly large structure, so another pair of hands will definitely not be superfluous.
A smart assistant definitely won't hurt
But seriously, to successfully complete the build we will need:
- saw for cutting MDF - circular or reciprocating with appropriate blades;
- a good hacksaw for making it exactly to size;
- drill and set of drills;
- screwdriver;
- a set of magnetic cue balls for a screwdriver (you need at least two - one for a cross and one for a hexagon);
- flat and Phillips screwdrivers;
- set of hex keys;
- clamps;
- marker or simple pencil;
- roulette;
- level.
Installation tool kit
This is the minimum set needed to assemble furniture from pre-cut panels. If you do the cutting and edging yourself (I strongly do not recommend it unless you are a professional carpenter), then you will also need a stationary saw with a hair dryer.
Purchase of raw materials
The next step is purchasing the materials needed to make the cabinet. We will determine how many MDF panels we need by analyzing the drawings, and we will start from this figure when planning the budget.
Purchasing MDF panels is the main expense item
Speaking about the independent production of furniture, I cannot help but note that today, when imported components are becoming more expensive, the cost of products is growing, and quite significantly. It still turns out cheaper than when ordering from specialists, but preliminary costs must be calculated:
| Material | Cost, rubles |
| Double-sided laminated MDF, 2800x2070x16 mm (standard) | 1600 — 2000 |
| PVC tape for edging, roll 16 mm x 5 m | 50 — 150 |
| Set of roller hangers for wardrobes | 250 — 700 |
| Closer for wardrobe | 650 — 1700 |
| Rail for wardrobe (top), 2.95 m | 610 — 1200 |
| Sliding wardrobe guide (bottom), 2.95 m | 250 — 600 |
| Door seal, PVC, linear m. | 50 — 80 |
| Buffer tape (brush for collecting dust), m. | 30 — 60 |
| Furniture handle without latch | 50 — 250 |
| Furniture mortise lock | 90 – 250 |
| Pipe for hangers, 90 cm | 150 – 250 |
| Retractable rod for cabinet | 90 — 350 |
| Cabinet slides | 350 — 800 |
| Furniture screws (50 pieces) | 150 — 250 |
| Confirmats (50 pieces) | 120 — 270 |
Fittings for sliding systems are also not cheap
I note that only approximate prices are given here: you can find components both somewhat cheaper and much more expensive. It all depends on what price category of products you are counting on, as well as on the volume of purchase, region, etc.
Kinds
There are many types of plastic cabinets, each with its own purpose, parameters and features. Some are used in residential areas, while others are installed outdoors. Structures can be formed using casting, and plastic panels are also often used, from which prefabricated models of cabinets are obtained.
Before purchasing a specific cabinet, it is recommended to consider for what purpose the structure will be used.
For toys
If there are small children living in the house, then they buy many different toys. Over time, there are so many of them that special cabinets are required to store them. An excellent choice would be a plastic cabinet, the height of which may not exceed 1.2 meters. This cabinet has compartments designed for different types of toys, notebooks and other accessories.
When purchasing a product where toys will be stored, the following recommendations are taken into account:
- plastic must be of high quality so that it does not harm babies;
- the corners of the structure must be rounded;
- the product should fit well into the interior of the nursery, and the color chosen should be bright and interesting, with any unusual patterns or textures.
With proper care, such a cabinet can last a long time, and it can be hung on the wall below so that children do not move it around the room.
To the bathroom
Plastic structures are often chosen for the bathroom, and they can be used to store things that are most often needed in this room. The widespread use of plastic cabinets in the bathroom is due to the fact that they are highly resistant to moisture, and the corrosion process does not begin on their surfaces and mold does not form.
The most common choices are small cabinets that can be hung on the wall. Their facade can be blank or equipped with a mirror.
For kitchen
Kitchen sets made of plastic are considered popular designs, and they can come in different colors and sizes. They are resistant to moisture and easy to clean, which is especially important for a room that is constantly used for the cooking process.
Plastic headsets have a reasonable price and can also have different dimensions and parameters. They have special elements for the sink or dishes, so they make it really easy to place the necessary items on the shelves.
Street
For dachas, plastic furniture is chosen quite often. It can be presented in different versions, and plastic cabinets are often purchased.
When choosing designs, the following features are taken into account:
- you purchase really high-quality plastic that can easily cope with constant exposure to sunlight, from which it should not melt or deform;
- it is best to buy a cast cabinet, but you can choose designs made from artificial rattan;
- outdoor cabinets can contain a different number of drawers and compartments, so the choice depends on the number of items that will be stored on the shelves.
The design should fit well into the exterior and be suitable for the building itself located on the site.
MDF or chipboard?
The first thing I had to face (and what you will definitely face) was the choice of material. Today, either chipboard or MDF are widely used for the manufacture of cabinet furniture.
In other respects, MDF is superior to it:
MDF on top, chipboard on bottom: the difference in density is obvious
- high homogeneity of the material provides it with greater density and strength;
- fasteners inside MDF hold up much better;
- Despite the above arguments, MDF is easy to saw and drill, with virtually no chipping.
- the walls of even a very tall and wide cabinet are practically not deformed by changes in temperature and humidity;
- low content of volatile phenols ensures a high level of environmental friendliness.
Among the disadvantages, I would note the greater mass of MDF compared to chipboard panels of the same thickness, but since we move the cabinet very rarely, this disadvantage will be very conditional.
Color spectrum
A distinctive feature of plastic furniture is that it can be presented in truly different shades. The choice of colors depends on various factors:
- the color should go well with other shades available on the street or at home;
- the style in which the room is designed is taken into account;
- if you are choosing a cabinet for the kitchen, then it is undesirable to focus on white color, since various contaminants will be too clearly visible on the surfaces;
- A closet for athletes is usually chosen in red.
The color depends entirely on the preferences of the owners and the color scheme of the room where the cabinet is planned to be installed.
Preparation
First of all, handles, moldings and other fittings located on the work surfaces are dismantled. Empty the closet of stuffing: linen, shelves, drawers.
We prepare the surface for pasting - it should be smooth and matte. Lightly sand the surface of the wood.
If the cabinet is varnished, then it needs to be cleaned of varnish. A grinding machine will help with this, the second option is sandpaper and physical effort. Finally, remove the dust with a damp cloth and dry.
We inspect for defects. If there are chips, damage, or cracks, cover them with putty. After drying, sand it with sandpaper and prime it. The cabinet is ready for gluing.
Rules of care
In order for a plastic cabinet to last long enough, it needs proper care. It consists of simple steps:
- It is not allowed to cut various products directly on a plastic surface, as this will cause scratches that are almost impossible to remove;
- You can use different detergents to clean plastic, but the composition should not contain abrasives or chlorine;
- During cleaning, soft rags are used, so it is not allowed to use hard brushes;
- For ordinary plastic cabinets, it is enough to simply wipe the shelves with a dry plush or microfiber cloth periodically to remove dust.
Thus, plastic products are considered really easy to care for. On the market you can buy special products designed to care for plastic structures, which ensure an ideal result of the process.
Place in the interior
Not every interior can be combined with furniture made of plastic, so before purchasing a cabinet you need to inquire about its combination with design trends.
Plastic looks best in modern concepts. This is an integral component of such styles as minimalism, hi-tech, loft, Japanese. But such material is not always combined with Baroque, Provence, eco and Italian design.
There is a compromise solution - selecting plastic with a special texture that imitates natural materials. In modern stores you can easily find a cabinet made to resemble wood in various colors. Another advantage of this model is its affordable price compared to cabinets made from natural materials.
How to choose
The correct choice of a plastic cabinet depends on various factors:
- the quality of the plastic must be high so that the structure can be safely used in a residential area;
- color and texture must match the style and interior;
- if you choose a children's locker, then it should be low and safe, so it is desirable that it does not have sharp corners;
- The dimensions of the cabinet should be suitable for the purpose of its purchase, so all items should be easily placed on the shelves.
Thus, plastic cabinets are considered an excellent choice, and these structures can be installed in an apartment or house, and can also be located outdoors. The many models on the market allow you to choose the optimal model for each interior or exterior. The number of storage systems may vary, so designs are selected that ideally match the desires of future owners.
Materials for making cabinets
Plastic cabinets for balconies, which do not have other materials in their design, can only be manufactured in industrial conditions. Factories have the necessary equipment for casting cases, shelves and doors reinforced with stiffeners. Home craftsmen can only operate with plastic panels or rigid sheets. Their strength is very limited. To strengthen it, the structure has to be supplemented with wood or metal.
The design of a homemade cabinet consists of the following elements:
- frame;
- shelves;
- doors;
- sheathing.
The frame can be made from:
- timber section 40x40 mm;
- galvanized profile intended for installation of plasterboard systems;
- profile metal pipe or corner.
Multilayer moisture-resistant plywood is suitable for making shelves. But it is better to put a board under heavy objects.
To assemble the structure you will need:
- furniture or profile corners;
- nails;
- self-tapping screws;
- dowels
It is also advisable to purchase furniture fittings for doors.
Important: the main factor influencing the choice of materials for balcony cabinets is strength and lightness. Loggia owners have a wider choice, for whom the additional load is not so dangerous.
Photo
Wallpapering
The gluing process is the final stage and the most critical; the appearance of the updated cabinet depends on the quality of gluing. The work consists of several stages.
- Take measurements of the selected part.
- We transfer it to the canvas, make a pattern or cut it to the required length.
- We coat the resulting sections with glue and apply them to the selected part. If the base of the wallpaper is non-woven, then the glue is applied to the surface of the cabinet.
- To fix, use a dry cloth or roller.
- After drying, the next day, install the fittings.
When using wallpaper glue, add a little PVA to it (1 tablespoon per 1 liter). When drying, do not allow drafts; if the windows are open, the wallpaper will crack or come apart at the seams.
The fittings are installed after the glue has completely dried
Selection rules
The choice of children's furniture must be approached especially responsibly, this concerns the health of the child. The safety of the cabinet must be assessed based on the following parameters:
- structural stability;
- no sharp corners;
- absence of unnecessary decorative protrusions and sharp elements;
- plastic fittings;
- hidden fastenings for assembly;
- reliable fastening of handles and decorative parts;
- quality of plastic (if possible).
If the chest of drawers passes the test based on these parameters, you need to move on to the next criteria. This is the appearance. First, a color scheme suitable for the interior of the room is determined. It is rare when the choice is limited to one color. Usually these are several colors or shades of color. It is better to leave the final choice of color scheme to the child, since he is the one who will use the cabinet. If the child does not like the furniture, he will not be willing to put toys there, which means difficulties and quarrels may arise due to cleaning.
If possible, the choice of design and decor should be left to the child. This will increase the level of responsibility, because he will be able to choose the furniture himself. And when he says that he doesn’t like the closet, you can always remind him that he chose it himself. This will teach you to make choices and be responsible for them.
The number of drawers and their depth must correspond to the purposes for which the cabinet is purchased. If a child has a lot of small toys, a closet with a large number of shallow drawers will be more suitable for him. In cases where you need to put away a small number of voluminous toys, it is better to purchase a cabinet with a small number of drawers. Let them be deep, then the toys will fit in without difficulty.
A chest of drawers for toys will help you clean up your apartment and eliminate the need to search for toys throughout the house. They will stop breaking down so quickly, which will save a lot of money for more enjoyable and useful purchases.
How to tighten the back wall if it has moved away and strengthen it
Often, if the owner uses furniture nails or cheap paper clips when assembling a cabinet, which do not penetrate deeply into the material, he is faced with the problem of the back wall of the cabinet coming off. The material simply loses its elasticity.
To correct the situation, you need to remove the old fasteners and install new ones slightly offset. To do this, you need to turn the cabinet over onto the floor and perform the fastening procedure again. To further strengthen the structure, you can fix it between the fasteners, but in this case it is advisable to use crab screws.
Two long flat boards in the form of glazing beads will help strengthen the structure. Such parts are attached crosswise to the module on which the rear wall is installed. If it is intended for a large set, then the boards must be long enough.
Attaching the rear wall to a multi-sectional cabinet provides for fixation with each partition and shelf Source warnen.ru
Color options
When choosing a plastic chest of drawers for toys, you don’t have to worry about whether you can choose the right color. They are made from plastic of any color; the material can be easily painted at the manufacturing stage. This prevents the paint from peeling off the dresser and ruining its appearance. The product will last a long time and retain its original appearance for a long time.
Plastic chests of drawers are often decorated with paper stickers. They are attached to the chest of drawers and the front doors of the drawers. This allows the child to choose a design with their favorite fairy tale or cartoon character or come up with their own. It is enough to buy a plain chest of drawers and special stickers that the child will choose.
If the child does not have a separate room, but storage space is already needed, there is plastic furniture that looks like wood. These chests of drawers are painted in neutral colors (white, beige, gray, brown) and will easily fit into any room interior. Most manufacturers offer chests of drawers of various colors with the same design. This way, the buyer has the opportunity to choose from the models he likes, and not just those that match the color.
Fiberboard
The back wall, made of wood-fiber boards, is installed on the assembled furniture body. Its thickness is most often 4 mm.
This “backdrop” is attached in a lying position with self-tapping screws or a construction stapler. If a wall made of this material is mounted vertically, then it is first divided into parts and assembled in stages.
Fiberboard is made from low-quality round wood or wood waste - sawdust and shavings. They are processed into fiber mass. Various chemicals are added to it in order to increase the water resistance and strength of the future material. Next, it is sent to casting machines to increase humidity, and then under a hot press.
Advantages
Fiberboard has only one advantage - relative cheapness.
Flaws
This material has much more disadvantages.
- fiberboard structures is very limited .
- A limited range of colors - no more than 5 shades.
- The material does not withstand high humidity , as often only one side is painted or laminated.
- Installation requires a lot of free space , which is physically impossible in small rooms.
- Often the wall has a persistent unpleasant odor
. - Due to the overlapping installation, the material is visible from the end of the furniture, which spoils the aesthetic appearance. Attaching tall wardrobes to the wall becomes more difficult.
Decorating an old wall cabinet
Summer is the season for summer cottages, summer kitchens and gazebos. So we moved to the gazebo. And, of course, we dragged old tables and cabinets there so that there would be a place to store dishes and all sorts of necessities. However, I want freshness and beauty, it’s summer after all!
So I decided to do my first job with furniture. The cabinet I needed to decorate was like this:
To begin with, I re-read a bunch of master classes on remodeling furniture. But when I went to the store in our village, I realized that there was no choice of paints and varnishes here, and I would have to work with what was on the store shelves. I want to share my experience with those who find themselves in the same situation as me.
These are the materials I used:
- white acrylic paint;
- colored acrylic paints;
- acrylic lacquer;
- yacht varnish;
— printouts on photo paper with a density of 180 mg on an inkjet printer;
- brushes, sponges, roller, sandpaper.
I only decorated the doors, since the cabinet box itself was in quite good condition. Therefore, I unscrewed everything and washed it thoroughly with detergents.
Next, we thoroughly sand everything on all sides, this is necessary so that the paint adheres better to the surface of the door.
Many people wrote that it is good to pre-coat furniture with Tikkurila Otex primer, but I didn’t find it in our stores. So I painted the doors with a simple white acrylic paint for the walls and ceilings. The first layer was covered with a brush to better paint over all areas.
It turned out like this:
When everything has dried well, you need to cover it with a second layer. I did this with a roller, but you can also use a brush carefully.
Next we move on to the pictures. The pictures were pre-coated with Tair decoupage varnish, three layers with intermediate drying. This varnish holds the paint well on the picture. Then I soaked the picture in a basin of warm water for about 15 minutes. Next, I carefully tear off the paper layer from the varnish print. And I glue it to the door with PVA glue.
The photo shows that the background of the pictures is not white and they stand out on the door. So it needs some touch up paint. If you look closely, you can see that the background is not uniform, but sort of spotty, which is why I also tint it unevenly. I paint with a brush, as if smacking it.
A closer look at the photo shows how the paint extends into the picture to better hide the border.
While the inside is drying, I select the color for the edges of the door. I settled on light ocher. I paint with a brush.
I leave it to dry overnight. Then I sanded it with fine sandpaper, since the paint applied unevenly. I cover it with acrylic varnish to protect what has already been done.
To better hide the borders of the design, you need to paint the door again, at least selectively, along the border and nearby. Then I select the color of the planks. I did this right on the doors.
As a result, I settled on olive. It seemed to me the most harmonious.
I cover everything with acrylic varnish. All that remains is to paint the back side and ends of the doors.
I wait until it dries, sand it, paint it again, sand it and cover it with acrylic varnish. I leave it to dry well. I did it overnight. Then I cover the entire door with yacht varnish, since the cabinet will hang outside in the gazebo. I paint the handles olive green, screw them on and that’s it! Beauty is ready! You can hang it and admire it!
I'm happy with the result, but we need to see how this cabinet will survive the winter. And there are still two summer months ahead and an old table and chest of drawers are waiting for me, which also crave restoration, if you can call it that.
Thanks to everyone who came to my master class. I would love to read your opinions, reviews, and comments.
( 2 ratings, average 5 out of 5 )
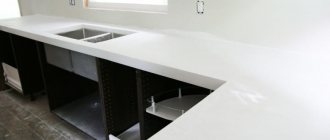
Wardrobe bottom design
The bottom of the sliding wardrobe is additionally installed on plastic legs, which are adjustable in height and allow you to level out uneven floors. The base is removable and attached to the legs using clips.
| Rice. 2. Wardrobe bottom design |
The internal space of the wardrobe is divided by vertical partitions (in diagram 3).
The shelves are removable (in diagram 2) on Rafix ties. The shelves on these connecting fittings will be rigid, will not fall out of the sliding wardrobe, and will additionally ensure the rigidity of the sliding wardrobe.
| Rice. 3. Shelves with Rafix ties |
The edges of the internal parts of the sliding wardrobe are lined with a polymer edge 0.45 mm thick. The edges of the external parts (the leading edges of the side walls, roof and bottom) are lined with a 2 mm thick edge.
| Rice. 4. Options for lining the edges of the wardrobe |
The body of the sliding wardrobe can, if desired, be supplemented with an ending with radius shelves made of chipboard or glass (in diagram 9). The shelves along the radius are lined with an edge 2 mm thick.
Budget restoration of products
You can turn old furniture into new without much investment. Desire, imagination, skill and knowledge of several methods of budget restoration. You already know about wallpapering, there are other techniques you can
- cover with fabric
- stencil paint,
- covered with artificial leather,
- use decoupage technique,
- stick photo wallpaper,
- use glass painting,
- apply decorative plaster,
- A convenient option is self-adhesive and stained glass film.
These methods are suitable not only for a wardrobe, they are used for chests of drawers, bedside tables, wardrobes, kitchen cabinets, bookcases, sideboards, for furniture located in the corridor, hallway.
Photo wallpaper on an old bedside table
Furniture decorated with wallpaper or having decoupage or a fabric surface should be placed in dry rooms. In an unheated dacha, the coating may deteriorate from excess humidity.
Purpose
Scattering toys on the floor is a favorite activity for kids. But no one likes to step on them: neither parents nor children. This causes pain, can cause injury, and toys simply break under the weight of the human body. There is a need for a place to store toys.
There are now many devices for storing toys, but they all have drawbacks.
- box – holds a small number of items, takes up a lot of space on the floor, is often used for other purposes (as a house or hut), which is why it quickly breaks down;
- a cardboard box is ugly and impractical. Cardboard easily wrinkles and tears, and the boxes look unpresentable and spoil the overall appearance of the room. It fits a small number of toys. A child can injure his legs on the sharp edges of the box if he touches them during active games;
- fabric bag - textiles collect dust, but you can’t just wipe it off; you have to take out the toys and wash the bag. It takes up a lot of space because it does not hold its shape;
- chests of drawers made of wood are heavy and dangerous. To reduce the number of accidents that occur with children due to wooden chests of drawers, it is recommended to screw them to the wall with self-tapping screws, which spoils the wall covering. Wooden chests of drawers are limited in mobility, it is difficult to bring them yourself, you have to order and pay for delivery.
Thus, a plastic chest of drawers designed for toys is the best option for storing a child’s treasures. It is easy to bring it from the store by car and move it from place to place without damaging the wall covering. You won’t have to trip or rip your legs over children’s toys laid out on the floor. There will be no need to buy toys more often than planned due to their damage, because they will not be stepped on, which means they will break less often.
Design
Plastic furniture can be of different shapes, volumes and designs. The parameters are subject to the stylistic features of the premises and their purpose. These are not just plastic boxes that perform a strictly basic function: the models differ in aesthetic perception. They can be special due to the color shade or decorative elements.
Plastic facades can be decorated using additional elements (rattan inserts, bamboo, mirrors). The use of a mirror helps to visually expand the space and complement the furniture with another function, and facades designed like rattan or bamboo make plastic furniture more solid, visually similar to wood furniture.
Below are examples of cabinets made of plastic panels, as well as options for their design and decoration, which will help inspire your interior design.
7 photos
For information on how to organize order using plastic cabinets in the nursery, see below.
Filling
A children's chest of drawers for toys is equipped with drawers, from 3 to 6 drawers. Usually a chest of drawers has 4-5 drawers. This is the optimal amount for a lot of items to fit in and the chest of drawers to remain stable. The boxes are made of plastic. They are lightweight, which allows the child to open and close them independently without much effort. If a child accidentally pulls out a box, he will not have to wait for help and call adults, he will be able to return it back himself. This teaches you to feel responsible for your actions and develops independence.
The number of boxes depends on the needs of a particular family. If the number of toys is small, 2-3 boxes will be enough. If you need to store a significant number of items, it is wiser to buy a chest of drawers with 5-6 drawers. This will allow you to collect the toys in one place, which will make them easier to find if necessary. But you need to explain to the child that you cannot hang on the chest of drawers or try to move it yourself, since due to the large number of drawers, the structure is not stable enough.
laminated chipboard
Back walls for a cabinet made of laminated chipboards are a more reliable option than those made of fiberboard . They are stronger , mounted in an inset manner and have a decorative coating, therefore they are more aesthetically pleasing in appearance . This coating can imitate the structure of wood or be smooth .
Laminated chipboards are made from ordinary sanded chipboards with a lamination section connected. Covering the material with laminating film can occur using three technologies: lamination, lamination, smooth lamination.
To produce this material, a hot press is used, the temperature of which is 160-220 degrees. Several layers of prepared paper and a mixture of several resins are applied to the chipboard, which, when heated, turn into a durable film and reliably protect the surface of the material.
Laminated particleboard boards are manufactured in a variety of thicknesses . There are three options: 10, 16 and 18 mm.
Advantages
- High strength and durability.
- Large selection of colors , which allows you to choose a shade that matches the color of the case.
- Installation can be carried out in confined spaces
. - Possibility of fastening in several ways : euroscrews, angles, eccentrics.
- Highly moisture and scratch resistant.
Flaws
The only drawback may be the high cost of this material .
The cost of installing laminated chipboard walls often reaches the cost of finishing work for the walls of premises.
Plywood
Plywood is one of the best, but expensive materials for the back wall of a cabinet . It has a smooth surface that does not require additional sanding. The production process uses heat treatment and drying. Therefore, the product retains its presentable appearance for a long time, does not dry out or become deformed.
Plywood is made from various types of wood, but the most popular raw material is birch.
Advantages
It has a smooth and durable structure , which is why smooth and high-quality veneer is made from it . After giving the desired thickness, the veneer sheets are glued together, resulting in the well-known plywood. Sheets of this material for the back walls of cabinets are traditionally made 3 mm thick.
Painting polished furniture
Chipboard, a natural wood that has an aged, polished finish, can be painted. To do this, use matte acrylic paints. The top layer (coarse sandpaper) should be removed from the surface, chips/cracks should be filled with putty, and degreased with white spirit.
The paint is applied in 2-3 steps. After drying, each layer is polished with fine sandpaper. At the end of the work, if you want to get something exclusive, facade spot painting will be done. Use a thin marker to outline the design and paint it with acrylic paint (use a brush).
Accommodation
Plastic cabinets differ in location and room where they can be installed.
On the balcony or in the pantry
In both cases, they perform the main function - storing things that are rarely used, or they are objects that are quite large in size and take up a lot of space in living rooms. Most often, the parameters of these rooms are small and non-standard, so built-in wardrobes made to individual measurements fit best into them.
For such rooms, it is preferable to choose cabinets with a sliding or hinged mechanism, or an option without a facade. For the plastic model, placement on the street (balcony) is allowed.
In the bathroom and toilet room
In the bathroom, space is limited, so the size of the cabinets should be compact or small (depending on the characteristics of the particular room). The choice of model is based on purchasing the product from a trusted store with a good reputation. You can purchase this model in stores specializing in plumbing fixtures and bathroom furniture.
In the toilet room, cabinets are usually hung according to individual measurements, since these rooms are most often non-standard. Such cabinets usually store household chemicals, building materials, and household goods. In this case, installation with wall mounting is most suitable, since the only convenient place is to mount the cabinet above the toilet.