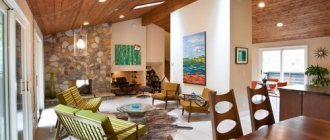
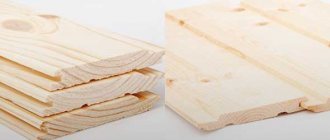
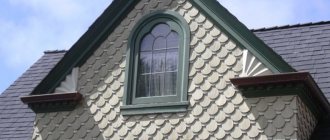
Quite often, the interior decoration of a balcony, attic, or dacha room is decorated with wooden paneling. This material is especially popular, creating a comfortable indoor atmosphere and a favorable microclimate. It is able to compete with modern materials: plastic panels, wallpaper, tiles. The lining absorbs high humidity and can release it in a dry room. Therefore, it is easy to breathe in rooms decorated with wood. The aroma of wood is not comparable to the smell of chemical finishing materials.
However, owners often encounter the problem that the lining has darkened over time; what should be done to restore its former beauty and attractiveness.
The lining has darkened, what to do?
What to process?
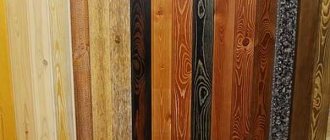
There are many types of paints and varnishes for wood on the shelves of construction stores.
You need to pay attention to the recommendations of manufacturers of finishing compounds
The most popular paints:
- Enamel. Easy to apply, forms a durable shiny film on the finishing surface. Suitable for painting lining in country or country houses.
- Glaze. Sold in transparent form, can be painted over with special colors. This coating is pleasant to the touch, beautiful to look at, and reliably protected from moisture.
- Alkyd varnish. Has good resistance to temperature fluctuations and high humidity. But flammable, long-drying.
- Acrylic aqualac. A water-based composition that dries very quickly, creating a stable, reliable coating with excellent decorative characteristics. When finishing, it does not emit unpleasant odors, since it consists of environmentally friendly components.
- Acrylic paint. Provides wood with a coating that protects the material from moisture. The compositions can retain their original shade for a long time, while they are odorless and quickly harden after application.
- Oil paint. This paint and varnish material is rarely used for interior decoration. Despite all the advantages and useful qualities of the coating when processing wood, it emits a sharp, unpleasant odor. Another disadvantage is the long drying period.
- Water-based paint. It is characterized by quick drying, no odor, and easy application. Without hiding the texture of the fibers, the composition gives the material a noble white tint.
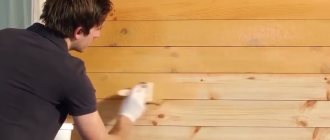
Important When using some types of paint, for example, water-based or aqualac, additional treatment of the wood with oil is required. This will give the material the necessary protective properties from moisture. How can you coat wooden lining inside a house, says a specialist in paint and varnish products:
A specialist in paint and varnish products explains how to coat wooden lining inside a house:
Why use impregnation?
Some owners have doubts about the need to impregnate wood paneling inside a suburban building. If the boards are not covered, changes will be noticeable on them after some time. With poor ventilation, the lining will appear blue; as a result of intense sunlight, it may become dark gray.
The blueness is explained by the action of microorganisms, which can be gotten rid of with the help of active oxidizing agents, such as chlorine. The procedure is not very easy to perform and is accompanied by the release of an unpleasant odor.
How to paint wood paneling white
Wooden lining is painted in the following order:
- Cleaning the surface from contamination;
- Application of protective compounds;
- Painting the lining.
Surface cleaning
For cleaning you will need cloth sandpaper. Depending on the amount of contamination, coarse or fine grain sandpaper can be used. Shallow holes and scratches are repaired with putty.
The cleaned surface is treated with a 3% solution of soda ash. Soda treatment is required to remove fat deposits and small dust particles.
Application of a protective composition
To ensure better adhesion and protection from insects, drying oil or a special primer composition is used. The protective layer is applied evenly using a brush with soft hair.
The width of the brush depends on the size of the area being treated. For large volumes, a wide brush is required. For small volumes, use small brushes.
To increase the protective effect, red lead or other types of oxidizing agents are added to the primer.
Then an antiseptic is applied to the surface of the product. The antiseptic is designed to protect wood from moisture penetration and the spread of fungal diseases.
Factory-made products or home-made compounds are used as an antiseptic.
To make an antiseptic with your own hands, you will need 100 grams of iron sulfate and 10 grams of potassium permanganate. The substances are thoroughly mixed. The resulting mixture is diluted in 20 liters of clean warm water. The prepared composition is applied with a roller or brush.
After the antiseptic has dried, begin painting the surface.
Applying paint
White wooden lining is painted after the primer layer has completely dried. Several types of brushes are used to apply paint. To paint the surface of the lining, brushes 5-10 cm wide with medium-hard bristles are used.
To paint hard-to-reach places, brushes 3-5 cm wide are used. To speed up the process and evenly distribute the layer, use a paint roller coated with fine pile or foam rubber.
The work site should be comfortable, warm and well lit. To protect against harmful fumes, the room must be ventilated.
Stepladders, ladders, and scaffolding are used to paint ceilings and the top of walls. Work at height is carried out using special devices. The products used must be strong and stable. Before work, it is necessary to check the safety equipment for serviceability.
Before painting, white paint from the factory packaging is poured into a convenient, clean container. The container is located near the work site.
Use a piece of clean cloth to remove oil droplets and dry your hands. The rag is periodically moistened in the solvent. White spirit and acetone are used as solvents.
The paint is applied with a brush or roller. Hand movements when moving the tool should be smooth.
The coloring composition is applied from top to bottom. The same place is painted in 2-3 passes in opposite directions.
At the junctions of the lining with surfaces that do not require treatment, use masking tape. Adhesive tape is glued along the entire perimeter of the surface.
After the paint has dried, the tape is carefully removed. Accidental splashes are cleaned with a razor blade. Small stains are removed with a cloth soaked in solvent.
To paint wooden lining white, use compositions of brands MA-015, MA-021 with plant components and GF-023, PF-024 with synthetic additives.
Restoration of varnished panels
The quality of the coating will depend on the degree of opacity required to obtain the walls. If you do not need to completely cover the wood structure, it is better to sand off the varnish and rub in the coating. You can use impregnation to preserve the wood texture .
Attention
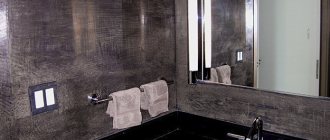
If preservation of the structure is not required, then nothing needs to be removed. Acrylic paints with high adhesion adhere well to all surfaces and are quickly tinted to any shade. You can use polyurethane tinted enamel, but walls with such a coating will be very shiny, so this method is not for everyone.
Painting technology: we will take into account every detail
If there are traces of old paint on the walls, both inside and outside the house, you need to check how well it is holding. If it is strong enough, then it must be washed with a 2% soda solution.
In some cases, this is enough to give the walls of the house a noble appearance, and there is no need for painting.
Up to 300 grams of soda are diluted into a bucket of hot water. After the walls are cleaned, they must be puttied and covered with drying oil. For grinding, you can use ordinary pumice.
After completing the preparatory work, a primer layer should be applied to the lining. This is required to secure the putty surface.
For the primer, use the same composition that will subsequently be used for painting. The primer layer must dry completely; before this, you cannot start painting.
Painting: brush is still in fashion
The paint is applied to the lining in a thin layer with continuous movements from top to bottom. It is not recommended to brush over the same area several times.
Only paint the ends of the brush bristles, not the base.
One layer of paint is usually not enough, so after the first layer has completely dried, a second one is applied. We should not forget that several thin ones will last much longer than one thick one.
Ceiling made of lining
The final layer is applied starting from the top. Otherwise, the streaks left by the brush will be noticeable.
To paint the frames of the windows, as well as the baseboards and the bottom of the doors of the house, you should use a small brush with a diameter of no more than 5 cm. The doors are painted from the panels, gradually moving to the surfaces that protrude.
The paint is smoothed over with an almost dry brush, preferably with upward strokes. The lining painted in this way will serve faithfully for a long time.
If you need to paint a narrow surface - a window frame, a door frame, then you should try not to stain the glass or wall located end-to-end with paint.
In this case, a piece of plywood or cardboard will come to the rescue, which is glued to the glass using soaked soap. The width of the strips is approximately 5 cm.
Thanks to this, there is no need to subsequently remove paint from the glass. At the end of the work, the paper strips can be easily removed with warm water.
Spray: when to use it?
Variety of colors and options for painting lining
Sometimes, when finishing with clapboard, it is necessary to apply nitro paint to small metal or wooden surfaces.
This is best done with a spray bottle.
You can make it yourself, just find two tubes. The diameter of each is about 3 mm, the length is 15-20 cm.
The tube through which air will flow should be slightly thicker.
Don't forget about windows and pipes
If paint does get on the glass, it is removed with a special paste containing chalk and concentrated soda. The paste is applied to the painted area and left on. When the paint becomes soft, it can be easily removed.
If you need to remove previously applied oil paint from a wall, it is good to use a hot iron, which is used to iron the area through aluminum foil.
The paint softens and is easily removed with a spatula.
Secrets of dyeing with mittens
Before painting the lining, which contains metal elements, for example, pipes, strips, etc., they are wiped with vinegar.
The paint adheres better to such a base and does not peel off. It is no secret that it is quite difficult to paint removed pipes due to the fact that one side always lies on the ground.
This kind of hand painting is quite effective. In one minute, you can paint up to 5 meters of pipe in this way.
Wood bleaches and purposes of their use
One of the chemical methods for treating darkened wood is bleaching. Wood bleach returns the original color of the material, helps lighten darkened areas, and destroys fungi, which prevents further darkening.
Bleaching agents that differ in their active ingredients will help lighten darkened elements:
- chlorine-containing, contain sodium or potassium hypochlorites, bleach and chlorine dioxide,
- preparations without chlorine - hydrogen peroxide, ammonia and oxalic acid.
Most bleaches have a disinfectant, fungicidal effect and can be used for preventive and protective purposes. Whitening wood helps improve the appearance of discolored areas.
Preparations for wood bleaching
Lightening of darkened surfaces is carried out using a wide range of preparations developed by the chemical industry.
A well-known preparation for lightening is Woodmaster Frost bleach. Its difference is that after processing a darkened area of wood, the natural color is restored and the pattern and structure of the wood is not damaged. In addition, it has protective properties and is used before painting or impregnating structures. Due to the gentle composition of the bleach, it is used indoors to improve the appearance of wood trim. Frost bleach, which is applied to a clean, dry surface with a brush and left to dry for 5-12 hours. Then it is recommended to wash the treated area with water. The active ingredient in bleach is an aqueous solution of sodium hypochlorite.
Belsin bleach contains chlorine-containing substances. It is applied with a brush, sponge or spray method; to achieve the desired degree of whitening, you can repeat the procedure. Belsin wood bleach is used for preventive, protective treatment of wooden elements if it is known in advance that they will lie in a damp place. The product can be easily applied to material of any moisture content. The composition of wood bleach makes it easy to wash away traces of use remaining on the surface with water.
Senezh is a line of antiseptics for preventive and protective treatment of wooden structures for various purposes. It is not recommended for use on surfaces previously treated with varnish, drying oil and other protective and water-repellent agents. Senezh penetrates deeply into wood, destroys and suppresses the development of mold fungi. The preparation is applied to the cleaned wood using brushes, rollers, or sprayers. Also suitable for soaking and deep impregnation processes in an autoclave, which improves protection and extends its life to 30-35 years.
Neomid 500 is a Russian bleaching impregnation for wooden structures. Restores the natural color of wood and provides protection against fungal damage for a long time. As a side effect of the treatment, salt is formed on the surface, which is easily removed with water. The concentration of the bleach solution depends on the purpose. To remove small stains and for preventive treatment, a 1:2 ratio of concentrate and water is sufficient. If the surface is damaged less than 3 mm, it is enough to dilute the impregnation with water one to one. For deep and extensive darkening of the surface, the use of undiluted concentrate is allowed.
Reasons why lining should be processed
The pleasant color of untreated lining will not please the eye for long. The wood will begin to deteriorate during use inside the house. Before you look for how to process the lining, you need to understand the reasons why it loses its beautiful appearance. Wood can be affected by dampness, attack by pests and, finally, even the simplest grease stains and abrasions.
Several main reasons why lining needs treatment with protective agents:
- Waterproofing. Boards become more resistant to water if there is high humidity in the room.
- Antiseptic. Fungal spores and mold microorganisms will not be able to get into the very depths of microcracks in the fibrous structure of the tree.
- Barrier against pests. No bark beetle (wood borer) or any other insect pest can destroy the wooden covering.
- Color preservation. The treated lining does not darken over time and retains its natural color throughout its entire service life.
- Health safety. If the lining is made of coniferous wood, then the release of their resins from the board stops after it is treated with protection. This nuance is important for rooms where people sleep or stay most often.
- Fire safety. The high flammability of wood can be reduced if it is treated with fire retardants in several layers.
Impregnation ensures the brightness and preservation of the color of the lining Source winterhouse.ru
Treating the surface of wood with a fire retardant to protect it from fire Source sigma01.ru
The tree will retain its integrity longer in conditions of high humidity because the protective layer of impregnation or covering material will prevent it from swelling and rotting. When attacked by small insects, a layer of protection will prevent the wood from turning into dust. If a protective layer of impregnation is periodically applied to the surface of unpainted lining, then it will become stained and retain all its design properties - color, texture of smooth curves, pattern of wood stains.
How to carry out the work correctly
Once you have chosen a specific option, you can get to work. Instructions for applying the composition yourself are as follows:
Before covering the lining inside the house, you need to stock up on the required tools. You can apply paint or impregnation with a brush, with a roller, or with a spray gun. You will also need a brush to clean the surface, a ladder to reach the top; if you are painting the ceiling, it is better to take a table;
- Next you need to prepare the surface. To do this, you need to clean it from dust and debris. If there are stains on the wood, they should be removed. It is unacceptable to work on wet substrates; if the material has not dried completely, then painting cannot be started;
- Covering the lining with the composition is done in different ways. If you do the bulk of the work with a roller, then the seams are painted over with a brush afterwards. If you work with a brush from start to finish, then you can go in order. The composition must be distributed in an even layer, the formation of smudges is not allowed, for this reason it is better to paint from top to bottom, then all the flaws will be removed;
In order for the coloring quality to be as good as possible, you need to apply at least 2, or even 3 layers. Some, before covering the lining with paint or varnish, impregnate it with an antiseptic. But even in this case, the decorative coating is applied twice, this allows you to achieve a rich color and durability of the coating.
The question is often asked, how to renew varnished lining? There are two options: if the surface condition is good, then you can go over the layer with fine sandpaper and apply a fresh coat of varnish. If the lining is darkened or damaged, then it is better to repaint it; to do this, use a composition on the same base, then it will fit perfectly.
Design
Many home owners prefer not to paint the lining and preserve the natural pattern. But in order to prolong the original appearance, the wood should still be treated, otherwise the walls may darken or acquire a blue tint. To get rid of the gray tint on wood, you will first have to sand the top layer, and then treat the surface to protect it from sunlight.
It will be more difficult to remove the blue tint - for this you need to use biological agents. Chlorine and active oxygen will help cope with the task. After treatment, the surface must be impregnated with a protective composition, and then painted with thick or translucent paint.
Natural wood shade will not harmoniously complement all interiors, so the walls can be painted. A large selection of painting methods allows you to create an exclusive coating
To do this, it is important to choose the right paint color. Don’t forget about simple rules: light shades visually expand the space, while dark shades, on the contrary, make the room smaller
Below are some recommendations and tips to help you choose the right color.
Warm and calm shades look great in the kitchen interior: yellow, orange, pink and peach.
- A honey-golden shade combined with a natural wood pattern looks great in the living room. The interior can be diluted with light shades or bright and catchy colors.
- For the office, you can choose natural wood colors. In this case, oak looks great, but the lighting in the room must be well thought out. Cool tones will also help you get into a working mood.
- In the bedroom it is better to use wood shades or light and neutral colors. White also looks great when decorating the walls in the bedroom.
- You can use any colors in a nursery, but psychologists advise against bright and saturated tones - it is better to choose calm and moderately bright shades. They will not only create a special playful mood, but will also help the child relax and get ready for sleep and rest.
- Lining painted gray and blue will create a feeling of dampness and cold, so it is wiser to use such shades in sunny rooms.
The lining can be mounted in various ways.
- Vertical. Will allow you to visually raise the ceiling. This technique is especially good to use in combination with light shades.
- Horizontally. Helps visually lengthen the wall and create the effect of expanded space.
- Diagonally. It will create special dynamics in the interior and allow you to make a spectacular accent on the wall or ceiling.
- Alternating. Allows you to create a special charm with a simple technique. For example, you can depict various shapes on the wall: a herringbone, steps and other combinations that the homeowner’s imagination can create.
Why is impregnation needed?
Some owners of private houses do not see the point in treating the surface of the lining with impregnations. In fact, if thin planks are not covered with anything, after a certain period of time, not the best changes will appear on them. If there is insufficient ventilation, the fitting will become covered with a peculiar blue color , and if it is intensively exposed to aggressive sun, it may become dark gray.
The blue discoloration on the lining is caused by the action of microorganisms, which can be eliminated with the help of special oxidizing agents, for example, chlorine.
The procedure will not be the easiest or fastest, and will be accompanied by characteristic unpleasant odors.
If a grayish coating has appeared on the lining due to exposure to sunlight, then you can get rid of it by turning to mechanical grinding. But the positive effect of these procedures is unlikely to last for a long time. It is more advisable to resort to processing the finishing material immediately after its installation. In this case, problems can be avoided in the future.
Impregnations suitable for lining not only protect it from negative external factors, but also make it more aesthetically attractive. With this addition, the interior looks nicer and neater.
Lining that has a waterproof treatment will last much longer, even if it is in a damp or irregularly heated room.