Dismantling the old product and preparing the opening
Before you begin installing a new window, you need to get rid of the old one. This must be done on the day the replacement is performed. If saving the frame is not necessary, you don't have to be very careful. Remove the doors or tear them out with the holding screws. File the frame and frame of the window in several different places.
Take a crowbar or nail puller, pry up each part and remove it from the opening. In some situations, it’s easier to immediately find the two-hundredth nails that hold the box in place and pull them out. Under the box you will find thermal insulation and sealing material. It needs to be removed. At the same time, using a hammer drill with a so-called spatula attachment, dismantle the slopes or some part of them. At this stage, it all depends on what slopes you plan to install in the future.
Pry up the window sill and remove it. Take a hammer drill and destroy the cement backing under the window sill and at the bottom of the opening. Collect construction waste in suitable sized bags and take it to a designated place. Take the remains of the old window there. You won't have to do any more dirty work. Level the ends of the window opening and clean them of dirt. The surface should be primed if possible. Although if window installation is carried out by company representatives, primer is usually not used, but it is better to do it anyway.
We use a software design method
To facilitate the process and increase the speed of development, specialized programs are used. In 3D scenes, architectural design is carried out at various stages, visualizations are viewed from an adjustable camera position, and lighting is changed. The software method allows you to create a wide variety of solutions, select materials for walls, floors, ceilings, and arrange furniture.
Below are the programs - from professional ones to those accessible to anyone familiar with a computer. They will help you draw a house plan yourself, as well as calculate the amount of materials needed for construction:
- ArchiCAD;
- AutoCAD;
- Revit;
- SweetHome;
- FloorPlan 3D;
- Google Sketch Up.
In addition to programs installed on your computer, you can find online applications for simplified design and calculations on the Internet.
Competent house design is the job of specialists
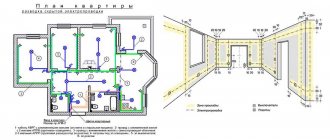
The architectural plan of the house is part of the construction project. In addition to floor plans for the location of rooms, passages, and stairs, drawings and communication diagrams are also developed.
Of course, the best option is to order a full package of necessary documentation from a specialized design organization.
After all, its preparation requires knowledge of technology, building codes and regulations, and skills in preparing diagrams and drawings. Independent design of a capital structure is always associated with errors. In the future, during the construction and installation work, corrections or changes to the decisions made may be required. However, although it will not be possible to create a project for a high-class cottage with a full package of drawings, calculations, and a well-thought-out estimate, a simplified version of such a development, with due diligence, can be done on your own.
Metal blocks
Today, wooden entrance doors are installed mainly in private houses. In multi-storey buildings, preference is often given to metal doors - and they are manufactured according to a different standard: 31173*2003. This document sets requirements for the manufacture of steel blocks with devices embedded in them that prevent unauthorized entry into the premises.
So:
- As for the mechanisms of these devices, they, in turn, are manufactured in accordance with GOST 51242 98. Doors and gates, windows and shutters, blinds and safes - all structures on which protective mechanisms are installed must meet all the requirements defined by this standard .
As for the standard for the doors themselves, it applies only to steel blocks installed in civil buildings for various purposes, including residential ones. As for special-purpose doors, which must be, for example, bulletproof, or resistant during an explosion or fire, they are manufactured according to completely different regulatory documents.
Basic example
Let's make a blank html page, paste the resulting SVG directly into it and add some CSS so that nothing extends beyond the screen. There’s not even anything to comment on here.
.map { width: 90%; max-width: 1300px; margin: 2rem auto; border: 1rem solid #fff; border-radius: 1rem; box-shadow: 0 0 .5rem rgba(0, 0, 0, .3); } .map > svg { width: 100%; height: auto; border-radius: .5rem; }
We remember that we added classes to buildings and use them to make the CSS more or less structured.
.building { transition: opacity .3s ease-in-out; } .building:hover { cursor: pointer; opacity: .8 !important; } .building.-available { fill: #0f0 !important; } .building.-reserved { fill: #f00 !important; } .building.-service { fill: #fff !important; }
Since we set inline styles in Inkscape, we need to override them in CSS. Would it be more convenient to do everything in CSS? Yes and no. Depends on the situation. Sometimes there is no choice. For example, if a designer has drawn a lot of multi-colored things and transferring everything into CSS and inflating it to the point of impossibility is somehow not comme il faut. In this example, I use the “inconvenient” option to show that it is not particularly scary in the context of the problem being solved.
Let's assume that we have received fresh data on houses, and we will add different classes to them depending on their current status:
const data = { id_0: { status: 'service' }, id_1: { status: 'available' }, id_2: { status: 'reserved' }, id_3: { status: 'available' }, id_4: { status: ' available' }, id_5: { status: 'reserved' }, messages: { 'available': 'Available for rent', 'reserved': 'Reserved', 'service': 'Available in 1-2 days' } }; const map = document.getElementById('my-map'); const buildings = map.querySelectorAll('.building'); for (building of buildings) { const id = building.getAttribute('data-building-id'); const status = data[`id_${id}`].status; building.classList.add(`-${status}`); }
We get something like this:
Something similar to what we need is already visible. At this stage, we have highlighted objects on the terrain plan that respond to mouse hover. And it’s not difficult to add a response to a mouse button press for them using the standard addEventListener.
How to make window openings on a house plan in AutoCAD (algorithm)
To create window openings in AutoCAD, I used the following algorithm (you can use any convenient method for creating window openings on the plan):
Call the Line command in AutoCAD and draw the first wall of the window opening.
Select the segment and activate the handle. Select the “Move” option from the context menu for editing objects in AutoCAD using handles. Next, to make a copy of it when moving a segment a specified distance, select the “Copy” option. Copy the segment to a distance of 910 mm, i.e. the width of the window opening. To track perpendicular angles and polar angles in AutoCAD, you will need polar snapping or ORTO mode.
Select two segments on the house plan in AutoCAD, indicating the window opening, and group them for ease of working with the window opening and placing it in positions according to the plan of the first floor of the cottage. You can group objects in AutoCAD from the context menu. Click the right mouse button and select the line “Group” – “Group” in the context menu.
Using the “Copy” and “Rotate” commands in AutoCAD, copy the window openings and place them according to the drawing of the house plan.
What other designations can be used
We have thus found out how interior doors installed directly in buildings can be marked. The second position for such models indicates the type of construction.
However, in various types of buildings, of course, external doors are almost always used. In the marking of such products, the second position may contain, for example, the following designations:
- “N” – entrance doors or tambour-type models.
- “C” – service doors.
- “L” – hatch doors or manhole models.
If there are such letters in the marking, the letters indicating the actual type of construction “G”, “O”, etc., can be transferred further - behind the numbers.
Unlike internal doors, entrance models are manufactured according to the standards provided for by GOST 24698-81. The same document also regulates their designations.
The numbers in the marking of internal doors, as already mentioned, usually appear in the third position. In the same place they are located for the entrance structures. For all types of doors, the numbers indicate the size of the openings in the house. Very often, after them in the door marking, in addition to the type, there are also additional letters displaying some secondary characteristics. In this place, GOST for doors may provide, for example, the following letters:
- “P” – threshold or right wing;
- “L” – left opening;
- “N” – with influx;
- “B” – moisture-resistant door;
- “C” – continuous filling of the canvas;
- “T” – fire-resistant door;
- “Ш” – panel door;
- “C” is a model with an internal solid filling made of wooden slats, equipped with a threshold and a cylinder lock, as well as a compacted rebate.
The last position in the door marking is usually marked with the designation GOST 24698-81.
Outdoor structures
In the previous chapter we talked about internal wooden doors. External standard doors are manufactured according to a different standard, number 24698-81. It does not apply to doors for cultural buildings, shopping and sports centers, train stations, as well as to structures whose area exceeds 9 m2.
So:
- This document regulates the production of three types of doors: under the letter “H” - vestibule and entrance doors, under “C” - service doors. The third type is designated by the letter "L". This is not even a door as such, but a hatch (manhole) - for example, for exiting the entrance to the attic. Everything is similar here: the requirements for door designs, their standard sizes and markings are also set out, taking into account the purpose.
A wooden door at the entrance is an excellent option for a private home
Determining distances
Before we begin drawing up a plan for our home, we need to know the dimensions of the room or the entire home. Previously, tape measures were used for this, but today everything can be made much simpler by purchasing a laser rangefinder, we can simply point it at any wall and find out the distances as quickly as possible. This makes it possible not to waste energy physically moving around the apartment and holding out tape measures, or even moving ordinary meter rulers from place to place. And there is practically no chance of making a mistake.
However, we still can’t do it without a tape measure, since it’s still easier for her to measure the thickness of the walls or the parameters of the room furnishings.
What other rules must be followed when drawing up diagrams?
Doors on conventional drawings, like, for example, windows, are supposed to be depicted as wall openings. In this case, such elements on the diagrams are not shaded, but are drawn in the form of perpendicular lines (sashes). Among other things, when depicting doors on drawings, the following rules are observed:
- the main lines are set to 0.8 mm thick;
- inscriptions above the designations are drawn in font No. 7;
- For explanations, font No. 5 is used for symbols.
You can, among other things, determine the characteristics of the door - the opening side of the leaf, the presence of a threshold, the type of construction - by its markings. Such information, according to current regulations, must be present on interior and entrance structures. It can also be placed on design drawings next to the door icon.