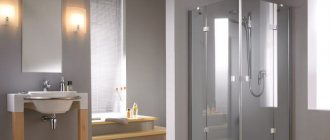
When there is little space in the bathroom, many people abandon the bath in favor of shower stalls. This allows you not only to save space, but also to equip your bathroom with a convenient device and a variety of useful functions. When choosing such boxes, you must take into account the size of the shower cabin, because this is the main criterion when purchasing a product. Only after deciding on the height and width of the structure can you begin to select a booth from the point of view of design and functionality.
Why are dimensions so important?
But it is important to know not only the size of the shower stall, but also the dimensions of the room where you plan to install it. It often happens that hydroboxes simply do not fit in the height of the bathroom, and a tray that is too wide does not fit in the space allotted to it. Therefore, when buying a shower cabin, you should take into account the size of the room so that bathing is comfortable, and at the same time the shower does not take up much space.
Before installation, carefully measure the height of the ceilings, because in some models the tray exceeds 40 cm, and shower cabins with bathtubs are even higher. Thus, if the height of the pallet is 40 cm, and the walls of the cabin are 175 cm, then the minimum ceiling height in the room must be 235 cm, otherwise the structure simply will not fit. Not every bathroom has such dimensions, and it is worth paying attention to the more modest sizes of shower trays.
Preparing for installation of shower trays
Regardless of the type and design features, you need to start by preparing the space for the cabin. We'll tell you how to do everything yourself.
Necessary materials
To work, you may need a screwdriver, saw, jigsaw, waterproofing, construction level, marker or pencil, drill, pliers, sealant, spatula or brush, glue, cement, sand or bricks.
Shower tray RAVAK Aneta PU
Preparing the floor and walls
- By the time the shower is installed, make the sewerage, wiring and water supply pipes. Subsequently, the defects will be difficult to correct.
- Check the quality of the wiring. It should have a minimum number of twists and be protected from moisture.
- Position the pipe as close to the drain hole as possible.
- Before starting installation, close all water supply and sewer outlets with plugs to prevent construction debris from getting into them.
- Mark the level at which the mixer will be located.
- Level the surface so that the differences are no more than 1-2 cm. Subsequently, you will only need a slight slope of the cabin towards the drain.
- Waterproof the area where you will place the pallet. Not only the floor, but also the walls are 20 cm above the level of the watering can. The easiest way to do this is with coating or impregnating mixtures.
Instagram @professionalnyiremont
Instagram @remont_vannoy_05ru
Instagram @tiler43
- Plumbing equipment
How to make a tile shower without a tray: detailed instructions
Main dimensions of shower stalls
The modern plumbing market offers a wide selection of shower cabins of various types and sizes. Typically, manufacturers produce standard sizes of shower cabins of the most popular models and shapes, focusing on the typical dimensions of bathrooms.
If we take the criterion of wall length as the basis for classification, then all shower stalls can be divided into three groups:
- small-sized (the minimum wall dimensions of these models are from 70 to 100 cm);
- medium (here the minimum wall size ranges from 80-130 cm);
- full-size (in this case, the wall length reaches 170 cm or more).
Based on the height of the structure, there are low and high models. In the first case, the height of the shower stall, including the tray, is in the range of 170-190 cm, and in the second case, the height of the product can reach 210-240 cm.
The dimensions of the smallest shower cabin, according to the parameters listed above, are as follows: the walls are about 75 cm long and 170 cm high; such models may not have a tray. Some manufacturers produce structures with a minimum wall size of 70 cm, which is a non-standard size for asymmetrical structures.
How to mount a pallet with your own hands
If you decide to make the bottom of the shower stall with your own hands, then select moisture-resistant brick as the base.
- Sewerage and water supply wiring is being installed.
- A waterproofing layer is laid.
- The installation site is treated with mastic and film.
- Brick sides are built using a moisture-resistant mortar. They should be higher in height than the overhang of the drain ladder. Its level determines the height of the homemade pallet. The vertical line of the sides corresponds to the walls of the cabin.
- The inside of the bottom is filled with a self-leveling concrete mixture. Its layer is 6-8 cm. This creates a slope towards the drain hole so that the water leaves.
- The dried structure is treated with primer and mastic.
- The last coating layer is a mixture of cement and ceramic tile adhesive.
- The dry structure is processed with sandpaper.
- A moisture-resistant material for cladding is selected. It is recommended to use mosaic. It will help hide the unevenness of the bottom.
If a structure of great height is erected, then steps for the cabin are built.
Shower cabin with equal sides
The equilateral design is one of the most common models. It is much easier to install such a shower cabin yourself than large or non-standard products. The front part of this model can be not only round, but with sliding walls.
The minimum sizes of shower stalls with equal sides are 70x70 cm and 80x80 cm. The first model with a straight front panel will fit perfectly into a small room, and the second option is more suitable for a small room if the front panel is rounded.
Square shower stalls can also have dimensions of 90×90 and 100×100 cm. Such designs can save space in a small room, as well as advantageously decorate the interior of the bathroom.
Some manufacturers periodically make limited releases of equilateral shower cabins of larger sizes, the length of which can be 120x120 cm. The height of the shower cabin in this case can exceed 240 cm. However, these models have one significant drawback - the front panel with hinged doors takes up a lot of space places when they open.
Drain care
Regardless of the quality of installation of the shower drain system, blockages occur periodically. They lead to stagnation of water in the cabin and the appearance of an unpleasant odor in the bathroom.
If the water does not drain well, then you need to check the siphon.
You can clean the drain in the following ways:
- Mechanical. In this case, a metal cable or plunger is used.
- Chemical. Special compounds are used to clean pipes. Aggressive substances damage plastic. Preference is given to gel-based products. You can use traditional methods, such as cleaning the sewer system with vinegar and soda.
When connecting the cabin to the sewer through a corrugated pipe, it is more difficult to clear blockages. You need to remove the hose and rinse it with a powerful stream of water. In some cases it is necessary to replace the siphon.
Shower cabin B&W G8001 90×90 RUB 74,400
Shower cabin B&W G8701 80×110 RUB 74,400
Shower cabin BYON SGUARE V0000228 RUB 60,200
Shower cabin BYON SGUARE H0000081 RUB 55,300
Shower cabin Grossman GR170D 100×100 RUB 59,300
Asymmetrical rectangular booths
So, we found out that the dimensions of standard booths can be:
- symmetrical (square): 70×70, 80×80… 120×120 cm;
- asymmetrical (rectangular): 80×100, 80×110, 80×120, 90×110 and 90×120 cm.
The dimensions of the shower stall of the standard asymmetrical model allow the structure to be placed on the bathtub, while simultaneously combining two possibilities for taking water procedures. However, a shower cabin and a bathtub are incompatible if the design is equipped with the functions of a steam room, hydromassage, or tropical shower.
Therefore, before combining a bath and shower, you need to study the functionality of the product and its dimensions.
Builders' problems
The trouble is that dealers do not indicate installation dimensions. Therefore, it is difficult for a person unfamiliar with the topic to understand what exactly they are offering to buy. There are no sectional drawings, side or bottom photos. Dealers only advertise appearance. But only installers know how many problems a shower cabin can cause during its installation.
Yes, there are some standard projects, but you can find weak points in each. And then it turns out that the unlucky buyers of the shower stall begin to flood the neighbors. This is the weak point of any design - there is no leakage control.
Shower with bathtub or tray
If the bathroom already has a bathtub, and you don’t want to give it up, then you can supplement it with a shower stand and partitions, turning it into a shower stall with a bathtub. It should be taken into account that the standard height of a bathtub is about 70 cm, and a shower is 170 cm, so the ceiling height in such a room should be at least 240-250 cm. A shower in which there is a bathtub instead of a tray is called a combined shower.
Shower cabins can be installed on a tray with low (10-15 cm) or high (40-60 cm) sides. The first model is installed almost on the floor, but when installing such a structure, you need to take into account that communications must fit under it: a siphon and sewer pipes. A shower with a bathtub or tray is installed only in a large or medium-sized bathroom.
Shower trays come in different shapes and sizes. The height of the structure with a tray or bathtub ranges from 210 cm to 245 cm, and the length of such a product is about 150-170 cm. Thanks to these dimensions, the cost of the equipment increases accordingly.
Sequence of installation of different pallets
To do everything right, use the tips in this section. Some materials will quickly deteriorate if their characteristics are not taken into account. For example, this often happens with acrylic.
Acrylic
If the bottom of the product is not reinforced, it can be reinforced with foamed polystyrene. A sheet of material is laid on the foundation. Another option is a support frame made of steel strips welded together or connected with brackets.
- Place the tray on the floor and mark the drainage area with a pencil on the floor.
- Pour or glue the foundation.
- Remove the bowl and connect the siphon to the drain pipe. Its edge should not touch the floor.
- Fill the siphon with water to check for leaks. Seal any detected defects.
- Coat the junction of the sleeve and siphon pipe with epoxy sealant. If they have paronite or polymer gaskets, no sealant is needed.
- Apply glue to the foundation and carefully glue the tray onto it.
- If the kit includes legs, attach them to the pallet at the same level. Make sure that their length is not less than the length of the siphon.
- Install the product on a foundation, podium or legs.
- Use a level to check the evenness of the tray.
- Degrease and seal the joints with the wall with silicone sealant.
You can use the shower after ten hours - after the sealant and glue have dried. Watch a video on how to install a shower tray yourself. It clearly outlines similar instructions.
Cast iron
Foundations for cast iron bowls are almost never made. An exception is cases when the distance from the bottom to the floor is less than the height of the siphon. To raise the tray, it is enough to lay bricks or foam blocks around the perimeter. In this case, ordinary masonry mortar is used. In other cases, the structure is installed directly on the floor, on legs that are already attached to the bowl.
- Using a level, determine differences and, where necessary, place steel plates or other objects under the legs.
- Connect the siphon and coat the joints with epoxy glue.
- A little later, add water and check for leaks. If there are, eliminate them.
- Fix the legs with cement mortar diluted in a ratio of 1:3. Formwork can be made from matchboxes.
Instagram @lm.plumbing.services
The cast iron pallet is not glued to the wall. You can use the cabin after ten hours - when the epoxy sealant has dried.
Shower tray RAVAK Perseus Pro
Steel
You can also strengthen the bottom of a steel tray with a sheet of expanded polystyrene foam on a podium or with a homemade frame. Typically, a steel stand does not come with legs.
- Make a frame: concrete or brick foundation.
- If the podium was filled with a cement-sand mixture, wait until it dries and waterproof it.
- Attach the siphon and check the functionality of the drain. Fix leaks if any.
- Install the tray and level it using a level.
- Attach it to the foundation with mortar or glue.
- Degrease and seal all joints with epoxy sealant.
The video contains visual instructions.
Semicircular corner shower model
This type of shower fixture is installed in a corner. The door width ranges from 70 cm to 90 cm, so this design is ideal for a small room where every centimeter is worth its weight in gold. The minimum dimensions of this hydrobox with compartment doors are 70x70 cm, which allows you to minimize the occupied space.
Such a shower cabin, as a rule, is installed on a low tray from 10 cm to 15 cm. The doors themselves and the panel of the product are attached to the walls of the bathroom. The semicircular shower cabin has standard dimensions of 70x70 cm - 110x110 cm, and the dimensions of larger models vary from 125x125 to 150x150 cm.
Step-by-step work plan for installing a pallet with sides on a frame
For work you will need materials and tools:
- for sealing connections - FUM tape;
- silicone sealant;
- for connection to the sewerage system - a double;
- siphon.
The sequence of work is not violated:
Installing a shower tray begins with assembling the frame. This will allow the pallet to be installed in a strictly horizontal position.
Installation of a metal frame
- The cross-section of the supporting beams of the frame is 0.1x0.1 cm. They are secured to the bottom of the pallet with self-tapping screws. To do this, the bottom is turned over.
- The strength of the structure is enhanced by fastening the pipes either crosswise or parallel to each other. The choice depends on the shape of the bottom.
- The supports of the metal frame will be studs with thrust bearings, which are installed in special holes at the end of the supporting tubes. The position of the studs is fixed with washers or nuts.
Dimensions of booths without rear walls
The shower stall may not have back walls; their function is performed by the walls of the bathroom. Such models are installed on a thin pallet, and shower cabins are small in size - from 70x70 cm to 100x100 cm. The most reliable and stable is the corner design, on the pallet of which sliding or hinged doors are installed.
The height of the product, as a rule, does not exceed 200 cm. Cabins without back walls are usually used only for taking water procedures in the shower. If you want to combine a cabin and a bathtub, then it is better to choose a closed-type hydrobox with high tray walls.
Tile or mosaic cladding
In many cases, side cladding is required to hide the mounting bases. One of the most convenient options for solving the problem is to use mosaic tiles on a plastic or glass base.
A layer of glue is applied to the base using a notched trowel. After pressing the tiles, excess adhesive must be removed immediately.
With the help of mosaic, you can cover any uneven surfaces, since it can be easily cut with construction scissors or a knife thanks to its paper base.
It doesn't matter whether you use tiles or mosaics, all seams need to be sealed. This especially makes sense when you decide to build the pallet yourself.
The space between the pallet and the floor can be closed using mosaic or tile cladding. Mosaic fragments are flexible and allow you to quickly and efficiently line the sides or the entire pallet if you build it yourself
When forming seams, use crosses. After facing, you need to grout the seams using waterproof grout and a rubber spatula. Then the remaining grout is removed and everything is wiped with a piece of cloth. After everything has dried, you need to wash the tiles.
Closed shower boxes
This model is closed on all sides and is considered completely sealed. It is these expensive structures that are equipped with all sorts of functions: steam room, lighting, hydromassage, radio, tropical rain, etc. Only in a sealed hydrobox can you install all the necessary equipment for additional functions.
Products can be equipped with a low or high tray. The length and height of this type of booth are quite large, so when choosing a design, you must take into account the distance from which the product is connected to the drain, sewerage system and water supply system. Closed shower cabins have a minimum size of 90x90 cm.
Regulatory Requirements
Regulatory requirements for the installation of pipeline fittings in accordance with SNiP 2.04.01 clause 10.5 are given in table No. 2.
Table 2. Regulatory requirements for the installation of pipeline fittings for cold and hot water supply
|
|
|
|
|
|
|
|
|
|
|
|
|
| ||
|
| ||
|
| ||
|
| ||
|
| ||
|
| ||
|
| ||
|
| ||
|
|
| |
|
|
| |
|
|
| |
|
|
| |
|
|
| |
|
|
|
|
|
|
| |
|
|
| |
|
|
|
|
|
|
|
|
|
|
|
|
|
| ||
|
| ||
|
| ||
|
| ||
|
|
|
|
|
| ||
|
| ||
|
|
When purchasing plumbing fixtures, the presence of invisible cracks is determined by ear by tapping the product, located on a wooden stand, with a wooden hammer weighing about 250 g. A product that has cracks makes a rattling sound when tapped.
The presence of nicks and scratches is determined visually by wiping the surface of the product with a cloth soaked in a 0.1% solution of methylene blue solution. If there are nicks or scratches, they are filled with a blue solution and are detected visually without the use of magnifying devices.
Non-standard dimensions and dimensions according to SNiP
Even with a wide selection of different shower designs, it is not appropriate to install a standard-sized shower stall in every bathroom. This may be hampered by a certain arrangement of furniture, other plumbing fixtures, communications, doors, etc. Standard hydroboxes can make it difficult to access other items in the bathroom. Therefore, some consumers order shower stalls of non-standard dimensions and shapes.
These can be small structures with dimensions of 70x70 cm or, conversely, huge models with a width of 150x150, or exact dimensions along the length of the walls 97x97 cm. Sometimes it becomes necessary to install shower products with a trapezoidal, oval or other tray. Non-standard sizes also include designs with dimensions of 110×85 cm, 170×85 cm, 150×85 cm or 170×110 cm.
The cost of custom-made plumbing is much higher, but it allows you to choose the most optimal size of the shower stall. Therefore, non-standard shower designs are in demand and are installed both in small bathrooms of small apartments and in spacious rooms in private houses.
In the modern world there are no standards or restrictions regarding the size, type and shape of plumbing products. Initially, shower cabins with a high tray were used in a variety of health complexes, for which regulations were provided.
For booths installed in public premises, standards according to SNiP 2.09.04-87 are still provided to this day. Expensive and high-quality models from trusted manufacturers have certificates of compliance with GOST, but the vast majority of shower stalls are not subject to certification.
Selection by door opening method
Even if the overall dimensions of the equipment fit into the room and do not interfere with standing near the sink or opening a cabinet, it may be inconvenient to use due to the wrong doors and the method of opening them. And sometimes it’s unsafe. Therefore, before choosing a shower stall, it would be a good idea to do your research.
In terms of design and opening mechanism, shower doors differ little from their interior counterparts.
- Hinged doors are mounted on standard hinges to fixed walls. They can only open outwards, which can be very inconvenient and unsafe, especially in a small bathroom and if there are children, animals and disabled or disabled residents in the house. As a rule, this option is chosen for spacious bathrooms.
- The swing doors open both outward and inward and are hinged. They are not suitable for all designs, which limits their use.
Swinging doors are installed only on shower enclosures with large internal space Source www.dm-steklo.ru
Varieties
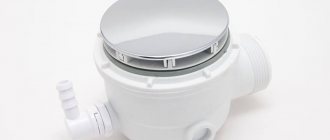
The siphon serves to “connect” the shower with the sewer system, and provides:
- discharge of dirt into the sewer pipe;
- prevents the passage of odors from the drain hole into the apartment.
There are cabins with a built-in water seal. If it is not available, then the product is purchased separately. Select a siphon according to the size of the drain hole. The model with a 9-mm diameter can be built into the floor, since it can be cleaned from inside the cabin, and the 52- and 62-mm ones are placed so as to have free access to the siphon if necessary. You also need to consider the distance from the floor to the bottom of the shower.
Depending on the functioning mechanism, siphons are of three types:
- automatic – closing the hole by turning the handle;
- standard - the simplest outdated models with a rubber or plastic plug;
- mechanical - controlled by pressing the valve.
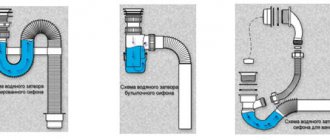
Products differ according to the type of design:
- bottle neck type - used for high pallets. Installation is quite simple, as is disassembly. The liquid first accumulates in a container, and only then is sent to the central sewer system;
- knee - S and U-shaped. These types have the advantageous properties of ensuring easy replacement of the water seal. The products have a plug, opening which you can quickly clean the system of dirt. These include corrugated models, installed at the desired angle in tight spaces using clamps. The presence of corrugation eliminates the presence of additional joints and the possibility of leakage, but the only negative is instability to high temperatures;
- drain - mounted in the floor or in the bottom of the shower. Maximum height 20 cm.
Helpful tips for making the best choice
Purchasing a shower cabin requires financial costs, repair and installation work, and a waste of time. To ensure that the efforts are not empty, it is necessary to approach the choice competently and responsibly.
First you need to decide on the shape and type of structure. Assembling and using closed or combined types of plumbing in a small room can be difficult.
Recommendations for selection:
- The ratio of the size of the finished product and the area of the bathroom. Taking measurements of the installation site of the system will allow you to select its optimal shape and avoid difficulties with plumbing work or movement.
- Quality of parts and equipment, selection of the necessary functions. It is necessary to study the operating conditions and characteristics of the product; the tightness, safety and durability of the booth are of great importance.
- Additional options provide more opportunities for relaxation and relaxation, but they affect the cost of the product and require additional energy and water resources.
- Design features. Hinged doors are more convenient to use, but they take up additional space in the room. Sliding doors make the structure more durable, but hide the interior space.
- Pallet material. It is preferable to choose a solid base with high thermal conductivity.
- Availability of warranty service.
A shower cabin is a good alternative to a bath in a small room. In addition, it has many additional functions. With the right choice of model and size, such a product can last for many years.
Made to order
Despite all the wealth of choice, sometimes it is not possible to find a suitable cabin. In this case, many manufacturers offer the service of making custom-made structures. The buyer can choose not only non-standard sizes, for example, 97x105 cm, but also an unusual shape. For example, you can order a cabin with a small recess, which will allow you to install a washing machine between it and the wall.
A custom-made cabin will cost more than a standard one, but the overpayment is justified by the benefits that come from optimal size and shape.
How to choose - expert advice
The main criterion when choosing any type of plumbing equipment is its cost, which determines ease of use and functionality; in addition, before purchasing, you can use the following useful tips from experts:
- Before purchasing a product, you should carefully study the instructions, read the supplier’s warranty obligations, and find information about the manufacturer on the World Wide Web. Mid-price products from Ravak (Czech Republic), Cersanit (Poland), and more expensive models from Roca (Spain), Timo (Finland), Geberit (Switzerland) have gained recognition and are in good demand among the average consumer.
- The height of the shower tray is an important criterion: deep and medium bowls are more functional than shallow ones; in the household, you can soak laundry in them, wash large items - a blanket, a coat, carpet runners.
- The cabin is installed in a corner with water outlets and a sewer drain, which were placed before its appearance; in another more remote location, the sewer pipe will have to be raised to create a slight slope - this is technically difficult to implement and requires additional costs.
- Before purchasing, pay attention to the functionality: a regular stall is suitable for adult family members; if you have small children and pets, it is better to purchase a multifunctional version with a bathtub.
Dimensions of closed boxes - examples - If elderly people live in a family, they buy a shower cabin with a low tray depth, the optimal product for this configuration is a shower cabin, the height of which is 200 cm with a roof.
- Before purchasing, it is useful to check the quality of the acrylic tray, the thickness of its walls, which can be determined by the edge (should be within 4 - 6 mm), it should not bend much if you stand on it at full height. The polymer tray on which one stands should have a slightly rough matte surface.
- If the water supply system has too hard water, it is better to abandon complex designs of boxes with nozzles to create different water supply modes with numerous small-diameter holes - due to limescale deposits, they will have to be cleaned too often to restore functionality.
Standard designs
Products sold on the domestic market differ in height by up to 70 cm - this should be taken into account when choosing a suitable model for installing a shower stall in the bathroom. Above all analogues are closed shower boxes with a ceiling and lighting, which can be installed in any room if there are water supply and sewerage utilities.
Poor drainage when there is a sewer smell
To eliminate unpleasant odor from the drain, a hydraulic seal located in the bend of the siphon is used. If the installation rules are violated and a layer of dirt forms on the walls of the sewer pipelines, the smell penetrates into the room. To eliminate the defect, it is necessary to clean the pipes mechanically, and then treat the lines with a disinfectant chemical solution. After this, you should check that the flexible pipe is installed correctly. To protect against odor, there must be a water plug in the bend at all times.
Cleaning
If water flows into the hole with difficulty after a shower, it means the system is clogged. Let's look at how to clean the cabin siphon. First, prepare a container to drain the dirty liquid. Carefully unscrew the union nut. Take your time when completing the task to avoid spilling the liquid. Drain it into a container and remove the gasket. Clean with a regular brush. As a result of stagnation, dirt often accumulates. Therefore, preventive cleaning is required every six months. It is not recommended to blow with compressed air under pressure to avoid breaking the tightness of the connection. Run water through the drain to make sure it is intact. Place a sheet of white paper under the device, if it remains dry, then everything is fine, connect it to the tray. If it gets wet, then you need to find and eliminate the cause of the leak. This often happens because the rubber gasket is too thin and has become unusable.
It happens that after cleaning there is an unpleasant odor. This means that dirt has accumulated in the pipes, which can be cleaned in the following ways:
- a small cable or plunger;
- using gel agents. Do not use aggressive substances so as not to damage the integrity of the structure;
- We use home remedies - a mixture of salt, soda, vinegar. Pour into the siphon, leave for a while, waiting until the reaction does its job. Then wash off with plenty of water.
If you are dealing with a corrugated elbow, remove it and clean it. How to remove the siphon from the shower stall is described above. It happens that the body cracks. In this case, you need to buy a new one. The choice is made depending on the height of the tray, the diameter of the hole, and the type of plug. When purchasing, pay attention to the integrity of the product and the presence of all components.
Old models that open manually are gradually being replaced by automatic ones. The operating principle of the plug is simple: when closed it provides water intake, and when open it provides outflow. New siphons are produced with a handle, pressing it with your foot once, the drain hole is blocked, and when pressed twice, it opens. This is convenient because you don’t have to bend over to open or close the plug.
In conclusion
Installing a shower stall in your home is not a difficult task. Particular attention should be paid to connecting the pan to the sewer; communications will be hidden, so it is better to do everything correctly right away than to correct minor defects later. The proposed material will allow you to correctly connect the pan to the sewer.
Sources:
- https://sovet-ingenera.com/santeh/vanna/sliv-dlya-dushevoj-kabiny.html
- https://stroyday.ru/remont-kvartiry/ustanovka-i-remont-santexniki/sliv-dlya-dushevoj-kabiny.html
- https://stroy-podskazka.ru/vannaya/dushevye-kabiny/sliv/
- https://stroitelniportal.ru/stati/santehnika/vybor-i-montazh-sliva-dlya-dushevogo-poddona-svoimi-rukami/
- https://gidroguru.com/vnutrennyaya-kanal/razvodka/dush-kabiny/2557-sliv-dlya-dushevoj-kabiny
- 1