Historically, the rubble foundation is the oldest foundation, still popular for the construction of 1-2 storey buildings. Buildings built in antiquity on rubble foundations still stand today. The service life of a stone foundation is now estimated to be at least 150 years. Such foundations are most resistant to freezing and the effects of groundwater. And natural stone is a beautiful and environmentally friendly material.
There are strip rubble foundations and columnar foundations
Rubble foundation: pros and cons
To make a decision, let’s look at the rubble foundation and take into account all the pros and cons. Remembering that the foundation is the most important part of the building, let's get started.
The advantages of buta bases include:
- Durability. Natural stone is more durable than concrete, and the service life of a rubble foundation is usually more than 150 years;
- Environmental cleanliness;
- The water resistance of a rubble concrete foundation is higher than that of a reinforced concrete foundation;
- Masonry made of large natural stone has an attractive appearance.
It is important to know about the disadvantages. The disadvantages of a rubble foundation include:
- Relatively high price of buta when purchasing it;
- Laying stone is a longer process than pouring a reinforced concrete base;
- Natural stone laying skills required.
Please note that a large bottle can weigh more than 10 kg. Working with stones weighing more than 30 kg is not recommended
Popular fractions of granite crushed stone and their scope of application
Photo comparison of granite crushed stone fraction: 5-20 mm, 20-40 and 40-70 mm, granite screening. Fractions of granite crushed stone:
- "Eurocrushed stone", fraction 3-8 mm. Filler for concrete foundations of buildings is considered a waste product from the production of natural stone;
- Fraction 5-10 mm. It is also used as a filler, only it is more often found in the production of massive heavy blocks;
- The 5-20 mm fraction is used in the production of asphalt;
- The 10-20 mm fraction is used in the production of high-strength blocks with high tensile strength;
- Granite crushed stone of fraction 20-25, 20-40 mm is used in the construction of road cushions;
- Granite of 25-60 mm fraction is perfect for creating a cushion under railway sleepers;
- Fraction 40-70 mm is an excellent finishing material.
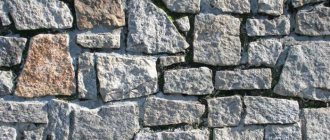
Rubble stone, which one to choose?
Cote is not a specific type of rock. Rubble stone is a torn or rounded natural stone ranging in size from crushed stone to large stones whose weight can exceed 30 kg.
Natural stone in construction is used in different types: light, heavy sedimentary or volcanic.
Rubble strength
Depending on the rock, the strength ranges from 2 MPa to 30 MPa.
Frost resistance
The frost resistance of rubble is assessed by the number of cycles of successive freezing, while the stone should not crumble and lose no more than 5% in weight. This parameter models the number of cold seasons for a buta without destruction.
15 or more cycles are acceptable.
The quality of the cement mixture (in terms of strength and frost resistance) must correspond to the selected stone
Flakiness
A characteristic that determines the shape of grains in a stone. There are 5 groups, depending on the content of lamellar grains from 10% (group 1) to 35-50% (group 5).
Flakiness affects strength (1 group is stronger than others), and somewhat increases the labor intensity of working with such a stone.
Radioactivity
Rocks can be dangerously radioactive.
In construction, 2 groups of rocks according to radioactivity are allowed:
- Up to 370 Bq/kg – allowed for the construction of residential buildings, as well as construction inside populated areas;
- Over 370 Bq/kg is not allowed for the construction of residential buildings, as well as construction inside populated areas (such material can only be used for industrial buildings).
The advantages of such designs
In general, artificial stone for foundations has been used for quite a long time. Rubble structures formed the basis of a wide variety of buildings associated with the very heavy weight of the walls. The material in question has only one “minus”, which is the complexity of the installation process.
At the same time, it has many advantages:
- Excellent strength indicators. However, this indicator depends on what kind of stone is used.
- Good frost resistance. It makes it possible to effectively withstand more than 300 freezing and thawing cycles.
- During the construction of the foundation, the use of local materials is allowed. They are formed during the processing of rocks of mountain origin.
- Moisture resistance, thanks to which the material is not afraid of the negative effects of groundwater.
- Relatively low cost. This way you can save a lot of money.
At the same time, if you are going to build a high-quality foundation, then the components should not have any special defects. During the decorative finishing process, a strength test is also performed.
Rubble stone is distinguished by shape
When choosing a rubble for the base, you need to decide not only on the type of rock, but also on the shape.
Depends on the form:
- ease of laying, which affects the work time;
- appearance;
- consumption of cement mixture.
Rounded bottle
A stone that was mined in the surf zone, in places where glaciers exist today or during the Ice Age.
This stone has a rounded, rounded shape. This kind of rubble is not suitable for a foundation.
Bedbed
A butte, the two sides of which are close to parallel, is called bedded. It turns out something like uneven natural brick (if you look at it uncritically). Thickness not less than 70 mm.
Unlike rounded ones, bedded rubble is most convenient for masonry; it also allows for dry masonry (without mortar).
Species from which bedded rubble is produced:
- Sandstones
- Limestones
- Layered rocks
Industrial bottle
Natural stone is extracted using blasting. After sorting into fractions it goes into sale. Has a “ragged” shape
Not in good condition
The stone must be clean, not crumble and not crumble when hit with a hammer.
A ringing sound when struck with a hammer is good!
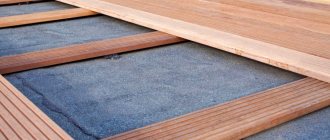
Arrangement of the “pillow”
In order for your foundation to “sleep securely” in the ground, it needs a pillow. To create such a cushion, a layer of crushed stone (at least 5 cm thick) must be poured onto the bottom of the dug trench. This will provide your foundation with a denser base, which will help reduce the number of cracks and deformations as the building shrinks.
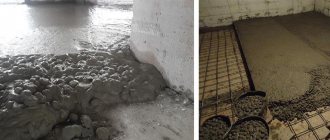
Thanks to the reinforcement, the foundation will not crack, but will lie as a single mass. Reinforcement also helps reduce settlement and deformation of walls. Therefore, it is necessary to make a reinforcement box for all foundation trenches and along their entire length.
The box should have the shape of volumetric rectangles, which are connected to each other at the corners of the future structure. When making a box, you can use welding, but you can also simply tie the reinforcement with wire using pliers.
Well, if the cushion is poured, the box of reinforcement is tied, the formwork is in place, then you can start pouring the foundation. The main rule here is solid casting, i.e. All of your foundation trenches must be filled at one time.
Of course, in this case it is necessary to use a concrete mixer or a ready-made solution, and also use the help of a team of friendly assistants. Concrete is poured into the trenches in buckets, you can do this in layers - alternately pour layers to the top of the formwork.
If the depth of the trench is more than 60 cm, then backfilling is allowed: after laying the first layer of concrete, large granite blocks, large pieces of broken old concrete or any other dense stones are placed in the trench.
When you start pouring the formwork, for better shrinkage of the concrete you need to tap the outer sides of the formwork with a trowel. The ideal option here is to use a deep vibrator, but tapping will do. Finally, so that the surface of the foundation is smooth, go over it with a trowel.
It is important to know!
There are cases when, in the presence of a box of reinforcement, trenches are filled with a break of seven to ten hours. This is allowed. However, the places where already poured and fresh concrete will be joined must be wetted.
Well, the foundation for your “fortress” is ready. Now we need to wait until the concrete “sets” completely, and in the meantime, bring building materials to the site.
If the work was carried out in dry, hot weather, then the poured structure must be periodically moistened with plenty of water at first. The ideal period for drying the foundation is 24 days.
Video. Slab foundation
Video. Strip foundation
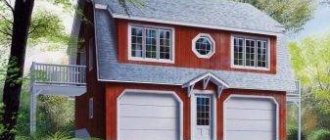
The foundation is the basis of the building and ensures the stability and durability of the entire building structure. Recently, foundation laying has been done mainly using concrete. However, the stone base is no less durable, and also has an original and aesthetic appearance. Another significant advantage is that laying the stone foundation of the building is completely doable with your own hands.
DIY rubble strip foundation
We suggest learning how to build a rubble foundation for a house with your own hands. You can both seriously save money by carrying out the work yourself, and control the work on the construction of a rubble foundation, understanding the process.
Calculation
To calculate, you need to collect:
- Weight of the superstructure (walls, windows, floor, ceiling, roof, utilities);
- Maximum payload (finishing, furniture, residents, water supply and heating);
- Snow load.
It is also necessary to determine the soil parameters on the site.
- Soil type;
- Freezing depth;
- The height of groundwater.
Let's say:
- weight per foundation 50,000 kg;
- building size in plan 4 x 3 m;
- without basement;
- located near Tver;
- soil – loam (soil resistance 1.5 kgf/cm2;
- groundwater below 3m;
- Freezing depth 1.4 m.
Calculation of the foundation body
Foundation support area:
50,000 / 1.5 *1.3 = 43,333 cm2 or 4.33 m2 (1.3 – safety factor)
The minimum width of a rubble strip foundation is 40 cm. If necessary, increase the foundation support area
The perimeter of the building is 14 m.
With a foundation thickness of 40 cm, the foundation support area will be:
14 * 0.4 = 5.6 m2
The depth of the foundation should be 20 cm greater than the freezing level.
Freezing depth of various soils by region, m
The height of the foundation base (height above ground level) is recommended to be 40 cm or 20 cm above the snow cover (whichever is greater). In our calculation we will take 40 cm.
Foundation volume:
5.6 * (1.4 + 0.2 + 0.4) = 11.2 m3
For 1 m3 of foundation you need 1 m3 of rubble and 0.35 - 0.5 m3 of cement-sand mortar for masonry.
Total:
11.2 m3 of rubble
3.9 – 5.6 m3 of solution
Calculation of material for a cushion on a rubble foundation
Please note that the width of the ditch under the foundation strip should be 60 cm greater on the side where the mason will move, and 30 cm on the opposite side (provided that the width of the foundation allows working on one side).
A sand cushion is, first of all, needed to level the bottom of the pit and to distribute the load on the ground evenly.
The thickness of the sand cushion is 20 cm (minimum).
To reduce labor costs, we will lay the foundation in a trench with the following width:
0.4 + 0.3 + 0.6 = 1.3 m
The volume of the sand cushion will be:
1.3 * 0.2 * 2 * (4 + 3) = 3.64 m3
Taking into account the reserve (including for leveling) 30%:
3.64 * 1.3 = 4.7 m3
Preparatory work
- Marking the foundation;
- Digging a pit;
- Leveling the bottom of the pit;
- Laying a sand cushion (preparation);
- Wash and sort natural stone:
First of all, you need to wash the stone from dirt and check whether it is good (the stone should not fall apart when hit by a hammer, it should not peel off).
If there are stones larger than 30 kg (or the weight that you have determined is comfortable for masonry), you need to break them.
Next you need to divide the stone into groups.
The first one will contain small stones. We will use them to fill the voids in the masonry between large stones.
The second group will include stones convenient for laying out corners and junctions. These stones are distinguished by their larger size and relatively regular shape.
The third group is all other stones.
Rubble masonry
Now it's time to move on to laying the stone. Please note that with the exception of the first layer, the stones are laid on mortar.
This is important: the stones should not touch. Leave a gap of 3–5 cm between the stones in the row.
The stone must be wet before laying.
a stone laid along the foundation is called a spoon, and across it is called a poke
There are three technologies for rubble masonry: “under the shovel”, “under the gulf”, “under the bracket”.
Under the shoulder blade
Rubble stone is uneven, and rows of it cannot be made even. But you need to try so that the next row, as it were, compensates for the unevenness of the previous one and all rows are relatively parallel.
It is not recommended to erect more than 30 - 40 cm of masonry in height at a time. After this, pause for 12 hours for this place and you can continue.
- The first to be laid is the bonded row on a cushion without mortar, the stones are compacted, the voids between the large stones are filled with small stones or crushed stone;
- A layer of concrete is laid (cement-sand mixture in a ratio of 1:3, cement grades M400 or M500), the concrete must completely cover the stones;
- The spoon layer is laid;
- Continue alternating the bond and tray layers on the concrete mortar until the design height of the foundation is reached;
- To level the horizontal surface of the foundation, use thicker concrete.
Observe ligation of stitches!
Under the bay
This type of masonry is made without selecting stones or bandaging voids.
- The rubble is laid in rows;
- Filled with mortar (cement-sand mixture 1:3 from cement M400, M 500) and compacted (it is recommended to use vibrating mortar compactors);
- Repeat until the target height is reached.
This method requires formwork. The size of the buta is not so important. A rubble foundation made using the “bay” technology has reduced strength.
Video description
This video shows in detail how the foundation of a rubble foundation is laid:
Having filled the trench around the entire perimeter with one layer of rubble, it is filled with a solution that will fill all the spaces between the stones.
Laying subsequent rows
The next rows are laid on concrete that has not yet hardened, bandaging the seams. Due to the irregular shape and different thickness of the stones, the masonry will be uneven, with protrusions, depressions, and voids. They must be eliminated, if possible, by working with a tamper and sledgehammer, pouring crushed stone into the voids. Each laid row is poured with concrete and work continues.
It is important! Do not forget to mark in advance the places of passage through the foundation of underground communications and leave holes for them.
For the underground part of the foundation, the most uneven and unattractive stones are used, leaving more even and attractive stones for the construction of the base. Having reached ground level, work is carried out with extreme care. Laying out the row begins from the corners, selecting stones of the correct shape and approximately the same height for them. The cords are pulled between them and the row is laid, focusing on them. Particular attention is paid to the outside of the base, using substandard rubble to fill the inside.
Average prices for raw materials and masonry work in the Russian Federation
The cost of granite depends on the type of rock and where it was mined .
The more complex and valuable the type of granite stone, the more expensive it will cost. Average prices for granite in Russia start from 2,000 rubles per 1 square meter, and the price ceiling reaches several tens of thousands of rubles.
With granite tiles, things are different: they are always available and can always be found on sale. Thermopolished tiles will cost 2,000 rubles for 1 piece - a 60x60x3 cm tile made of Gabbro stone. Material for facing from Siberian granite costs from 2,600 rubles per 1 meter, and tiles from Ladoga granite will cost 3,300 rubles per square.
In Moscow and the region, the cost of covering surfaces with granite slabs at low heights starts from 3,100 rubles per 1 sq.m. At the same time, companies offer additional processing of stone by polishing, grinding, honing or heat treatment. For such a procedure they are ready to charge from 400 rubles per square.
In St. Petersburg, for the installation procedure with grout they ask from 2000 rubles per square meter. Some companies offer a surveyor's visit for free, others charge from 1,000 rubles for this service.
Features of the material for cladding
This material has been used for a very long time for finishing work on external walls , so its use for the plinth becomes appropriate. This cladding is durable, since granite is considered a natural agglomerate with good properties and characteristics.
It is composed of feldspar, which gives it durability. Granite does not emit radiation, therefore it is safe for human health and the environment.
Properties of granite for plinth:
- environmental friendliness
- practicality;
- moisture resistance;
- fire resistance;
- withstand temperature changes;
- UV resistance.
The granite cladding of the foundation base is wear-resistant, therefore it retains its original appearance for many years, while at the same time withstanding heavy physical and chemical loads.
Granite tiles: differences from natural stone
Granite tiles are available in set sizes - it is more convenient to install them on the wall surface.
Tile material differs from natural granite in its weight - it is much lighter than natural unprocessed raw materials. Tiles are used for interior and exterior decoration of buildings. It gives the surface sophistication, reliability, durability and good decorative properties.
The tiles can have natural patterns or be plain. For wall cladding, tiles with dimensions of 60 cm in length and 30 to 60 cm in width are often used.
Construction order
Step #1. Preparing the pit for the foundation. When the building design is ready and all construction approvals have been received, you can begin preparing the construction site. We import rubble stone and other building materials in the required quantities. Prepare all the necessary tools. Mark the project and dig a pit. The depth of the pit should be below the soil freezing level.
Step #2. Installation of formwork. If the soil is dry and strong, you don’t have to install the formwork, but lay the rubble stone directly into the trench. In case of crumbling soil, conventional formwork is installed or sheet or roll materials are used.
Note!
Ventilation and communication openings are provided before laying rubble stone. It is very difficult to drill a finished stone foundation.
Step #3. Rubble stone laying. The bottom of the trench should be covered with a 25 cm layer of sand, compacted and the first layer of stone should be laid. To do this, select the largest stones and forcefully lay them on the sand so that they lie firmly and do not move. If the depth of the foundation is 50 cm, then its width should be from 65 cm to 70 cm.
Note!
Before laying the stone in the foundation, it must be soaked. Having absorbed water, the rubble stone will be cleared of small crumbling particles and will adhere better to the cement. First wet it and then let it dry a little.
The stone is carefully selected according to its shape, laying out the first row and the corners of subsequent ones. If there is no rubble stone of the required shape, you need to trim a piece closer in shape with a chisel and sledgehammer. The empty spaces between large blocks are filled with small fractions formed after hewing. The laid row is filled with liquid cement mortar, and then sand-cement mortar is laid. They begin laying the next row, observing the dressing.
Note!
When using concrete blocks or bricks for the walls of a building, the upper part of the foundation must be reinforced. To do this, a reinforcing mesh is placed in the stone foundation and filled with mortar.
Step #4. Removing formwork. When the stone foundation gained strength, it was time to dismantle the formwork. There is empty space between the trench wall and the stone foundation. It needs to be covered with small pieces of stone. You will get an excellent drainage layer.
The remains of the stone can be used to create a beautiful alpine slide on a personal plot and paving garden paths.
Types of raw materials
There are several types of granite that are used for external cladding of buildings:
Gray granites - a classic option . They sometimes contain impurities of black granite, so this pattern is often used on plinths, this is:
- Mansurovsky,
- Pokostovsky granite,
- as well as varieties Flower of the Urals,
- Sesame Black.
During heat treatment, the material's strength properties increase, which makes it possible to use it for cladding.
Colored granites play with shade at different viewing angles, these are:
- red,
- yellow,
- brown varieties of Leznikovsky varieties,
- Kapustinsky,
- Sunset Gold.
They are often used to create monuments; they are no less popular for cladding facades and plinths.
Black granites are the most common . Dymovsky, Gabbro - all of them are suitable for decorating residential and administrative buildings. They are beautifully combined with brown and beige granites.
Beautiful, reliable, respectable: how to finish the basement of a granite house yourself?
To finish the basement of the house, choose materials that are not exposed to external aggressive factors over time and will be able to maintain the attractive appearance of the house for years.
One of these options is lining the base with granite or granite tiles. This is a decorative protective material that helps prevent the destruction of the base from weather factors.
The result is a beautiful, solid and reliable base belt with a respectable appearance.
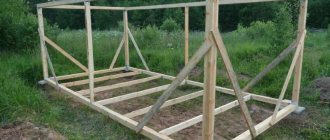
Pouring concrete
For installation of the cabinet, a sand-cement mortar of high rigidity is made. Humidity should be low. Sand should not be allowed to spill. A weak solution is not suitable for such work.
Cement laitance is applied completely over the entire area of the reinforcement. Concrete is poured into the trench so that the beam is supported and located in the concrete. The structure is sprinkled with dry soil on top. The distance between the gaps is two mm or less.
After pouring, the joints are grouted. Cement is mixed with water until it reaches the consistency of sour cream. First, the long part of the flower bed is carefully removed and a concrete solution is laid. The middle remains empty to drain water during rain.