The most correct version of the porch is when its foundation is cast along with the house. In this case, there are practically no problems. Sometimes when planning a building it is forgotten. Then a porch is added to the house. An extension is made mainly from three materials: wood, metal and concrete. If the house is brick, they can build it out of brick. Another option is to make it from building blocks and then finish it. In any case, when planning to make a porch with your own hands, you must immediately decide what kind of foundation to make and whether or not to connect it with the base of the building.
How to calculate parameters
First you need to decide which way the steps will go. They can be on one, two or three sides. You determine this based on personal preferences and the finances that you can/want to allocate for construction. The height of the porch depends on the height of the plinth and should be 50-70 mm below the edge of the door leaf. This small step prevents precipitation from getting inside the house. Perhaps more importantly, it prevents the doors from becoming blocked if the porch rises up due to frost heaving (if the doors open outward).
Determining the dimensions of the upper platform
The layout of the porch begins with determining the size of the upper platform. If the doors open outward, you should be able to stand on the landing to open the doors. That is, its depth should be 30-40 cm greater than the width of the door leaf. According to GOST recommendations, the dimensions of the platform should be 1.5 times the width of the doorway. More is possible - less - undesirable - inconvenient.
Porch with a small terrace
If your doors are 80 cm wide, then the depth of the upper platform at the very minimum is 120 cm. Its width is determined based on the tastes and proportions of the house, but it should definitely be greater than the width of the doorway.
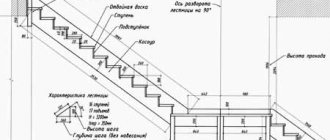
We count the number and sizes of steps
You know the height of the porch: 50-60 mm below the door leaf. The recommended height of the step (riser) is 15-20 cm. Divide the height of the porch by the height of the steps, you get the approximate number of steps. The number rarely turns out to be a whole number. The remaining centimeters can be divided between all steps or one of them can be made higher. Another option is to create a small step at the bottom, although this may be awkward.
Optimal step sizes
The optimal width of the step (tread) is 25-30 cm. Knowing the number of steps, the depth of the upper platform, the depth of the steps, you can calculate the full dimensions of the porch. Using them you can already develop the foundation for the porch.
When choosing the parameters of the steps, you must adhere to the recommendations of SNiP: the sum of the tread and double riser should be in the range of 600-640 mm. For example, you calculated that the height of the step (riser) is 17 cm, the tread (depth) is 280 mm. After performing the calculations we get: 170 mm * 2+280 mm = 620 mm. We fit into the recommended parameters, which means there is no need to change anything.
Types of steps
The most common are steps in the shape of a rectangle. But often, especially in individual construction, products in a screw shape or trapezoidal shape began to be found.
They also happen:
- triangular or wedge-shaped (like a beveled vertical plane);
- slab (without steps at all or with unlined types);
- block (with one cladding overhanging the other);
- corner (can be standing or hanging).
From the descriptions it becomes clear that making rectangular steps from wood or concrete will be the simplest.
What kind of foundation is needed?
If the porch is planned to be light - wooden or metal - the foundation is most often made of piles or columns. Specifically chosen based on geological conditions. On well-draining soils with a low groundwater level, a columnar foundation is sufficient; if there is a tendency to heave, a pile foundation, possibly a TISE, is needed.
For a heavy porch - made of brick or monolithic concrete - a strip foundation or monolithic slab is made. The type of foundation is most often similar to the one on which the house is built.
Types of foundations for a porch
Next, you need to decide whether you will connect the porch foundation to the house foundation or not. Decisions are made based on the planned mass of the extension and the type of soil. Both options have disadvantages. If there is no connection, cracks often form at the junction of the porch and the house; due to frost heaving, the porch may become warped. Owners of dacha plots often face this problem - usually the porch to the dachas is made of wood and is disconnected. After the ground thaws, it may “sit” in place on its own, or it may require some additional measures.
When installing connections, it is also possible for cracks to form, but not only at the joint, but also in the “body” of the extension. This happens if the reinforced connections installed cannot compensate for the uneven load created by the house and the extension. Therefore, a connected foundation for a porch is made if it is attached to a heavy house and is itself heavy and massive, made of reinforced concrete. The second difficulty with this decision is to make the connection high-quality. To do this, use ribbed reinforcement with a diameter of 12-16 mm, for which holes are drilled in the foundation with a given diameter. Reinforcement is hammered into them and a frame for the porch is knitted on its basis.
Summarizing
In order to obtain a high-quality result when constructing a porch and entrance staircase, knowledge and practical experience are required. The entrance area can be either simple - made of boards or welded from corners and channels, or more complex - stone - with a monolithic staircase and forged elements. But it all starts with calculation and comparison of different options.
You can get ideas for construction, ask a question or find the optimal design on our portal. FORUMHOUSE has collected dozens of options for arranging the entrance area. Read how to attach a porch to a summer frame veranda and repair an old porch. We also recommend articles about the basics of building a porch and the features of building stairs. The video shows the addition of a wooden two-story porch and balcony to a log house.
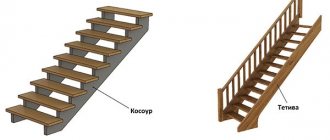
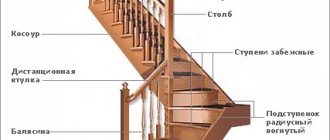
Staircase designs
There are two main designs of stairs: on bowstrings and on stringers. They can be made of wood or metal. There are also combined options - metal + wooden steps or metal + concrete steps.
Staircase designs - on bowstrings and on stringers
On the bowstrings
Stairs on bowstrings are the simplest. For a porch - a good option, especially if the house is wooden or a small country house. Support bars are attached to the inside of the bowstring. If you are working with metal, the bars are welded horizontally (with a minimum slope of 1-2° to allow water to drain from the steps). In the case of wood, support bars can either be nailed to which the step will then be attached, or recesses can be cut into the bowstring (no more than 1/2 the thickness of the board), into which the step boards are inserted.
On the stringers
A staircase on stringers can also be of a simple design - with open supports. In this case, triangles are cut at the required angle in the upper part of the board. Their lower part serves as a support for the steps.
Staircase on an open stringer
When cutting the stringer, set aside the height of the step and the width of the tread. They are connected at right angles. Using the applied markings, a template is made, with which all steps are marked.
The principle of cutting stringers
The number of stringers in a staircase depends on its width and the thickness of the boards used for the steps. The thinner the board for the steps, the more often you need to install stringers. If you use 25 mm boards, then there should be a distance of no more than 50-60 cm between the two supports. If you need a larger staircase width and don’t want to install three stringers, use thicker boards. It is important that they do not bend under your feet.
The procedure for assembling stairs on stringers
If you decide to weld a ladder on stringers from metal, you will need to be patient: you will have to weld many small sections, but the formation principle is the same.
Metal staircase on stringers
Methods of fastening parts
The lower edge of the porch stairs can sometimes rest directly on the ground. This option is simple, but unreliable. Firstly, the soil may settle and the stairs will begin to collapse. Secondly, upon contact with the ground, both wood and metal are destroyed faster. There are special impregnations for wood (Senezh and Senezh Ultra, for example), and metal is well prepared with a primer and painted in several layers. However, it is better to make a base - pour a shallow tape on which the bowstrings or stringers will rest.
How to Support a Porch Staircase
There are two ways to attach a porch ladder to a reinforced concrete base - to a beam - a beam with a cross-section of at least 75 * 75 mm or to an embedded beam of a smaller cross-section (pictured on the left).
Difficulties may also arise with the installation of porch posts. There are several ways. There is one very simple and effective one that works great even on heaving soils (clays and loams). Holes 50-60 cm deep are dug under the pillars. A bucket and a half of sand is poured into them at the bottom and compacted well. Half a bucket of crushed stone is poured on top of the sand and compacted too. They put up a pole, level it, put spacers that will hold it in a given position. The space between the wall of the hole and the pillar is gradually filled with crushed stone, tamping it thoroughly. The hole is filled flush with the ground, the top can be concreted (so that precipitation does not drain), but not spilled to the very bottom. Pillars installed in this way do not lead even with severe heaving. A significant part of the water goes into the sand, and the remaining forces of frost heaving are absorbed by the rubble, neutralizing them.
Methods for attaching pillars to a concrete base
If piles, a strip foundation or a monolithic slab are poured under the pillars of the porch, or a columnar base is laid, then studs or special glasses are walled into the concrete to secure the wooden posts. After the concrete has matured, the rack bars are attached to them with wood grouse or bolts.
If the racks are metal, a corner with a wall thickness of at least 3-4 mm is placed in the concrete so that it can be easily welded to it later.
When building a wooden porch with your own hands, questions may arise about attaching the railings and balusters. They can be assembled using ordinary nails, but if desired, you can use bolts or wood grouse. In this case, holes are pre-drilled, then fasteners are installed in them and tightened using an angle wrench. Such a connection is certainly more reliable than simply using nails.
How to attach railings or balusters
If the porch is attached to a freshly cut wooden house, in which the shrinkage has not yet been completed, and the design of the porch provides for a canopy, the posts must be attached to special adjustable plates.
Installation of porch posts with the ability to compensate for the shrinkage of a wooden house
All racks supporting the canopy over the porch of a wooden house are placed on special adjustable elevators
Please note that both the metal and wood that you will use to build the porch require careful processing. The porch is exposed to all climatic influences and the materials require good protection.
Monolithic concrete stairs
The most durable stairs are made of monolithic concrete. They take longer to manufacture than metal or wood ones, but their service life is calculated in decades. The types of concrete stairs are described in detail in the video. The basics of calculation are also given.
How to make a concrete staircase on stringers with your own hands, see the following video.
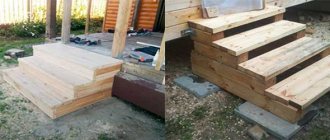
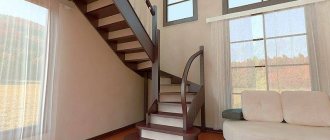
Wooden porch
A wooden porch is one of the most common options in our country. Wood is plastic, easy to process, costs relatively little (in our country), and forgives many mistakes. That is why it is a favorite building material.
It also has disadvantages: it requires good protection before construction begins (antibacterial impregnations and fire retardants), as well as regular maintenance - updating the protective paint coating. Then it looks attractive for a long time, otherwise it quickly loses its decorative effect.
One of the options for building a wooden porch with a ladder on bowstrings can be seen in the video. Please note that the porch is being built on sandy soil, so the method used to install the pillars is not suitable for everyone. Everything else is clear.
Brick porch
Since brick is a dense and heavy material, a brick porch requires a serious foundation. Usually this is a monolithic slab, with double reinforcement and it is better if it is larger in size than the planned porch.
When calculating the parameters of the steps, it is necessary to take into account the dimensions of the brick and the thickness of the seam between them. Then the laying work will be easier - no need to cut the brick. If you are not going to cover the porch, use high-quality material for the outer rows. The inner rows - backfilling - can be made from scrap or building blocks and their remains.
Brick porch with wooden steps
If the house is on a high base, making a monolithic brick porch is too expensive. Then the columns or walls are folded, leaving empty space inside. It can then be used for household purposes or covered with decorative panels. If an upper platform is needed, these columns/walls are covered from above with a concrete slab - homemade or ready-made - this is your choice. Then a staircase is attached to the resulting base. It doesn't have to be brick. It can be metal, concrete or a combination.
Glazing methods
Making the porch closed is an ideal option, although it will take a lot of money and time. A foundation made of stone or concrete is suitable as a base, and always on piles to reduce the overall load on the base.
It is better to use metal corners as a material for the frame. As a rule, the frame is attached to the piles using electric welding. After this, the structure is filled with wooden frames with double glass.
Important point! The width of glass sheets should not be more than 1 meter 20 centimeters. Since the windage of the structure is quite high, the glass may not withstand the force of the wind if the width of the clean window opening without a frame is greater.
If the distance between the piles is more than 1 meter, then this space should be filled with pseudo-piles. Pseudo-piles are formed using metal corners, which are welded both below and above the piles. The result is a fairly reliable design that looks light and beautiful.
Photo report: wooden porch on a metal frame
A theory is just a theory, and in construction too. You always understand the essence of the matter better if you observe the process yourself, because you can see how others do it and learn something for yourself.
At the request of the parents, an exact copy of the old porch was made. The only difference is that the new one has a welded metal frame.
This is an old porch
In place of the demolished porch, a pit with a depth of 25 cm was dug. Sand was poured and compacted into layers at the bottom, crushed stone was placed on it - 10 cm each. A metal mesh with a mesh of 10 cm was laid on top and the whole thing was filled with concrete.
Porch slab
A metal frame was welded according to the previous dimensions of the porch (from a 70*5 mm corner). The sidewalls are set vertically and secured with studs. Next, the base for the benches is welded to them. All metal is treated with a rust converter, primed and painted twice.
We weld, prime and paint the base for the benches
The wood used for construction was dry. Planed boards were cut to size (the width of the porch) and treated with impregnation for direct contact with the ground.
Wood dries after impregnation
We lay the dried boards on the frame. You have to drill a hole for each fastener - you can’t just take a corner.
The boarding of the porch has begun
At this stage, two mistakes were made at once. The first is that the sheathing did not start from the sides. They immediately began laying the steps. As a result, water constantly flows into the joints of the side paneling and steps and warps the wood. It is necessary to start the cladding from the sides, and make the steps a little longer so that they protrude beyond the side cladding by at least a couple of centimeters. The second mistake is that the boards on the porch are laid close to each other. With high humidity they swell and the surface becomes uneven. When laying porch sheathing, make gaps of at least 5-8 mm.
Sheathing process
After all the boards are secured, they are sanded. First, with a belt sander with a coarse grain, then with a disk sander with a fine grain. The process is long. At the same time, the task of removing the green color of the impregnation is being solved. It is not covered even by three layers of tint.
Sanding the surface of the boards for an acceptable smoothness
After sanding, we begin painting. We apply it three times. Each layer after the previous one has completely dried. The resulting color is dark mahogany.
Wooden parts are coated with a protective compound
That's already three layers of paint
While the paint dries completely, we begin making the benches. We cut boards for them, grind down an oblique chamfer (for beauty), and cover them with impregnation.
Boards for benches
We make the backs with a small decor - roundings at the edges.
We mark beauty according to the template
We saw along the marked lines with a jigsaw, then sanded to a smooth edge.
This is how the bench on the porch turned out
The sides are covered with plywood, which was painted the same color. The porch is ready.
Do-it-yourself finished wooden porch - side view
Is heating necessary?
This question regarding the design of a covered porch can be left to the discretion of the owner. Some argue that heating for such a room is necessary due to the fact that it is not a direct part of the house and in winter condensation can form inside due to temperature changes and become frost or ice. There is also an opinion that with strong cooling, the covered porch ceases to be a buffer, because the temperature in it drops to the street temperature. But if you bring the radiator from the main heating circuit into the covered porch, a difficult situation may arise. If the heating stops functioning for some reason, the external radiator can cause the entire system to fail. Media consumption will also increase significantly.
You can solve the issue regarding heating with good insulation and then you won’t have to worry about there being a big difference in temperature. It is easy to install a small autonomous electric convector in a covered porch, which will turn on according to a given mode. Set its operating temperature at 14 degrees and leave it as is. There is also the option of installing film or cable heated floors. It should be understood that the first one cannot be laid under the tiles, so on the covered porch you will have to use another flooring or cable heated floor. The advantage of this solution is the quick drying of outdoor shoes, which previously had to be done near heating devices.
Advice! Another interesting solution for a covered porch would be to use a thermal curtain. It is mounted above the entrance and cuts off the flow of cold air. It is worth understanding that such a curtain is energy-consuming, so it is rarely used in private homes.
DIY brick and concrete porch: photo
The walls of the staircase landing were pre-built from brick, on top of which a monolithic concrete slab was poured. Along the edge, a frame of corners is embedded into it so that the stairs and railings can be welded.
Porch plan: how everything should look
Finished brick base with concrete slab
From a corner 70*70*5 mm we cut blanks of the required length. After which we treat them with a rust converter. We start cooking after the reaction has stopped and the metal has dried.
Cut the metal to the required length
Treated with rust converter
We welded the first metal string.
First string welded
The finished sidewall was attached to the concrete base with two pins.
Attaching to a concrete support support
We cook the second string in the same way and secure it. When working, make sure that the two bowstrings are in the same plane.
Two bowstrings and a level, the feast of which controlled the plane
We begin to weld the support bars. Here it is important to constantly monitor the horizontality so that the steps are not oblique.
The first frame for the top step is ready
We weld all the supporting pieces onto the bowstrings
We weld transverse pieces of the corner to the support bars to form a shelf.
The cross members are almost welded
The corners are welded so that they form a frame. We put a piece of slate sheet in it. We lay out a reinforcing metal mesh on the slate. We weld the edges of the mesh to the frame.
Steps ready for pouring concrete
We pour concrete into the prepared steps. We make it high-quality so that the steps do not wear out longer.
The steps are filled with concrete
While the concrete gains strength, we begin to work on the posts that will support the canopy over the porch. For them we take a profiled pipe 70*40*3 mm. We cut four columns from it. Two are slightly longer - they will be near the wall of the house, two are 15 cm shorter - they stand on the outer edge of the porch, creating the necessary slope - so that the water and snow melt off normally. For railings and crossbars we use profiled pipe 40*40 mm.
Canopy and Porch Railing Parts
All metal is also treated with a rust converter.
First we set up the racks, grab them, install temporary stops
To avoid lateral stresses, it is important to position the racks strictly vertically. We set them up, grab them, use short seams in several places, and check again whether they are positioned correctly. We weld the temporary stops and only after the next check we weld them according to all the rules.
Clamps make work easier
Once all the posts are aligned and welded, you can assemble the railings. At the required height they are fixed strictly horizontally.
Railings are welded horizontally
This is what it looks like from the outside
Then we proceed to install the roof. We also cook it from a 40*40 mm profile pipe. First, strapping around the perimeter - at the level of the shorter posts, then - the rest of the structure. It's not complicated, but it takes a lot of time - a lot of intersections.
Rafter system for canopy over porch
Then it was time to do the railings and decorations. And again, there are no difficulties, it can be done easily if desired.
We improve the railings
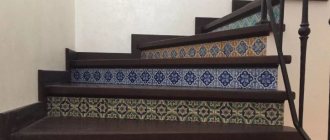
That's it, the porch is ready for finishing work. Rough tiles for outdoor use were purchased for the steps and landing. The sidewall of the monolithic slab was also trimmed with it.
The tiles for the steps were red-brown to match the color of the brick
The metal was painted with paint that matched the tone, and the corrugated sheeting left over from the installation of the roof was used on the roof. The DIY porch turned out pretty good.
Ready
What is important to consider before starting construction
When making steps onto the porch, the following nuances are taken into account:
- For a house made of wood or a log house, wooden steps are ideal. Using brick or metal ones will be ridiculous. The stone product must rest on a foundation, which is best poured together with the main foundation of the building. Failure to comply with this condition will lead to possible distortions, subsidence, cracking, etc.;
- Metal is not considered an ideal material for arranging a porch, because... In winter there will be a problem of icing. In addition, if the roof does not prevent precipitation from entering, then constant problems with rust and corrosion arise. This means that regular cleaning and touch-up will be required;
- Wood is also considered unreliable, because... it is prone to absorbing moisture and swelling. To prevent premature decay, it is recommended to make supporting piles from brick. The use of wood when constructing street steps for a porch requires appropriate treatment with agents against rot, combustion, animals and pests.
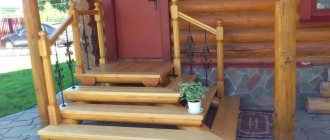
An example of a wooden porch for a country house Source obustroeno.com
It is necessary to use only dried boards in order to prevent the release of resins during operation, leading to the destruction of the external paintwork;
- The dimensions of the porch are usually calculated with a margin so that it is comfortable to use the door that opens outward. The best option is when additional storage space for shoes, bags and other small items is provided;
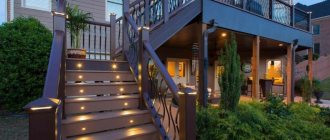
- the presence of four or more steps on the porch, as well as the lack of protection from precipitation (roof, canopy), requires the mandatory installation of railings of the appropriate height. This will be convenient for the elderly and children, and in winter it will protect even adults from injury due to falls;
- If, as a result of a design decision, the use of tiles is considered ideal, then it is better to opt for a material that has a corrugated surface. The benefit of this will become noticeable the first time the porch ices up;
- the height of the steps on the porch must be identical, with the exception of the outer steps. This is provided for by the relevant GOSTs, which make the process of moving along the stairs safe.
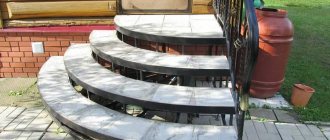
Option for concrete steps with tiled cladding Source olestnicah.ru
Photo ideas for porch design
One of the options for a concrete porch with wooden railings
View from the other side
Light porch to a country house on metal pillars
Porch to a wooden bathhouse or cottage - a staircase made of logs
Porch covered with WPC - wood-polymer composite
Metal porch with polycarbonate canopy
Round brick porch
Porch made of logs to a log house
Porch-terrace with polycarbonate canopy
Peculiarities
In principle, a porch is considered an extension to a building that occupies a minimum of territory. Today on the global network you can see many photos of the porch in various interpretations. The design of the porch includes several components:
- canopy – protects from precipitation;
- railings - play the role of support for a person;
- ladder;
- free area.
Every detail is very important for the porch. The complete design always looks impressive and attractive. The porch in a suburban house connects the landscape design with the facade of the building.
Video description
An example of making a chopped wooden porch for a bathhouse from a log house is described in detail in this video:
A layer of roofing felt is laid over the foundation, and then it sits on the Mauerlat anchor, onto which, together with the support pillar, the stringers are attached using construction staples. Only then are the steps and risers attached with self-tapping screws. The installation movement is carried out from the lower elements to the upper ones progressively.
The presence of more than four steps will lead to the need to arrange a railing with a height of about 90 cm. During installation, it is recommended, in addition to screws or dowels, to take care of additional gluing of the joints.
The final touch will be the elimination of minor defects, fine sanding and processing of the finished product using stain, enamel or varnish.
Arrangement of concrete steps
The work should begin with a sketch of the future design and calculation of the need for materials to implement the idea. One cubic meter of concrete solution, as a rule, consists of 330-340 kg of cement, 0.4-0.5 cubic meters of sand, about 0.9 cubic meters of crushed stone and up to 180 liters of water. A preliminary calculation is made from these parameters.
One of the simplest ways to fill formwork with concrete Source 1beton.info
The work of installing concrete steps also begins with creating a foundation. Concrete is much heavier than wood, so the base must be appropriate. A hole is dug with the required width to a depth of 60 cm. Sand is poured into it, and on top there is a layer of crushed stone or broken brick. Compacting is done so that there is a free space of 30 cm in depth. Next will be the construction of the formwork.
Arrangement of formwork
Its task is to hold concrete in a certain shape and protect it from spreading when hardening. There are special kits for sale for these purposes, but usually in everyday life they use boards or plywood, from which blanks of the required size are cut to fit the size of the porch.
In addition, to separate the steps from each other, stiffening ribs are created, placed on the sides. The formwork is placed around the perimeter and supported by special pegs driven into the ground.