At first glance, laying mosaic cladding is a painstaking and complex job. Now small elements of tiled decor are attached to a special mesh or paper. Therefore, piece-by-piece installation is a thing of the past. But the main criterion for reliable fastening is still mosaic glue. If you study all the subtleties and nuances of the work, you can do it yourself no worse than experienced masters.
Features of the material
The block structure of the mosaic, when small segments are assembled into square plates, measuring 15x15, 20x20, allows you to select a ready-made pattern. The basis for mosaic tiles can be a mesh, reinforcing substrate or flexible, durable paper.
This distribution of tile pieces allows you to place the parts at equal distances and reduce installation time. Selected in one color scheme or with a specific pattern, tiled cladding does not require joining skills.
The fastening of the mesh for the mosaic is located on the back side, and the paper on the front side. Therefore, when installing the parchment base, it is placed on the solution with the paper facing up. Then it is moistened and the adhesive layer is removed.
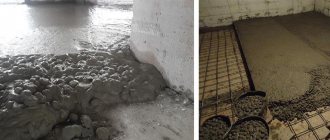
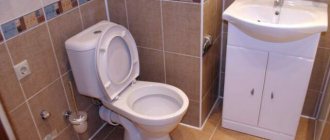
Basically, mosaic tiles are used to cover bathrooms, showers, and splashbacks in kitchen areas. Now tiles have appeared, details that are not square, but of arbitrary shape. This finish imitates a pebble surface, with many irregularly shaped elements.
In addition to straight surfaces, mosaics on a grid can be glued to walls with curves, protrusions and semicircular areas.
Required Tools
To work with mosaics prepare:
building level;
- spatula (toothed with a comb profile height of 3 mm, as well as rubber);
- roulette;
- pencil;
- plumb line;
- rule;
- grater (preference is given to a polyurethane product);
- rubber mallet;
- container for preparing the solution;
- knife;
- construction mixer.
In areas of complex configuration, you need to divide the mosaic tiles into parts. A standard tool, a tile cutter, is not suitable for this. You need to use an angle grinder, and with a diamond blade. There is a risk of injury when handling the material.
Types of glue
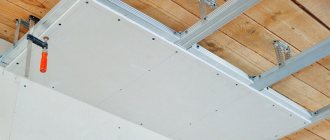
The choice of tile adhesive for mosaics is influenced by the type of base on which the decorative covering should be attached. If the prepared walls are made of plasterboard or plastered, then the mosaic can be laid using ordinary cement glue. Substrates made of wood, plastic or with old finishes require the application of compounds with improved properties.
- For a small amount of work, ready-made quick-drying options are suitable.
- To provide water resistance when installing elements made of artificial and natural stone, glue based on epoxy resins is suitable.
- Walls in new houses subject to shrinkage or vibration loads require the use of highly elastic mortars.
Liquid nails are unevenly distributed over the surface, so after 3-4 weeks, the chips begin to move away from the surface.
Cement
Cement adhesives are available in the form of a dry powder for self-dilution immediately before repairs. Packages contain 20–30 kg. and are cheaper than other adhesive material options. After dilution, the solution has a white or gray tint.
Water is added to the dry mass; the manufacturer indicates the proportions on the packaging.
To make the glue lighter, use only clean, rust-free water for mixing.
Cement types are used for laying mosaics on brick and concrete. For plasterboard substrates, the adhesive will be too heavy and may wet the gypsum boards too much. Also, the glue does not have sufficient adhesion to glass, ceramics, wood and plastic.
Dispersion composition
A ready-made adhesive substance that is produced in buckets. The composition includes: water, acrylic and mineral additives, stabilizers. The solution has a white color and a paste-like structure. Does not require additional dilution, mosaic adjustment time is 20–25 minutes.
If the package is not completely used, the substance can be stored for 3–5 months. under a tightly closed lid. Using dispersion glue, clinker tiles, ceramics, stone and majolica segments are attached.
Two-component
The glue is produced on the basis of epoxy or polyurethane, it is more expensive than other types. For the polymerization reaction, a hardener is added to the solution. At the same time, the resulting mass has high adhesion and water resistance. The two-component material is used on complex surfaces with a smooth structure: plastic, glass, wood. The adhesive component can withstand high humidity and high temperatures in saunas, baths, and swimming pools.
Sanding and grouting
Before grouting, excess glue must be removed. There are special brushes with metal bristles for this. Then prepare the grout according to the instructions.
It is important to correctly correlate the amount of water with the dry mixture. The grout should not be too thick or thin.
Apply the grout with a rubber spatula, distributing the mixture evenly along the seams.
The grout is difficult to clean off the mosaic, so carefully remove the excess with a spatula. It dries quickly, so if you are not confident in your abilities and cannot grout quickly, it is better to dilute it little by little. All minor mistakes when laying mosaics will be corrected by grouting. Having rubbed the seams, wait 15-30 minutes.
Then use a sponge soaked in clean water to remove all excess.
We used white grout, and in our case it almost merged with the mosaic, and it turned out not very impressive.
It would be better to use grout in contrasting colors to grout the seams of a mosaic kitchen apron.
TOP manufacturers
- Axton mosaic adhesive. It is used for interior decoration with mosaics in bathrooms, showers, and kitchens. Axton glue is available in the form of a dry mixture for mixing. Has high adhesion to concrete, brick and plaster.
The diluted mixture is viable for 2 hours. Economical consumption, allows you to apply glue in a layer of up to 5 mm. Axton provides reliable fastening without loosening or falling out of mosaic chips.
Consumption
The approximate consumption of the clutch component is indicated in the instructions provided by the manufacturer. But in practice, the thickness and size of the tile itself affects the mass consumption. To more accurately calculate the consumption, you need to divide the tile thickness by 2, and multiply the resulting figure by the average glue consumption specified by the manufacturer.
In this case, we will get the amount of glue that is needed for 1 m². Next, we multiply the value for 1 m² by the area that needs to be covered. This is how we find out the volume of the substance to work with.
Technology for gluing mosaics in the bathroom
During installation, trimming of parts is required. If the borders are smooth, the mesh or paper is cut along the edge of the fixed chips with a mounting blade or scissors. When shaped trimming is required (in the area of sockets or pipes), you have to cut the ceramic elements themselves. Tile nippers or grinders are suitable for this. For convenience, some chips can be detached from the grid and cut individually, and then installed directly on the wall.
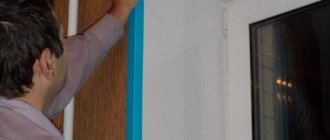
Before gluing the mosaic, the walls need to be prepared. The mosaic finish follows all the curves and unevenness of the surface, so the plane must be smooth, without drops, grooves or bumps.
In addition to external leveling, you need to check the base for internal voids. If they are found, the gaps are filled with cement mortar. After leveling, the plane is ground and treated with a primer. For better adhesion, the primer is applied 2 times and allowed to dry completely for at least a day.
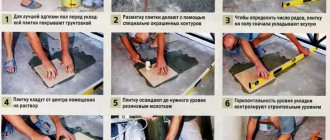
After drying, marking and preliminary layout are carried out to determine which parts need to be trimmed.
We recommend videos on the topic:
Why glue tiles on tiles
This method of installing tiles is not a popular solution, and opinions differ regarding this method. There are several reasons why installing new tiles over old ones is preferable:
- Removing old tiles is hard work. Sometimes the coating is attached to the base so firmly that it cannot be removed without special tools. Sometimes you have to call special services, which costs a pretty penny. In addition, a large amount of construction debris and dust is generated, which means a waste of effort on cleaning the premises. All nearby rooms will have to be emptied of furniture, since the dust will be significant and polyethylene coverings will not help.
- Proceeding from the opposite, installing tiles on tiles will be much easier and will save a lot of time.
- When demolishing the old coating, fragments of the cement-sand screed may break off. You will have to refill it and wait for the solution to harden.
- This method significantly reduces the consumption of materials: there is no need to level the surface. Preparation time is also reduced.
Is it worth installing tiles based on these reasons? Do not hurry. Other factors need to be taken into account.
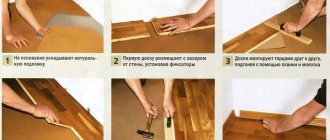
Step-by-step instruction
In order for the mosaic to serve for a long time, installation is carried out sequentially in the following order:
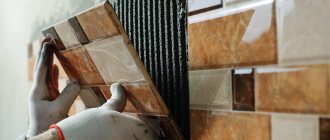
- The glue is first applied to the surface in an even layer of 3–5 mm. Then the mass is leveled with a notched trowel to create grooves. The larger the elements, the greater the height of the teeth.
- The mixture can be applied not only to the base, but also to the mosaic itself. In this case, the glue thickness is 2–3 mm.
If you do not have experience in installing it yourself, spread the glue over an area of 3-4 plates, no more. To take your time and prevent the top layer from drying out.
- After applying the glue, the mosaic is applied to the surface and tapped with a rubber hammer to release excess air.
- To ensure that the tile lies flat, the top is rolled with a plastic roller.
- After half an hour, excess glue is removed from the surface of the mosaic with a brush with stiff bristles or a match.
- Paper sheets are pre-moistened with water and peeled off from the front side.
- After the glue has completely dried, the joint space is grouted using special materials. The grout is distributed evenly between the chips with a rubber spatula.
- The color of the grout is chosen depending on the shade of the decorative coating.
- Excess grout is removed with a wet sponge and wiped with a lint-free soft cloth.
Interesting video on the topic:
How to make a mosaic kitchen apron with your own hands
In this article we will look at how to decorate a kitchen with a mosaic apron with your own hands. While this may seem complicated and time-consuming, the process is actually quite simple and quick.
The installation process consists of several stages: preparing the walls, marking, preparing and applying glue, laying the mosaic, cleaning, sanding and grouting.
To work you will need:
- mosaic;
- tile adhesive;
- large and medium spatulas;
- notched spatula;
- mallet;
- grout;
- rubber spatula;
- sponge.
For ease of grouting, we purchased a set of plastic or rubber spatulas. Instead of a mallet, a wooden block was used.
Important Tips
- To maintain the same distance between parts, cross-shaped dividers are installed in the spaces between the plates. The crosses are then removed before the glue is completely dry.
- You can install the mosaic not only from bottom to top, but also in any direction, since it is light in weight.
- It is recommended to glue decorative panels at temperatures from +10 to +30˚С.
- To prevent mold from forming in the gaps, the surface is treated with a fungicidal coating.
- When cleaning the surface from glue and grout, avoid hard abrasive materials. You may scratch the parts and they will lose their shine.