Today, there are a wide variety of plumbing products on the market. One of the most familiar and firmly established devices in our everyday life is the shower stall. However, the apparent simplicity of the product, improper care or installation can lead to consequences such as leaks, the appearance of fungus, and malfunctions. Sometimes you even need to replace the shower stall.
Leaking showers are one of the most common problems. If you do not see it right away, the condensation will collect in a certain place and contribute to the formation of various types of mold fungi, which can harm not only the product, but also your health.
Benefits of a shower enclosure
Such a device as a shower corner has the following advantages:
- Compactness. Due to the fact that the shower enclosure is installed in a vertical position, it does not take up much space. Thus, the bathroom can easily accommodate elements such as a washing machine, sink, laundry basket, toilet and other elements without which you cannot imagine a bathroom.
- Affordable price. The price depends on the manufacturer, dimensions, electronic functions that may be inherent in the shower enclosure, as well as the quality of the material.
- Easy installation. The shower installation is completed in just a few hours. It all depends on the skills of the master and the availability of tools. Apartment owners who have decided to install a shower, but have never done anything like this, do not have to worry, since almost anyone can handle this task.
Design
The vertical design will help save a lot of space. If the bathroom has a small area, then specially selected models of cubicles, as well as accessories and decoration, will help visually expand the bathroom.
Shower cabins are:
- Open. These are models without a dome (roof) on top. In this design, warm steam immediately comes out without forming condensation on the walls of the cabin. Therefore, the product is much easier to wash.
- Closed. Such booths are closed on all sides and have a dome. They are the warmest.
- Asymmetrical. This is a great option for those who want to create a unique interior in their bathroom.
- Square. For installation, a pallet with equal lengths on all sides is used. Such booths may be inconvenient to use in a small bathroom, as they take up a lot of space.
Types of cabins and equipment
It is worth immediately noting that all types of shower cabins differ in shape, materials of manufacture and method of installation relative to the bathroom space. Let's look at each type in more detail:
Open cabins
In this case, the wall will be the wall of the room itself. The complete set of this type of shower stall includes only a door, a tray on which a person stands, and a shower head. The option is quite simple and does not have any additional features. Mostly such models are installed in the corner of the bathroom.
Of course, their main advantage is cost. This cabin is the most budget-friendly among all those on the market. It is also possible to construct a cabin of any size that will be necessary for comfortable use.
Their main drawback is the difficult repair of sewer and water supply units. Open models do not have an upper base, that is, a roof. Thus, a “tropical shower” is not possible in this case. A regular shower head is used, which is connected to the mixer.
This type of shower stall is intended only for just washing, but not relaxing under warm water.
Pallets are needed to collect water and also drain it into the sewer. According to their shape, pallets are divided into corner and rectangular.
When choosing it, first of all pay attention to the depth, which is divided into:
- Deep or high pallets. Very similar to a small bathtub, in which you can sit and draw water.
- Medium size pallets. They are considered the most universal and are used much more often than other types.
- Low pallets. They are quite compact. They are often called flat. This is due to the fact that they are practically invisible. Such pallets require special techniques for installing water drainage. Otherwise, problems may arise and the water will not go down the drain.
The most common pallets are made of acrylic.
You can also find products made from other materials:
- cast iron;
- steel;
- earthenware;
- from artificial marble;
- natural stone.
As a rule, the most popular and frequently used is the acrylic tray. It is durable, easy to maintain and inexpensive.
The most expensive is a pallet made of natural stone. Its main advantage is fast heating. As a rule, the tray retains heat for a long time, which makes your stay in the shower more comfortable.
Walls are essential components of a shower room. Their main function is to protect against the ingress of water, which can extend far beyond the cabin.
The raw materials for the production of doors are plastic, glass or aluminum. Glass doors are the most popular. They are presented on the market in two versions: frosted and tinted glass.
The standard equipment of the shower stall includes the following elements:
- pallet;
- back panel;
- roof;
- racks.
Closed models
They are the most common option. Every second person who prefers showers can find this type. It is characterized by closed walls and is a separate small room. An enclosed shower cabin also has a door, a tray, a roof and a shower head.
Additional functions are built inside that are necessary for a comfortable shower. If desired, you can install a water heater and even a radio. The main disadvantage of this type of shower cabin is the cost, which is higher than the market average.
Much depends on the manufacturer, as well as the material from which the booth is made. One of the main advantages of such models is good sound insulation. Advantages also include additional features, variety of models on the market and quick installation.
Popular brands of sealants
Dow Corning
- a world-famous manufacturer. One of the few giants that actually produce silicones.
Dow Corning sealants have excellent water resistance and adhesion to any surface. Recently, after a company reorganization, the Dow Corning brand name changed to Dowsil.
Among the materials from this manufacturer there are products in different packaging, with special fungicidal additives.
Moment
is a well-known company that has been specializing in the production of sealing and adhesive materials for many decades.
The manufacturer offers a wide range of high-quality silicone sealants in various packages
Soudal
– the largest Belgian manufacturer of a wide range of special quality materials
Somafix
– a famous Turkish manufacturer of construction chemicals
Ottoseal
– sealant produced by OttoChemie, which occupies a leading position in Europe in providing market consumers with this type of product
Ravak
– very high quality sealants from a Czech manufacturer, but their cost is significantly higher than other analogues
Tytan
– acrylic and silicone sealants made in Poland (), which have proven themselves to be excellent in sealing shower stalls.
Ciki Fix
- Turkish manufacturer, characterized by low cost and excellent quality. Can be used for gluing small decorative elements.
Ceresit
is a subsidiary of a famous German manufacturer of household chemicals. It can be used to seal bathrooms, but cannot be used on aquariums or surfaces that will come into contact with food.
Features of installation on the floor and on a pallet
Floor installation
When installing a shower corner on the floor, even at the stage of floor screed, it is necessary to provide for the installation of a shower drain to drain into the floor, since it must be installed flush with the floor and all drainage pipes will be located directly in the floor screed.
If your bathroom has already been finished, you will have to dismantle the floor covering and screed to install a drain and ensure the necessary slope of the floor so that water flows into the area of the drain hole.
The main disadvantage of this method, as you understand, is the need to foresee everything in advance. Let's list the advantages:
- You are absolutely not limited in your choice of shower enclosure. Absolutely any solution, regardless of shape and size (if there is enough space in the bathroom), is available to you.
- The absence of hills and sides that affect the smooth movement from the shower space and back. And also on the overall aesthetic appearance.
Installation on a pallet
Installing a shower enclosure on a shower tray is much simpler, but it also has its own characteristics that must be taken into account. With this approach, the tray determines the shape of the future shower enclosure.
The walls and floor must be at right angles to each other, so that the tray fits snugly against the walls, in order to maintain tightness and prevent water from getting under the shower tray and into the cracks between the tray and the walls.
The main advantage is ease of installation. There are no shortcomings as such, apart from the absolute attachment to the shape and size of the shower tray.
Resurfacing
If, during testing of the level of tightness of the shower stall, leaks or insufficiently treated areas are found, then a re-application of a layer of waterproof sealant will be required.
You must first thoroughly dry the surface in all problem areas. It should be remembered that the outer film coating of any sealing composition is characterized by rapid drying, so all work must be carried out as carefully and quickly as possible. The standard sealing layer hardens at a humidity level of no more than 48-50% and a temperature of 20-22°C at a rate of 0.2-0.4 mm/day.
When choosing a sealant, pay attention not only to its composition, but also color, level of water resistance, the presence of antibacterial and antifungal properties, as well as the presence of additives that positively affect the durability of the treatment. The sealants “Tytan”, “Moment”, “Ciki Fix”, “Ceresit” and “Dow Corning” have proven themselves very well.
Choosing a shower enclosure with a tray
Shower enclosures differ in shape, size and material from which it is made. Also decide in which corner of the bathroom it will be installed. It is not necessary to buy a cabin and a pallet as a set; as a rule, construction stores should have a large selection of both pallets and cabins that can be easily combined.
It is worth considering the fact that when buying two parts from different manufacturers, certain difficulties may arise due to the difference in size. Therefore, we select only those parts that fit each other perfectly.
Advice! Buy the corner and tray from the same store, this will make it easier for you to select and combine the two parts together.
Manufacturers produce the following types of pallets:
- steel;
- cast iron;
- ceramics;
- marble;
- acrylic.
The latter version of pallets is very popular, and all because it has many advantages, such as: average weight, durability and relatively low price.
Such a platform can be rectangular, round or square. Particular attention should be paid to the doors, because if they come into contact with the wall when opening, they may become damaged or even break. Therefore, take accurate measurements before purchasing.
In appearance, glass doors also have slight differences, since they can be not only matte or transparent, but also with quite different and at the same time attractive texture and coloring. Even the handles on shower enclosure doors can be very different from each other.
Which one is better to choose?
If your choice is not determined by any specific features, then you should use proven and affordable sealants. Silicone compounds are great for this. They are cheap, durable and practical.
When purchasing a product, pay attention to its instructions and labeling. Make sure that the sealant has antiseptic properties, which will help you not to worry about the development of microorganisms on its surface. Water resistance is also a priority.
It is not recommended to purchase products that contain more than 10% of all kinds of additives, as this can impair adhesion and negatively affect the properties of the sealant.
Assembly steps common to all cabin types
The shower enclosure is delivered from the retail outlet in disassembled and packaged condition. The multitude of packages with parts can be confusing at first due to their diversity. All components are sorted, grouped and arranged in packages in such a way as to suggest how to properly assemble the shower cabin in order to consistently complete all the steps for assembling the kit.
Some box models are designed to allow for self-assembly from the inside. This is convenient when installing a shower enclosure in cramped conditions of a small room.
Installation of the corner requires compliance with a certain sequence. Assembling a shower cabin with your own hands can be done alone within a few hours. This provides the user with some advantages when minor repairs are required.
The owner of a modern device, who has completed the installation himself, will not be at a loss when faced with the question: how to disassemble the shower stall. At any time, he can partially disassemble, carry out minor repairs, and reassemble the structure again, without resorting to paid cabin repair services.
Adviсe
- If you don't want to buy a caulking gun, buy sealant in tubes.
- Do not try to fill large (more than 6 mm) cracks with sealant. For this, use a dense insert (wood, plastic, etc.) or a special waxed braid. Fill the gap with sealant over the insert.
- Plan to apply the sealant in one go. If you take breaks and come back to apply the sealant again, it will adhere unevenly, thereby creating points of moisture penetration and mold growth.
Preliminary stage
Cabin assembly begins with checking all components. It is necessary to fully check the integrity of all elements, especially glass. They are made using special technology, are shockproof and hardened, so if damaged they break into many elements without sharp edges.
Simply shake the packaging to determine the integrity of the glass by sound. Defects, geometric errors, or damage are unacceptable on the remaining parts of the shower stall.
Cabin elements include:
- pallet (has various shapes, most often comes with a reinforced frame);
- doors (most often have rollers for movement and fastening elements);
- glass for doors (usually transparent, less often frosted);
- walls, side panels (water supply and other functions are provided);
- roof of the shower stall (depending on the manufacturer and type, may be missing);
- factory fasteners and installation elements.
The assembly of a Chinese shower cabin, like any other, begins only after a thorough check and creation of a workplace. If the size of the bathroom is not large enough, it is better to assemble it in another place in several stages, transferring the finished parts.
For high-quality installation, you must have on hand the tools and additional materials from the list below.
Required tools:
- adjustable wrench (or gas);
- flat and Phillips screwdrivers;
- metal drills of small diameter (3-6 mm);
- level (for leveling installed parts);
- a screwdriver, or a drill as a replacement;
- gun for squeezing out silicone;
- sharp knife.
Additional materials that may be needed:
- sealant (silicone) transparent, antibacterial;
- waterproofing tape;
- hoses for supplying hot and cold water;
- transition to sewer 32/50;
- paint, gloves, brush for correcting defects.
It is necessary to check the location for the shower stall being installed. It must be level, have waterproofing, and it is also desirable to have ventilation to remove steam if the cabin does not have a roof.
List of problems
Those who try to use sealant with their own hands testify that the task is not as simple as it seems at first glance. Many people complain about poor adhesion of silicone glue. Even the best composition will lag after a few years if applied incorrectly. The mistake people make is that basic installation rules are not followed. The surface is not cleaned, not dried, and does not get rid of dirt or grease.
Shower may leak
Whatever sealant you intend to use, you should carefully study the instructions. The trouble is that the problem only affects itself over time. Initially the adhesion looks great, but after some time the coating peels off. MS sealant quickly becomes moldy in damp and dirty rooms. In this case, acrylic or silicone should be used instead. But MS sealant adheres perfectly to acrylic paint.
It is impossible to determine the best composition. However, the most common plumbing material is silicone sealant. This is what should be used in the most general case.
Removing and sorting shower components
The cabin is delivered to its destination in several packages. Separately packed:
- Rear walls;
- Glass, doors and vertical profiles;
- Central panel;
- Pallet, roof, horizontal profiles and components.
Markings on the boxes allow you to determine what components are contained in them without looking inside. Assembling a shower cabin with your own hands begins with one by one opening the packages with the necessary parts. Manufacturers recommend that after purchasing the box, you unpack it and check the contents.
Why are high trays often chosen for showers?
Shower cabins with a deep tray quite well combine the characteristics of the already beloved shower and bathtub in its latest traditions.
A tray made from acrylic can be used both for hygiene procedures and for bathing small members of your family, washing by hand, washing animals and other purposes.
A very high pallet requires additional reinforcement, so the cabin box consists of strong steel, passing under its bottom and rising walls from the side to the roof. The boxes themselves consist of metal, acrylic, and the stack is connected to a siphon tube.
The walls of the cabin are usually made of glass, and lighting fixtures and ventilation airlocks can be located on its roof. Inside the shower cabin there can be a massage panel, as well as shelves and stands for shampoos, shower gels, and soaps.
Source: https://catchwave.ru/dushevye-kabini/dushevye-kabiny-s-vysokim-poddonom.html
Frame assembly
Using screws we need to connect this into a frame. Profile A1 has grooves for rollers, so you need to keep track of which arc will be the top and which will be the bottom.
We take the screws out of the bag and begin to methodically twist the horizontal arc A1 with the vertical profile A2. The profiles should be placed relative to each other in such a way that the grooves for the rollers are opposite the groove for the glass. The axes of the twist holes are on the same line.
We carry out similar manipulations with the remaining screws until our frame is ready.
Installing door guides
Next, the assembly of the shower cabin continues with the installation of door guides. Even if the cabin does not have side panels, you first need to assemble the guide frame for the doors, install it on the pallet, and then mark the installation locations for the fasteners.
Assembling the frame means fastening the side posts and two rounded guides together. To add rigidity to the structure, fixed glass sides can be installed.
Why can't you immediately attach the door posts to the wall? Because the walls in the bathroom are rarely perfectly smooth. By attaching the racks this way, you will get skewed doors that will close/open poorly.
To understand the difference, you can mark it strictly vertically, setting the side guides vertically as expected. Then assemble the supporting frame, put it in place and look at any deviations. In 99% of cases they are present, and significant ones at that.
One of the design of rollers for shower cabin
There can be no discrepancies when assembling the shower cabin frame. There are two arcs, there are two posts. Align the grooves and holes, tighten with screws. Then install the glass sides. They are fixed with clamps.
After this, do not forget to install the rollers for the shower stall. They can have different designs, but most often, to install them you need to remove the side stoppers from the guides, drive two rollers into the profile on both sides, and put the stopper in place.
In some models you have to not only install the rollers, but also hang the glass, otherwise you won’t be able to move it. But then it’s better to work together. It's difficult for one.
Having placed the assembled frame on the pallet and checked whether it is positioned correctly, mark the location of the fasteners with a marker. Having removed the cabin, drill holes and install dowels.
Coat the junction of the frame with the walls with sealant. You need to apply the strip generously - it’s better to wipe off the excess later. Then put the guides in place and screw them on. The remaining cracks are re-filled with sealant. The installation of the shower enclosure is almost complete: all that remains is to hang the doors and install the seals.
Assembling a shower cabin: hanging the doors
If the doors have not been installed, they are hung. They start from the top. Most models have holes in the door leaf: top and bottom. These are the places where the rollers are attached. Some shower stalls have two holes, some have four. Their number depends on the design of the rollers.
Take a screw and put a plastic spacer (from the kit) on it. After inserting the screw into the hole, put on the second gasket. Next: there is a thread inside the roller, you need to get a screw into it, then support the roller from the outside with your fingers and screw the screw inside.
This acrobatic element is repeated with all rollers. There is no need to tighten them until all the screws are installed. Just tighten it so that the door holds and doesn’t fall.
After the doors are hung, tighten all fasteners. There is one last thing left: installing seals on the doors. They simply snap into place (press with your finger) on the side edges of the two joining halves of the door. They are attached in the same way on the other side - on racks near the walls.
For details on hanging shower doors in one of the models, see the video.
Connection to water supply and electrical system
This is the final part of the work, which is carried out strictly according to the instructions. And in most situations it is generally better to entrust it to a professional.
At this stage, you need to assemble the flexible hoses and connect them to the hot and cold water. Often, inputs are color coded: blue and red, respectively.
The shower does not require an RCD or other special equipment; it does not place a large load on the overall system. However, if power surges often occur in your home (both multi-apartment and private), we recommend installing general electrical protection.
Preparation
When the type of shower and the location for it have been chosen, preparations for installation begin.
Wall requirements
The area where the cabin will be installed will be damp and damp due to frequent contact with water. Therefore, the walls near which it will stand must be made of water-repellent material. The best choice for this purpose is tiles secured with water-resistant material. Covering with PVC panels, brick, and stone is also suitable. If it is not possible to completely change the material of the walls, you can sheathe them with moisture-resistant plasterboard and additionally coat them with a waterproof compound. This will help completely prevent rotting and the proliferation of fungi and bacteria. In addition, the coating must be easy to wash and not deteriorate under the influence of cleaning agents.
In addition, ventilation and electrical conduction must be provided.
Open communications can be covered with plaster, and the wires can be placed where the importance is minimal, that is, as far as possible from the shower itself
Doors or fencing
When choosing what to install as shower doors, you also need to focus on the size of the room.
Drawing of swing doors
For larger spaces in your home, you can opt for fixed fencing. This way the shower will be open, looking beautiful, aesthetically pleasing and modern. Sometimes a rotating fence or screen is additionally installed - this advantageously combines a classic shower box and a modern open shower. With this solution, splashes will certainly fly away, and only one person can use the shower at a time.
Doors are a classic solution that will suit any shower stall. They can be matte or glossy, with different opening options. For cramped bathrooms in a private house, those doors that take up as little space as possible are suitable - sliding, folding and so-called “in-swing”.
Size calculation
The dimensions are also planned taking into account the area of the bathroom and your own needs, but you need to start from standard measurements. The minimum size of a cabin that can accommodate an adult of average build is 80x80 centimeters. But in such a space you can forget about comfort. It is better to install a cabin with dimensions of 90x90, 100x100, 90x110 centimeters, depending on the capabilities of the room. The most comfortable size would be 1.2-1.4 meters on at least one side.
Drawing of the communication line to the shower stall
In city apartments, the height of the shower is determined by the height of the ceiling. In any case, this parameter must be calculated so that a person can enter the cabin at full height, easily reach the mixer with his hand, and so that splashes of water fall on the ceiling as little as possible.
Tools and materials
Before building a shower, you need to prepare all the necessary tools:
- drill;
- putty knife;
- brush;
- roulette;
- level.
You also need to prepare materials:
- brick;
- cement;
- waterproofing mixture;
- film and mesh.
Once the materials are ready, assembly can begin.
Functionality check
Upon completion of installation, it is recommended to check the shower enclosure yourself for operation of the following functions:
- Guided by the instructions on how to assemble the shower cabin and the rules of use, alternately pressing the buttons on the control panel, make sure that they are working.
- Be sure to make sure that the pallet is in a stable position. If swaying is detected, it is eliminated by turning the adjustable heels of the legs.
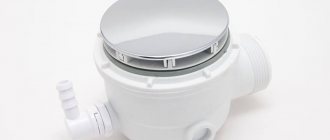
- The drain should be inspected especially carefully. Its reliability will protect against leaks, which lead, at a minimum, to unpleasant explanations with the neighbors below. Reliable drainage is ensured by special gaskets on the threaded connections of the siphon. To obtain the best result, use silicone sealant.
Video description
Assembling the cabin frame in this video:
Panel installation
The prefabricated panel is a distinctive feature for hydroboxes. It should cover the wall and allow you to control all functions. All holes on which the panel will be installed must be treated with sealant to eliminate possible leaks.
Particular attention should be paid to the injectors. Hose sections are used to connect the injectors to each other. To avoid leaks, clamps are used to tighten the tubes. For additional protection against moisture, a sealant is used to coat all connecting elements.
Working with sealant Source e-stroy.pro
Some nuances
In some cases, it is advisable to perform preliminary assembly to familiarize yourself with how to assemble a shower stall. This is useful to do in order to understand the installation principles, mark the holes, and, if necessary, purchase missing fittings.
The installed drain must be equipped with additional outlets for connecting other plumbing fixtures. We should not forget about including an audit in the sewerage system.
The process of operating plumbing fixtures involves periodic inspections and ongoing repairs. Loose fastenings, depressurized joints, replacement of doors or rain showers necessitate complete or partial dismantling.
If the assembly was carried out independently, the question of how to disassemble the shower stall does not cause confusion. When disassembling, follow the reverse order of installation. Assembling the cabin yourself saves money and increases confidence in the correct use of this convenient plumbing equipment.
Shower assembly video:
More detailed video:
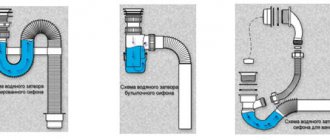
Sewage connection
High-quality instructions for the correct assembly of a shower cabin usually contain information on how to equip a drain and install a siphon. So how is this done?
First, the protective film is removed from the drain pipe. Then a pipe with a diameter of 4 cm with a special adapter is supplied to the installation site of the pallet. The adapter must have sufficient rigidity - this will increase the functionality of the sewer system and there will be no stagnation in the corrugation area.
Next, you need to lift the back of the shower tray and lay the shower hose on the shower drain elbow from below. The other end of this hose should be secured to the drain. Its edge, reinforced with fiber, must be attached to the side nipple on the drain elbow.