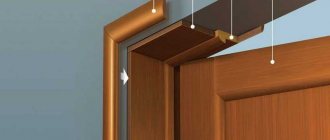
As energy prices rise, more and more attention is paid to the thermal insulation of homes. A significant part of the heat loss occurs through the cracks in the entrance doors: this means the gaps between the leaf and the floor or frame. As for interior doors, such defects noticeably worsen the aesthetic perception of the interior of the premises and the level of sound insulation between individual rooms.
- Self-adhesive tapes
- Eliminating side gaps
Finishing a doorway after installing an iron door: cladding methods
For reliable protection of the apartment, iron doors are increasingly becoming popular.
Their designs are durable, easy to clean, and can ensure safe living in a residential area for many years.
Without much difficulty, you can find a company offering door installation services.
After installation work, it is important to finish the doorway after installing the iron door, so that the entrance to the apartment looks neat and aesthetically pleasing.
For such work, you can invite a professional or, in order to save money, do it yourself.
The main condition is that the gap between the door and the wall must be sealed beautifully and efficiently, providing reliable thermal insulation.
Getting rid of an old door: the sloppy removal method
We remind you that with this approach the box must be recycled. The door can be used elsewhere. The set of tools is being trimmed down a bit. All you need is an axe, a hammer, a nail puller and a hacksaw. The dismantling technology is carried out in the following order:
- We remove the interior door and put it aside;
- Then, using a hacksaw, we make cuts in the vertical and horizontal posts approximately in the middle (you can make several cuts on the vertical side);
- Then we hit the box elements with force with a hammer to move them out of place;
- In places where the wood has moved away from the wall, insert a nail puller and forcefully pull out partial elements of the frame.
The second dismantling option is simpler and faster. However, this is a barbaric method and a lot of dust is generated in the process, so it is better to purchase a respirator first. Having broken all the elements, we remove them and work on the opening according to further work.
Cladding a doorway with plasterboard
This finishing material looks stylish, the surface is perfectly smooth. Initially, excess polyurethane foam is removed.
Next, measurements are taken. Drywall sheets are cut into separate elements corresponding to the dimensions of the slope.
To obtain an even cut, it is better to attach an aluminum profile to the marked line on the drywall, and then carry out the cutting.
Initially, the paper layer of the finishing material is cut through. After this, the cut location is tapped on the opposite side of the sheet until the plaster breaks.
At the final stage, starting from the edge on the reverse side, the paper covering is cut through to the center of the sheet.
The next step will require mounting adhesive. It is important that no grains remain when it dissolves. The glue is applied pointwise to the strips of material from the back side.
The cut elements are pressed with force against the concrete surface for several minutes, with the obligatory careful adjustment of the fragments to each other.
The slope is leveled with a special measuring tool, a building level. To avoid bending of the sheet, excess glue must be removed.
After 12 hours of drying, the edges of the slopes are covered with mounting profiled corners and putty. Then the surface is sanded and primed, after which the slopes are painted or covered with wallpaper.
The strength of the slope with such sealing of the opening is not too great.
But thanks to its easy installation, visual appeal and relatively low cost, plasterboard is used quite often as a material for lining doorways.
Design methods
To choose the right solution for a doorway, first think about its shape. The front door is traditionally associated with a rectangle. In the absence of doors, interior rooms are given shaped configurations.
Classic
Classic style technology allows you to refine the passage between rooms without affecting its shape. A traditional rectangle, with or without a sash, is lined with platbands. Extensions are used to finish wide slopes. You can glue a decorative corner as platbands. The stained glass windows above the doorway, made from multi-colored glass inserts, look beautiful.
Arch
The arched shape is considered the most popular way to decorate an opening without a sash. Its advantage lies in smoothing out sharp corners. Smooth transitions of the upper part of the door structure allow you to play with your imagination. In low rooms, the arch visually makes the ceiling higher, and in high rooms - lower. The effect is achieved due to the size of the structure. The more the arch expands, the lower the ceiling appears.
The wood frame of the arched doorway between the rooms looks rich. In a budget option, you can use plastic or MDF. Arches usually separate a hall from a kitchen or hallway, and are also used when combining an insulated loggia with a living room.
Trapezoid
Not a very popular form for decorating a passage in a partition, especially in a small apartment. Sharp corners will make the room uncomfortable. The trapezoid is suitable for a wide doorway in a large apartment, and the best cladding option is materials of light and warm shades. In a house with low ceilings, it is undesirable to make the upper part of the trapezoid narrow. A small jumper will visually lower the ceiling, make the room smaller and give the interior a heavy look.
Asymmetrical shape
To achieve a modern interior, room design is often associated with the idea of arranging an asymmetrical opening on the interior partition. Construction stores offer ready-made kits. When implementing your idea, a fancy shape is created with a galvanized profile and covered with plasterboard on top.
An asymmetrical configuration involves the formation of smooth transitions in different parts of the structure. It is better to avoid sharp corners. Finishing is usually done by painting or wallpapering.
Decoration with curtains
Free passage between rooms without a door is decorated with a screen or curtains. This is the most affordable way to decorate. Fabric curtains look cozy. Thread curtains create an unusual interior. In the “eco” style, the room is decorated with bamboo curtains.
Making a slope using plaster
Most often, the classic option is used for finishing openings - plaster. This is the most labor-intensive design option, but is not without its advantages.
Plastering makes the space of the doorway monolithic, protecting the room from the cold. The process is gradual and takes from 3 to 4 days.
Such finishing of a doorway after installing an iron door requires special care when applying.
It is mainly used for further painting.
Plastering work is carried out in a certain order:
Preparation - cleaning the working surface, followed by priming and drying.
Using a level, guide beacons are installed, which are fixed with a solution.
A reinforced mesh is attached to the surface to be treated. To protect against contamination, nearby walls and the door frame itself are covered with masking tape.
The voids between the door and the wall are filled with ready-made plaster or cement mortar (a mixture of sand, cement and water) using a special tool, a trowel.
Then the solution is applied several times to the entire surface to be leveled. It is important that each layer is completely dry.
To remove all unevenness and roughness, the slopes are carefully sanded.
Possible cracks are repaired with putty.
After finishing work on leveling the surface, you can apply paint to the plastered space or decorate it with any material placed on glue.
Doorways made with plaster are quite durable, resistant to dampness, and from a cost point of view, economical.
Video lesson on the topic:
If treated with care, they will last a long time; if damaged, they can be easily restored.
Removing the door frame is easy
You may ask why dismantle the door frame yourself if it is sometimes included in the cost of installing a new door. I agree with you. However, there is a small nuance.
If you are 100% sure that after removing the old one, your new door will fit exactly into the existing opening, then there is no question, let the master do it. But if, suddenly, the new door does not fit in width or height, then you will need to expand the opening, but this can already be regarded as a separate job, and not a cheap one.
Therefore, if you have read my article: Learning to widen a doorway, then you will already be able to do this part of the work. Thus, by dismantling everything old and expanding the doorways yourself, you can save money. True, there is a second nuance. When expanding the opening, do not overdo it! It needs to be expanded exactly to fit the new box. Therefore, if you are not sure, it is better to call a specialist.
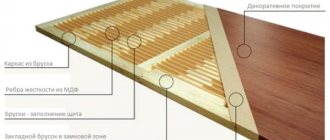
Covering with MDF panels
To achieve good thermal insulation and soundproofing, MDF panels are used when making slopes. The panels are attached directly to the finished slopes.
The main stages of design using MDF materials:
Wooden slats (guides) are prepared, which are pre-treated with an antiseptic. These slats are attached around the perimeter of the doorway with dowels and screws.
You can use shingles.
A decorative corner is attached to the guides along the entire doorway using screws or nails.
MDF sheets are cut according to the dimensions of the slope and inserted into the fixed corner.
Then the outer edges of the slope are sheathed with a decorative strip or corner.
A platband is installed on the opposite side of the door.
MDF material tolerates moisture well, is durable and hygienic. Looks presentable. The main disadvantage is rapid flammability.
Bottom line
The best way to avoid the appearance of gaps in the doors is to carry out proper installation of the frame and door leaf. But it happens that during use the product shrinks or warps. There are several ways to eliminate the gaps that appear in this case. The choice of a specific option is influenced by the function of the door (entrance or interior), the material used to make the door, and the skill of the performer.
How and how to seal a gap in a door: entrance, interior
door repair
Covering a slope with decorative stone
The design of a doorway using decorative stone looks very beautiful. The process is not very labor-intensive, but requires additional experience and knowledge.
Using facing stone, doorways are finished after installing iron doors in a certain sequence.
Work begins after preliminary creation of slopes using drywall or plaster, without finishing.
The surface of the opening must be clean and primed, without traces of whitewash or paint. Any damage to the door opening is repaired with putty.
The pattern is first laid out on a flat surface, possibly on the floor, with symmetrical layout of horizontal and vertical seams.
If necessary, the edges of the material are trimmed and then sanded. The material is attached to the wall surface using liquid nails or special glue.
You need to start gluing from the bottom corner. The gaps between the fragments are filled with a sealing agent. It is possible to lay out the facing material without leaving gaps.
After drying and removing excess glue from the front side of the trim, a polishing gloss is applied to the surface.
This option of slopes requires considerable costs. The price range depends on the type of decorative stone. Artificial material is more economical; natural material is much more expensive.
Decorative stone is resistant to temperature changes, moisture resistant, very durable, and can reliably protect slopes from damage.
Video on the topic:
The choice of type of slope cladding depends on the individual needs of the owner of the residential premises. It all depends on the taste, desires and capabilities of the owner.
What can you think of with the opening in which the door leaf is installed?
A doorway that is fully equipped for its intended purpose can be refined in the simplest way. It is enough to purchase a small list of materials and use basic options.
- The most common method that is suitable for any modern interior is the installation of standard additions and fittings on slopes (the use of platbands, moldings and corners. Such additions are chosen to match the door frame and the door leaf itself. To complete the design, think about installing a threshold (in case the door frame did not have it.
- The original method is finishing in a wide variety of ways. But, moving towards such a step, you need to understand that the chosen composition for decoration must correspond to the stylistic direction in the design. Framing with tiles in a patchwork style will come in handy and will suit the interior design of the same name.
- Addition with stained glass. This method will perfectly complement a doorway with double doors. The glass inserts on both sides of the opening will look original. It is not necessary that they be transparent; you can decorate them with any type of glass (frosted, with patterns).
- Design of a photo gallery. A standard rectangular opening with a door will not look so boring if you decorate it on both sides with photographs. The upper part can be decorated with an interesting pattern. You should first make sure that the photo frames are all the same color (preferably black, so they will attract attention).
- An asymmetrical opening in the form of a wooden structure will serve as a good complement to the sliding doors made of solid wood with installed openwork frosted glass.
You need to choose an option not only at your own discretion, but also take into account the design style involved in the house.
Methods of insulating entrance doors: how to eliminate cracks and install insulation
Methods for insulating entrance doors depend on several factors, including the material of the door itself. Entrance doors can be wooden, plastic and metal.
It is better to entrust the insulation of plastic doors to professionals, as this will require certain skills and tools. In cases with wooden and metal door leaves, you can do it yourself.
First you need to get rid of all the cracks. If there are gaps around the door frame, they need to be sealed with foam. To tightly close the products, use a seal. Installing a second door will have a good effect, then a vestibule will be formed that will prevent the passage of air from the entrance to the apartment and back. Some of the problems with heat conservation will go away with the installation of a closer on the entrance door.
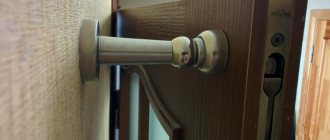
Seal the gap at the bottom of the door
As a rule, all entrance doors are equipped with a threshold. Blowing from the bottom is eliminated by increasing its height or decorating the area of contact with the canvas with a special seal. Given the constant contact with water and cold air, it is recommended to use reliable rubber as a seal. An excellent option are special threshold slats of a combined type, equipped with nylon brushes. The presence of a special groove protects the home from the penetration of external moisture.
Installation procedure for the combined threshold strip:
- Cutting the strip and brush to the size of the threshold. It is important to ensure that the overhanging edge penetrates into the opening. You can use a hacksaw as a tool.
- Brush installation. In the correct position, it should exert some pressure on the bar.
- Screwing the brush onto the lower edge of the canvas (away from the home). For this, a screwdriver and self-tapping screws are used.
Insulation with foam rubber
To work you will need:
- Foam rubber
- Upholstery material (artificial leather, dermantin)
- Adhesive for foam rubber
- Threshold material
- Wooden or plastic slats
If there was already an old coating on the door, it must be completely removed. The surface of the door leaf should be thoroughly cleaned, washed from dirt and dust for subsequent application of glue.
Sheets of foam rubber cut to size are glued to the dry surface of the canvas.
Upholstery with dermantine is done with a stapler or decorative nails.
Along the perimeter of the frame, where the sash fits, slats should be nailed, covered with foam rubber and upholstery material. It is necessary to ensure that there are no gaps in the closed position, but at the same time the door itself must close freely.
A new threshold is needed to bridge the lower gap.
Gaps in interior doors
Unlike entrance doors, these structures generally do not require outstanding thermal insulation qualities. However, it is advisable to eliminate large gaps around the perimeter of the canvas, because this spoils the overall impression of the interior of the room and complicates the use of doors (they do not close tightly, they slam in drafts).
Eliminating side gaps
In addition to the above-mentioned self-adhesive tapes, silicone paste, which is sold in special tubes, is often used to seal interior doors. To apply it you will need a special gun.
Operating procedure:
- Tape the application areas on both sides with masking tape or Vaseline. This will eliminate the possibility of contamination of adjacent surfaces of the canvas.
- Charge the gun with a package of silicone. The thickness of the extruded seal is adjusted by cutting the edge of the tube. This parameter should slightly exceed the dimensions of the gap seal.
- The optimal angle for holding the gun relative to the surface during application is 45 degrees. You must press the lever smoothly and move the gun evenly and slowly.
- The treated door is closed until the silicone dries completely (the time is indicated in the instructions).
- After drying, the door is opened to remove excess sealant.
Applying silicone paste into the crack of a doorway
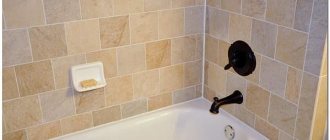
The convenience of this method lies in the speed of application and good sealing of joints (the property of silicone is to completely repeat the configuration of the gap). Most often, doors to the bathroom, toilet or kitchen are designed in this way, which allows you to create a reliable barrier to moisture and odors.
You can watch the video for more information about applying silicone using this method:
Gap between floor and door
The appearance of excessive clearance in this area does not always indicate an error in installing the interior door. Such a defect is often discovered after replacing the floor covering, when the new material is inferior in thickness to the previous one.
There are several ways to fix the problem:
- Lower the hinges to the desired height. If the owner of the house has at least a little experience in carpentry, it is better to use this method. To do this, you need to remove the door and move the hinges on the frame lower. This does not require additional seals or linings.
- Install sealing brushes or pads. Specialized departments offer a choice of rubber pads of different thicknesses. It is necessary to select a product so that it closes the gap without creating additional interference when opening and closing. The seal is cut to the width of the canvas and screwed to the bottom end.
- Use a decorative threshold or flat threshold strip. As a rule, such products are equipped with special holes for self-tapping screws. The cut-to-size strip is fastened to the floor using dowels or screws.
- Installation of a lowering tire seal. We are talking about automatic sealing devices of the “Dichtomat” type. Before installing the system, the door must be closed, using pads to achieve strict horizontal fastening. The size of the mechanism, strap and rubber insert is adjusted using a hacksaw. The support mechanism is fixed to the bottom of the box using screws. The metal plate must be placed strictly at the border between two rooms, under the door.
How to insulate a metal door
- First you need to remove all the locks and handles.
- The door can be a frame of corners with an outer steel sheet. The inner side is either covered with overlay sheets or left open (budget option). If the inner cover sheet is removable, it must be temporarily removed.
- Insulation is placed inside the door leaf.
- The inner cover sheet is installed in place.
- If the door is one-piece, then it is supplemented with an insulated internal or external lining. It is better to entrust work with Chinese one-piece doors to specialists.
Cladding with cement screed
Advantages: this is the oldest and most universal method of finishing door openings. It is easy to do with your own hands, even for a novice builder. Many people choose this traditional method precisely because of its reliability, proven by more than one generation. All you need is to mix a solution of cement, water and sand. Spread the solution on the surface and carefully level it with a spatula.
You should get a perfectly smooth surface. Experts try to achieve a unique result, smooth as a chicken egg shell. After the surface has dried, it should be coated with paint, preferably acrylic-based.
Eliminating cracks and installing sealant
A loose fit of the door to the frame leads to the formation of cracks. If the design of the product allows you to adjust the canopies, then this should be done in order to minimize the size of the gaps.
A sealant is installed along the perimeter of the junction. The building materials market offers many types of seals. They differ in width, thickness, cross-sectional configuration and material of manufacture. You need to try to choose the best sealant option. An option that is too narrow and thin will not cope with its task, and one that is too wide will interfere with normal closing.
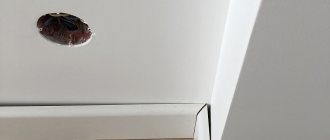
The gaps between the frame and the wall are sealed with polyurethane foam. Upon completion of work, a leak test is performed. This is done using an ordinary burning candle. A burning candle is slowly drawn along the perimeter of the junction of the door to the frame and along the junction of the frame itself to the wall. In places of insufficient compaction, the flame will be deflected under the influence of a draft, which means that minor local modifications will be needed here.
Without cracks - no way
There must be a certain gap between the door along the entire perimeter of the frame, otherwise it simply will not be able to open and close. The dimensions of the gaps are strictly regulated by the relevant GOST. The material used to make the canvas and the box is of great importance. For example, wooden products tend to change their size to a certain extent, depending on the level of humidity (the so-called “drying out” and “swelling”).
Recommended clearances in the doorway
Proper formation of gaps at the installation stage directly affects how convenient the door structure will be to use. In addition to the material of manufacture, the parameters of the gaps depend on the height, width and weight of the canvas. Certain errors are acceptable, usually within 1 mm of deviation in one direction or another.
A slight increase in the distance between the frame and the door is allowed in the following cases:
- The indoor microclimate is too humid and there is no ventilation.
- The material used to make the door block is natural wood or lumber, which is prone to absorbing moisture.
As for the clearance between the canvas and the floor (threshold), it is recommended within 20–25 mm.
To increase ventilation efficiency and ease of opening, this parameter can be increased to 40 mm.
Finishing the doorway after installing the iron door
The front door is the face of any building. The appearance of the entire structure depends on how well it is made and installed. Today, iron entrance doors are considered the most popular. They are reliable, durable, and do not require complex maintenance. You can purchase models of simple design or with glass inserts and various decorative elements. Whatever door you choose, the decoration of the doorway should also be done well and beautifully, because the overall appearance of the door structure depends on this. A professional master will help you bring the doorway back to normal. But finishing the doorway yourself after installing an iron door will allow you to save money.
Features of door frame dismantling work
There are several ways to dismantle door structures. In order to decide how to saddle correctly in this particular case, it is necessary to take into account the design of the door system itself, the material from which it is made, and what the walls are made of. If the old door frame has retained its integrity, then it can be used to install a new door.
In addition, you need to take into account the condition of the finishing material of the walls near the door frame and the importance of preserving it. If the door structure is in fairly good condition, then it is advisable to dismantle it with minimal damage, since the old doors may be useful in the future.
When carrying out major repairs, old doors are the easiest to dismantle. In such a situation, there is no need to worry about the condition of the flooring and wall finishing material, since during the overhaul process all these materials will also be dismantled. Although even with such work it is very important not to damage the walls if they are fragile, as, for example, in Khrushchev-era buildings.
If we talk about how the price for door dismantling work is determined, then it is important to determine the complexity of performing various operations. The complexity of the work increases significantly if the dismantling of the metal entrance door must be carried out while preserving the floor covering and finishing materials on the walls. In addition, the process is slower if there are continuous hinges and anchor bolts that are secured in the opening.
What can slopes be made from?
Slopes can be internal or external, depending on their location relative to the room. When finishing them, two problems are solved: aesthetic and thermal insulation. To do this you need to choose the right material.
MDF panels
Today, for this type of work, MDF panels are most often chosen, as they have proven themselves in bathroom renovations. This wood fiber material comes in several types.
- Veneered is a material ideal for finishing a doorway; it is particularly strong and durable compared to other types of panels.
- Laminated is a moisture-resistant material that is slightly less durable than veneered MDF. But it is very attractive in appearance: it has a rich color palette, and there are also panels that imitate the texture of natural wood. This MDF is also excellent for finishing a doorway after installing a metal entrance door.
- Painted is a material whose surface has the least strength. It is not suitable for this type of work.
We make slopes from MDF with our own hands
If you decide to decorate the doorway yourself with MDF panels, then you will need the following materials and tools:
- MDF panels (3 pcs.);
- platbands (3 pcs.);
- decorative bending corner (3 pcs.);
- decorative rail (3 pcs.);
- guides (slats with a thickness of 10 mm and a width of 30 mm, the total length of the slats is approximately 9 m);
- self-tapping screws (length - 35 mm), approximately 30 pcs.;
- dowels (diameter – 6 mm), approximately 30 pcs.;
- liquid Nails;
- cement mortar;
- polyurethane foam;
- jigsaw;
- assembly knife;
- chisel;
- brace;
- bit;
- roulette;
- pencil.
To perform quality work on finishing a doorway, the following rules must be observed:
- slopes should be placed approximately 1.5-2 cm below the level of the box;
- the distance between the external slopes should be greater than the distance between the internal ones;
- To properly install the door and obtain smooth slopes, it is necessary to accurately measure the dimensions of the doorway.
Stages of finishing a doorway
- Sealing cracks with cement
First, inspect the slopes, seal large cracks and holes with cement mortar or putty (if small), remove protruding old cement mortar, old whitewash or paint; Seal the gaps between the wall and the door structure with polyurethane foam, and after it has hardened, cut off the excess with a knife.
- Treat the surface of the slopes with a primer: this is necessary for better adhesion of the plaster to the wall.
- Level the slopes with plaster or cement mortar; to do this, use a system of beacons (metal profiles fixed to the wall with dowels). Plaster consists of cement, sand, and lime mortar. You can purchase a ready-made plaster solution intended for facade work.
- securing external corners with a mounting profile.
Reinforce the external corners of the slopes with a mounting profile. It must be carefully pressed into fresh plaster. The base for the slopes is ready. Let it dry completely. - Carefully measure the dimensions of the slopes, pay special attention to the corners to avoid inconsistencies later when installing the panels. From MDF panels, cut out two side and one top parts of the required size.
- Cover the entire upper surface of the slope with special glue and press the MDF panel onto it. You need to hold it tightly until the glue has completely set.
- The side panels need to be fixed in the same way. Experts recommend using spacers for reliable and high-quality fixation.
- installation of MDF panels on slopes
Close the gaps formed between the panels and the wall with a decorative plastic corner, which is glued using liquid nails. - Finish the outer edge of the slopes with a decorative corner or nail in cash.
If you do not pre-align the slopes, you can put guide strips on them, to which you can attach MDF panels with self-tapping screws. The whole process is only slightly different from finishing the slopes on the windows.
Methods for dismantling the door frame
Any door structure consists of pillars, a crossbar, a threshold at the bottom and a leaf. Apartment owners are wondering how to dismantle the box so that they can later use it, for example, at the dacha. To maintain integrity, they approach work creatively.
For a box that goes to a landfill, a quick dismantling option is chosen. For those products that are still supposed to be used - neat, gentle. Regardless of the chosen method, replacing the door frame is carried out carefully, otherwise you will have to spend money on puttying and plastering.
For a box that goes to a landfill, choose a quick dismantling option for those products that are still intended to be used, neat, gentle
Dismantling a box fastened with screws:
- remove the platbands: insert the tip of an ax between the platband and the box, hammer the ax in with a hammer until a gap appears. It is hammered deeper until each platband fastener comes away from the box;
- Having freed the product from the platbands on all sides, you need to find the places where the product is attached to the opening. They look for fasteners in the hinges and pretend lock. They may be located under plugs;
- The fasteners are carefully unscrewed with a screwdriver at low speed. A screwdriver will also work. If you can’t unscrew it, cut it off with a grinder;
- To carefully remove the box, cut out the foam between it and the wall with a sharp knife. If the structure is attached to the plaster coating, then it is carefully tapped with a hammer;
- the whole box is removed from the opening and disassembled horizontally.
Dismantling activities are carried out carefully, even if the dismantled structure is thrown away, because an entire wall is needed to install a new door.
If the design will not be used in the future, then use a quick method of replacing doors:
- remove the door leaf using a crowbar, placing it under the door and using it as a lever;
- Since the box does not need to be disassembled, it is easier to break it. To do this, make a cut in the central part of the rack;
- then use a hacksaw to make a cut at an angle of 45 degrees;
- if there is a threshold, then it is also sawn through the center;
- the threshold of the box, fixed above the floor surface, is removed using a crowbar;
- The platband is quickly dismantled: the edge of an ax is inserted between it and the frame, the handle is pulled back until gaps appear in order to work with a nail puller.
Removing the door frame is easy. The main thing is to carry out the actions measuredly and carefully, so as not to spoil the opening in the wall - it will be useful for installing a new door. The new door block will delight you with its appearance for many years.
Alternative options
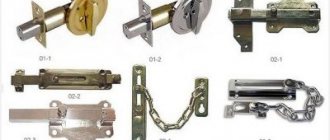
To effectively seal gaps between the leaf and the door frame, flashing strips are used. Structurally, they are made in the form of wedges or external adjustments. The slats can be made of plastic, metal or foamed polymers. Home craftsmen often replace them with pieces of felt or wood glazing beads, and use nails or screws for fastening.
Materials for work
Wood panels, laminate, veneer, MDF, plasterboard, plastic and other materials are used for embedding. You need to prepare:
- Screwdriver Set;
- screwdriver with a set of bits;
- drill for metal.
You will also need:
- level to check;
- polyurethane foam;
- wooden slats;
- putty knife;
- fastening means.
Plaster
Plastering is the most common method. It is used to eliminate defects after the door has been installed. You will need to set the guide beacons and mix the solution. A vapor barrier is carried out on the foam seam of the door block to avoid the appearance of moisture on the internal slopes in the future. This will also help prevent the appearance of fungus and mold.
Standard door kit
If there is a standard door set with dimensions of 200x60x90 cm, then the gap should be 3-4mm on all sides. It is allowed to form a lumen of up to 5 mm if:
- the room has high humidity and ventilation is needed;
- the doors are made of a material that absorbs moisture very well.
It is worth paying attention to the distance from the threshold to the canvas. Under normal conditions, it is 2–2.5 cm. If you need to ensure improved ventilation and unhindered opening, the distance can be increased to 4 cm.
Door seal
How to seal the gap between the trim and the door: budget tips from an experienced craftsman
The need to seal the gap between the casing and the door
occurs quite often. You cannot completely ignore this defect, as the following problems may arise during subsequent operation:
- with large differences in the gap, the play of light and shadow emphasizes the disadvantage;
- Insects - cockroaches, spiders - can settle in the cracks formed;
- the receding part of the casing, unprotected by varnish or painting, will be more quickly affected by shashel and fungus;
- kids have a habit of sticking their fingers into such gaps, tearing off the wallpaper and injuring their hands;
- in a cramped room near a window or hanger, clothes or curtains can get caught in the gap, clinging to the lagging upper corner of the door frame.
So, most often the problem of the formation of gaps between the platband and the interior door is due to the fact that the walls were unevenly plastered or the concrete structure of the doorway was deformed.
In the latter case, we can recommend leveling the wall. The method will require expenses for the purchase of cement and sand, removal of wallpaper, tiles, painting or panels. If you have the skills to carry out such repair work, do the following:
- mark a strict vertical line near the casing with a level;
- use it to display the deviation of the wall in a positive or negative value;
- make marks on the wall with chalk or pencil every 30-40 cm to achieve the correct gradient;
- remove the trim;
- level the plaster on the wall with a hammer drill or manually with a regular hammer;
- using the marks and level as a guide, apply wet cement mortar;
Important: a standard electric angle grinder is unsafe when cutting and generates a lot of dust!
- check the verticality of the wall after fastening after 1-2 hours;
- After 24 hours, apply a 2 mm layer of finishing putty.
- attach the trims.
If there is a need to paint or wallpaper without dismantling the trim, then create an even gap around the entire perimeter of the door. The gap should be even, its width should be about 5 mm, and it should be covered by a special insert. If the walls are aligned so that the gaps are equal, inserts are not needed.
If the gap is small - up to 2-3 mm, then you can simply remove the gap from the inner surface of the plastic or wooden frame. Also take into account the thickness of the plank - it varies between 7-12 mm, so large gaps cannot be eliminated in this way.
How to trim trim
Sometimes it becomes necessary to trim the platbands. Most often this is necessary in old wooden houses that have suffered severe shrinkage, Khrushchev-era buildings with uneven walls. To trim trims made of different materials, it is recommended to use the following tools:
- wood or foam can be planed with a plane or knife;
- MDF trims are covered with decorative lamination on the front and side surfaces. The structure of MDF itself, as a pressed board made of sawdust and an adhesive base, is fragile and cannot be processed with a plane. Its thickness can only be adjusted with a sharply sharpened knife, removing chips no more than 25% of the original thickness of the plank. When the thickness of the platband is trimmed, it will lose its decorative effect and it is the sidewalls that will suffer, since the PVC coating is brittle and breaks unevenly when trimmed, with chips.
If you have hollow plastic trim with a cable duct, you will not be able to align them. From the remains of the platbands, you can form a wedge according to the parameters of the gap. To do this you need to do the following:
- determine the dimensions of the insert based on the difference in the gap;
- make a wedge;
- remove the casing and attach a wedge to it with wood glue;
- mask the gap at the junction between the platband and the wedge with acrylic sealant;
- After drying, install the structure in place.
If the platbands are made of wood and the gap does not exceed 12 mm, then the insert can be planed from window bead and painted to match the platband with acrylic paint.
If you don’t have the desire or skills to tinker with wedges, then you can fill the gap with gypsum putty without removing the trim, if the decoration of the room has not yet been completed. A strip of construction tape insulates the door frame from contamination with the solution.
Important: the disadvantage of filling the gap is that it quickly crumbles from slams and vibrations of the door.
It is also quite possible to get by with even less effort. If the door and walls follow a standard color scheme, try to find colored silicone sealant for plastic, wood and ceramics in the store. This product does not require touch-up and will close the gap well. The sealant is suitable for all types of doors, except metal ones. This is due to the fact that silicone activates the processes of rust. It will not be possible to paint silicone - the paint will dry out and soon crumble.
Use acrylic sealant, colored or white, if the gap width does not exceed 5 mm. The algorithm of actions is as follows:
- protect the trim and wall with masking tape;
- gradually fill the gap, removing protruding excess acrylic with a rectangular spatula or a small block of wood;
- if the gap width exceeds 5 mm, 2-3 sizing cycles will be needed to completely fill the gap;
- remove the masking tape and continue finishing work.
Important: select the shade of the sealant to match the trim or interior decoration of the room so that the repaired defect is not noticeable. The seams of the white sealant will have to be tinted only with acrylic paint. It is best to use a color that will not contrast with the interior decoration of the room.
If there is no suitable color among silicone and acrylic, you can try using putty for laminate flooring; it has a rich range of colors.
How do you seal the gap and with what? What tools do you use?
Even more useful information on the TRIADOORS website