Today, the building materials market offers a lot of materials for interior decoration, and now we will talk about MDF plinths. Skirting is necessary to give an attractive and finished look to the flooring, as well as to the interior as a whole. The abbreviation MDF means finely dispersed fraction; this material, in structure and characteristics, resembles particle board and is completely safe due to the absence of epoxy resin and phenols. However, the advantages of the material will be discussed in more detail in another article; here we will pay attention to the features of installing MDF plinths.
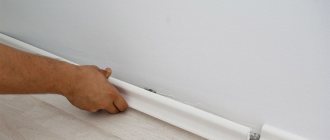
The features of these products make them extremely convenient for installation. First of all, the design of the MDF plinth itself makes its installation simple even for beginners in repair. Fixation to the wall occurs very tightly, if, of course, the wall was initially properly aligned. However, thanks to some flexibility, the plinth can easily be fixed even to a surface with a slight curvature. Resistance to humidity allows you to use MDF plinth in almost any room (however, you should not allow it to get completely wet). Add the aesthetic appearance of the plinth: it will add neatness to the space, and if it was made according to an individual design project, it will become an exclusive interior detail.
Despite all the advantages, the product has its own negative features:
- Brittleness; manual force is enough to damage MDF
- Presence of toxic phenols if cheap material was chosen
However, it is easy to avoid troubles when choosing skirting boards: it is enough to give preference to brands from the middle price category and trusted manufacturers who care about the environmental friendliness of their products. And so that the installation of MDF plinth does not end in its failure, the work is carried out carefully and without the use of significant effort.
Types of floor skirting boards
The use of skirting boards when decorating the junction of floors and walls is necessary, because this decorative product performs a lot of useful functions:
- closes the compensation gap that forms between the floor covering and the wall (when laying laminate, parquet boards and other materials);
- masks uneven surfaces near the walls formed during the installation of floor finishing;
- serves as a cable channel and allows you to lay electrical communications and other cables inside;
- allows the walls and floor to harmoniously fit together.
The floor plinth performs several functions at once
The complexity of dismantling work regarding this decorative element will directly depend on what type of baseboard needs to be removed, as well as how it was secured. Therefore, it is necessary to familiarize yourself with all types of products in order to have an idea of how difficult or simple the job will be.
Floor skirting boards
Table. Types of floor skirting boards.
| Material of manufacture | Description |
| Tree | The oldest and most famous type of plinth. It is usually made from coniferous wood, as well as beech or oak. Environmentally friendly, very durable and beautiful. It is quite expensive compared to other types. Another disadvantage of wooden plinths is that they are difficult to install; the material requires very precise fitting of parts, and then finishing (for example, painting). Yes, and it’s not easy to dismantle. It also does not have cable channels; laying wires under it is inconvenient and undesirable due to the high fire hazard. |
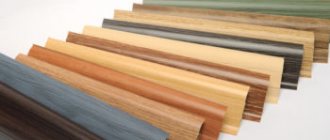
| Plastic | It is very popular due to its beautiful appearance (no worse than wood) and low price. Lightweight, easy to install, often has cable channels for laying wires. Plastic plinth does not need to be coated with varnish or paint. The product is made of PVC, can have different heights and absolutely any color. Disadvantages: fragility under mechanical stress and the need to use additional elements (plugs, connectors). |
| MDF | Easy to clean and relatively inexpensive. Not afraid of ultraviolet radiation, does not fade, does not crumble. Made from MDF. Can imitate expensive wood species. There are cable channels. The main disadvantages are low strength and short shelf life. |
| Veneered | It has a wood base and a beautiful outer finish coated with varnish or melamine. A wide range of colors, naturalness of the material, reasonable cost, as well as the possible presence of a cable channel are attracting more and more consumers to veneered plinths. The main disadvantage of the material is the fear of water. |
| Aluminum | Often used in commercial premises, it is extremely rare in residential buildings. Various wires can be laid inside it. |
| Polyurethane | Flexible, easy to install, but requires finishing (painting) provided that the white plinth does not match the interior. It is not afraid of temperature changes or humidity, so it can be used in the kitchen or bathroom. |
plastic floor plinth
How to attach skirting boards with self-tapping screws
conclusions
Plastic plinth has a number of advantages:
- Available in unlimited colors.
- During operation it does not require special care.
- Installation is easy even for a beginner.
- They don't rot.
- The material is not afraid of water, moisture and ultraviolet radiation.
- Service life more than 100 years.
- No additional preparation is required before installation.
- Flexibility and lightness allow for high-quality installation.
The plinth performs three main functions:
- Protective. Thanks to this solution, the walls are protected from moisture during cleaning.
- Decorative. The floor surface becomes decorated. In many cases more expressive. Emphases in this case are placed as desired. The leading elements can be the floor, the wall, or the baseboard itself, if it is a contrasting color.
- Leveling. Hides all defects and irregularities that formed during the repair process.
By attaching the ceiling and floor plinths in the living room, you can emphasize the completion of the repair work. If you want the installation to be carried out by a specialist, then in the online service you can easily find a large number of organizations that will help you in this matter. On the main page, the company's contacts will be at your service.
Did you manage to solve your problem using the recommendations from the article?
Yes!
46.57%
No. More answers required. I'll ask in the comments now.
37.79%
Partially. There are still questions. I'll write in the comments now.
15.64%
Voted: 569
Methods of fastening skirting boards
All types of skirting boards require a certain method of fastening and can be installed using:
- self-tapping screws (all types);
- nails (wooden, veneered);
- adhesive solutions (all types);
- special mounting fasteners (MDF, plastic, etc.);
- chopiks (wooden).
One way to install a floor plinth
Basic rules for dismantling
You won’t be able to remove the old baseboard with your bare hands, so you should get the necessary tools. The list below is general - some of the devices, depending on the method of attaching the plinth, may not be needed.
Features of dismantling floor skirting boards
What you will need for work:
- nail puller or crowbar;
- screwdriver or screwdriver;
- mallet, spatula;
- putty knife;
- hammer;
- stationery or any other sharp knife;
- wooden wedges or chisels.
Carpentry nail puller
Wooden mallet
wooden mallet
Chisel with protector
Advice! To carry out the work, you should take clothes that you don’t mind. There is not so much debris and dust when dismantling skirting boards, but, nevertheless, they exist. You can also easily ruin clean clothes if you remove a plinth that was previously installed with glue.
The process of dismantling the old baseboard
The most difficult thing is to remove the baseboard secured with nails without damaging the walls and floor. In this case, you will have to put in a lot of effort, since the product is usually installed using powerful and long nails, which are quite difficult to tear out from the base. Here you need to use a small crowbar (crowbar), a chisel or a small spatula.
Attaching skirting boards to parquet floors with nails
Attention! When dismantling a wooden plinth secured with nails, the effort should be great, but sudden movements should not be made.
If the baseboard is screwed with self-tapping screws, then the work will be much easier. In this case, using a screwdriver or screwdriver, the baseboard is simply unscrewed.
Attention! If the product is equipped with a cable channel, then it is important, before starting dismantling work, to remove all wires from it, especially electrical ones. Otherwise, there will be a risk that the person performing the work may receive an electric shock.
A plinth with cable duct is installed at the junction of the wall and floor, giving the finish a finished look
Required Tools
To decorate the premises you will need the following construction equipment. If you don’t have one at home, you can order tools from the catalog in the online store:
- Screwdriver, screwdriver with bits for installation using screws.
- For measuring - tape measure, dowels or screws - for fastening.
- Pencil – for marking drilling. Use a felt-tip pen on brick and concrete walls.
- To cut plastic materials, use a metal file or a construction knife. Using a grinder you can cut plastic of any hardness.
- If the product is fastened with nails and dowels, then a hammer will be required.
- To drill technological holes in concrete walls, a drill with perforation and a set of drills will be useful.
- You may need a miter box to cut the pieces at an angle.
- Awl - to mark the drilling location on the plastic.
- If the product is installed using glue, then the glue must be applied with a liquid nail gun or spatula.
Apron without baseboard
After reading all of the above, the reader may think: there are so many complexities and nuances with the plinth - maybe without it at all? Yes, this is possible, but subject to a number of conditions:
- The tabletop must be installed strictly level, the permissible deviation is no more than 0.5mm
- the joint between the countertop and the apron in the kitchen should not exceed 1mm
Fire safety
Most electrical cables are made of plastic, which raises questions about fire safety. If you don’t take into account the very cheap options on the market, all the rest are made of plastic, which does not support or propagate combustion. More serious material is used. From a fire safety point of view, such an electrical baseboard is an acceptable option.
Electrical safety is guaranteed subject to cable operating conditions
Well, to be sure of fire safety, also take cables with a spare cross-section and in non-flammable sheaths. And it is cables, not wires, when it comes to wiring. There is a difference and not only in price.
How to remove baseboards with your own hands?
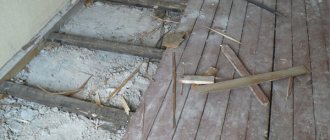
Sometimes skirting boards need to be removed to replace them with new ones, sometimes to lay fresh flooring and then put it back in place. Breaking is not building, and in any case, removing the baseboards to throw them away is much easier. But to reuse them, you will have to act carefully. Let's consider methods for dismantling skirting boards, depending on the material from which they are made, and on how and with what they are secured.
We dismantle the baseboard with our own hands
Removing a baseboard screwed with self-tapping screws
In this case, it is likely that things will go easier. In the same way as in the previous section, you should find all the screw heads. They can be recessed into the baseboard, or they can protrude slightly above the surface. In order to dismantle the plinth, just use a screwdriver or screwdriver to unscrew all the screws, and the product will be easily removed.
Wooden plinth screwed with self-tapping screws
If the screws were driven into the baseboard, which is also not uncommon, then you must act in exactly the same way as when removing a baseboard secured with nails.
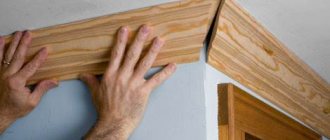
The role of baseboards in the interior
The joint between the ceiling and the wall was processed in ancient times, for which craftsmen were invited to create real masterpieces. Nowadays this procedure has become easier as a result of modern technologies and materials. All you have to do is go to the store and buy the appropriate part in the form of a plinth.
Why this element is installed:
- It transforms the room. The home gets a finished look. Professional designers use these products to change the perception of a room - making it taller or larger.
- Hides imperfections in finishing. In the process of gluing wallpaper or applying plaster, especially in corners, it is very difficult to do everything perfectly. That's why skirting boards were invented to hide minor defects.
- Protects laid communications. It is easy to lay an Internet cable or power wiring behind the baseboard.
The traditional color of baguette is white. They do not need additional processing, and they retain their appearance and quality even after years of use. At the same time, caring for them is very simple.
It is allowed to clean skirting boards using:
- vacuum cleaner;
- detergent and a soft sponge.
As experts assure, the service life can reach 30 years.
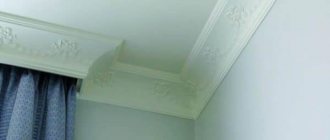
The most popular material from which this element is made is polyurethane. These baguettes act as an independent strip of a narrow shape or copy stucco molding. Polyurethane is a material that is not afraid of moisture and does not absorb foreign odors. That's why they are so in demand in kitchens. To prevent the structure from sagging, it is fixed to the ceiling and walls. As a rule, these elements are used for suspended ceilings.
Components
High-quality installation of skirting boards is not possible without the following components:
- external and internal corners, with the help of which the planks in the corners of the room are connected;
- plugs intended for decorating the edges of the baseboard. They come as a set and are available left and right;
- connections - a part with two grooves, which serves for joining and extending the planks;
- fastenings designed for fixing the plinth to the wall.
Return to content
What to do with a small and medium gap
Minor defects can be eliminated without any problems, for example, using putty. Depending on the room (wet or dry), the grouting solution can be cement or gypsum based.
You can seal a medium-sized gap between a wall and a floor using tow or felt, which is hammered into the gap in the form of a rolled sausage and compacted with a caulk or spatula. When the hole is filled, plastering or blowing with foam is done.
The appearance of cracks between the wall and the floor, first of all, has various causes. To eliminate the consequences, you need to find out why the defects appeared, as well as find the source of the problems. This is the only way to effectively seal the cracks without causing new ones to grow.
How to tear off baseboards
It must be said right away that the only task that does not cause any difficulties is how to remove the plastic baseboard. Typically, it is used to seal the joint between the wall and the floor covering, and screw nails onto the dowel. It is enough to remove the decorative strip, remove the wires from the cable channel, unscrew the screws, and after repair, simply install it in place.
To remove the PVC profile, just unscrew the screws
Stucco molding
It is better not to touch the plaster baguette. Sadly, it is extremely difficult to carefully remove stucco molding; it is dismantled if it is not suitable for the new interior; in other cases, it is better not to touch it. Try, of course, running a knife along the joints several times, each time trying to push the knife deeper. If the mixture on which the fillet is held crumbles, then there is a chance to slowly remove it. But more often than not, it’s impossible to tear off the stucco molding; it gets wet and is simply beaten off with a hammer and chisel.
Polystyrene and foam
Planks made of polystyrene and foam plastic are usually glued with special glue. Before removing the ceiling plinth made of these materials, direct a stream of warm air at it; after a while, the adhesive composition will soften. All that remains is to run a knife or thin spatula along the joint, pry up the profile, and carefully remove it.
Important: Try to dismantle the ceiling plinth made of polystyrene or foam plastic as carefully as possible: do not touch the front side with the decor, since when exposed to warm air, the material becomes soft and can be damaged even with minor mechanical stress.
Photo diagram of how to remove ceiling plinth
Calculation of the required amount of material
To begin installation, you need to purchase material and fasteners in accordance with the calculations. A reliable calculation will allow you to install the product efficiently and accurately in the future. To do this, you first need to measure the length of the room in which the installation will take place. The door opening is not included in the calculation.
The resulting number is divided by the length of the standard lamella. The division results in the number of panels that need to be purchased. When purchasing, you need to make a small reserve, at least 0.5 meters. In case of inaccurate calculation, you can make up for the missing quantity by purchasing any components.
Then you need to decide on the number of external and internal corners, right and left caps. This data is obtained by visual inspection of the room. It is recommended to carry out the calculation two or three times so as not to forget anything. We can say with confidence that you will need two plugs per doorway.
By dividing the length of the room by 50 cm, calculate the number of dowels and screws, adding two extra fasteners to each corner. It is advisable to purchase at least a few screws in reserve.
How to remove plastic skirting board from the floor?
The easiest way to dismantle plastic skirting boards. As a rule, they are not held as securely as, for example, wooden ones, and are usually simply screwed to the wall using screws and dowels. The fastening point is covered with an insert, so the fastening elements are invisible from the outside.
Plastic floor plinth
Dismantling and removing the baseboard with cable channel
Removing the plastic floor plinth
It is better to start work from any external corner. This is one of the most common dismantling methods.
Step 1. Using a flat-head screwdriver, pry the decorative corner from the bottom and carefully lift it up. Then it is simply removed by hand.
The decorative corner is pryed off with a screwdriver
Removing the decorative corner
Step 2. Remove the strip covering the cable channel and the fastening points with self-tapping screws by hand.
Removing trim strip
Step 3. Use a screwdriver or screwdriver to unscrew the screws. The baseboard has been removed.
Unscrewing screws
However, not everyone has external corners in their rooms. It depends on the geometric shape of the room. Fortunately, you can remove the baseboard in another way - in this case, dismantling begins from the end part.
Step 1. The end cap is removed from the end of the baseboard by hand.
End cap
Step 2. Using your hands, pull out the bar covering the cable channel.
Removing the trim strip
Decorative strip removed
Step 3. The screws are unscrewed in any convenient way.
Self-tapping screws are unscrewed
Preparing for work
- When starting work, you should decide how much material you will need. It is necessary to prepare a work plan for high-quality installation of the floor cornice.
- By measuring the perimeter of the room, it is determined how many planks are needed to install for the length of the room. All connecting parts and plugs are selected to match the shape of the plinth.
- All sets of plastic strips come with additional parts necessary for attaching them to the wall.
- If you need to hide the cable, then it is better to take a plinth with a special channel.
- The plastic plinth is installed last, when the repair is completely completed.
- An awl and a hacksaw for metal will help to make holes in the plank. To attach to the floor, you will also need a drill with a set of drills, a screwdriver, a tape measure, a pencil, and a construction corner. A hammer drill will be needed if the wall in the room is concrete or brick.