Finishing is the final stage of any renovation work. Ceiling rims are a detail that is almost always used, because with the help of this element you can disguise various imperfections. Also, using it, they often decorate the room. Therefore, when we cut the ceiling plinth correctly, the quality of the repair directly depends on it.
How to cut at 45 degrees
- - miter box;
- - construction square;
- - pencil;
- - hacksaw;
- - sharp knife;
- - metal ruler.
Most often you have to cut the baseboard for the internal corners of the room. To trim, place it in a miter box fixed in a stationary state. Press the very edge a little further than the slot at the 45 degree mark located on the right. Cut the baseboard using a hacksaw blade. If its long part is on the right, the cropped corner will be right-handed, respectively, on the left - left-handed.
Remember that the side of the plinth that is pressed against the side wall of the miter box when cutting the corner will be glued to the wall during installation, and the side that is pressed against the bottom of the miter box will be glued to the ceiling. After cutting off two corners: left and right, place the product in the corners to check the accuracy of the cuts made. Correct minor discrepancies using a sharp knife.
External corners are less common in apartments. When cutting the baseboard to create such corners, you must first make a mark at the beginning of the outer corner. To do this, use the markings to press the product against the wall and use a pencil to mark the edge of the corner of the wall where the cut will be made. Please note that before applying the mark, the baseboard must be prepared for gluing, that is, have an internal corner or be ready for direct joining.
Place the plinth in the miter box and press down. If its long part is located on the left, make a cut along the left mark of the miter box, corresponding to an angle of 45 degrees. The side pressed against the side wall, as when cutting an internal corner, will be glued to the wall during installation.
When gluing, make sure that the bottom side of the outer corner matches the outer corner of the wall or protrudes slightly beyond it. Cut the right side of the corner in the same way.
To cut an angle on a wide plane, use a square. Place it so that the inside fits snugly against the end of the product.
How to cut a 45 degree angle without a square and a protractor
Methods
In addition to cutting using a miter box, in which the angles are clearly defined (90, 45, sometimes 60 degrees), there are other methods. More expensive is to use a rotary miter box or rotary circular saw. Cutting an angle with a tool like this, where it can be adjusted and is fairly easy to install, is not difficult. Cutting is done either manually or using a circular saw.
Purchasing such equipment for finishing one room, bathroom or even an apartment is hardly justified; professional activity is another matter, in this case, of course, it is better not to save.
In order to file a fillet at home, you can get by with a more budget-friendly option by preparing a homemade miter box from plywood. It is important to clearly measure the corners and make cuts along which the plinth will be sawn off in the future.
In order not to confuse the sides of the plinth and to cut correctly, at first it is better to apply it together with the miter box to the ceiling; gradually the skill will be developed and you will be able to do without repeated movements up and down.
You can also prepare a kind of mock-up of the miter box on cardboard; the sawn-off plinth will have to be placed on the mock-up and marked with a pencil. In order to cut the required angle, it is better to move it to a more convenient place; in addition, it is important not to spoil the layout.
There are ways to saw off corners without a miter box. This is especially true since the angles are not always ideal, and the standard angle of 45 degrees may be incorrect. In order to make a corner in this way, you need to place a piece of plinth directly on the ceiling exactly as it will be mounted. Use a pencil to mark the width of the fillet on the ceiling. Having placed the baseboard on the other side of the corner, you also need to mark its width on the ceiling.
You will get two intersecting segments. Then you need to again attach the pieces of plinth to the ceiling and mark the same point on them.
It is necessary to cut from the edge to the marked point; it is important to remember the sides with which the plinth will be adjacent to the wall and ceiling; under no circumstances should they be confused. Small flaws can be corrected during the installation process, trimmed with a stationery knife, if the baseboard material allows this. With wooden fillets everything is much more complicated; a knife will not help there.
READ How to Cut Corners of Ceiling Plinths with a Miter Box Video
“On-the-spot” measurements make it possible to cut both internal and external corners without large losses, although the latter are not common, yet their finish is significantly different.
How to cut the ceiling plinth at 45 degrees, see below.
Recommendations from professionals
Useful tips will help beginners with DIY installation.
- Be precise when marking so that there are no gaps between the joints. To prevent this, you can increase the length of the workpiece by 0.5-1 mm. They will still fall into place due to the elasticity of the material.
- It is not recommended to fill the joints with silicone, as over time it will darken and it will stand out against the background of the slope.
- To be on the safe side, do not glue the corners right away, but first attach them with tape and take the necessary measurements.
- To create the correct shape for the arch, use a hair dryer.
- When processing areas in openings where the angle is not 90°, but more or less, it is necessary to take measurements locally and cut them with a knife.
Plastic corners serve as reliable protection for slopes from damage, and also add aesthetic completeness to the entire interior. Among the wide range of shapes, sizes and colors, it is easy to choose the best option for a specific design. And it’s also easy to attach them yourself, having all the necessary tools and work skills. Reinforce your knowledge by watching the video.
Plastic corners for slopes are the logical conclusion of home renovations. They act as a protective and aesthetic design for doorways, window slopes and corners.
How to cut a 45 degree angle: How to cut a 45 degree angle
Trimming using a miter box
How to evenly trim the corner of a ceiling plinth using it?
A miter box is a simple tool used by carpenters. With its help, you can cut any workpiece at the desired angle.
It is usually a wooden, metal or plastic tray on which special vertical slots are made for cutting at an angle of 45° and 90°.
There are complicated designs, which, in addition to the mentioned angles, also have a hole for making a 60-degree cut.
A special miter box is produced for professional work. Its rotating mechanism allows you to fix the cutting blade in relation to the workpiece at any given angle.
How I glued plastic corners to the wall and windows.
The process of trimming skirting boards to go around internal and external corners in a room is simple, but requires precision in execution. The video below provides you with additional information on this topic.
Using an electric saw
The miter saw cuts at an angle with high precision.
To perfectly cut a ceiling plinth, it is best to use an electric miter saw, where you can set it in any direction and cut off the desired slope as accurately and accurately as possible.
It doesn't require much effort. You just need to set the desired parameters and lower the saw blade onto the surface to be cut, be it wood or plastic. However, you can cut down the ceiling plinth using cheaper tools.
How to form an angle?
Lay the cut tiles on the corner so that they look perfect, which is important, since the profile of the connecting edges has been changed and it is necessary that the tiles fit together evenly at the joint.
- The first tile is glued, the position is fixed with a level, the cut edge goes beyond the edge of the wall, which is normal.
- While the glue has not hardened, the tiles are glued to the other side of the wall, the cut edges are tightly connected, and then the tiles are glued in this order.
- It is important that the wall is level on both sides, otherwise it will not be possible to form the correct angle with the help of tiles.
Laying tiles is no different from what is done during regular tiling work. The main thing is that the walls on both sides are smooth, and the tiles are adjusted so that everything looks smooth and beautiful.
Attaching the ceiling cornice to the wall
For cases with suspended or plasterboard ceilings, there is another installation option - on special brackets that are attached to the wall. In this case, the distance from the corner is determined by the parameters of the bracket. They have longitudinal slits that allow you to adjust the length at your discretion. There are several holes at a distance of 5-6 cm from each other. Wall mounting brackets usually come with mounting plates that are attached to the plastic case with four small self-tapping screws. The installation step of the fasteners for wall mounting is the same - 50-60 cm; two stops are placed at the joints, 10-15 cm away from the joint.
Types of brackets for wall mounting of ceiling curtain rods
How to attach a ceiling cornice to a wall? The installation procedure is the same as in the case of installation on a concrete ceiling: marking the mounting holes, installing dowels, then attaching the cornice itself to the wall with brackets. But with different brackets the procedure is different.
Option with long cuts in the bracket body:
This option is good because, if desired, you can move the cornice closer or further within the length of the cut. You can also level out imperfect wall geometry. When using the option with several holes, it is easier to first attach the brackets to the cornice, then lift the entire structure and make markings. After installing the plastic part of the dowels, the cornice assembly to the wall again. As you can see, it is very difficult to do without an assistant: you need someone to hold the cornice.
Sources:
https://avrorasdk.ru/vnutrennyaya-otdelka/kak-otrezat-potolochnyj-karniz.html https://stroychik.ru/okna/montazh-potolochnyh-karnizov
How is cutting done?
Here's how to cut a corner of a tile for wall installation:
- when cutting, do not touch the glazed part, minus 0.5 mm and maximum 1 mm;
- if the coating layer is touched when cutting at a UCA (i.e. at 45 degrees), then treat it with sandpaper, giving the edge an attractive appearance;
- tiles, especially domestic ones, have a concave shape, so in principle it is impossible to make an ideal cut on a machine; the section that is concave is processed manually by grinding, but if there is a deflection in the tile, it is better to use a traditional plastic corner, it will turn out cheaper and faster;
- when cutting there is a secret - cut the tiles with an angle of less than 45 degrees, but for ceramic plinths such a tolerance is not applicable;
- the painted end is better suited for cutting, it is not finished to the end, leaving a gap of 1 mm;
- A tile cutter cuts the edge of a tile without dust; if you use water when cutting, an angle grinder leaves much more dust, so they work in a sealed mask or respirator.
Laying on corner surfaces is a costly method and takes a lot of time. In some cases, it is better to go the usual route - pick up plastic corners. But there are options when you can’t do without pruning. This refers to tiles that look like decorative stone. In this case, it is only possible to cut the edge of the tile at an angle of 45 degrees.
Features of choosing glue
Quite often, novice home craftsmen wonder how to properly glue corners to wall slopes. To do this, you can use three types of compositions:
- silicone sealant;
- liquid Nails;
- polyurethane glue.
Liquid nails have increased strength characteristics. They are easy to apply, especially on plastic surfaces. It is better to do this in a zigzag or dotted manner. The material does not dissolve plastic and leaves no residue. The glue holds the elements together well, the adhesive strength does not decrease for two decades. The final adhesive force is achieved after hardening and is 40 kg/m2. When choosing glue, it is better to give preference to a colorless composition.
If you are still thinking about how to glue the slopes, then you can choose silicone sealant. It does an excellent job not only of gluing to wallpaper, but also to ceramic tiles, as well as tiled surfaces. Silicone sealant has an acrylic component, so it is ideally suited for these purposes.
Polyurethane glue is in no way inferior to the mixture described above. Its characteristics can be compared with liquid nails. But plastic corners for walls are produced completely self-adhesive. In this case, you only have to take accurate measurements, remove the protective film and press the element against the protruding corner.
To apply the composition, if you plan to use it in your work, it is better to purchase a glue gun. Before gluing plastic corners, you should study the characteristics of the glue to see if it is suitable for the wallpaper. Before you start gluing the plastic corners, you should clean the surface of dust.
What tool to cut with?
In this version of tile cutting, the bottom part is cleared so that only the bottom tile layer is involved. And the top glazed part is not affected. Tools used to cut corners :
- an electric tile cutter is a convenient, practical tool that cuts an angle at 45 degrees, because it cuts tiles in the range of up to 45 degrees and firmly fixes the cutting edge in this position;
- an angle grinder, with which you can also cut a corner, but doing this is much more difficult than with a tile cutter, however, for home use, an angle grinder is the most reasonable option.
Cutting tiles at 45 degrees with a tile cutter
It is clear that a tile cutter is used by those who are engaged in professional tile laying, and an angle grinder is suitable for those who decide to do their own renovations in the bathroom or kitchen. But professionals also use an angle grinder to carry out the final work of grinding the cut corner. But making a cut on a tile with an angle grinder is not easy for an untrained person. Therefore, practice on used pieces of ceramic before you start finishing work, which will help you cut the corner correctly.
Cutting tiles at 45 degrees with a grinder
Laying tiles end-to-end
- externally aesthetically pleasing, and if the cut corner is made correctly, neatly, the wall is even, then it feels like the surface of the wall is monolithic;
- there is no need to match the plastic corner to the tile so that it matches the color of the cladding, which reduces time.
But tiles treated in this way also have disadvantages:
- such a corner is located in the passage part and since the cut part becomes thin, it is more vulnerable; a small blow with an empty bucket is enough to make a chip in this place, which will lead to the need to replace the tiles;
- Work with cutting a corner is labor-intensive, time-consuming, and the price will increase compared to using a plastic corner.
But still, cutting ceramic tiles at an angle of 45 degrees is a preferable and presentable technology, giving the room a cozy look.
Where should you not use a turned 45° angle?
This type of corner becomes quite fragile due to the thinned (narrowed) edge of the tile, so it is undesirable to use it when facing steps. In the place of the greatest traffic, the tile will definitely come off, the corner will be chipped - it’s only a matter of time.
READ Which Battery Is Better For A Screwdriver
The steps are laid with the top tile overlapping the end tile (on the riser) or using aluminum corners/profiles.
And in general, before making such angles, think carefully about everything. If there is a big threat of hitting and knocking down a given corner, then most likely this is not your option. In this case, you can try using an aluminum corner (but not a plastic one).
The easiest way is a grinder
It is more difficult to achieve a high-quality result with a grinder, but, in principle, it is also possible. This is the easiest way to sharpen a 45 degree corner of a tile with your own hands at home.
The process of bevelling and polishing porcelain tiles in the video below.
First of all, you must have a good diamond tile blade.
Place the tile on the edge (perpendicular to the one that is being cut) and grind its back part (clay) at an angle of 45 degrees.
If it turns out a little uneven, then large rough irregularities can be gone over again with a disk, and in order to get a cleaner and smoother edge, you can use a grinding attachment like this (pictured below) with sandpaper or diamond “turtles”.
The sanding wheels are on Velcro, if they wear off, take them off and attach a new one. The base itself with Velcro is screwed onto the thread of the grinder. Diamond bits have a much longer service life, but they also cost many times more. If you are constantly laying tiles, then it makes sense to take diamond turtles. If you are doing the first and last repairs in your life, then you can get by with sanding wheels.
When working with such a thing, you need an angle grinder with adjustable speed (minimum speed!), otherwise the edge of the tile will melt and burn, rather than being sanded.
Stucco molding
It is almost impossible to remove the molding without damaging it. The stucco decoration is removed during renovation when the decoration does not fit into the updated design. In all other cases, it is better not to touch the stucco molding.
You can try to remove it by running a sharp knife along the joints several times, gradually pushing the blade deeper and deeper.
Important! If the mixture on which the decor is held crumbles, then perhaps your attempts will be crowned with success.
However, most often, it is not possible to tear off the molded plinth without damaging it, so it is simply beaten off using a chisel and hammer.
How to properly cut tiles at 45 degrees?
In order for the corner of two tiles to look beautiful, when cutting the tiles you need to be a little short of the glaze (0.5-1mm). That is, only the clay is cut off. If you walk on the glaze (the front part of the tile), it will be “torn” and chipped. It will immediately catch your eye, it’s not beautiful.
We encountered this problem when cutting wavy tiles. But more on that later.
Surely many of you have seen such “art”, but most often everyone thinks that this is how it should be. And a tilemaker with twenty years of experience assures that it cannot be any other way.
Even if there is a need to cut the corner of the tile away from the “factory” edge and you have to cut the glaze, there is still a way to do it beautifully.
Firstly, to do this, you first need to cut the tile evenly (to the required size), and then, again, before reaching the glaze, cut it at 45°. This cut will be much cleaner and more beautiful.
You can also sand the edge of the glaze with fine sandpaper, this will make it even smoother.
Secondly, you can still cut off the corner from the beautiful edge (factory end), and sand the trimmed opposite edge and hide it in the other direction. It will be less noticeable.
For example, we once did this when tiling a toilet installation. Because a nice corner is more important than the bottom seam. Moreover, it also turned out to be very neat, and if you don’t know that it is trimmed, you will never pay attention to it.
Electric tile cutter
An electric tile cutter, or as tilers also call it, a wet cutter. It has a water-cooled disk, and the same water extinguishes all possible dust. The tile cutter cuts along one clear, fixed path and minimizes the human factor such as hand trembling, etc.
The tile cutter has two working positions - a straight cut and a cut at an angle of 45° (in fact, you can set any angle from 0 to 45°, but this most often makes no sense).
Design elements
The design of a ceiling cornice with through fastening is extremely simple and consists of several elements. Some of them are included in the standard kit, and some are additional and can be purchased as needed.
- Tire. This is a plastic or metal profile with runners for moving fixing hooks for curtains. It can have different sizes - the width of the ceiling cornice depends on the number of runners (working tracks), and the length is standard (2; 2.5; 3 m, etc.).
Three-row profile tire
Advice. The number of working tracks must correspond to the number of layers of curtains. But lambrequins can also be attached to the front plane of the cornice using special Velcro.
- Hooks are holders for curtains with a leg and a base that prevents them from falling out of the runners. Once connected to the fabric, they snap tightly into place, allowing them to remain in place even when washed.
Photo of plastic hooks
- Caps and stoppers serve to limit the movement of the hooks and prevent them from falling out at the ends of the bar.
Screw stoppers can be installed anywhere on the track
Additional elements include connectors, turns, decorative hoods and brackets.
- Connectors are needed to increase the length. For example, you can assemble a 4-meter ceiling cornice from two two-meter tires.
- Turns allow you to change the configuration of the profile - make it with rounded ends or a broken plan.
- Blends are colored plastic strips that snap onto the front surface of the cornice. Needed for decorating an open structure.
How to veneer and form a right angle?
First you need to glue the first tile and level it. The trimmed edge will “fly” beyond the plane of the wall.
Then you immediately need to glue the second (counter) tile on the other side of the corner. While the glue is fresh and adjustable, you need to form a beautiful right angle.
And so we gradually move up, row by row.
How to cut a baseboard at 45 degrees? Three best ways.
Before tiling the corner, make sure that your walls are vertical.
Because if the walls are even slightly heaped outwards, then without steps the corner will no longer meet. And this is not very beautiful, believe me! And you won’t cover it up or make up anything.
How to cut a 45 degree angle correctly
Sometimes you need to cut a particular part or product at a certain angle. As a rule, you need to cut baguettes, fillets, platbands, baseboards and other similar interior elements at an angle of 45 degrees. Anyone can cope with this task. The main thing is not to rush, don’t be nervous and everything will work out.
READ Which Screwdriver Is Better Nickel Or Lithium
Buy ready-made corner elements
For example, as for baguettes or fillets, special corner elements are sold for them that fit perfectly into the corner and do not need to be trimmed. They just need to be glued into place and pressed well.
Why do you need to attach corners to slopes?
Let's start with the most important thing - why is this necessary? What role do the corners play - only decorative or do they have more serious functions? Let’s not argue with the fact that if you frame the slopes of doors or windows with special decorative elements that fit perfectly into the design of the room, then the interior will immediately change for the better.
But besides this, they also perform a very important protective function. Sooner or later you have to carry large items through the opening, which can damage the corners, and you can simply accidentally touch the outer corner and damage it. There can be a lot of situations, the main thing is that the result is the same - a damaged surface and, accordingly, a damaged appearance. In addition, as practice shows, most often the wallpaper begins to peel off in these places. So it is best to protect the outer corner of the slope with the help of a decorative element, which will also transform the interior.
Corners are not only protection, but also a neat aesthetic appearance
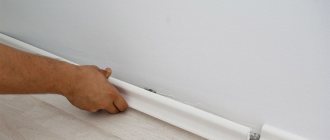
How to cut skirting boards at inner corners: step-by-step action plan
Begin installing the skirting boards in one of the corners. If this is your first experience, choose the part of the room in which something will stand. Not always, of course, the first pancake is lumpy, but still it’s better to play it safe. To make corner on the baseboard, work slowly. One was sawed off, checked, adjusted. Let's move on to the next one. It is better to fasten after two adjacent corners have been assembled. But you shouldn’t delay the assembly too much either.
Trimming skirting boards in corners requires certain skills. But by making a few joints yourself, you can beautifully design complex angles
How to use a miter box to cut baseboards? Place the device in front of you, preferably on a table, but it can also be on the floor. It doesn’t matter which way you turn it, it’s symmetrical. Insert the bar into the profile and turn it so that it will stand against the wall. When cutting down a floor plinth in a miter box, the “wall” is the wall that is farthest from you. Once again: firmly press the baseboard strip against the back wall in the position in which it will be installed. Insert a hacksaw into the required slots. You can start sawing.
How and with what to cut plastic skirting boards
All of the above applies to MDF and wood skirting boards. Cutting them with a regular hacksaw is not a problem. It is advisable to use a blade for metal, since it has a smaller tooth and the cut is smoother; you will have to work less with sandpaper. With plastic the situation is different - when you try to cut a piece, some thin-walled skirting boards crumble and break.
Cutting plastic is not very convenient due to the thin walls
To cut normal quality plastic skirting boards you can use:
- A hacksaw for metal.
- Grinder (angle grinder) with a diamond blade.
- Turned with a miter saw. Before cutting, accelerate the blade and only then start cutting.
- A jigsaw and a fine-tooth file. Here you have to try - select the speed and blade.
- Sharp knife.
- Metal scissors. In any case, it is not difficult to make straight cuts with them.
Only personal experience will help you decide which is more convenient for you to cut plastic floor plinths. If you have a miter saw, try using it. It’s not a problem to try a couple of times with a grinder with a diamond blade. If all this does not give a normal result, try a hacksaw, jigsaw or knife. There are, of course, special scissors for plastic, but for one-time use they are too expensive to buy.
Accessories for decorating corners and joints of PVC skirting boards
In plastic skirting boards, you can design corners and joints using special fittings. There are external and internal corners, plugs and connectors. In principle, they allow you to assemble the desired configuration. Each manufacturer makes its own fittings - according to its own profile, colors. But the principle of their use is the same.
How to decorate the corners of a plastic plinth
The first rule is that all cuts are made straight. Strictly perpendicular. Marks in the corners are placed 1-1.5 mm away from the corner. The fact is that the fittings for rigidity have their own jumpers. So for them you need to retreat a couple of millimeters, but no more. Otherwise, a gap will appear or the baseboards will pop out of these corners.
This is what comes out of the assembly:
I must say that not everyone likes the look of plastic corners. You can make a corner on a PVC plinth in the same way as described for wooden or MDF. The only difficulty is that you have to be careful with plastic - it breaks from excessive force. There is one trick - before cutting the plastic baseboard, add a little polyurethane foam on the back side and wait for polymerization to begin. It will be tougher, easier to cut, less deformation. If the foam subsequently gets in the way, it’s not a problem to remove it, but it’s actually easier to cut it.
Using Templates
If you don’t have a protractor, miter box or ready-made corner elements, you’ll have to look for a suitable template. Of course, the template must have the desired angle. It is applied to the workpiece and the workpiece is marked with a pencil. This is one of the easiest ways to achieve the desired result.
Arch finishing
Arch design often becomes a problem. In general, there are not many external corners in the apartment, but there are always some on the arch. And in the aisle they very often get touched. Either furniture, or other cargo, or simply a resident who did not fit into the opening. And there are no questions with the straight part, but the rounded part can be a problem.
And not only in the doorway can there be an arched vault
In general, you can use universal corners for an arch. They are flexible, which is very convenient. There are flexible, non-universal ones - plastic, made from a special polymer with increased elasticity.
But in general, corners with different shelf widths are used to decorate arches. They are even called arched. They have one shelf 10 mm (external) and the second - internal - 30 mm or more. They bend easily. You can’t twist it into a donut, but it’s not difficult to get an arc of any curvature. You just need to use a secure hold while the glue dries.
If you want to bend a regular corner , you can do this by heating the plastic. For this work you need a hair dryer. The usual one - for hair - will not work, since its temperature is too low. We also need a template according to which we will bend the plastic corner . Take a piece of fiberboard, tighten screws or drive nails, forming the profile that you require.
This way you can decorate the corners of the arch with protective corners
They start bending from the middle. Warm up the area, constantly pressing on the middle, and using a hairdryer, moving from the center to the edges. So you need to bring the corner to the desired curvature and leave it in this position to cool. To prevent it from straightening out, holes are made in parallel with a row of screws for the second row. The distance between the rows is equal to the width of the corner shelf. After the plastic has bent, insert and lightly tighten the screws. After the plastic has cooled, remove them.
Miter box for skirting boards
A carpenter's miter box is a device for making cuts at a certain angle. It is used with a hacksaw. In principle, you can make a miter box yourself by assembling a guide from boards and making cuts in the walls. There are various models on sale ranging from 15 to several hundred dollars. They differ in capabilities and materials, although they are all called “miter box”. Professional models are made on the basis of a good hacksaw and have a scale that allows you to set the saw as needed. With such a tool, it is not a problem to set any desired cutting angle in order to correctly cut the plinth for a perfect fit.
Professional carpenter's miter box - a tool with a wide range
The simplest miter box is a plastic U-shaped profile with slots in the walls. These slots are used as a guide for the hacksaw. They do not allow the canvas to deviate. In any version there are two cuts - straight and at 45 degrees. Some may have a couple more options.
How to cut a baseboard at 45 degrees? One way is to use a miter box
Sometimes a hacksaw is included, sometimes not. Usually the ones included are not very good. You can use any hacksaw, selecting a blade for the material you plan to cut. It is important that the canvas moves freely in the slots.
Sources:
https://laminatepol.ru/21523-rezku-plitki-pod-45-gradusov.html https://instabur.ru/plitka-pod-45/ https://ingener-pto.ru/2019/12/12 /kak-pravilno-otrezat-ugol-45-gradusov/
Using a crowbar to mark corners
Another measuring instrument is called a malka. In plumbing and carpentry, it is used to mark something at certain angles. Using such a measuring device will help you avoid making mistakes before sawing off the corner for your bathtub. The instructions for using the malka are quite simple; even a novice builder can handle it.
The malka is a structure of two rulers connected by a clamping joint. Some models of the instrument also have a circular degree scale, reminiscent of a protractor. Malka is very easy to use. A corner is applied to a more massive ruler, the second strip is moved to the desired angle and is used as a guide when making a mark in the right place.