Repairs in any room involve a variety of work. This includes wall decoration, floor finishing, and replacement of windows/doors. But in most cases - and this is especially true for secondary housing - various dismantling works are carried out in advance, affecting almost all elements inside the premises. Dismantling the baseboard must be done in order to be able to properly lay the new floor covering, as well as in order to replace old products. The procedure is quite simple, and therefore you can do it yourself.
Dismantling the baseboard
Types of floor skirting boards
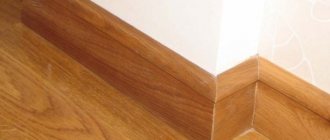
The use of skirting boards when decorating the junction of floors and walls is necessary, because this decorative product performs a lot of useful functions:
- closes the compensation gap that forms between the floor covering and the wall (when laying laminate, parquet boards and other materials);
- masks uneven surfaces near the walls formed during the installation of floor finishing;
- serves as a cable channel and allows you to lay electrical communications and other cables inside;
- allows the walls and floor to harmoniously fit together.
The floor plinth performs several functions at once
The complexity of dismantling work regarding this decorative element will directly depend on what type of baseboard needs to be removed, as well as how it was secured. Therefore, it is necessary to familiarize yourself with all types of products in order to have an idea of how difficult or simple the job will be.
Floor skirting boards
Table. Types of floor skirting boards.
| Material of manufacture | Description |
| Tree | The oldest and most famous type of plinth. It is usually made from coniferous wood, as well as beech or oak. Environmentally friendly, very durable and beautiful. It is quite expensive compared to other types. Another disadvantage of wooden plinths is that they are difficult to install; the material requires very precise fitting of parts, and then finishing (for example, painting). Yes, and it’s not easy to dismantle. It also does not have cable channels; laying wires under it is inconvenient and undesirable due to the high fire hazard. |
| Plastic | It is very popular due to its beautiful appearance (no worse than wood) and low price. Lightweight, easy to install, often has cable channels for laying wires. Plastic plinth does not need to be coated with varnish or paint. The product is made of PVC, can have different heights and absolutely any color. Disadvantages: fragility under mechanical stress and the need to use additional elements (plugs, connectors). |
| MDF | Easy to clean and relatively inexpensive. Not afraid of ultraviolet radiation, does not fade, does not crumble. Made from MDF. Can imitate expensive wood species. There are cable channels. The main disadvantages are low strength and short shelf life. |
| Veneered | It has a wood base and a beautiful outer finish coated with varnish or melamine. A wide range of colors, naturalness of the material, reasonable cost, as well as the possible presence of a cable channel are attracting more and more consumers to veneered plinths. The main disadvantage of the material is the fear of water. |
| Aluminum | Often used in commercial premises, it is extremely rare in residential buildings. Various wires can be laid inside it. |
| Polyurethane | Flexible, easy to install, but requires finishing (painting) provided that the white plinth does not match the interior. It is not afraid of temperature changes or humidity, so it can be used in the kitchen or bathroom. |
plastic floor plinth
How to attach skirting boards with self-tapping screws
Cork damper
It is most often used to visually remove joints between parquet and ceramic tiles, but it is also perfect for decorating the transition between floor and wall. Unfortunately, only a small number of shades are sold in stores. But thanks to the special structure of the damper, you can independently paint it in any desired color.
The advantages include original appearance, low cost and ease of installation. But the cork compensator has one serious drawback. Due to its porous structure, under the influence of high air humidity, the material quickly breaks down and becomes unusable. Therefore, if the house is constantly damp, then it is better to opt for another material.
Methods of fastening skirting boards
All types of skirting boards require a certain method of fastening and can be installed using:
- self-tapping screws (all types);
- nails (wooden, veneered);
- adhesive solutions (all types);
- special mounting fasteners (MDF, plastic, etc.);
- chopiks (wooden).
One way to install a floor plinth
Basic rules for dismantling
You won’t be able to remove the old baseboard with your bare hands, so you should get the necessary tools. The list below is general - some of the devices, depending on the method of attaching the plinth, may not be needed.
Features of dismantling floor skirting boards
What you will need for work:
- nail puller or crowbar;
- screwdriver or screwdriver;
- mallet, spatula;
- putty knife;
- hammer;
- stationery or any other sharp knife;
- wooden wedges or chisels.
Carpentry nail puller
Wooden mallet
wooden mallet
Chisel with protector
Advice! To carry out the work, you should take clothes that you don’t mind. There is not so much debris and dust when dismantling skirting boards, but, nevertheless, they exist. You can also easily ruin clean clothes if you remove a plinth that was previously installed with glue.
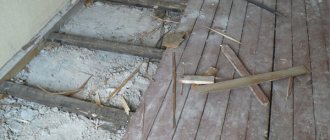
The process of dismantling the old baseboard
The most difficult thing is to remove the baseboard secured with nails without damaging the walls and floor. In this case, you will have to put in a lot of effort, since the product is usually installed using powerful and long nails, which are quite difficult to tear out from the base. Here you need to use a small crowbar (crowbar), a chisel or a small spatula.
Attaching skirting boards to parquet floors with nails
Attention! When dismantling a wooden plinth secured with nails, the effort should be great, but sudden movements should not be made.
If the baseboard is screwed with self-tapping screws, then the work will be much easier. In this case, using a screwdriver or screwdriver, the baseboard is simply unscrewed.
Attention! If the product is equipped with a cable channel, then it is important, before starting dismantling work, to remove all wires from it, especially electrical ones. Otherwise, there will be a risk that the person performing the work may receive an electric shock.
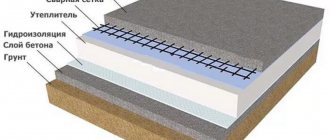
A plinth with cable duct is installed at the junction of the wall and floor, giving the finish a finished look
What tools are needed?
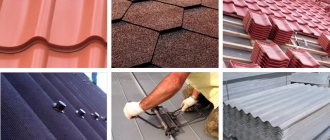
It all depends on the material used to make the products. Materials such as wood, PVC, gypsum, and polystyrene can be used to make skirting boards. The plinth can be with or without corners, with or without decorative elements.
To dismantle a glued or nailed profile yourself, you will need:
- Mallet.
- A flathead screwdriver or chisel.
- Thin spatula or scraper.
- Wooden wedges.
- Nail puller.
- Stationery or shoe knife.
- Hammer.
How to remove baseboards with your own hands?
Sometimes skirting boards need to be removed to replace them with new ones, sometimes to lay fresh flooring and then put it back in place. Breaking is not building, and in any case, removing the baseboards to throw them away is much easier. But to reuse them, you will have to act carefully. Let's consider methods for dismantling skirting boards, depending on the material from which they are made, and on how and with what they are secured.
We dismantle the baseboard with our own hands
Ceramic border
Initially, this technology was used in places where the bathtub adjoined the wall to seal the cracks. But then someone suggested using a ceramic border instead of a baseboard for the floor. As a result, this technology quickly spread throughout Russia and Europe.
Since the ceramic border has an attractive appearance and a number of useful properties: long service life, resistance to almost all external factors and high tightness.
If you are already tired of the classic option of framing the transition between the floor and the wall, then you can use one of the unusual analogues to the baseboard. This way you will get a more original and attractive interior, thereby spending not much more money.
How to remove a wooden baseboard from the floor?
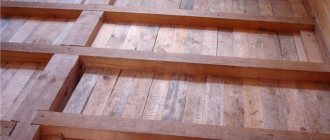
The most difficult to dismantle are old wooden skirting boards, which were produced back in the days of the Soviet Union and were made to last. And they were attached the same way. Yes, such products are still found in some apartments and have not yet outlived their usefulness, although they have lost their appearance under a mass of layers of paint. They can be fixed in several ways - with glue, nails, or to the wall or floor.
Removing wooden floor skirting
The first thing you need to do is look at how the baseboard is attached. If nails were used for this, their heads will be clearly visible on the surface of the product. They can be recessed into it or, conversely, protrude slightly above the surface.
Old wooden baseboard
If the plinth is nailed to the floor, in the place where the nail is found, a crowbar is driven under the plinth with the side with the curved end. It is more convenient to do this if you additionally use a pointed flat spatula. Next, all that remains is to tilt the crowbar and the plinth will come away. There is no need to pull it out completely - the same procedure is carried out at the next nail. And only when the plinth is raised along its entire length is it removed completely.
Advice! Very often, in order to tear off a wooden plinth secured with powerful thick nails, you have to make a lot of effort. In order not to damage the floors and protect them from dents, a small piece of plywood is placed under the base of the crowbar.
Scheme for dismantling a wooden plinth
Sometimes new wooden baseboards have to be dismantled in the same way. They can be used again. However, the plinth may break during work. To prevent this from happening, dismantling must begin from the edge of the wall, and the product should be lifted at a time by no more than 1-3 cm. Also, there should not be a large distance between the crowbar and the nail, otherwise the plinth can easily break. After the product has been raised by this amount, you need to return to the first nail and raise it higher. The rest of the joints are processed in the same way until the nails come out completely. If you can’t get close to the plinth with a crowbar, then you can use a chisel to try to work the product around the nail heads, and then remove them (the nails) separately and remove the plinth.
Advice! In this case, a small wooden block can serve as a support for the crowbar.
Here a wooden block acts as a support.
Sometimes it happens that the nails on the surface of the baseboard are not noticeable - most likely, they were puttied after installation. In this case, you will have to act at random, starting from the beginning of the plinth. As a rule, nails were driven in increments of no more than 70 cm. Usually the distance between them is 50 cm. The first nail will be located approximately 20 cm from the edge.
It is more difficult to remove a baseboard that is nailed to the wall rather than to the floor. In this case, it is easy to damage both the plaster and the wallpaper on the walls. Typically this kind of fastening can be found in very old houses. In this case, a thin spatula is driven between the wall and the baseboard - this is an attempt to slightly expand the existing gap. Next, insert a wooden wedge and drive it deeper with a hammer. The procedure is repeated in increments of approximately 30 cm. Then they return to the first wedge, it is driven even deeper, then the second and so on. You will have to work like this until the plinth itself moves away from the wall. If you don’t mind covering the walls, then you can use a crowbar.
Scheme for removing plinth nailed to the wall
Video - How to remove old skirting boards
Some useful tips that will make the work and preparation easier
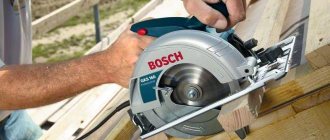
Next we will talk about the tool with which you can make trimming. This section also contains useful information on joining pieces of plinth at the corners.
Selecting a tool for forming an angle
The most economical option is to buy a simple plastic miter box. It is a plastic block with eight working slots. This device is designed for only two operations: trimming at 45, 90 and 22.5 degrees. An angle of 90 degrees is useful, for example, if you need to embed a socket box into the middle of the molding.
Some devices come with eccentric locks included. They are preferable because it is easier to work with - the plinth is clamped in the desired position and does not move during the cutting process. Accordingly, if any errors occur, they will be minimal and adjusting the angle will not be difficult.
How to cut a plastic baseboard: a simple plastic miter box
If you have to make repairs in your own home, then perhaps it makes sense to purchase a more serious tool - a rotary single-plane miter box. It is designed for cutting at angles of 15, 22.5, 30, 36, 45 and 90 degrees. The design of this miter box includes 2 clamps - for clamping in horizontal and vertical planes, as well as a limiter that will allow you to cut workpieces to the same length. The hacksaw will be built-in here. If it is not clear how to cut a ceiling plinth, the video review below will help you.
How to trim a baseboard in a corner: a rotary miter box
How to saw down a ceiling plinth: the video contains a detailed description of a rotary miter box and information on how to use this tool.
This will be useful to you at work
As you noticed, the text mentioned marking using electrical tape. This is the most convenient way to mark blanks, since the pencil is not always visible on the floor plinth, and it is sometimes difficult to trace its lines from the ceiling. The bright pieces of electrical tape are very clearly visible, and when they are no longer needed, they are removed literally with one movement of the hand. There are no traces of glue left after removing such marks.
Sometimes you have to trim moldings with a very large pattern. How to connect corners to make them beautiful:
- From one long fillet we cut pieces according to the number of corners, each of which should contain an element of the pattern. On both sides of the pattern there should be 5 cm of the length of the plinth.
- We measure the resulting blanks and find their middle, cut along the center line.
- We make corner trims as usual, but taking into account the fact that the centers of the patterns on the workpieces should fall on the tops of the corners.
How to join the corners of a ceiling plinth if there is a large pattern on its surface
Removing a baseboard screwed with self-tapping screws
In this case, it is likely that things will go easier. In the same way as in the previous section, you should find all the screw heads. They can be recessed into the baseboard, or they can protrude slightly above the surface. In order to dismantle the plinth, just use a screwdriver or screwdriver to unscrew all the screws, and the product will be easily removed.
Wooden plinth screwed with self-tapping screws
If the screws were driven into the baseboard, which is also not uncommon, then you must act in exactly the same way as when removing a baseboard secured with nails.
Dismantling wooden plinths with choppers
It is extremely rare, but still there are skirting boards attached to the base using small wooden choppers. This installation method occurs in 5% of cases. Typically, the technique is used when installing expensive skirting boards made of valuable wood. In this case, the attachment points will be unnoticeable - they may be circles that resemble knots in the appearance of solid wood.
Advice! You can find chopiks by the dark rim around them or by the grain of the wood. The fibers of the baseboard will run along, and the fibers of the chop will run across.
Skirting board with choppers
In this case, the chopsticks are simply drilled out or picked out using improvised means. Sometimes there may be nails or screws underneath them. Then the same crowbar will be used.
Removing MDF skirting boards
Skirting boards made from MDF are usually attached to the wall using special fasteners and secured with a latch. These fasteners are screwed to the wall separately, and the decorative product itself is mounted on them.
Fastening MDF skirting boards
Quick-Step fastenings for MDF skirting boards
In order to remove such a plinth, use a wide spatula. It is driven under the bottom of the baseboard and is used as a small lever. The baseboard rises. The spatula can also be inserted into the gap between the wall and the baseboard - in this case it pulls towards itself. All actions are carried out very carefully. As a result of the work done, the plinth will simply snap off and be removed from the mount.
Wood-effect MDF plinth
MDF floor plinth
Door frames
Door trims can be used not only for doors, but also instead of baseboards on the floor. It turns out very original and beautiful. And some models of platbands can still be purchased cheaper than baseboards.
Among the advantages, we can highlight the fact that when using this decorative element, a smooth transition near the doors is maintained, and the door casing does not protrude as much as the baseboard.
How to remove plastic skirting board from the floor?
The easiest way to dismantle plastic skirting boards. As a rule, they are not held as securely as, for example, wooden ones, and are usually simply screwed to the wall using screws and dowels. The fastening point is covered with an insert, so the fastening elements are invisible from the outside.
Plastic floor plinth
Dismantling and removing the baseboard with cable channel
Removing the plastic floor plinth
It is better to start work from any external corner. This is one of the most common dismantling methods.
Step 1. Using a flat-head screwdriver, pry the decorative corner from the bottom and carefully lift it up. Then it is simply removed by hand.
The decorative corner is pryed off with a screwdriver
Removing the decorative corner
Step 2. Remove the strip covering the cable channel and the fastening points with self-tapping screws by hand.
Removing trim strip
Step 3. Use a screwdriver or screwdriver to unscrew the screws. The baseboard has been removed.
Unscrewing screws
However, not everyone has external corners in their rooms. It depends on the geometric shape of the room. Fortunately, you can remove the baseboard in another way - in this case, dismantling begins from the end part.
Step 1. The end cap is removed from the end of the baseboard by hand.
End cap
Step 2. Using your hands, pull out the bar covering the cable channel.
Removing the trim strip
Decorative strip removed
Step 3. The screws are unscrewed in any convenient way.
Self-tapping screws are unscrewed
Backlight
Every person has seen LED lighting on the floor or ceiling in at least one movie or TV program. It goes well with any design and looks great.
The only disadvantage we can highlight is that the monthly payment for electricity will increase (the backlight does not consume a large amount of energy, so the increase in the amount will be insignificant). In addition, you can install an LED strip that will respond to movements in the room and turn on at that moment.
The lighting can be installed inside the shadow seam or built into special baseboards. Alternatively, you can install a special neon cord along the transition of the floor to the wall. And if you want to install a backlight that will turn on when you move, you also need to connect a motion sensor.