The subfloor is one of the main components of the floor structure as a whole, on top of which, after carrying out the necessary additional previous measures, the final finish chosen by the homeowner is laid. This design can have a different structure and be made of different materials.
Subfloor installation
Next, you are invited to familiarize yourself with the most significant information about the rough field and study the instructions for arranging the structure in question in accordance with the most popular methods.
Subfloor components
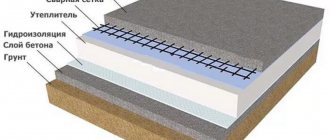
Regardless of the chosen design, the subfloor will consist of several main layers, information about which is given in the following table.
Table. Subfloor structure
| Layer | Description and functions |
| Substrate | Ensures uniform distribution of loads created by the structural elements arranged above. It is the lowest layer of the “pie”. Traditionally it is a floor slab or suitably prepared soil. |
| Leveling layer | The functions are clear from the name and boil down to leveling out the unevenness of the previous layer. If necessary, at the stage of arranging the leveling layer, the required surface slope is set. For the arrangement, backfills of sand and crushed stone, as well as concrete screed, are traditionally used. |
| Intermediate layer | Takes on the functions of a kind of layer connecting the lower and higher layers of the subfloor. |
| insulating layer | Consists of moisture-, heat- and sound-proofing materials. Features of the choice and arrangement of such are determined by the level of future functional load on the structure. |
Gypsum fiber boards (GVL, GVLV)
This material, like no other, allows you to create an even base for a finished floor. It is laid in two layers with glue or with ready-made elements. Gypsum fiber board can be recommended for the method of leveling over expanded clay backfill or over sound and heat insulating boards. It is also suitable for leveling an existing old “sub-floor”: it is laid on top. However, insufficient strength to local loads (for example, from furniture legs) does not allow it to be used in combination with joists: it can break.
If you take into account possible leaks (from the upper floor or water supply failure), then you should choose only moisture-resistant brands of this material and be sure to cover it with a water-repellent composition. But even in this case, we would not recommend it for rooms with high humidity. This base is suitable for any floor covering: parquet, laminate, linoleum, carpet, cork and ceramic tiles.
Arrangement of subfloor on joists
Arrangement of subfloor on joists
You will spend significantly less time and effort on arranging such a structure than pouring a screed. In addition, laying wooden supports does not require the use of water, which eliminates the possibility of increasing air humidity in the room being equipped and makes it possible to simultaneously carry out other planned finishing activities. The logs are directly laid on beams, a concrete base or other supports, which will be discussed later.
Important tips before you start
In this case, the functions of supports for flooring made of boards, plywood or OSB boards are taken over by a structure made of longitudinal logs. The latter can be mounted on supporting posts or beams, as well as on a crown molding. If necessary, logs can even be attached to a concrete base. The specific option is selected in accordance with the characteristics of the structure being developed.
Option for attaching subfloor joists to the bottom frame
If the room has an impressive area, simply attaching the ends of the logs to the beams will not be enough to ensure the required structural strength. In this case, support posts are mounted between the walls to support the joists. The distance between additional supports is determined mainly by the cross-section of the mounted elements. In most cases, it is enough to make columns in increments of up to 0.8 m. Otherwise, be guided by the characteristics of your situation.
The pillars themselves are made of concrete or brick. At this point, also be guided by your preferences.
How to make a subfloor correctly
Operating procedure
The sequence of arranging the subfloor along the joists is as follows:
- horizontal surface marking is performed. Having determined the required level for installing the floor, laces, fishing line or thick thread are pulled across the location of the future installation of the logs - such markings will allow you to navigate the process of arranging the logs and place them at the same level. If you wish, you can not do this, but then you will have to check the horizontality of the supports at each stage of work, spending more time correcting inaccuracies;
- the surface is covered with a waterproofing material, for example, a polyethylene film 200 microns thick. This layer will protect wooden logs from moisture from concrete, soil and other sources;
- The optimal step for installing the lag is determined. To do this, you need to know the expected level of load on the future structure. In residential areas, it is recommended to adhere to a 35-45 cm step. If the base cannot boast of ideal evenness, the logs will have to be attached to pre-arranged pads. As such, pieces of plywood are most often used;
- Holes are drilled in the base to accommodate dowels. Next, the dowels are driven directly. Finally, all that remains is to simply screw the logs to the base using self-tapping screws.
An example of laying subfloor lags in an apartment
If necessary, the space between the joists is filled with insulation. Expanded clay is most often used as backfill, and mineral wool insulation is used as “monolithic” materials. When choosing a specific option, take into account the climatic features of your region and focus on your available budget.
The flooring can be made of plywood, chipboard, OSB or wooden boards. The task is extremely simple: the elements of the rough flooring are laid perpendicular to the joists and nailed to them.
Features of the use of expanded clay concrete
An example of expanded clay concrete screed
When is a expanded clay concrete screed made? This type of material is relevant in the process of laying the “pie” on the ground, which is possible in the case of arranging the floor on a strip foundation. Using expanded clay concrete, you can make a warm, moisture-resistant monolithic base with very low thermal conductivity. A mixture of expanded clay and cement simultaneously performs a heat-insulating and drainage function, which is especially important in the case of shallow groundwater.
How is expanded clay concrete laid?
- The soil is compacted and covered with sand;
- For additional waterproofing, roll out roofing felt;
- Then the reinforcement frame is assembled;
- Then a primary screed is made from a cement-sand composition;
- After the cement has hardened, a screed is made from expanded clay concrete with a layer thickness of at least 6 cm.
Subfloor on adjustable joists
Subfloor on adjustable joists
A very effective option that is rapidly gaining popularity among domestic developers. To perform the work, plastic screw racks are used, characterized by high reliability and service life.
The adjustable floor is the modern ancestor of the floor on joists, providing the ability to quickly build a subfloor
This technology allows you to quickly install a subfloor that will not creak in the future. At the same time, you do not have to waste time determining the required thickness of plywood pads and arranging them - the verticality of the legs can be easily adjusted to the required level. After installation, the logs will not come into contact with the base, which is also an additional advantage.
The procedure is as follows:
- in places where screw posts are planned to be installed (necessarily along the edges and along the length of the product with an average step of 0.5-0.8 m), holes are prepared in the logs;
- The log is laid in the right place, starting from one of the walls. A 1-centimeter gap must be left between the wall and the support;
- the support is attached to the base, starting from the outermost screw posts. This type of stand has a hollow structure. To fix it, the performer just needs to drill a hole about 4.5 cm deep in it, drive a dowel into it, and then hammer in a nail or screw in a self-tapping screw.
Stages of installing supports for adjustable joists
Finally, the racks are tightened to the level, and work continues in accordance with the scheme for arranging the subfloor on standard joists, discussed earlier.
Drilling a hole
Adjustable Plywood Subfloors
A rather effective and interesting option for a subfloor is a plywood base installed using special bushings equipped with internal threads. The bushings are inserted into pre-created holes in the plywood. For one sheet of standard size, 16 holes are usually sufficient. As a result, the plywood will seem to stand on legs. Moreover, such a base is characterized by impressive resistance indicators - 1 m2 of subfloor can withstand a load of about 5000 kg.
Adjustable floors
Moisture-resistant chipboard
This material is capable of withstanding very high mechanical loads and can be laid both on frame joists and on leveling backfill. It has a slight variation in thickness and allows you to create a fairly even base. Please note that this must be high-density chipboard (used in furniture countertops or window sills). Chipboard has good sound and heat insulating characteristics.
In Europe, ready-made tongue-and-groove panels are made from chipboard (including those with additional insulating layers). If you use these slabs, then, like plasterboard, they are laid in two layers with glue and coated with a water-repellent compound. If you have special requirements for soundproofing the floor, then you can lay a layer of technical cork on top (on glue). It is recommended to use chipboard only in dry rooms under parquet, linoleum or carpet.
Important nuances of installing a subfloor in a wooden house
Subfloor in a wooden house
In wooden houses, the subfloor is most often laid on the ground (otherwise, you can use a suitable option from the list above). The job requirements are as follows:
- the room should be dry and well ventilated. For this purpose, the foundation structure is supplemented with air duct openings. If the basement has damp soil, a waterproofing layer needs to be placed on top of it. Traditionally, clay is used for this - just fill the surface with the material and compact it thoroughly, sprinkling sand on top;
- the base must be waterproofed. When working with foundations, roofing felt is most often used. If desired, you can use other material with a similar purpose.
Installation of subfloor support joists
Laying OSB sheets
Before starting work, treat all wooden elements used with a special antiseptic. It is recommended to apply the impregnation in a double layer, maintaining a 5-hour interval. Don't forget to wear personal protective equipment: gloves, respirator and goggles.
An example of a subfloor in a frame house. OSB boards are fixed to the load-bearing joists
Subfloor boards can be laid in accordance with one of the following methods:
- on top of pre-installed H-beams. In this case, the flooring elements are placed in the grooves of the supports;
- on top of T-beams. The boards are laid on the shoulders of the supports;
- onto rough bars. The easiest to use, and therefore the most popular option. It is enough to simply nail the bars to the edges of the beams and lay the boards on top of them.
If the work is carried out in a non-residential premises, you can, if desired, replace the boards with slabs and save money.
Example of a subfloor in a wooden house
All that remains is to lay layers of hydro-, heat- and vapor barrier material on top of the boards. After this, depending on the preferences of the owner, either the finishing flooring is arranged or the screed is poured.
The insulation is laid in a checkerboard pattern
The vapor barrier is attached over the joists
You have become familiar with the sequence of arranging a subfloor in accordance with the most common and preferred methods. Choose the option that is most suitable for your case, and everything will definitely work out.
Good luck!
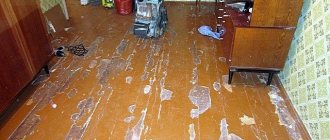
Sanding – high-quality restoration of wooden floors
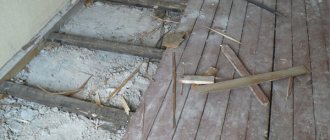
If your parquet or laminate flooring has become quite worn out (cracks, scratches, chips, abrasions, dents from furniture have appeared), but in general the floor is still in good condition (there are not a large number of rotten or broken boards), in this case the boards can be scraped off. Repairing a wooden floor using the scraping method involves removing the top thin layer of wood along with the varnish, as well as all defects. After this, the floor is covered with varnish or paint. In this case, a complete replacement of the floor covering is not required. Partial replacement of unsuitable strips is sufficient.
The step-by-step repair of an old floor using the scraping method looks like this:
- All objects must be removed from the room and the floor must be cleared of debris;
- inspect the surface for the presence of strips unsuitable for further use, if necessary, replace them with new ones;
- using a manual scraper or automated machines, remove the top layer of wood from the entire surface of the floor covering;
- seal the gaps between the floorboards with putty material;
- sand the floor using special grinding machines or regular sandpaper;
- cover the boards with several layers of parquet varnish or special paint.
This reconstruction method allows you to restore the floor to its original appearance, shine, smoothness, make it several tones lighter or darker, and also improve its performance characteristics.
$APPLICATION->IncludeFile( SITE_DIR."local/foto2.php", Array(), Array("MODE"=>"html", "SHOW_BORDER"=>false) );?>
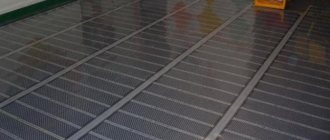
Cement particle board (CSP)
This material, thanks to its unique technical characteristics, is increasingly used in modern construction technologies: non-flammable, high mechanical strength, water resistance and environmental friendliness (cement, lime and wood chips), at a fairly low price. Available in different thicknesses (from 10 to 32 mm). It is used for making “sub-flooring” both in ordinary and in rooms with high humidity. Even serious leaks are not a problem for DSP.
DSP can be laid both on frame joists and on leveling backfill. It is laid similarly to gypsum fiber board: in two layers, spaced at the seams and with glue (for ceramic tiles). The top layer is also coated with a water-repellent or waterproofing (in rooms with high humidity) composition. Perhaps the only drawback of this sheet material is its thickness deviations (1-2 mm) at the joints of the panels, which does not always make it possible to achieve a perfectly flat surface, which is extremely necessary for floor coverings such as linoleum or cork (irregularities appear at the joints). However, experienced craftsmen eliminate this drawback by grinding and leveling putty. It is good to lay parquet (including piece), laminate, and ceramic tiles on the DSP. DSP makes it possible to simply solve the issue of “heating” in the floor.