A heated towel rail is a convenient device that allows towels to always remain dry and prevents the formation of mold and mildew in such a damp room as a bathroom. But how to choose the location of the heated towel rail in the bathroom interior? Photos with different types of design of this device, optimal placement options, as well as recommendations for installing a heated towel rail can be found below.
Above the bath
Designers advise placing a heated towel rail in small bathrooms directly above the bathtub, on the wall opposite the faucet. In this case, usable space is preserved. If you relax in a full bath, the heated towel rail does not hit your head. And if you wash in the shower, it doesn’t rub against your back.
Yes, the towels get a little warm from the steam coming from the water, but they still remain dry and warm. This is convenient: you can immediately take a towel and wrap yourself up, rather than having to go after it across the entire bathroom to the far wall at the exit.
Installation of a water heated towel rail
After you have chosen a place where to hang the heated towel rail, you need to proceed with installation to the water supply system.
- Shut off the hot water supply.
- Weld the threads to the pipes.
- Solder fittings to the pipes.
- Install the brackets on the wall.
- Install a heated towel rail.
- Let the water run and check the system for leaks.
In some cases, a bypass is installed. This is a workaround for water in case there is no access to the dryer. To install it, valves are installed in the places where the pipes and heated towel rail are attached. A pipe with another valve is connected to them. It blocks the access of water to the bypass during normal operating mode.
Many people are interested in whether a heated towel rail can be installed in a heating system. Of course, this can be done, but many apartment owners who chose this method regretted it, because in this case the structure heats up only during the heating season. Therefore, inserting a heated towel rail into hot water supply pipes is the best option.
When planning the location of the towel dryer, it is necessary to take into account the size of the room and the layout of the plumbing. On the Internet you can find photos of heated towel rails in the bathroom interior. But it is best to develop your own plan that is suitable for a specific apartment. The wishes of all residents are taken into account. You also need to calculate which design will be the most economical in a particular house.
Next to the sink
A heated towel rail next to the sink is a functional solution for a small bathroom. Firstly, everyone uses the sink many times a day (especially in the current pandemic conditions). Therefore, dry towels should always be at hand. As a rule, even in small bathrooms there is a little space next to the sink - you can hang a compact vertical device there.
Original coloring for masking communications ↑
Most often, they try to cover the coil not because it is an old model, but because of its ugly surface. Many years of layers of paint + rust can turn perfectly smooth metal into a shapeless, lumpy “something” that cannot be corrected with ordinary painting.
This type of “towel” will ruin anyone’s mood.
It is worth approaching the issue with humor and creating a coil of an unusual, avant-garde look. Making an art object is simple:
- buy paper for covering windows with a sticky layer applied;
- cut the bay in half with a sharp knife to get narrower strips:
- wrap the entire heated towel rail with this paper, laying it in even turns;
- the resulting surface is coated with any decorative paint.
If the coil is installed almost flush against the wall, then the roll of paper will not fit through the narrow space when winding. Then you will have to tear off individual strips and rewind them.
Pasting paper
Keep in mind that your appliance will heat the bathroom worse, and the laundry will dry more slowly
You can not wrap the entire pipe, but wrap individual sections at equal intervals. The result will be a decor similar to a rope with knots. All you have to do is paint the main part in one color, and the wound “bumps” in a contrasting color. When you decide to move, simply cut off the layers of paper with a knife and use the device to return to their original state.
In a wall or niche
If there is a niche in the bathroom, then this is an ideal place to place a heated towel rail. Often in small bathrooms it is used under cabinets or hanging shelves, but it is better to install a drying device instead. In addition to the usual universal appliance, you can install an electric heated towel rail here - this is the safest place for it.
Installation of a combined model
Installing an electric heated towel rail requires special efforts. The main advantage of this installation is the continuous heating of the dryer at any time of the year. In addition, you can adjust the temperature here.
During the repair work, it is necessary to carry out additional wiring from the pipeline. This will save energy consumption in winter. At the end of the heating season, the electrical network is used.
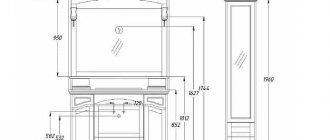
The height of the heated towel rail from the floor should be from 65 to 100 cm. The higher the drying position for small items, the greater the heat transfer of the device.
As you can see, installing such a system requires special knowledge in the field of electricity. Photo installation instructions help to perform installation work correctly.
Above the washing machine
To save space, heated towel rails in small bathrooms are often placed above household appliances. For example, above a regular dryer or washing machine. This place is safe, and the wall above the cars is usually empty. The heated towel rail not only fully fulfills its function, but also adds a touch of coziness. Here's a practical application: immediately after washing, small items can be placed directly above the washing machine.
Video description
The video discusses in detail the advantages of installing a bypass:
Installation diagrams for a water heated towel rail
For most models, the working medium is supplied through the top outlet, and the outlet is provided from the bottom. This is a universal approach that can be applied to any design. In addition, there are other advantages:
- efficiency does not depend on the pressure in the serviced network and the direction of water movement;
- air does not accumulate in the pipes of the unit;
- the distance from the highway is determined by the desire of the bathroom owner.
Lateral connection of drying equipment Source polotenhik.ru
Let's consider how to install a heated towel rail with a lateral or diagonal connection so that the equipment functions correctly:
- The slope of the pipes should be 20-30 mm when water enters towards the heated towel rail, and when exiting towards the main line. The exception is pipes with a diameter of 32 mm at a distance of up to 200 cm. Then it is permissible to maintain a horizontal level.
- The supply contours must only be level. Any curvature will provoke the formation of air with subsequent disruption of the natural circulation of fluid.
- Connecting pipes for devices with steel lines can be at least ¾ inch in diameter. For reinforced polypropylene the limit is 25 mm.
For hidden connections, experts recommend resorting to thermal insulation measures. This applies to plastic pipelines. For this purpose, polystyrene foam sleeves or polyurethane foam shells are often used. The materials are resistant to temperature changes, moisture, inert to biological damage and serve for a long time.
Insulation of connecting circuits and water supply Source montagtrub.ru
Above the toilet
This option for placing a heated towel rail is not the most popular, but one of the most convenient for small apartments with a combined bathroom. Why here? Because the wall above the toilet is free and can be used comfortably by the whole family. The only downside is that things being dried on the slats may accidentally slide into the toilet. However, this is easy to avoid: you just need to always keep the toilet lid closed.
Water device installation process
The first step is to assemble it correctly. Next, it is important to follow the basic rules for installing a heated towel rail. Shut-off valves with detachable connections are installed on the supply line. In the future, they will ensure the smooth replacement of the old model with a more modern one.
Installation of a bypass using pipes and special tees. Here you will need three additional valves. Two of them are installed at the top and bottom of the heated towel rail and one on the pipeline itself to stop the water supply.
The final step will be to fill the device with water from the central water supply system. To do this, open all three taps.
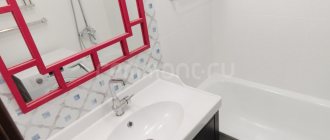
At the mirror
If there is a mirror in the bathroom, then it is worth considering the option of placing a heated towel rail near it. This way, all the towels will be in sight, especially in the morning, when you need to wash your face, brush your teeth, shave, and apply cosmetic masks at the same time. You don’t even need to leave - a dry, clean towel is right there! There is only one downside: sometimes condensation can form on the mirror from being close to wet towels.
Fastening the heated towel rail in accordance with the standards
There are standards for installing water heated towel rails:
- The diameter of the main pipeline should not be larger than the diameter of the device.
- The distance from the wall to the center of the pipe should be 3.5–5.5 cm.
- The heated towel rail is attached to the wall using brackets.
- The connection to the pipe is made using couplings.
- The coolant must move strictly from top to bottom.
- The height to the floor according to the standards is 120 cm. The minimum permissible height is 95 cm.
- Distance from other objects – 60 cm.
USEFUL INFORMATION: Compact sink siphon: flat and short models
Depending on the type of heated towel rail, before purchasing and installing, you need to consult with a plumber or electrician servicing your home. They will tell you what requirements the device must meet in order not to harm home communications.
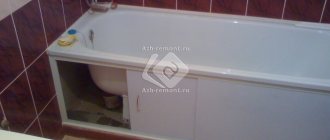
Under the sink countertop
This unusual option for placing a heated towel rail will save the owners of tiny bathrooms, where every millimeter counts. When all the walls are occupied by shelves or hooks that cannot be removed, a heated towel rail under the bathtub will significantly save space and will not be conspicuous. Here you can conveniently dry any textiles for cleaning: rags, napkins, sponges.
Types of towel dryers
So, all wall-mounted bathroom heaters are divided into 3 types:
- Electric, operating from a 220 volt network. There are 2 types - with a heating cable inside or a liquid coolant and a heating element. Both options connect the same way.
- Water heated towel rails are connected to the hot water supply or heating system.
- In combined double-circuit devices, heat transfer is organized from 2 sources - electricity and the hot water supply network.
Note. The design of combined dryers is quite simple. The heater consists of 2 separate circuits - electric and water, which can operate simultaneously or alternately. Accordingly, the price of universal heated towel rails is 1.5–2 times higher.
The principle of operation of electrical appliances is as follows: the heating element or cable heats up to a given temperature, then the thermostat turns off the power. After the tubular body has cooled by 3–5 °C, heating automatically resumes. In heating element dryers filled with non-freezing liquid, air is discharged through the Mayevsky valve.
It’s easier with water dryers - they warm up to the temperature of the coolant flowing inside. The body is made of stainless or black painted steel, less often - of copper. Shape – in the form of a ladder, a coil, E-shaped, M-shaped. Since we are considering purely the installation of a heated towel rail, the shape and material do not play a big role, the only thing that matters is the connection method - side or bottom.
How to place taps (connection methods)
For lateral and diagonal connections, the outlets should be located at the same level as the heated towel rail inlets or slightly higher/lower. What definitely won’t work is installing a heated towel rail if the outlets are located at a distance less than the distance between the inputs. The photo below is an example of a non-working diagonal connection with closely spaced taps. The option for correcting it (top feed) is indicated in black.
With a side connection, the heated towel rail will only work if the outlets are located slightly above and slightly below its inputs or at least on the same level
When connecting, the taps must be positioned strictly horizontally or slightly at an angle. Slightly at an angle - this is from 2 cm per meter (2%) or maybe a little more. The direction of the slope depends on the connection diagram and which end this outlet will be connected to. To make it a little clearer, let’s look at several typical connection diagrams for heated towel rails.
Universal bottom connection for heated towel rail "ladder"
This circuit works regardless of the direction of hot water supply. Connection type - bottom, both outlets should be located lower than the bottom edge of the dryer. With top feed, an option is acceptable when the edge is located between the bends, but the work may not be so efficient (it may heat up worse).
Universal connection for heated towel rail (bottom)
In this scheme, you can install shut-off valves. For its normal operation you need:
- Mayevsky valves (air vents) installed on the upper outlets to release air accumulated in the upper part. They will need to be periodically opened and vented (as the heat begins to worsen). There is an option - install automatic air vents. They are also compact. This will make it easier to use.
- The bypass is straight and narrowed. The size of the narrowing is a pipe of one step smaller in diameter.
- Bends are made with a pipe of a step smaller in diameter than the main riser.
If this option suits your height, do it. The scheme works in any conditions, with ladder-type heated towel rails of any type.
Possible bottom connection for top supply
When pouring hot water from above, you can make the upper outlet higher than the bottom edge of the dryer. With the bypass displaced and narrowed, it should heat up normally. This method is not the best, but it works.
Working option for top spill of hot water
The presence of air vents and bleeding of air after the system is stopped are mandatory.
Universal side connection
You can connect the pipes from the side to the heated towel rail in any of the standard shapes - U-shaped, snake and ladder. The connection itself does not depend on the form. The standard version comes with a straight, unnarrowed bypass. Bends are either strictly horizontal or with a slight slope. There is a slope in the figure: the end of the upper branch is tilted slightly downwards (2 cm by 1 meter), the lower one is tilted slightly upwards. The diameter of the outlets is not less than the diameter of the heated towel rail.
Lateral universal connection for heated towel rail
This connection diagram is good because there is no need to install air vents on the “ladder” (they install plugs), since the air simply goes into the riser.
With the top supply on the bypass, you can narrow it and/or move the jumper towards the heated towel rail. This will improve circulation and the dryer will heat up better. But once again: such a scheme will only work with top water supply.
When supplying water from above, the bypass can be shifted and made into a pipe with a smaller diameter step
With this scheme, it is also possible to make bends at a slight angle or strictly horizontally.
Possible side connection option (not the best)
A lateral connection scheme with the top outlet located below the top edge of the heated towel rail is acceptable. But with such a connection, Mayevsky taps are needed, through which you will have to bleed the air after turning off the hot water supply for repairs/maintenance. It may also be necessary to periodically remove air during the process.
Not the best, but quite a workable option
Diagonal connection
There is no particular point in the diagonal connection of most heated towel rails: their efficiency is no different from the side one (in any case, there is no significant improvement), but the pipe consumption is greater, longer grooves are required, and this is labor-intensive. Although the scheme is workable.
The diagonal works fine if the water supply comes from above. Then the upper outlet is connected to the far edge of the “ladder”, and the lower one to the near one.
Diagonal connection with top feed
In this case, you can also make a narrowed and offset bypass, but even without this everything should work with a bang. With bottom supply, the bypass is not narrowed, exactly along the riser, connection
Heated towel rails with complex shapes: how to connect
In the case of connecting heated towel rails of complex shape, in addition to the usual means, it is also necessary to take into account the structural features of each specific model. They must be considered from the point of view of hydrodynamics - where water flows best, water is supplied there. For example, the popular model “Elegy” from Sunerge. This is not a ladder or a zig-zag.
A diagonal connection is chosen here, because anything else simply won’t work.
Installation of the Sunerzhi Elegy heated towel rail was chosen from the side, since with any other installation the circulation will be disrupted. There are no options at all.
Another model with a bottom connection and a complex design has three installation options. Provided water is supplied from above, the second one will work best, the first one will work a little worse, and the third one will be the most ineffective.
Bottom connection options with top spill
When feeding from below, options 1 and 3 remain, but only without narrowing the bypasses - it will interfere, not help. We exclude the second option completely.
Finally about combined dryers
A double-circuit heated towel rail perfectly solves the problem of seasonality when connecting to home heating. During the cold season, the water circuit is heated; at the end of the heating season, you can turn on the second electric coil. The mounting of the device is quite ordinary - on brackets, the connection is made immediately to 2 networks - electrical and heating.
If it is necessary to change the old Soviet coil in an apartment, then the new one does not have to be installed in the same place and connected to the existing fittings. It is very advisable to replace the riser - it is probably “overgrown” with rust. Choose a suitable location for the heater, sketch out the connection diagram and install the heated towel rail according to the new requirements.