Electrician in the house
Encyclopedia about electricity from A to Z
Masters catalog
Find the best master or company in your city
We change the wiring in a Khrushchev building
The old wiring diagram in the Khrushchev building is not capable of handling modern loads. And in many cases its service life has already expired. Therefore, its complete replacement during apartment renovation is the only right decision.
And following our advice, you can change it without any problems without involving professionals. And what is very important, your wiring will comply with all necessary norms and standards and will not lead to a fire.
- Calculation of wiring and selection of apartment power supply circuit Calculation of electrical wiring
- Choosing an apartment power plan
- Hidden wiring installation
Reasons for rewiring
People remember the condition of electrical equipment only when problems arise in its operation. Most of these houses were built from the 50s to the 80s, that is, more than 30 years have passed. So, why is it necessary and is it worth changing the electrical wiring in a Khrushchev-era building?
- Old cracked insulation. The service life of PVC-insulated cables is 15-25 years. But in Soviet times, cables with rubber insulation, and even with aluminum conductors, were used for electrical wiring. The service life of old wiring in rubber insulation, depending on the specific case, is two or more times shorter than that of PVC insulation.
- Aluminum and its conductivity and softness. Aluminum is a soft and “flowing” metal; for more than the last 15 years it has been prohibited from being used for home electrical wiring. Contact connections of aluminum wires must be tightened once a year (depending on operating conditions).
- Equipment power “then” and “now”. At the time of designing electrical wiring for Khrushchev houses, potential residents could have the following electrical equipment at home - radio, TV, iron, refrigerator and light bulb. Therefore, the cross-section of the TPG was selected accordingly. Now the load has increased, they are using copper cables with a cross-section of 2.5 square meters. mm for socket groups, which allows you to power more than 3 kW on one line.
These reasons are enough to replace the wiring with modern copper, made with VVGng-LS cable or similar.
What is a panel house?
Panel houses were built back in Soviet times. They were a kind of economical option because they combined speed of construction and low cost of building materials. The panel structure was erected from reinforced concrete slabs, which were manufactured in special factories by pouring concrete into metal reinforcement. These slabs (or panels) were of two types - for floors or ceilings and for walls.
The panel structure is akin to a house of cards; each wall in it is load-bearing. There can be no talk of any redevelopment here; just touch one wall and the whole house will come together. Nowadays such buildings are rarely erected, and people don’t particularly want to buy housing in panel houses. Still, brick buildings are considered more comfortable for living. They retain heat better, have increased noise insulation, and, of course, it is much easier to carry out repairs and remodeling in them. Especially when it comes to the issue of how to replace wiring.
Where to look for wiring
Wiring in panel houses is laid in special channels inside the panels. They are provided for by the design of the slabs. In the figure below you see several examples of typical channel locations in Khrushchev.
You may notice that the channels are located at an angle, and not always vertical or horizontal as is commonly believed. In addition to these channels, it is possible to lay wires in beams under the ceiling. These beams resemble curbs that extend above the wall surface at the corner of the ceiling slab.
Wiring requires connections, so you also need to find the location of the junction boxes. They can be open - protrude slightly above the wall, then their contents are hidden behind a plastic cover, or they can be plastered.
In a one-room apartment there may be only 1 distribution box, which is accessible without removing the wallpaper.
In this case, to find the junction box you will have to not only remove the wallpaper, but also possibly tap the entire wall along the ceiling corner until you hear the characteristic sound of emptiness. After which this place simply breaks through. They do the same on the ceiling. We talked in detail about how to find a junction box in a separate article.
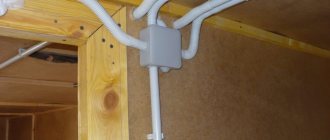
Once you have found all the boxes and sockets you can evaluate how the wires are routed. The picture below shows the appearance of the wiring channel at the bottom of the ceiling junction box.
By the way, Khrushchev buildings can be divided into two types. The first is houses with load-bearing external walls, that is, those that have windows, and the second is with load-bearing internal walls. In any case, concrete slabs are a load-bearing structure, and those that do not perform a load-bearing role are stiffening ribs, more on this below.
Replacing electrical wiring in a Khrushchev-era building requires at least an approximate knowledge of where it may be (where the cable runs), as well as knowledge of typical diagrams. The electrical diagram of the apartment depends on the number of rooms. In general, the following situation emerges: in each living room there is 1 lamp and 2-4 sockets (depending on the area), while in small rooms, about 10 square meters. m. maybe even 1 socket.
Open wiring installation
We will not dwell in detail on the installation features of each individual method; they are described in detail in previous articles. Let's talk only about the advantages and disadvantages of each of them.
Appearance of open wiring
So:
- According to clause 2.1.4 of the PUE, open wiring is electrical wiring laid directly along the elements of building structures. This includes installation of wiring in skirting boards and in special electrical skirting boards.
The advantages of open wiring include:
- Possibility of installation in already renovated premises. After all, installing boxes for laying wires does not imply a large amount of dusty work and destruction of building structures.
- High degree of maintainability. After all, the wire laid in the boxes is quite easily accessible and in case of a malfunction, it can be easily removed or replaced.
- Due to the absence of the need to perform work on wall gating, the installation speed of hidden wiring is quite high. Therefore, for a small apartment, all work can be completed literally in one day.
Hidden wiring installation
Hidden wiring is electrical wiring laid directly in the elements of building structures. This includes wiring laid under the screed, in the cavities of building structures and under suspended ceilings.
Hidden wiring
The advantages of hidden wiring include:
- Thanks to its concealment from prying eyes, this method has a more attractive appearance. At the same time, he does not take away the already small space of the Khrushchev buildings.
- The electrical wiring diagram of a brick Khrushchev building does not involve the use of additional boxes for laying wires. Therefore, the price of materials is significantly reduced.
- A wire laid in a hidden way has higher overload capacity parameters. After all, brick or cement mortar have higher thermal conductivity, unlike air. This allows the wire to transfer heat better and reduces the likelihood of it burning out.
- Fire safety requirements for hidden wiring are less stringent and do not have many restrictions on use.
Where to start replacing electrical wiring in a Khrushchev building
Structural diagram of the apartment's electrical wiring
At the preparatory stage, a plan diagram of new wiring in a two-room apartment is drawn up. It is agreed upon by BTI and Energosbyt. Preparation also includes:
- Visually inspect the line for visible damage.
- Drawing up a drawing of the electrical systems of the entire house.
- Purchase of consumables - sockets, cables, switches, boxes.
- Search for the necessary tools - a hammer drill, an angle grinder, an indicator, side cutters, a level, a flashlight, a mounting knife, pliers, a soldering iron, fabric insulating tape.
Buy wire with allowances after measuring the length of the route.
Danger of using old wiring
Currently, a wide variety of electrical appliances are used in everyday life. Depending on the functionality, it has a specific power level. Old wiring is not designed to withstand heavy loads. When several electrical appliances are turned on at the same time, there is a high probability of electrical wiring ignition. Electrical panel in an old five-story building
The initial signs of the required replacement of old conductors in Khrushchev include:
- sparking and melting of sockets as a result of connecting devices;
- the appearance of a characteristic smell of burnt insulation in the room;
- when connecting sockets or switches, the ends of the wire break off;
- current leakage through the walls.
Preparation for repair
Before you begin directly replacing the wires, you should draw up a detailed drawing of the new route, marking all the elements of the electrical system. It must be developed taking into account the convenient connection of all electrical appliances available on the household.
Tip 1. Remember that equipment manufacturers do not recommend connecting powerful electrical appliances to the network through power strips. Separate sockets must be provided for an electric stove, boiler, air conditioner, etc.
Tip 2. Each room must have at least two cable branches: for lighting fixtures and for sockets.
After drawing up a drawing plan, you can begin purchasing the necessary materials. In addition to the cable, you will need:
- boxes
- switches
- sockets
- rag tape
You should not use system elements that have already been used, since there is no guarantee that they have retained their original performance properties. Saving on small things can lead to problems in the future. A worn-out socket will certainly need replacement sooner or later, but if a short circuit accidentally occurs in it, the new wiring may also burn out.
To change internal electrical networks with your own hands, you will also need a set of tools, namely:
- phase indicator
- hammer drill
- pliers
- screwdrivers
- angle grinder (grinder)
- soldering iron
- terminal blocks
- knife
Having everything you need in hand, you can get to work.
Do-it-yourself electrical wiring replacement
When starting major renovations, property owners are faced with the need to replace electrical wiring. This process cannot be called simple, but with some effort it is quite possible to implement it on your own. The inevitability of its implementation is due to the deterioration of electrical networks and their inability to cope with increased loads. The problem is especially acute for residents of old houses.
To replace electrical wiring without involving professionals, you will need careful preparation: study the theory, draw up a plan, select components and tools. Consultation with a qualified electrician should not be neglected. By following simple rules, you can guarantee that the new network will work for a long time, reliably, and will not cause a short circuit or fire.
Full or partial replacement?
Homeowners have to choose: partial or complete replacement of electrical wiring. What is the difference? Partial repairs involve changes in a separate room, changing only some elements (switches, sockets). Its advantage is the speed of execution, minimal damage to the finish, and cost savings. Its disadvantages: does not solve the problem of increasing electricity consumption; There remain areas that do not meet modern requirements.
Do-it-yourself partial replacement of electrical wiring in a house continues to be popular among DIYers who are aware of the enormous amount of renovations ahead. However, this approach is wrong. Experts recommend analyzing the situation:
- Degree of wear of networks. It is not difficult to find out if the date of construction of the house is known. The older the building, the more worn out the communications are.
- Material. Previously, electrical wiring was installed using aluminum wires. They are hopelessly outdated and, of course, need to be replaced with copper ones.
- Power consumption. To connect a single device, you can extend an additional line to it. If the power is insufficient for a large number of equipment, major repairs will be required.
The need for complete reconstruction arises when connecting equipment that requires grounding. New buildings are often already equipped with grounding, which is connected to each outlet. Old houses will require a complete reconstruction of the electrical system.
If you have no experience in electrical work and are afraid of the scale of the upcoming alterations, you can order a turnkey repair. Then all the difficulties will fall on the shoulders of the performer. The owner will only have to coordinate the decisions made, pay bills for materials and services.
At the same time, having minimal theoretical knowledge and an understanding of the connection procedure will help control the implementation of planned activities by third-party workers.
Doesn't such a transfer violate the law?
The transfer of an electricity meter to an apartment must be agreed upon with Energosbyt.
Independent transfer of an electricity meter to an apartment from the site is considered legal if the following approval measures have been taken beforehand:
- An application is submitted to the Energobyt service with a request to move the apartment meter.
- After reviewing it, company representatives prepare technical specifications, according to which a number of installation operations will need to be performed.
- Upon completion, a service inspector should come and check that the transferred electrical energy meter is connected correctly.
- He must seal the meter and draw up an inspection report confirming the absence of serious comments.
With this procedure for registering the transfer of the device, it does not matter who was the direct performer of the work - the user himself or an invited specialist. There will be no penalties for the procedure. But if at least one of the listed points is violated, the transfer of electricity meters to the apartment will not be considered legal.
Features and disadvantages of partial replacement
Replacing electrical wiring in a Khrushchev-era building guarantees safe and complete use of all modern household appliances
Complete replacement of hidden electrical wiring in a Khrushchev-era apartment is accompanied by noise, which can disturb the peace of neighbors. The labor-intensive work of removing cables from all walls is beyond the power of few owners. If the Soviet aluminum wire is in good condition, you can partially replace communications. During the process, it is important to consider the following points:
- a new 7 kW input circuit breaker is installed to protect against short circuits and blackouts in premises;
- sockets designed for a load of 10-15 A must be grounded;
- for laying, insulated copper wire is used with a current rating of 2 to 5 A per mm2. Copper and aluminum are not galvanically compatible
The disadvantages of partial replacement include the electrochemical incompatibility of copper and aluminum wires and the mismatch between the cable cross-section and the power of modern household appliances. Often there is not enough space in small old boxes, and reconnecting brittle aluminum cables requires some skill.
Partially it is worth replacing only open lines.
When is a complete replacement required?
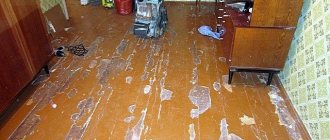
Old wiring cannot withstand the load of switched on devices
A major overhaul with the dismantling of the floor covering and radical alteration of the walls involves a complete replacement of communications. It is necessary to completely change the wiring in the following cases:
- When you turn on household appliances at once, a burning smell appears;
- sockets spark when appliances are turned on;
- Some outlets have no power;
- current leaks through the wall;
- wires break and become less flexible.
A complete replacement of electrical wiring is carried out once every 20-25 years.
Khrushchevka
It is possible to change the electrical wiring in a Khrushchev house only after inspecting the building structures of the room. The problem is that due to their long service life, these structures could partially lose their load-bearing capacity.
In this case, trenching the walls, even vertically, is not allowed. Replacement is permissible when installing new wires in a layer of plaster or behind sheet materials.
It is permissible to conduct individual sections or all electrical wiring in an apartment in a floor screed.
Hidden way
Appearance of the wiring channel at the bottom of the ceiling junction box
In brick or panel houses, wires can be laid in three ways:
- Inside the ceiling, the route from the switchboard goes vertically, runs along grooves or in a corrugation. Internal ceiling tiles already have channels from where you can run power cables to lamps, switches, and sockets. The wiring runs perpendicularly, without falling horizontally below 15 cm. Each distribution box has an individual automatic switch.
- Under plaster - wires are inserted into pre-drilled holes, fixed, and brought out to consumers. The lines are masked with a layer of plaster, which prevents them from being damaged by voltage fluctuations.
- Under the floor - the line is routed under the floor surface. Channel pipes are laid, which are then filled with solution. Lines for sockets and lighting are masked with a mounting box or pipe.
With a combined connection, pipes and cables are distributed at an acute angle. The routes are connected via a distribution box to the input panel.
Open way
Wiring in the baseboard
The open option is used when it is impossible to organize the electrical network in another way. There are several methods:
- On the brackets - for sockets you need copper wires with a cross-section of 2.5 mm2, for lighting - 1.5 mm2. Metal strips are used as staples, fixing them so that the non-flammable part extends 1 cm beyond the line.
- In pipes, corrugated flexible products prevent surface leveling. The diameter of the pipe is equal to the total thickness of the conductors, multiplied by 2. Fastening is done with screws, clips, dowels and nails. Each element is removed from each other by 20-40 cm.
- The boxes contain a metal or plastic cable channel and the baseboard is equipped with a removable lid with a latch. The main difficulty of the work is the correct fastening with screws, dowels or staples. Sockets can be mounted directly onto the box.
If the apartment has a retro interior, the wires do not need to be masked.
Power calculation
Approximate power of various electrical appliances
It is necessary to replace the electrician so that further failures and network overvoltages do not occur. The line power is selected taking into account all electrical equipment and depends on the cable cross-section. You will need to make several calculations:
- Sum up the power of all equipment connected to the power grid.
- Add +100 W to each device.
- Divide the total by 220.
If the result is 12-15, it is permissible to use a cable with a cross-section of 1.5 mm2. This is enough for an apartment with a standard layout.
When there is a heavy load on the line, it is allowed to increase the cable cross-section and arrange communications using a two-wire or three-wire circuit.
When using thick wire there are risks of failure.
Apartment power supply diagram
Apartment power supply diagram via RCD
In old houses, on each floor there is an electrical panel where there is a meter, a batch switch, and circuit breakers. Therefore, when designing a wiring diagram in a two-room apartment, it is worth making an independent power and lighting circuit, planning the main and additional branches. The following connection options are allowed in Khrushchev buildings:
- Parallel - energy is supplied to the consumer from the power source via its own line. A three-core cable is connected to a single-phase device, and a five-core cable with wires of phases A, B, C, zero and ground is connected to a three-phase device. Such a scheme provides for the organization of each consumer’s own line and the installation of an individual RCD.
- Serial - a cable is pulled from one power source, and the consumer is connected to it at a certain distance. To implement the scheme, you will need a wire with a large cross-section and grooves in the walls. The energy source will be a generator producing a nominal 220 V. To save money, you can stretch the electrical cable from the panel to a specific consumer.
- Series-parallel - the circuit is used in most apartments. The distribution box is designed for consumers grouped by type (boiler, sockets, light) or location (kitchen, bedroom, bathroom).
A series-parallel connection is the best option for a budget-friendly complete replacement of the electrical network.
Shield installation
When it comes to a panel house, it makes sense to think about installing a new panel. Often the machines are located in interfloor panels. It is reasonable to leave only the main switch and electric meter there, but place your switchboard in the living room.
The best option for placement in an apartment is a hidden panel design. Such a shield can be hidden in a plasterboard box if there is no suitable niche in the hallway. A security alarm and intercom are often placed next to the panel.
Grilling
It remains to consider the gating and laying of cables in a two-room apartment. The procedure must be carried out only in the horizontal or vertical direction. This will protect the electrical wiring from accidental damage when drilling holes in the wall or driving a nail, which is not uncommon in the household.
The cable must be threaded into the corrugation in a convenient place for this (on the floor, perhaps in another room of the apartment), having previously cut off the required pieces of both.
When laying a cable with corrugation in a groove, it is necessary to fix them in it with small volumes of alabaster at a distance of 50 cm.
After threading the cable into the socket boxes, they are covered with alabaster flush with the wall. The grooves are sealed with plaster.
Now all that remains is to connect the contacts correctly, and the replacement of electrical wiring in the Khrushchev is completed.
Here you just need to add that changing the electrical wiring diagram, as well as switching from aluminum to copper, is not some kind of whim or, especially, a tribute to fashion. These actions are an objective necessity for two-room apartments in old Soviet houses.
Switchboard
A switchboard must be provided not far from the front door. Its purpose is to distribute the load across the premises of the apartment. Protective devices for each circuit are installed in the panel.
Bathroom premises are protected using RCDs (residual current devices) or differential circuit breakers. The cable cross-sections of each circuit are calculated similarly to the input cable, taking into account the load in each room of the apartment.
Separate lines
For an electric stove, oven, instantaneous water heater, washing machine (if the power of its heating element is more than 3.0 kW), it is necessary to arrange separate lines from the distribution board. Each line in the apartment must be protected by its own machine.
The diagram should show the wire routes, locations of sockets, switches, their power, installation height from the floor level.
For cable routing, the installation locations of junction boxes are marked.
The installation location of the consumed electricity meter is determined. In an apartment building, as a rule, utility panels are installed for this purpose on the staircase landings in the entrances.
For alarm systems, in addition to wire routes, installation locations for control panels and sensors are determined.
Practical advice. When dismantling old wiring, there is no need to rush to remove wires laid in pipes or voids; they can be used as a conductor for pulling new wiring.
Preparation for installation
Replacement of wiring should begin with the preparation of materials. You need to purchase cables, switches, sockets, and circuit breakers. In accordance with the number of protective devices in the apartment, calculated according to the diagram, it is necessary to select a special box for the distribution board.
Very often, the design of switchboards includes brackets for mounting devices. If they are not available, then you need to purchase a sufficient number of DIN rails.
The cable is sold through retail chains rolled into coils. For ease of installation, it must be unrolled from the coil, and not thrown off in rings, otherwise the cable will twist into a spiral, and it will be difficult to pull it into pipes and voids.
First of all, it is necessary to assemble the distribution board and mount it in the appropriate place. In the future, all wiring in the apartment should be installed from this panel.
Next, you should mark the locations of sockets, switches, lighting fixtures, junction boxes, and wire routes.
Laying depending on the type of house
Design solutions for wiring when replacing it in buildings of different designs also differ.
Electrical wiring calculations, diagram
Before you pick up the tool, you should perform calculations and draw up a diagram, because the electrical wiring should be:
- electrical/fireproof
- provide comfortable accommodation
- easy to maintain.
In fact, it is not so difficult: just use a simple formula and a ready-made tablet. But, first things first.
Below are several electrical wiring diagrams for typical two-room apartments in panel and brick houses:
For those with the most lighting requirements, sufficient luminaires must be provided. The long corridor in the first diagram has three lamps for better lighting. The same approach is used to place sockets. In the diagrams shown, most of them are in the kitchen, where most electrical appliances are concentrated: hood, microwave oven, refrigerator, air conditioner, dishwasher, electric kettle, etc. Sockets in the bathroom can only be connected through an RCD (residual current device).
Selecting the cross-section of conductors according to the calculated load
First you need to count the total number of consumers and determine their power. By consumer we mean a separate electrical device: light bulb, fan, refrigerator, etc. In order not to miss anything, it is better to draw a floor plan of the apartment and mark on it the locations of household appliances, lighting fixtures and sockets.
Procedure:
- It is necessary to divide all devices according to power consumption in the apartment into 3 categories: lighting, devices up to 2 kW and devices over 2 kW.
- We distribute all consumers along the lines and plot them on the diagram. A separate line means a group of consumers powered through a separate machine. According to the requirements of the PUE, there can be no more than 20 points (light bulbs, sockets, etc.) on one line. It is better to connect devices with high power consumption (electric furnaces, air conditioners, electric boilers, etc.) through separate circuit breakers in the distribution panel.
- We calculate the total power consumption of each category and calculate the current load.
- Select the wire cross-section according to the table.
The current strength is determined by the formula:
I=(P/U) x cosφ, where
I – current, A U – voltage, V P – power consumption, W cosφ – power factor.
In this case, cosφ can be neglected, since its value in household electrical networks tends to unity. Thus, the formula for determining the current load takes the following form:
I=P/U
Following the steps described above, we will determine the magnitude of the current load when all consumers operate simultaneously. Let's be realistic: this is unlikely. Based on experience, the peak load usually does not exceed 60-80% of the total power of all sources of electricity consumption in the apartment. This value is what you need to focus on.
Example: let's say we need to determine the current load of an electric stove with a maximum power consumption of 4 kW, which is connected through a separate machine. Household power supply voltage is 220 V. Substituting both values into the formula, we get:
I=4000/220 = 18 (A)
Using the table, we determine: the cross-section of the wire for connecting the electric stove must be at least 1.5 mm².
According to the PUE, the ratio of the wire cross-section to the magnitude of the current loads must correspond to the values given in the table:
Open wiring Cable cross-section Hidden wiring
| Copper | Aluminum | Copper | Aluminum | |||||||||
| Current, A | power, kWt | Current, A | power, kWt | Current, A | power, kWt | Current, A | power, kWt | |||||
| 220 V | 380 V | 220 V | 220 V | 220V | ||||||||
| 11 | 2,4 | — | — | — | — | 0,5 | — | — | — | — | — | — |
| 15 | 3,3 | — | — | — | — | 0,75 | — | — | — | — | — | — |
| 17 | 3,7 | 6,4 | — | — | — | 1,0 | 14 | 3,0 | 5,3 | — | — | — |
| 23 | 5,0 | 8,7 | — | — | — | 1,5 | 15 | 3,3 | 5,7 | — | — | — |
| 26 | 5,7 | 9,8 | 21 | 4,6 | 7,9 | 2,0 | 19 | 4,1 | 7,2 | 14 | 3,0 | 5,3 |
| 30 | 6,6 | 11 | 24 | 5,2 | 9,1 | 2,5 | 21 | 4,6 | 7,9 | 16 | 3,5 | 6,0 |
| 41 | 9,0 | 15 | 32 | 7,0 | 12 | 4,0 | 27 | 5,9 | 10 | 21 | 4,6 | 7,9 |
| 50 | 11 | 19 | 39 | 8,5 | 14 | 6,0 | 34 | 7,4 | 12 | 26 | 5,7 | 9,8 |
| 80 | 17 | 30 | 60 | 13 | 22 | 10 | 50 | 11 | 19 | 38 | 8,3 | 14 |
| 100 | 22 | 38 | 75 | 16 | 28 | 16 | 80 | 17 | 30 | 55 | 12 | 20 |
| 140 | 30 | 53 | 105 | 23 | 39 | 25 | 100 | 22 | 38 | 65 | 14 | 24 |
| 170 | 37 | 64 | 130 | 28 | 49 | 35 | 135 | 29 | 51 | 75 | 16 | 28 |
According to the requirements of the PUE, the rating of each circuit breaker should not exceed 25A. Taking this into account, it is better to power powerful electrical appliances through a separate machine. Below is the electrical diagram of a one-room apartment:
In the example given there are only 4 lines. Its advantage is simplicity. The simpler the circuit, the easier it is to maintain during operation.
Development of a power supply scheme
To draw up a diagram of the planned electrical wiring, it is recommended to use the general plan of the apartment. This will allow you to mark the required locations of sockets, switches and electrical equipment. The following factors need to be considered:
- total load of electrical appliances;
- the presence of a security or fire alarm;
- the need to lay network cable lines.
It is recommended to connect large electricity consumers through a separate outlet. This could be an electric stove, a split system, and so on. It is also better to separate the lighting and socket lines. You can use standard schemes for two-room and three-room apartments.
Operational resource
The electrical wiring of current-carrying conductors in the Khrushchev building definitely needs to change, since these objects were put into operation more than fifty years ago. In those days, aluminum cables with rubber insulation were used for electrical wiring. The operational life of such cable lines is about twenty years.
Old aluminum wiring
When independently replacing the electrical wiring in a Khrushchev-era building, it should be taken into account that currently only copper is used for wiring. Copper cable lines have a service life of more than forty years.
Detailed instructions for laying electrical wiring: sequence of work
Replacing the in-house electrical network is carried out in several stages.
Blackout
First of all, dismantle the old wiring. To do this, you need to completely de-energize the room. The presence of voltage is then checked with a multimeter. You also need to clear the room of furniture and remove switches and sockets. To connect the hammer drill, a temporary electrical point is prepared, connected directly to the meter. The socket is installed on a board, which is equipped with a 16 A circuit breaker.
To dismantle the old wiring, you need to de-energize the room.
Dismantling
Remove wiring from junction boxes. They are equipped with round plastic lids. The cables are disconnected and removed from the channels. If necessary, look for old wires with a metal detector. Sometimes a network branch is laid in such a way that when it is pulled out, part of the panel may collapse.
In this case, the problem area is separated from the system. To do this, the wires are cut and the exposed wires are insulated.
Channels for wires
After dismantling the electrical wiring, prepare the walls for further work. For this purpose, grooves are made. To make the channel even, 2 parallel lines are drawn in advance. If there are old grooves, the gating stage is skipped. The channels are cleared of remnants of alabaster and, if necessary, slightly deepened. The installation locations of switches and sockets are marked in advance.
Distribution boxes
These devices are immediately fixed at the installation sites. Cement mortar is used for fastening. The cable is pulled to the distribution boxes from the switchboard.
Distribution boxes are fixed at installation sites.
Laying wires
The length of the cables is selected in accordance with the length of the groove. The correct installation is checked with a level. Terminals are used to connect elements. Twisting is done so that the ends of the wires do not get tangled in the phase. All twists are left in distribution boxes.
Connections do this:
- The ends of the cores are cleared of 3-5 cm of insulation. The exposed sections are twisted and the extra centimeter is cut off.
- Wrap the twist with electrical tape or cover it with a terminal.
After performing these steps, the branches are taken from the distribution boxes to the consumers along the recesses prepared in advance.
Inserting wires into the electrical panel
When performing this work, a group of conductors is divided into separate lines.
When running wires into an electrical panel, they are divided into lines.
The wiring diagram is drawn in advance. Each line is equipped with a separate circuit breaker. This scheme is suitable if powerful electrical appliances will be installed in the apartment. Individual branches cope better with supplying the required current. Line allocation simplifies subsequent network maintenance.
The cables are covered with corrugated or simple tubes laid in grooves. This method is considered safer than hiding conductors under plaster. During subsequent replacement, the wiring is simply pulled out of the pipes through the distribution box.
Installation of openings for sockets
The seats must be drilled out when installing new switches or sockets.
At this stage you will need:
- ruler and marker;
- perforator;
- crown attachment;
- drill 8 mm;
- shovel for removing concrete from the excavation.
At the place where the socket is installed, draw a circle with a marker, the diameter of which corresponds to that of the socket box. A hole 5-6 cm deep is made in the central part. The contour of the seat is marked with a crown. Several holes are drilled with a drill. The central part is drilled to the full depth.
The seats are drilled when installing holes for sockets.
The remaining concrete is removed with a spatula. Seats for distribution boxes are made in the same way.
System testing
The wiring is fixed only after checking its functionality. To do this, test the system with a multimeter. The device helps detect short circuits that occur when network components are connected incorrectly. If the system has no defects, the grooves are covered with putty. After this, lamps, switches, and sockets are installed. The temporary electrical point is disconnected from the meter.
Wiring for lighting
Cables can be hidden in the gap between the floor slabs or pulled through the panel channel. The second method is considered safer. If the chandelier will be installed in its original place, the new wire can be tied to the old one by tightening it. The channels in the slab are located parallel, with a pitch of 10-12 cm. The first line is located at a distance of 15-17 cm from the edge.
Required materials
To perform wiring installation work yourself, you will need the following material:
- cable;
- protective disconnecting devices (automatic circuit breakers, RCDs);
- sockets, switches and distribution boxes;
- distribution board;
- insulating tape;
- connection terminals;
- various fasteners.
What tools will you need?
Independent replacement of electrical wiring is carried out using the following tools:
- perforator;
- concrete drill, concrete drill (16-20 mm), core drill (90-100 mm);
- chisel 25-30 mm;
- soldering iron 40 W;
- grinder with a disc for stone;
- screwdrivers;
- pliers;
- side cutters;
- phase indicator;
- tester;
- cord and level;
- flashlight;
- stationery knife;
- putty knife.
Before work, it is important to calculate the number of wires - measure the length from the shield to the connection point, taking into account protrusions, niches and corners.
Required consumables and tools
You need to prepare the following:
- Perforator with drill and bit for concrete.
- A wall chaser or grinder with diamond blades.
- Hammer and chisel.
- Pliers.
- Wire cutters.
- Flathead and Phillips screwdrivers.
- Multimeter.
- Indicator screwdriver (phase indicator).
- Dowel clamps for fastening wires to building structures.
- Corrugation.
- Steel pipe for making sleeves (passes through panels).
- Switches: self-insulating clamps (PPE), Wafgo terminal blocks, crimp sleeves or bolts with nuts and washers. You can connect the wires directly using a welding machine.
How to choose a cable?
The power of the electrical circuit inside the apartment must be sufficient to connect all devices. Replacement of wiring in Khrushchev is carried out taking into account this requirement. Only in this case can you be sure that in the future there will be no emergency situations due to network overload.
When preparing to install a new electrical wiring in a Khrushchev building with your own hands, first of all, you should correctly calculate the cross-section of the cable for laying the route. To do this you need:
- add up the power indicators of all major electrical appliances used in the household
- add an additional 100 watts to each device
- divide the resulting amount by 220
If the result is a number of 15 (or less), then a wire with a cross-section of 1.5 mm2 is sufficient for laying an internal electrical network. Otherwise, one of two things: either you need to choose a cable with a larger cross-section, or you will have to lay two (or three) wiring lines from the electrical panel.