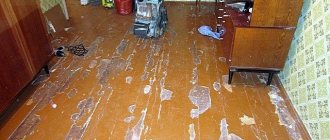
During renovations in a Khrushchev-type building, a problem very often arises: how to level the walls in a Khrushchev-era building? The plaster crumbles and falls to the floor. This is especially clearly visible in apartments built in Soviet times. This is due to the commissioning of a residential building, which usually took place without strict control and carelessly. Today this is monitored much more strictly, but even in our time there are builders who do defective work. It’s good if a small piece fell on the floor in a Khrushchev-era building, but what if it’s a big one? This is not only damage to the floor itself, but also a danger to the people who are there.
The walls are leveled by plastering or installing drywall.
In addition, wall defects are clearly visible under the paint. Wallpaper cannot hide unevenly placed plaster. It is strictly prohibited to glue silk-screen printing onto such walls. There is only one thing left to do - to straighten them out.
Choosing a ceiling design for a Khrushchev building
If you are planning to repair the ceiling in a Khrushchev-era building, then pay attention to the following design options:
- an ordinary single-level ceiling in a Khrushchev-era building, lined with gypsum board (outwardly no different from the traditional one);
- two-level combined structure made of plasterboard and tension sheet;
- single-level covering with eaves lighting around the perimeter (the LED strip is placed in the ceiling plinth, mounted at a short distance from the ceiling);
- plasterboard podium under the chandelier.
Characteristic features of ceilings in Khrushchev-era buildings
When choosing a ceiling for a Khrushchev building, it is important to visually expand the space and increase the height of the room. Therefore, when making repairs, choose light-colored finishes, and when installing plasterboard ceilings, give preference to laconic one-level structures.
If you want to highlight certain areas in the room, you can do this using different colors and textures of the ceiling covering. Lighting also plays a significant role in the zoning of a room.
The only option for a two-level ceiling for a Khrushchev-era building is a combination of gypsum plasterboard and tension covering. In this case, the plasterboard ceiling in the Khrushchev-era building is made around the perimeter of the room in the form of a box. A light glossy stretch ceiling is installed in the central part of the room. It visually makes the room higher.
Advice! If you make a shelf in a plasterboard box and put LED strip lighting there, the light reflected in the glossy tension surface will visually make the room more spacious and taller.
Required tools and materials
To install a suspended ceiling made of plasterboard, you will need the following tools and materials:
- screwdrivers or screwdriver;
- drills and drills;
- construction knife;
- plane for chamfering;
- metal scissors;
- laser or construction level;
- spatulas of different sizes;
- rollers;
- tape measure, pencil and ruler;
- sandpaper;
- lighting;
- wiring.
To install a plasterboard structure, you need the following materials:
- ceiling plasterboard;
- guides and ceiling profiles;
- connecting elements;
- pendants;
- extension cords;
- dowels;
- anchor suspension;
- for fastening gypsum boards you need metal screws;
- if you do heat or sound insulation, you will need mineral wool;
- deep penetration primer;
- reinforcing tape;
- putty (starting and finishing);
- To finish the surface you need paint or wallpaper.
Preparatory work
Before installing a plasterboard ceiling, you need to carefully prepare the base surface:
- Dismantle the old ceiling skirting boards and remove the old ceiling covering, if any. It’s easy to peel off the wallpaper and remove the old peeling paint with a spatula.
- If there are places with loose plaster, then they are thoroughly cleaned so that the material does not fall onto the new ceiling and weigh down the structure.
- If the drywall does not cover the entire surface of the ceiling, then the base needs to be well prepared by priming and leveling with putty. After the putty has dried, the surface is again primed with a deep penetration compound. This will protect it from mold.
We begin the redevelopment by dismantling the existing walls
- Remove all doors and dismantle frames.
- If the destruction of the partition is partial, then mark and make a hole with a grinder or a hammer drill.
- You only need to start from the top corner. First, break off or crumble a small piece of the wall, then move lower and break off another one, thus going down 250-300mm, and then you can start moving to the side. After the top strip, 300mm high, has been removed, proceed to remove the next strip using the same method until the entire wall is destroyed. Be sure to knock down any remaining concrete that gets stuck in the reinforcement, otherwise further impacts may cause it to fall on you.
- After destroying the partition, we cut off the reinforcement from its attachment points using a grinder.
- We load all the garbage into bags (when dismantling it is better to break off small pieces of concrete, as they fit better into bags) and send them to the landfill.
To install new partitions we will need the following material:
- profiles for mounting the main partition structure. I took the guides: 50x40 mm, and the vertical ones 50x50mm;
- plasterboard (12.5 mm) - for covering the main structure (I used moisture-resistant one in the bathroom);
- dowel-nails - for attaching the profile to the wall, ceiling and floor;
- self-tapping screws 25 mm. for metal – for attaching drywall to the profile.
Measurements and markings
To purchase the required amount of materials, measurements are taken from the ceiling. By measuring the length and width of the room, we find its area. To the resulting figure we add 5% for trimming the material. This way we will get the required amount of drywall for a single-level ceiling.
If you plan to assemble a plasterboard box around the perimeter or install a podium under a chandelier, then the material consumption will be much less. In this case, we multiply the length of the box by its width plus the height of the structure. We also add the trimming margin to the resulting number. When calculating the material for the podium, it is enough to add its height multiplied by the perimeter to the area of the structure.
Markings for plasterboard ceilings are made after making a sketch of the future structure. After this, we proceed to apply markings in this order:
- On the walls of the room we draw a line onto which the lower tier of the ceiling will fall. To do this, find the lowest corner in the room.
- Set aside the height of the box in this corner and put a mark.
- Using a level, we transfer this mark to all the walls of the room and draw a line.
- After this, we begin to apply markings on the ceiling. We mark the places where the hangers are attached. The marking pitch for ceiling profiles is 600 mm. The installation step of the hangers is 25 cm.
- Markings for crossbars are applied in increments of 40 cm.
Installation of a metal frame
The installation of suspended plasterboard ceilings begins with the installation of guide profiles. The work sequence is as follows:
- On the walls of the room, we drill holes for dowels in increments of 20 cm. After this, we screw the guide profile.
- Next, we install the suspensions on the ceiling.
- After this, we insert the ceiling element into the guide strips on the walls and fix it with self-tapping screws.
- We fix the edges of the suspensions to the ceiling profiles using self-tapping screws, aligning all the elements in one plane. To facilitate horizontal alignment, we stretch a cord between the guide profiles.
- We install the jumpers in the ceiling profiles and fasten them with self-tapping screws.
- We lay the wiring under the lighting fixtures.
To connect several ceiling profiles in one plane when creating a podium, we use cross-shaped connectors and anchor suspensions. To bend the profile to form a curved edge of the podium, we make cuts on the shelves of the ceiling strip and bend it along a given radius. The steeper the radius, the thicker the cuts we make.
Open the wiring
Many people don’t like the way exposed wiring looks, but in an apartment with this layout it will be the most successful option. It's all about too thin internal walls and partitions between apartments. Their thickness is so small that it is very difficult to hide the wires efficiently and safely. Interior designers recommend not to be afraid to do open wiring in your apartment, because it can always be organically integrated into the interior, the main thing is to show your imagination.
Sheathing with plasterboard
Next, the assembly of the suspended plasterboard ceiling is carried out using gypsum plasterboard. We first install whole sheets of drywall on the metal frame. All joints of the material must be on the ceiling profiles. If necessary, cut the product to the required size.
First, we hem the bottom part of the box or podium, not forgetting to cut holes in the sheet for mounting the lamps. After this, we sew up the side of the box or podium. If you are cutting sheets of drywall, use a plane to make a chamfer on the cut for puttying and reinforcing the joints.
Important! We fasten the gypsum boards with self-tapping screws, which we install in increments of 150 mm. To bend the sheet, we go over it with a needle roller and moisten it a little with water.
Insulation
In panel Khrushchev-era buildings, the external walls are only 30-40 centimeters thick, which provides an insufficient amount of thermal insulation. In this case, you will have to insulate the walls from the outside and cover them with polystyrene foam. When renovating an apartment on the ground floor, it is possible to form lathing and insulate it using mineral wool.
Reinforcement of joints and finishing work
After installing the drywall, begin processing the joints. To do this, apply a thin layer of putty on them, after which reinforcing tape or sickle is pressed into it. Cover the top of the tape with another layer of putty.
After the putty has dried, the surface in this place is sanded with sandpaper. We treat the entire ceiling with a primer. After it dries, they begin finishing. There are several options for this finish:
- painting (for rooms with high humidity, acrylic latex or silicone paints are suitable; for living rooms, you can use water-based paint);
- The option of gluing wallpaper is convenient because in addition to color, you can give the product the desired texture;
- the surface is also covered with self-adhesive film to obtain a glossy coating that will visually expand the room (this option is also suitable for kitchens, because the coating is easy to clean).
After finishing is completed, lighting fixtures are installed. Spot built-in lamps have latches on the body that securely fix them to the surface of the structure. The LED strip and power supply are placed in a shelf of a plasterboard box.
Source
Which ceiling in Khrushchev is better to make - options for finishing the ceiling
Published by: Arthur Kanapatsky 0 2,
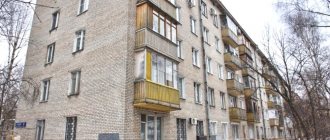
Khrushchevkas are a characteristic type of apartment buildings that first appeared several decades ago. The main distinguishing feature of Khrushchev apartments was the maximum cheapness of individual apartments. However, the low cost had to be paid for by the small area and low ceilings of such housing. The limited height naturally limited the possibility of finishing the ceilings. This article will discuss how to make a ceiling in a Khrushchev-era building.
Every room has its own secret
So, as you already understand, Khrushchev should not be cluttered and filled with unnecessary things. It is better to use folding tables and folding surfaces. Everything is also clear with the color scheme - a small area loves light and warm colors , for example: milky, white, light gray, pale pink and cream.
Reasons for low ceilings in Khrushchev buildings
The answer to the question of how high the ceilings in Khrushchev-era buildings are is very modest - this value is only 2.5 m. The main reason that the ceilings in Khrushchev-era buildings are very low is directly related to the economy. A limited amount of building materials was allocated for the production of houses, so the standard project had to be made as budget as possible. Increasing the distance between floors beyond 2.5 m led to serious cost overruns, which is why the emphasis was placed on quantity rather than quality.
Organization of storage systems
Renovation in a Khrushchev-era building involves the installation of functional furniture. An excellent option is a wardrobe up to the ceiling with sliding doors that do not require space to open.
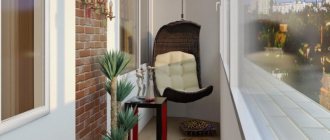
In a small space, it is appropriate to use wall cabinets and mezzanines, which not only optimize the storage of things, but also help to visually increase the height of the ceiling. You can also make maximum use of the area of the resulting niche.
The photo shows the organization of storage systems in a narrow corridor in a Khrushchev building.
Repair of Khrushchev
Most Khrushchev buildings have a history of almost half a century, so immediately after purchasing such housing you have to think about renovating it. A complete renovation consists of a number of stages, and one of them is bringing the ceiling into proper shape. The task is quite complex and important - the ceilings in Khrushchev-era buildings are traditionally uneven, crooked and covered with crumbling whitewash. We have to figure out how best to make the ceiling in the Khrushchev so that it looks good and is quite reliable.
The following solutions are most often used for ceiling finishing:
- Coating with a layer of paint;
- Wallpapering;
- Installation of plastic ceiling;
- Installation of plasterboard ceiling;
- Installation of stretch ceiling.
Each of these solutions has its advantages, but in relation to Khrushchev buildings there is always one significant limitation - the ceiling height is only 2.5 meters. Stretch ceilings located in the hall of a Khrushchev-era building “eat up” part of the height, and as a result the ceiling may turn out to be excessively low. Of course, in this case there can be no talk of any comfort and coziness.
To decide how to decorate the ceiling in a Khrushchev-era building, you also need to take into account compatibility with decisions regarding other surfaces. For example, if the floor is insulated or leveled, its level will rise by several centimeters, due to which the overall height of the room will decrease even more. To avoid such situations, you need to consider the repair of the Khrushchev complex in a comprehensive manner, and not separately.
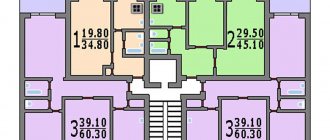
Redevelopment of Khrushchev: 1, 2, 3, 4 rooms, before and after photos
The photo above shows that the redevelopment partially affected the bathroom, due to the movement of two walls a considerable distance. This is the wall facing the hall and the wall separating the hallway. Due to a slight increase in area, it was possible to place a washing machine. In small rooms there is always a lack of space when it is necessary to install modern household appliances.
Although the hallway is not large, there is enough space in the room and you can install a dressing room. The photo below shows the second option for unsuccessful planning of the living space of those times. Here, to get to the second room, you need to go through the first.
The layout is so unfortunate that not only are the spaces small, but there are also dead zones that distort the functionality of the rooms. Sometimes, at the end of the second room there is a storage room, which cannot be fully used. There is another option for remodeling a 1-room apartment, but only with a different original layout. In this case, the alteration is minimal and comes down to installing a plasterboard partition.
It is installed so that it occupies no more than half the space, so that lighting is available in the second part. An ordinary two-room Khrushchev apartment in a panel house can be turned into a studio apartment by combining the living room and kitchen. The main task of such a modification is to move the entrance doors.
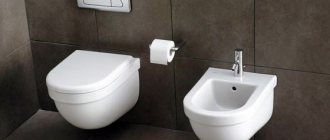
Due to this, the large hallway will serve as a dressing room. At the same time, the toilet and bath are combined, and the kitchen and living room are combined due to a partially disassembled partition. Young families, as a rule, buy one-room apartments.
A one-room Khrushchev apartment can be easily converted into a studio apartment, which is an excellent option for young people. In this case, get rid of the partitions separating the room and the kitchen, as well as the hallway. Assemble aprons over the bathtub and sink from plastic wall panels. Their seams are not sealed, so water will inevitably get under them.
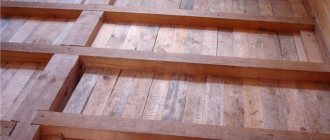
Dampness will quickly lead to fungal damage to the walls; However: for a boiler with a volume of 50 liters or more, it is advisable to assemble a full-fledged wooden frame made of thick timber inside the wall. It must transfer the load from the sheathing and light frame of the wall to the floor. Master builders use a variety of convenient methods for demolishing partitions, and, naturally, most of them try to carry out this process with less flying dust. If the apartment owner himself gets down to business, then he is looking for a way to do the work not only cleanly and at lower cost, but also as quietly as possible, so as not to cause inconvenience to the neighbors. After the specified period has expired, the certified finished document can be received in hand within three working days, after which you can proceed to the planned redevelopment.
If the commission did not approve the project, then it is worth correcting the circumstances that caused the refusal. Usually these include three points: About the GGP - it’s possible, but then it’s monolithic, without holes. At the same time, it is heavier with the same strength and likes to fall off in large pieces. Placed faster than blocks.
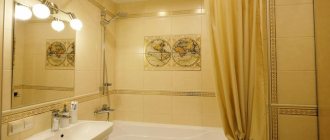
Well, if 8- or 10-centimeter blocks seem snotty to you - knit the reinforcement, install the formwork and pour a monolith of M-300 concrete, you can’t go wrong - Pipes are available separately for hot and cold water supply. Pipes for hot water have internal reinforcement, which is visible in the cut (red). While I was waiting for the couriers with the new bathroom, I started leveling the second crooked wall of the Khrushchev building (the wall with the door). The same slabs of moisture-resistant plasterboard were used, the joints between which were covered with plaster.
The corners that are visible in the frame were intended for attaching shelves to them across the entire width of the wall (for basins, etc.). During the work, the decorator suggested a slightly different method of manufacturing and attaching such a shelf (I will describe it later). As soon as the roof began to slowly go away from laying the tiles, I decided to take a break and build the frame of the future wall where the door to the bathroom used to be. Using a laser level, we draw a parallel strip along the wall of the corridor - hall, along which we nail the beams, then the most tedious and patience-requiring stage begins - laying the tiles. crosses chose 4k. and at your own discretion and desire.
Ceiling decoration in Khrushchev
To prevent the ceiling level in a Khrushchev building from decreasing, it is worth choosing wallpaper or tiles as a finish. These materials are characterized by minimal thickness, which can be called their main advantage. If we talk specifically about wallpaper, then they are also distinguished by their minimal cost and ease of gluing. In addition, you can always choose the option with the most suitable pattern for the interior of the room.
Tiles are also relatively inexpensive, and it’s easy to glue them to the ceiling - but it’s difficult to find tiles that are ideal for the interior, so the decorative properties of the ceiling will not be high enough. However, this drawback can be partially compensated for by painting the tiles.
The main problem with these materials is their demands on the ceiling - it must be perfectly even. Wallpaper glued to an uneven ceiling looks extremely unaesthetic, so you can forget about an attractive ceiling. With tiles, the situation is even worse - if the ceiling is not level enough, the coating will simply peel off at the joints.
To level the surface of the ceiling, you will have to spend a lot of time and money - simply applying a layer of putty will not be enough. For complete leveling, the ceiling must be completely cleared of the old coating and reprocessed. The safest thing to do (albeit more expensive) is to contact specialists who will perform all the necessary work quickly and efficiently.
The main advantage of this method of finishing the ceiling is the fact that the height of the room ultimately will not change at all. Once the ceiling is in order, you can, for example, paint it - and no work will be required for the next few years, since the paint is relatively durable, does not fade and is suitable for wet cleaning. In addition, this coating allows you to install any lighting fixtures.
Plastic panels
The option with PVC panels is quite suitable for Khrushchev-era apartment buildings, but it is best to use it for finishing kitchens. It's all about fat and soot, which are common to all kitchens without exception. Most coatings are difficult to clean from these contaminants - and plastic panels can simply be washed using any detergent.
Plastic panels can also be used to finish the ceiling in the bathroom. These parts withstand seasonal changes in temperature and humidity well. In addition, direct contact with water is not dangerous for plastic, so if the apartment is flooded by neighbors from above, no problems will arise - wet parts can be easily removed, dried and installed in their places.
In addition, plastic panels allow you to integrate various lighting fixtures into them. For example, you can mount spotlights that make it possible to create uniform lighting in the bathroom - however, in this case you need to make a glossy ceiling in the Khrushchev-era building to visually expand the space.
In addition to the qualities already described, it is worth noting the following advantages of PVC panels:
- Low cost;
- Long service life;
- Easy installation and maintenance.
However, despite all the advantages, it is better not to use plastic panels in living rooms - they simply will not look good. In addition, the longest panels are 3 meters long, and at the points where they join on the ceiling, noticeable joints will be visible.
Drywall
Drywall is not used as a tool for leveling floors - it is unprofitable, inconvenient and still leads to significant losses in the height of the room. However, this material does not need to be used in this way - it is valued for its ability to create suspended structures.
As noted above, lowering the ceiling in Khrushchev-era buildings is unacceptable, therefore plasterboard suspension systems are irrelevant for them. The only option that may make sense is to form a small threshold of plasterboard around the perimeter of the room. Lamps can be built into such a plasterboard ceiling in a Khrushchev-era hall to improve lighting and zone the room.
Stretch ceiling
Stretch ceilings in Khrushchev are a better solution than suspended structures. The canvas allows you to create a perfectly flat surface, and glossy coatings also make it possible to visually expand the room. The resistance of the canvas to point mechanical impacts is very low, but it is partly compensated by its high elasticity, due to which, when flooded, the material can hold a huge mass of water.
Of course, you still can’t do without designing the structure, especially if you want to install, for example, suspended two-level ceilings in a Khrushchev-era building. Visually, such a design will look quite good - and the height will be reduced only in certain areas where it is not of key importance. However, there is always a need for design, regardless of the type of finish.
Another small limitation relates to the installation of lighting fixtures. The fact is that polyvinyl chloride sheets are very afraid of overheating - and standard lamps get very hot during operation. For example, you can install a suspended ceiling in a hall in a Khrushchev-era building only if you do not plan to install a chandelier. To level out this factor, you will have to very carefully select and correctly install lamps.
Secrets of redevelopment
The main task of the owner of a Khrushchev building is to try to effectively use every meter of usable space. It is important to clarify here - not to clutter, but to use it functionally.
Demolishing partitions is the first thing that comes to every resident’s mind. This method will add space to you and increase usable space. In this case, you need to familiarize yourself with the apartment plan, find out which wall is load-bearing (so as not to accidentally demolish it) and develop a detailed redevelopment plan.
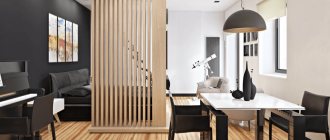
For one-room apartments, the solution may be to create a studio apartment - when all the partitions are demolished and the room is combined with a kitchen and hallway. The latter is most often separated from the living room by furniture or conventional decor. To highlight the kitchen and separate it from the living area, you can raise the floor or use a flooring that is different from the room.
The studio apartment option is suitable for creative individuals or single people, but for families with small children it is better to leave the walls so that the space is divided into zones.
If you are not a fan of radical wall demolitions, replace partitions with arches or move doorways. Then you will get separate rooms and a more comfortable apartment.
A combined bathroom can be connected to part of the corridor - in the end you will get a large space where a washing machine or boiler can fit. The remaining space in the corridor can be used for a wardrobe. In this case, you will free up space in the room and you will have somewhere to store seasonal items.
Use mobile and multifunctional furniture. Especially if you have a one-room Khrushchev house, such furniture will become indispensable. Take a closer look at compact chests of drawers, wall-folding beds and cabinets.
If you have a storage closet , you can safely demolish it or attach it to an adjacent area - a corridor, a room. Owners of a two-room Khrushchev house, where one room does not have its own entrance, can add a new partition. There will be less living space, but you will have another personal space.
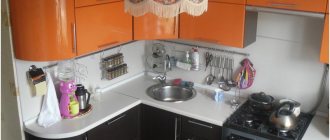
Cabinets that reach up to the ceiling will help save space in the kitchen. The main thing is not to make them too deep.
No matter how many rooms there are in your apartment, try to make them as bright as possible. The lighter the walls and ceiling, the wider the space appears. The ideal solution is to use shades of the same color for all rooms. In this case, regardless of the style, you can create a cozy atmosphere.
Also avoid saturated and bright colors in the decoration; it is better to add bright accents in the form of paintings, decor, pillows and souvenirs than to paint or paste over the Khrushchev in red or green colors.