People who strive for comfort in the apartment, but at the same time do not trust the crews, are starting to repair their balconies with their own hands. Some people prefer to go it alone to save money. In any case, it is quite possible to repair a balcony with your own hands if you have a solid theoretical basis.
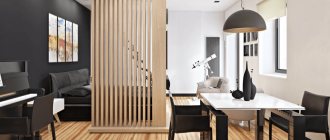
Beautiful balcony after finishing the walls with furniture
Preparation for repair
Preparatory work includes 3 main stages. Sequence should not be compromised or preparation should not be left unattended as it is the backbone and directly affects quality. Stages:
- A project is being drawn up. The materials that are planned to be used are preliminarily determined.
- A work sequence schedule is drawn up to ensure that all materials receive sufficient time and attention.
- An estimate is prepared to determine whether the planned project fits within the budget.
Interior solutions and balcony design in Khrushchev
The choice of style for the design and layout of the balcony always remains with the owner. But there are still basic design rules:
- a small room will be visually enlarged by smooth glossy surfaces, calm light shades, mirrors;
- a smaller wall should be contrasting and stand out against the general background;
- colorful surfaces should be balanced with monochrome objects;
- furniture should not clutter up the space; it is advisable to use light, functional, folding furniture or transformable furniture;
- upholstered or wicker furniture will create a cozy home environment.
Selecting quality glazing
Repairing a balcony must begin with the glazing. The primary choice is between:
- Cold;
- Warm.
The first is used to protect the room from precipitation and dust, but it is not capable of providing the required level of heat during the cold season. If you plan to use your balcony all year round, you must definitely choose warm glazing.
Universal storage systems
In order not to turn a renovated, insulated and glazed balcony into a warehouse of unnecessary and forgotten things, it is important to take care of spacious storage systems.
Open and closed shelves, spacious shelving and ready-made storage systems in the form of wall cabinets are perfect for arranging a renovated room.
Laying lags
The design features of the balcony have a slight slope. This is necessary to remove precipitation and moisture. Therefore, before starting repair work you will need:
- Level the floor, since its surface is usually full of cracks, unevenness and other defects;
- Eliminate the slope to make full use of the room. You cannot use a concrete screed for this, as it greatly increases the weight of the room, which is prohibited by safety standards.
- Raise the floor to the desired level, usually 10 cm
Preparatory work
Before the main work, it is recommended to prepare the foundations. To do this, you should follow the recommendations given below.
Surface preparation
Algorithm for preparing surfaces for repair:
- dismantle old window frames and coverings from all surfaces;
- building foundations are tapped with a hammer to detect and remove unstable fragments;
- metal parts are cleaned of rust and treated with an anti-corrosion agent.
If the floor reinforcement is thoroughly rusted, it is recommended to fix new material on top. It is best to lay a mesh with cell sides of 150-170 mm, connected from class A-III reinforcement, with a diameter of 3 mm.
Slab restoration
Do-it-yourself slab restoration can only be done if the building base has minimal damage or simply needs leveling. If the floor is destroyed to a significant extent, it is recommended to invite professionals.
The help of specialists will be required in the following cases:
- a piece of cement has collapsed, resulting in through defects or a significant part of the reinforcement being exposed;
- a deep crack has formed at the junction of the slab with the house;
- the concrete base has collapsed or the material has peeled off.
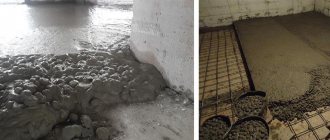
Self-leveling of the slab is carried out as follows:
- the building base is primed, the primer is applied in two layers and after each treatment a break is taken so that the product hardens;
- Cement plaster is laid, the material is leveled over the surface using the rule;
- install the formwork using a board 15-17 cm wide;
- Concrete is poured, the material is leveled, and activity is stopped until the composition hardens.
Replacing the fence
At the very beginning of the work, the old fence is dismantled along with the glazing and coverings. After this, a new structure is installed. To do this, it is recommended to invite professionals. Specialists will take the necessary measurements, after which they will manufacture and install the fence. Usually the structure is made of metal, but you can order the parapet from glass or other material, depending on personal preferences.
You can also do the fencing yourself. For this, a rectangular profile pipe is used. This material has the following advantages:
- strength;
- ease of use;
- external attractiveness.
To manufacture the fence, measurements of the balcony are taken and a diagram of the parapet and its installation are developed. After this, the material is prepared, and the pipe parts are welded together according to the plan. The fence is then installed on a concrete base using anchors.
To make a parapet, you can also use foam blocks. The material is laid on a concrete base using a repair mortar. If you do not have a welding machine and experience in drawing up diagrams, it is best to use this particular method of arranging a parapet.
Lathing walls and ceilings under panels
The sheathing is a grid of timber, which subsequently serves as the basis for securing finishing materials. It is also intended to insulate the room, so if you do not plan to use the balcony in winter, you can use a thin beam to save useful space. For high-quality insulation, you will need to choose a thick beam.
Loggia as a continuation of the apartment
If the area of the loggia allows, then you can make it into a separate room, or remove the partition and combine the space with the adjacent territory.
Children's
The loggia can be turned into a play area for a child. You need to lay a warm carpet on the floor. Hang shelves for toys along the walls. For older children, the loggia can become a creative workshop.
Cabinet
For people who work on a computer at home, turning a loggia into a work office is a very common occurrence. Not much space is required for a table and other equipment. In addition, thanks to the large number of windows, it is always bright there.
When creating a work area, you can install either a ready-made factory table or install a custom-made tabletop according to the specified dimensions.
If the loggia is combined with a room, then a work space can also be built into the existing niche on the side.
Kitchen
If you want the house to have another additional living room, then you can include a kitchen in the design of the loggia. True, you will have to take care of transferring communications. In this case, installing a small compact headset will be the ideal solution.
To save space, you can install a folding table, or you can only do cooking on the loggia, and place a dining table with chairs in the living room.
Wardrobe
To save space in the apartment, you can not install a large closet for things, but make a dressing room out of the loggia.
Just keep in mind that if things are constantly exposed to the sun, they will fade over time. Therefore, shelves and crossbars where clothes will be placed must be covered with doors or a screen.
Lighting and socket connections
Electrics are thought through at the design stage. You need to decide where electrical appliances will be located, as well as navigate the location of outlets. Usually there is no need to install a separate panel for the balcony; it is enough to remove the wires from the apartment. Also, in modern houses, the electrics are already connected to the balcony or loggia, so you just have to think about the location of the wiring before starting the repair. You can use external wiring, which is placed in neat boxes, which provides easy access to the wires in case of repair or maintenance.
Project development
Repairing a turnkey loggia requires a responsible approach. It is necessary to think through every detail in advance and take into account many points, including the architectural and planning features of the room.
- When creating a project, the first thing you need to do is decide on a budget. Then you should develop an idea, choose a color scheme and furniture items.
- Next, you need to decide whether to do thermal insulation work or not, and also clarify the type of repair and calculate the required amount of materials.
- After all the steps described above have been completed, it’s time to go shopping.
- When purchasing building materials, you need to focus on the established budget, measurements taken and the chosen style concept.
If you have doubts about your abilities, then when repairing balconies and loggias in an apartment, design work should be entrusted to specialists. This will help avoid disappointment.
Insulation of walls, ceilings and floors
Previously, mineral wool was mainly used for insulation. It copes well with thermal insulation tasks, but quickly deteriorates when in contact with water. Therefore, to use it, it will be necessary to use additional waterproofing coatings, which increases the time spent on installing insulation.
It is better to use penoplex on the balcony - a modern synthetic insulation with the best qualities. It does not require waterproofing, since it is not susceptible to moisture. Even in conditions of constant high humidity, it retains its original properties.
It is also possible to use polystyrene foam as a thermal damper. But it quickly deteriorates, rots and becomes completely unusable. After a couple of years, such insulation will need to be changed. Also, fungi often grow in it, which causes an unpleasant odor on the balcony.
Decorative plaster
A simple and affordable universal material that can be used in almost any room. There are a huge number of varieties and colors of plaster. In addition, it does not absorb odors, does not conduct extraneous noise and retains heat well.
The disadvantage is the need for careful pre-treatment of the walls. Otherwise, the interior decoration of the balcony with your own hands will look sloppy, and the coating will quickly crack.
Note!
Do-it-yourself installation of plastic windows: a step-by-step do-it-yourself installation master class, preparing the necessary toolsDo-it-yourself strip foundation - step-by-step instructions: detailed description of the stages of work, features of DIY construction + simple master class
Do-it-yourself lifting gates: necessary materials for manufacturing + step-by-step instructions for DIY construction and installation
Warm floor on the balcony
Typically, traditional insulation, such as radiators or other heating elements, is not installed on the balcony.
Electric heating can be used on the balcony. Warm floors in electric format are presented in specialized stores in a completely ready-made version. All you have to do is take the correct measurements, buy and quickly install the equipment. There will definitely not be any difficulties. This floor operates from a regular outlet; there are options with custom temperature control.
Waterproofing
Arranging a balcony in a Khrushchev-era building will require additional protection of supporting structures from moisture coming from the street. Although this will not hurt modern designs either.
You can only do waterproofing yourself inside; for exterior work you will have to call in specialists (unless, of course, the balcony is located on the first floor).
For waterproofing, coating compounds are used (to create a protective layer) or penetrating compounds. But the latter are considered more reliable, since they are practically not damaged during operation.
Most of this type of finishing work will be on the floor, but experts recommend touching the lower part of the walls, literally by 2-3 centimeters.
Selecting materials for finishing walls, floors and ceilings
A wide range of materials are offered for wall decoration:
- The lining is environmentally friendly and beautiful;
- MDF panels are economical and easy to install;
- Ceramic tiles – reliable protection under intense loads;
- Drywall - possibilities for different design options;
- Plastic panels are easy to maintain and affordable at the same time.
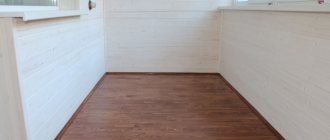
For the floor, use linoleum, laminate or special floorboards. For the ceiling, you can use plastic, lining or hanging structures.
Wooden lining
Most often used for finishing balconies. The material is easy to attach to walls and adjust to the desired size.
With proper use and timely impregnation of wooden surfaces with special compounds (for example, varnish), the result is a strong, durable and resistant to external factors material.
Decorating the inside of the balcony with wood with your own hands looks impressive and expensive. The main disadvantage of wooden lining is its cost. In addition, the material has a low level of fire safety.
Do-it-yourself step-by-step instructions for finishing a balcony with siding
What is siding? This is a facing material for external use, presented in the form of a plastic (PVC) profile. Siding is not afraid of severe frosts and is resistant to negative environmental influences. The only difference between panels of different brands is the level of resistance and duration of operation. However, if the lining is produced in different quality versions (not all of them can be used for exterior work), then any type of siding is suitable for exterior decoration; it is resistant to frost and other external weather influences.
In addition, due to the special design, even a beginner can handle the installation of siding. Another plus is that frequent lathing is not needed. If the profile was installed correctly - the recesses are directed downwards - the cladding is dense, the wind does not blow through it and moisture does not accumulate on it.
What is the step-by-step process for finishing a balcony with siding?
Action 1: preparatory work.
First, we dismantle the railings and remove the old finishing of the balcony. Using a grinder, we cut off the panel holders flush with the fencing bars. The joints should be inspected: if there are cracks in the fence, we fix them by welding.
We remove the cement from the lower edge of the balcony grille until solid concrete appears. To do this, we knock it down in sections. First, some kind of container (for example, a baking tray) must be tied to the outside of the fence, which will prevent broken pieces of cement from falling out. Think not only about the safety of your neighbors’ balconies, but also about the fact that a piece of concrete weighing 200–500 grams, falling from a height of 4 floors, can lead to an accident.
Using a wire brush, remove rust from the grille, then apply a rust primer, followed by a coat of paint. A border of concrete paint is not needed. After this, we check the level of the edge of the balcony along the perimeter, external and behind the bars. We achieve a perfectly flat surface by eliminating holes with cement. Have you noticed that the balcony leans to one side? In such a situation, you should stop repairs and consult a professional builder.
Action 2: lower and upper belt.
After making sure that the balcony slab is level, we make the lower belt of the sheathing from timber. The lower belt should be from 80 mm, for this you will need to lay out 2-3 rows of timber. Let's see how many whole strips of siding are required for the height of the fence (from the top edge to the bottom belt). The difference between siding and lining is that it cannot be cut lengthwise to size. If suddenly a few centimeters remain in the height of the cladding, then there is no point in raising it to another row of siding - it is inconvenient. It is better to leave this distance below, attaching the starting bar a little higher. Then the lower section of the wooden beam, not covered with siding, is simply painted.
The upper perimeter of the frame should be made of boards 60–100 mm wide. The outer edge should be flush with the sheathing strips, and the inner edge should be used as a support for the window sill. We attach the top belt of the sheathing to the metal fence so that its top edge is 2 cm higher than the top siding strip. This distance will be needed for the platband. Self-tapping screws and bolts are suitable as fastening elements.
Action 3: starting belt.
At the very bottom, we attach the starting profile to the horizontal strip of the sheathing with self-tapping screws; the successively installed siding strips will then rest on it. To make the work easier and safer, we will first make a safety loop from braid for the drill. We carefully tighten this loop around the wrist.
You can simplify the work (especially if it is performed by one person) by using 3-4 pieces of fishing line, one edge of which is attached to the inside of the upper belt. We tie a thick wire hook to the opposite edge. We attach the starting strip to these hooks, and then pass it over the railing and lower it down. We will do the same with the next siding strips in the future.
Recommended articles on this topic:
- Arrangement of a small apartment
- Stages of renovation in an apartment
- Turnkey cosmetic repairs
Step 4: paint the bottom.
As soon as the sockets for the corners, as well as the starting strip, are secured, we apply two layers of paint to the remaining part of the lower belt (if the tree not covered by the siding is outside). Dry the paint layer thoroughly before applying a new one. We remember that the wood for sheathing should be treated with fungicides and impregnated with drying oil. Of course, over time, the paint underneath will peel off, but leaving the wood untreated is not an option; it will also become dark. And since only a maximum of 10 cm of the tree will be visible, this will not spoil the appearance of the balcony.
Of course, the excess wood below can be covered with half a strip of siding secured with self-tapping screws. Unfortunately, in this case, when the panels are not attached in a standard manner, the siding can be torn off by a strong gust of wind.
Step 5: attach the siding.
We begin to attach the siding. How to do it right? Look, the mounting slots in it are made oblong. Due to this, during thermal deformations, the panels move on the fasteners. There is no need to tighten the siding too much, otherwise the finishing material will swell and come off. How to attach siding using self-tapping screws? We attach the self-tapping screw to the magnetic attachment of the drill, and then screw it into the middle of the slot.
You can perform this operation with one hand (screws are much more convenient than nails), while you can hold the siding with your other hand.
To make it more convenient to work, and most likely you will be attaching the panels by weight or in a squat, first use a metal scribe to make a hole in the wood for the screw. Once it is screwed in, use a screwdriver to unscrew it one-fourth of a turn. Due to this, a backlash of 0.3–0.5 mm is formed. If you use nails, then they should not be finished to 1–1.5 mm. Of course, with such a gap, the siding will creak in windy weather. To provide thermal displacement, it is sufficient to loosen the fastening by 0.5 mm in the transverse direction of the play.
Step 6: External corners.
Before proceeding with the sheathing and cladding, the outer corners should be inserted into the lower slots. Then their upper ends are attached to the upper wooden belt. It is recommended to apply glue to the corner fastenings from below. Subsequently, we will push the sheathing beams under the corner flanges, while the siding will slide into their grooves.
Action 7: lathing work.
The width of the siding panel should be measured from the bottom edge of the lock of the first plank. We will use this step when attaching the sheathing beams to the fence. They must be secured using clamps and self-tapping screws. If you are a beginner, install the sheathing and siding at the same time. To do this, simply snap a strip of siding suspended on a fishing line with hooks into the starting profile. Draw a pencil along the top of the fence, then fasten the sheathing belt. Stick with this technology until you complete the job.
This way you can make the cladding parallel to the sheathing, while precise alignment will take place on site.
We slide the next strip of siding into the grooves of the outer corners, push it down until a characteristic click is heard. Then proceed to fastening the sheathing beams (parallel fastening technology). We repeat the steps until the work is completed. Ready! Now we proceed to attaching the platbands.
Do-it-yourself step-by-step instructions for interior finishing of a balcony with plastic panels
Why choose plastic as a finishing material?
- Long service life 25–50 years.
- High-quality material is not afraid of exposure to ultraviolet radiation, is not subject to rotting, and can be washed with aggressive chemicals.
- Ease of use. Even a beginner can install plastic panels. You will save on turning to professionals for help.
- A huge variety of types of plastic panels of various shades. You will definitely choose the material that suits the design of your room.
- Low cost of plastic panels.
- Ease of care. Due to the antistatic properties, dust does not stick to the plastic; cleaning such a surface is easy. In addition, even if the panel is damaged, it will not be difficult to install a new one.
- Let's start installing the sheathing.
Before we start covering, we attach a frame made of wooden blocks (metal profile) to the inner walls of the balcony. It is better to choose the second option - the fact is that the tree will change its shape due to sudden temperature changes and high humidity. This means that the skin will not hold its shape. You need to determine the direction of the finishing slabs before you begin installation.
Have you chosen a horizontal layout? Then we fasten the planks vertically. And vice versa, respectively. The horizontal arrangement will visually expand the balcony. And vertical will make it taller. The best option is to mount the panels vertically on the walls and perpendicular to the room on the ceiling.
We attach the frame strips to the wall in increments of 40 cm. In this case, the bottom strip should be at a height of 3–5 cm from the floor surface. We place the planks at the same distance from the wall, they should be parallel to each other.
- Select the order of plating.
Where to start covering? From the ceiling, of course. We attach the starting profile along the perimeter of the room: using self-tapping screws to the window frame, and using dowels to the wall. We attach the guide profile in the middle of the ceiling on hangers, the pitch of which is 0.5 m. Do you have a small balcony with a width of up to 120 cm? Then one profile will be enough. If the balcony is wider, then we install 2 profiles.
We insert the panel cut to the width of the balcony into the grooves of the starting profile. We fasten it with self-tapping screws and a construction stapler to the guide profile. Let's see if the panel is attached evenly - this is what we will use to align all subsequent finishing. We also insert the second panel into the grooves, connect it with the previous one, and fasten it to the guide profile.
- How to do wall cladding.
We start attaching the plastic panels from the corner. We install the sheathing as described earlier. We fix the corners around the perimeter of each wall. Then we insert the panel with a narrow shelf into the groove of the corner. Let's see if the panel is perpendicular to the floor and ceiling? It should stand upright. Now we attach the panel to the sheathing using a self-tapping screw or stapler. The next sheet of sheathing will snap into the groove of the previous sheet. Please note: the panels must be pressed tightly against each other and against the guide profile.
We cut the last panel to the width, making it 6-8 mm narrower than the remaining gap - this will make it easier to install. We perform this operation using a stationery knife. Do you need to cut sheathing sheets crosswise? A metal knife is suitable for this.
Do-it-yourself step-by-step instructions for finishing a balcony with plasterboard
Step-by-step finishing of the balcony with plasterboard will be quick and easy. Just follow the recommendations below.
Step one. We install the sheathing.
If you are planning to cladding a gypsum board balcony, then remember: the result of all your work depends on the quality of installation of the sheathing. Under the plasterboard, the sheathing can be made of mounting wooden planks. You can also make a metal frame from a profile for gypsum plasterboard, it depends on your preferences.
We mount the lathing on the wall horizontally, at a pitch of 40–60 cm, taking into account the width of the insulation. Perform a double laying of the sheathing where the vertical joint of the plasterboard slabs occurs. The sheathing is secured with dowels or nails. The most important thing is that the planks on the surface must be attached as firmly and evenly as possible relative to the wall and the general level.
Step two. We lay insulation.
After the frame for the plasterboard is built, we fill it with insulation. We use polystyrene foam, mineral wool or other high-quality material.
We lay the insulation between the planks and secure it. We simply drive the foam between the wooden sheathing, this will be quite enough. If you use mineral wool, then to secure it you will need L-shaped hooks or dowels with a wide round mushroom-type cap.
Step three. We provide vapor barrier.
At this stage, it is necessary to carry out simple manipulations with the rolled foil vapor barrier. It will protect the material from moisture. We place the vapor barrier along the sheathing on top of the insulation, attach it to the staples using a mounting stapler. The joints between the parts of the vapor barrier should be taped, this is the only way the coating will be airtight.
Step four . Installation.
It is better to start installing drywall from the side where you can fix the whole sheet or most of it. Thanks to this approach, you can use the material more economically without having to cut the gypsum plasterboard again.
Even a beginner can handle installing gypsum boards on wooden sheathing. Simply fix the bottom edge of the gypsum board onto the beam (sheathing), starting from the wall, level the sheet, and press it against the wall (sheathing). Screw in 3-4 self-tapping screws around the entire perimeter and check using a level.
As soon as the first sheet of material is mounted, focus on it and secure subsequent sheets. If necessary, the sheet can be cut to complete the surface finish.
So, your balcony is covered with plasterboard. What's next?
First of all, the gypsum board surface must be primed, seams and joints sealed, and putty applied. After this, we proceed to grouting and priming again, using steklohost where required.