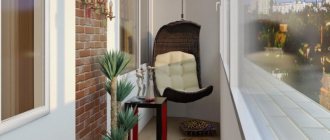
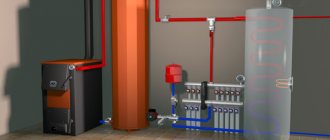
The balcony of any apartment can serve not only for storing things, but also as a place for relaxation and work. In this case, it is necessary, first of all, to insulate it. In any case, it is not enough to simply install metal-plastic windows; it is necessary to take measures to insulate the floor. The ideal option is an insulated floor on joists.
Let's take a closer look at the arrangement of decking on the balcony using logs.
Features of floor finishing on the balcony
The choice of material for finishing the floor on the balcony largely depends on the balcony itself. Is it insulated? Is there glazing? If not glazed, it is better to give preference to ceramic tiles. It is durable, not subject to corrosion, and can withstand sudden temperature changes, high humidity and even precipitation.
You can also consider the option of a wooden covering. But this is where the work gets complicated. To avoid the appearance of fungus and mold, and its destruction under the influence of unfavorable weather conditions, it is recommended to periodically coat it with special products.
Repairing a balcony is a fairly large-scale undertaking that requires a variety of construction and finishing operations.
They will help create a protective layer for the wooden covering.
Balcony glazing significantly expands the range of finishing materials for the floor surface. Now you can use samples that are afraid of moisture, frost and heat. After all, windows will protect you from their harmful influences. You can lay parquet, laminate, or linoleum.
When choosing a finishing material for the floor on a balcony, it is worth remembering that it is important to take into account the total weight of the surface and the number of structural supports.
For the same reason, natural stone and porcelain stoneware are never used for finishing.
Raising the floor level correctly
Even if your balcony has a permanent parapet, there will definitely be gaps where it meets the floor. Therefore, before starting installation work, the joints must be cleaned and sealed with foam. The frame method of constructing a floor provides the best opportunity for laying insulation, which is located between the joists.
But the main question still remains the correct calculation of the height to which the floor needs to be raised, taking into account not only the mark of the door opening, but also the safe height of the parapet. Regardless of what the finishing coat is, this part of the work is performed the same way.
Table 1. How to raise the floor level on the balcony?
| Steps, photo | Description of work |
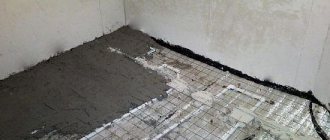
| Step 1 - Cleaning | Perhaps you had to dismantle the old covering, you carried out tiling work on the ceiling or installed an air conditioner. In any case, after such work, either large debris or fine cement dust remains. A careless owner can cover it all up with a floor structure, but a responsible owner can clean it all out with a vacuum cleaner. Moreover, when foaming joints, dust will interfere. |
Step 2 - sealing joints | You inspect the foundation and identify places that will need to be repaired or sealed. Depending on the result, use a solution or foam for sealing. When using mineral wool as insulation, lay polyethylene or roofing felt on the slab with an overlap on the wall. Expanded polystyrene can be placed like this, but an extra layer of insulation will not hurt. Note! For this purpose, you can use thin roll material made of polyethylene foam such as Penofol or Isolon. It does not allow moisture to pass through, and will serve as an additional heat insulator. |
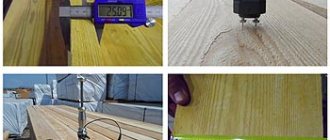
Step 3 - determining the finished floor level | When calculating the height to which the floor should be raised, you need to remember that there must be logic in all your actions. Of course, the thicker the floors, the warmer they are, and if desired, they can be raised even higher than the threshold of the balcony door. However, this will create an obstacle to movement. Don’t forget about the total height of the room, which ultimately should not be less than 2.45 m. Attention! But the most important thing is that when the floor level is raised, the height of the parapet decreases, which absolutely cannot be allowed. |
Step 4 - pay attention to the height of the fence | The final height of the fence should not be less than 95 cm. If there are small children in the house, then it is better to focus on 1.1 m. Thus, if the distance from the balcony slab to the bottom of the window is 125 cm, as in our example, raising the floor by 15-16 cm will be the most optimal solution. |
Step 5 – calculation of floor pie layers | Ideally, a balcony subfloor pie consists of bars, a layer of thin and a layer of thick insulation, a simple floorboard or plywood (any other sheet material, including gypsum fiber board, can be used). The mathematics of the calculation is simple. Considering the thickness of all layers of the floor, in order to raise its level by 16 cm, you need to take logs with a cross-section of 50 * 70 mm, and install them in two tiers on the edge. This overlaps 14 cm. Add 1 cm to this for the rough coating layer, and about the same amount for the finishing coat. Note! If there is no need to raise the floor so high, make the sheathing in one plane. |
Step 6 - cutting cross bars | To obtain a rigid frame, it must contain both longitudinal and transverse elements. Since the balcony is extended in length, there will be more crossbars. This is where you need to start cutting lumber. Apply the block to the opening and cut it so that the crossbar does not rest against the wall, but a gap of 2-3 mm remains. Place the belts so that the distance between them corresponds to the width of the insulation that will fit into the resulting cells. |
Step 7 - choosing an anchor | The logs must be firmly fixed to the base. Taking into account their cross-sectional size, we choose an anchor with a length of 120 mm for fastening. Attention! When choosing the length of the anchor, pay attention to the thickness of the balcony slab and the height of the log section. The smaller they are, the shorter the fastener should be. |
Step 8 - pre-drilling the bars | Drilling a concrete slab through a block is very inconvenient. Therefore, first we make marks on the tree where the fastenings will be made, and then we drill holes - not through, but about three-quarters of the way through. Considering the small width of balconies and loggias, no more than two fastenings are usually required for each transverse beam. The distance between them is about 80 cm. |
Step 9 – Drilling Holes in Concrete | When all the beams are pre-drilled, you can start drilling concrete. Place the timber on the base and drill through the prepared holes. Their depth should exceed the length of the fasteners by 2.5-3 cm. After driving the anchor into the hole, the beam must be firmly pressed against the concrete surface with your foot, and the head must be tightened with a screwdriver so that it goes into the hole. If the anchors rise above the surface of the joists, they will interfere with the installation of the upper tier. |
Step 10 - cleaning again | Since there was a lot of drilling involved in attaching the crossbars, there was once again a need for cleanup. After this, you can proceed to the next stage. |
Step 11 - installation of longitudinal joists | Anyone who has ever worked with lumber knows that beams often have significant curvature. Therefore, they need to be sorted initially: worse things can be used on the crossbars, and the longitudinal beam should be as even as possible. The distance between the longitudinal elements of the frame should not exceed 45 cm. On a standard balcony with a width of 1-1.2 m, it is enough to place 3 beams. If suddenly you happen to be the lucky one whose balcony has a large width, the outermost logs can simply be moved to the center. Move it 10 cm from the warm wall, and 20 cm from the cold parapet. |
Step 12 – leveling | Once you have determined the optimal layout of the timber, you need to find the highest point of the floor to start installation from, and then use it to navigate in the future. The easiest way is to first align the two outer joists, and then, placing any long object on them, adjust the middle belt to its surface. |
Step 13 - fixing the longitudinal bars to the crossbars | To align the bars in the right places, you will have to place either special mounting wedges or cut pads made of plywood or hardboard. To screw longitudinal joists, wood screws with a length corresponding to the height of their section are used - but no more. Simply, the fasteners need to be pressed well into the hole. |
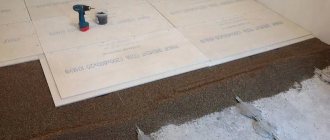
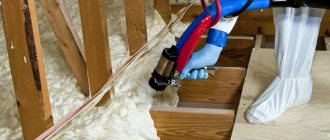
Step 14 – filling the floor contour with mineral wool | Since the logs are mounted not in one plane, but on top of each other - otherwise the floor cannot be raised by 16 cm, the frame turns out to be two-level. Now it needs to be filled with insulation, in this case rolled mineral wool is used. It can only be laid between the crossbars in one layer, or you can make two layers to make it warmer. You can decide for yourself. Place in the bottom row by cutting the cotton wool into squares according to the size of the cells. It can be laid on top in strips along the entire length of the lag. |
Step 15 - installation of subfloor material | Since the balcony room is not heated, but it is well sealed, the mineral wool does not need to be covered with a vapor barrier film. Simply mount sheets of chipboard or other material over the entire structure, focusing on the visible belts of the frame. |
Step 16 - foaming the contour | After installing the sheet material, all that remains is to foam the seams of the floor contour so that accidental moisture does not get there, and particles of mineral wool, which cause allergies in many, do not penetrate into the room. |
Prices for chipboards
chipboard boards
At this point, the installation of the subfloor is completed, and you can begin arranging the finishing coating. In this case, the rough base was made of chipboard, as it was prepared for installation of the laminate. If you want to glue, for example, ceramic tiles, then you need to take a moisture-resistant material - OSB or DSP boards.
You will find detailed step-by-step instructions for laying laminate flooring in the article “How to lay laminate flooring.” We talk about the nuances, choosing a substrate and its types, the installation process and how to cut holes.
A thin layer of self-leveling screed is poured over the sheathing, on which the tiles can already be mounted. For all other materials, the floor arrangement that we demonstrated above is the best option.
Video - How to make a floor on a balcony
Finish options
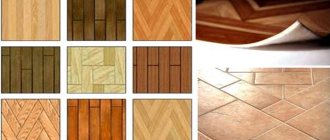
Let's consider the main facing materials:
Painting
This finishing option is used for a concrete or wooden base, which will not only change the appearance of the balcony, but also protect it from negative influences. For wood – protection against permission, mold and mildew. You can buy alkyd varnish or polyurethane or acrylic paint.
The floor on the balcony can simply be painted with special paint, which is intended for outdoor work.
Ceramic tile
Ceramic tiles and porcelain tiles have a number of advantages: high mechanical strength; water resistance; heat resistance; ease of care; wide range and color palette. Disadvantage: the floor is very cold and it is unpleasant to walk on it barefoot, especially in the cold season; Ceramics are perfect as cladding for “warm floors” on the balcony.
Ceramic tiles have good thermal conductivity
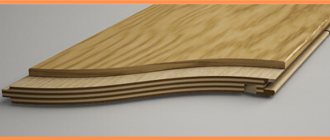
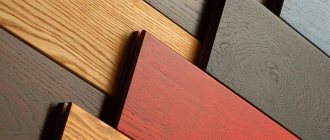
Tree
Finishing with a wooden board will create a pleasant and comfortable surface. This is a beautiful finishing option. The tree is absolutely safe for human health, will last a long time and has a beautiful appearance. But it does not cope well with adverse weather conditions in the form of temperature changes, high humidity and ultraviolet radiation. The problem can be eliminated by applying a special impregnation to the surface.
The facing material can be used for both open and glazed balconies
Cork covering
The cork version will not cause harm to human health, will last a long time, is pleasant to the touch, is resistant to deformation and has a high degree of sound insulation.
Cork can swell when exposed to excess moisture; it is expensive and not tensile strength.
Bulk
Self-leveling – recommended for use on an open balcony. The material has a high degree of wear and moisture resistance. Not affected by temperature changes and ultraviolet radiation. Easy to use and maintain. Has an attractive appearance.
The self-leveling surface can serve as a rough covering, on which you can later lay laminate, parquet boards, or ceramic tiles
Linoleum
Linoleum is one of the most common and cheapest options. Easy to lay. The material is distinguished by a wide range, aesthetic appearance, durability, and water permeability. Linoleum is easy to care for and clean. It will also be possible to cover them without much difficulty. Minus: afraid of ultraviolet radiation. Therefore, it is not worth using for an open balcony.
The choice of linoleum, in addition to appearance, is determined by its quality characteristics
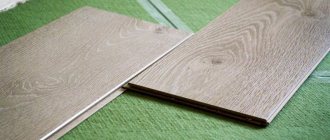
Laminate
Laminate is an inexpensive, practical and hygienic covering that can also be used to organize a heated floor system. There are special brands that differ in thermal conductivity and heat resistance.
Since the material is laid on glue, it is easy to install and dismantle
Parquet
Parquet has its advantages. It is absolutely safe for humans; exhibits sound absorption ability; forms a warm surface; easy to post; It has a beautiful appearance and a wide range. Disadvantages: does not interact well with water, exhibits poor performance against mechanical loads - easily scratched.
Parquet board
Pros and cons of coatings
Naturally, there is no absolutely right choice. When choosing a material, you should pay attention to the amount of light entering the balcony. Consider options, future use of space, and level of your own skills. However, knowing the positive and negative features of the material, you can get a result close to perfection.
| Material | pros | Minuses |
| Laminate, parquet | Moisture-resistant laminate will not deteriorate if exposed to water. Exposure to sunlight, temperature changes and humidity will not affect the material. | Violation of the assembly technology will lead to creaking when walking, or swelling of the coating. The material has increased toxicity in case of fire. May break if heavy objects fall on it. |
| Facing tiles | Has high resistance to aggressive external environments. You can create a unique design. The surface is easy to clean. | Even rough surfaces slip. If the floor is uneven, fungal mold may appear from the accumulation of moisture in the seams. A surface that does not produce any heat. The glossy surface is easily damaged after a heavy object falls. |
| Linoleum | Cheap material. Easily replaced if necessary. | Burns out in the sun. Easily damaged by sharp objects. |
| Terrace board | Easy to assemble. Reliability and durability of the coating. | It will greatly increase the load on the slab, which can lead to its destruction. |
| Dye | Low cost. Easy to apply. You can quickly change the color if you wish. Makes cleaning easier. | The paint fades in the sun. The coating will begin to deteriorate after a year of use. Lack of insulation. Unsightly appearance. |
The apartment becomes a home for many years. The more comfortable the home, the more pleasant it is to return there after work. On your own, with a minimal investment of money, you can easily get an additional room, a flower garden, or just a place to relax.
DIY finishing
The ceramic coating will retain its original appearance in such harsh conditions for many years.
Recommendations regarding finishing depend entirely on the finishing material. Consider the option with ceramic tiles. Although it is cold, it is durable, reliable, not afraid of sudden temperature changes, direct sunlight, moisture, can be bought in a wide range, and is inexpensive.
Its important advantage is that ceramics can be used to decorate the surface of an open balcony.
Floor insulation
Linoleum
The good thing about the material is that it can be used both on open and closed balconies. All thanks to its main advantages:
- Strength;
- Fire safety;
- Environmentally friendly.
But despite its versatility, linoleum wears out quite quickly. Its price is low, but it is used less and less due to the fact that it has gone out of fashion. It spreads on plywood or on a primed screed. But the first option is more suitable for closed balconies.
Important! It is not recommended to lay several different pieces of linoleum at once. This will cause the flooring to wear out faster.
Required materials and tools
To work you will need:
- drill with whisk attachment;
- tile cutter;
- roulette;
- putty knife;
- tile adhesive;
- level;
- ceramic tile;
- “self-leveling floor” mixture;
- vacuum cleaner;
- needle roller;
- baseboard;
- plastic crosses;
- grout.
On cold, open loggias it is appropriate to use linoleum and ceramic tiles, on glazed, warm balconies - these and other types of coatings
Laminate
Excellent coverage for an enclosed balcony. Presented in the form of a synthesis of chipboard or fiberboard coated with a decorative layer. But it is also suitable for an open loggia, due to its moisture resistance. Also, the material is resistant to sunlight and temperature changes. Laminate flooring is easy to clean and does not lose its attractiveness for many years. In addition, it is inexpensive and looks solid.
Advantages:
- Beauty;
- Strength;
- Moisture resistance;
- Heat resistance;
- Easy installation;
- Availability of insulation;
- Affordable price;
- Easy to care for;
- Fire resistance.
But there are also disadvantages:
- Lack of soundproofing qualities;
- Specialized and thorough preparation of the coating for installation.
As you can see, the significant difference between the pros and cons still turns into an advantage. Therefore, by choosing a laminate, you can also resolve its shortcomings. Preparation for installation involves leveling the surface. For this, concrete and a substrate are used, which will contribute to the density and tightness of the installation. In addition, it can insulate the floor; plastic is sometimes used for this.
Preliminary work
Regardless of what exactly the floor surface will be decorated with, it needs to be leveled. Bulk is the fastest and easiest option.
To do this you need:
- Cover the surface with primer. After drying, it is recommended to clean the surface with a vacuum cleaner.
- We make the mixture strictly according to the instructions. To obtain a homogeneous mass, you need to use a drill with a whisk attachment.
- You need to pour the mixture from the far corner in the direction of the exit. While working, level the surface using a spatula with a smooth edge.
- To remove air from the mixture, go over the surface with a needle roller.
- It will be possible to walk on the surface in 5 hours. Then, once the liquid has completely dried, it is important to use the finished mixture no later than half an hour after mixing.
Installing the frame allows you to raise the covering to a level sufficient for laying thermal insulation