Recently, people have been trying to make furniture with their own hands.
This is explained by: saving money, the ability to build a bed to your taste, a wide range of materials on the market, and the opportunity to show your imagination.
In addition, this is an easy way to make an exclusive bed that will fully match the overall interior of the room and your personal needs. For example, a loft bed.
Benefits for children
The main advantages of the loft bed model include:
saving free space . Under the bed you can organize a play corner or a work area;- presence of a work area . Children will use the furniture not only for sleeping, but also for lessons and other activities;
- additional physical activity . Regular descent and ascent on the product will have a beneficial effect on the child’s health;
- functionality . With proper planning, the area under the sleeping place can be arranged for games, or you can place a computer desk in it or install a closet;
- saving money . Making your own bed will save you a considerable amount of money. In a store, such a product will cost twice as much;
- practicality and durability . Since you will select the manufacturing materials yourself and assemble the structure yourself, you can be confident in its quality, safety and durability.
Organizing your desk or desk
If there is sufficient height from the floor to the bed, it is recommended to leave some space for the tabletop. This option is optimal for study and work: the width of a single bed is about 80–100 cm, the same depth is optimal for a spacious table.
For double beds, the installation height in this case should be 10–15 cm higher than the height of the person using the work or study place. Also, due to the overhanging bed and side rails, shading is possible, so the table will need a close electrical connection point and at least a simple table lamp.
The table does not have to be tied to the bed structure, but when making a support structure from chipboard, it is very convenient to use one of the side panels as a support point for the table top. All that remains is to place another board 70–80 cm high on its edge - the space for work and creativity is already ready. To further save space, the tabletop can be made folding or retractable.
Types of structures
What is this lodge? This is a simple bed mounted on a frame. Its height can vary between 1.3 m and up to 1.8 meters. The main thing is to adhere to the correct proportions. According to the types of structures, the loft bed is divided into:
bed on four bases .
This design is characterized by mobility. It can be easily moved from place to place. To make it comfortable to rest on, you need to correctly determine the height of the lounger. With proper skill, this option is also suitable for an adult double bed;- bed on two supports , with additional fixation to the wall. This option is stable and reliable. But, it is installed in a certain place, and in the future it will be problematic to move it to another corner of the room;
- loft attached to the ceiling . This design has no supports at all. But for such a bed you need to be sure that the ceiling surface can handle the load. In addition, for its installation you will need to purchase high-quality and reliable fasteners.
Attention : people prefer making a loft bed with 4 supports. It is easy to build on your own, and can be moved to another location at any time.
As for installing the stairs, there are also different options:
installing the stairs at an angle is the safest way.
In addition, it will be easy to install and secure. But the slope of the stairs will take up a small space in the room. If the room is already small and cramped, you should pay attention to other options;- the staircase on the facade of the attic implies fastening at the end of the bed. It is recommended to fence such a structure with sides. It can be installed on the left or right side, depending on the characteristics of the room and personal preferences;
- a retractable staircase is the most ideal option for small spaces. But making it yourself, without having the skills to make furniture items, is quite difficult. This design should be equipped with special modules with rollers, which are fixed to the bed frame with hinges. The staircase is located under the upper tier;
- steps with drawers are an excellent choice for small rooms. The drawers can be used to place personal items, children's toys, and bedding;
- The design with a podium is suitable for a spacious children's bedroom. The podium is installed at half the height of the bed and is protected by railings.
Attention : when deciding to make a loft bed for your child, be sure to consider his age.
For small children, compact models located at a low height of 1.2 meters are suitable. For teenagers, you can build a roomy sunbed at a height of 1.7 meters.
Style solutions
The house on the bed can become the pearl of the room. An unusual model with a bed on top and an open lower floor, decorated as a forest house located in a tree, will look good in a room with beige walls, laconic light flooring, and a contrasting glossy dark ceiling. It will be even more interesting if you place glowing stars or bright lanterns under the ceiling.
All children dream of a tree house. This idea can be implemented at home
In a house intended for two girls, it is convenient to install a wooden bed in a delicate color. You can hang fabric curtains on it, cover the walls with light wallpaper, and cover the floor with a patchwork quilt or carpet. This way all pieces of furniture will look harmonious, it is desirable that light green, white or pink shades predominate.
Houses of delicate light shades can be installed in almost any interior
A luxurious bed that looks like a castle with towers used to store literature looks good in a snow-white room with floral prints. It is advisable to cover the floor in the room with a beige-gray laminate and hang a classic chandelier.
Any girl will love a pink house with a slide
Made from wood?
Once you have decided on the design of the bed and the type of stairs, you should take care of the materials for its manufacture. There are many options for what to make a children's bed from. Here it is worth considering that it should be :
safe and environmentally friendly;- hypoallergenic and hygroscopic;
- aesthetic;
- durable;
- resistant to mechanical damage.
Following from all of the above, people prefer the following materials:
- natural massif. This material is natural and safe.
It does not release toxins, has a beautiful texture, and is pleasant to the touch. There is a huge selection of wood that has different technical characteristics. When making beds for children, it is customary to use: pine, beech, birch, ash; - Chipboard . This material has a wide color palette. It is convenient to work with, as the sheets can be easily cut with hand and electric tools. This material can be given any shape and various types of structures can be built;
- MDF . This material is distinguished by its favorable cost, aesthetics, and resistance to mechanical damage.
As practice shows, furniture makers give preference to boards and timber.
Advice : in order to save money, it is recommended to purchase premium pine boards. If finances allow, you can make a loft bed from oak or beech.
Organizing your desk or desk
If there is sufficient height from the floor to the bed, it is recommended to leave some space for the tabletop. This option is optimal for study and work: the width of a single bed is about 80–100 cm, the same depth is optimal for a spacious table.
For double beds, the installation height in this case should be 10–15 cm higher than the height of the person using the work or study place. Also, due to the overhanging bed and side rails, shading is possible, so the table will need a close electrical connection point and at least a simple table lamp.
The table does not have to be tied to the bed structure, but when making a support structure from chipboard, it is very convenient to use one of the side panels as a support point for the table top. All that remains is to place another board 70–80 cm high on its edge - the space for work and creativity is already ready. To further save space, the tabletop can be made folding or retractable.
Scheme and drawing with working area
Now you know what materials your bed will be made of, what design and size it will be. Next, you will need to transfer all your thoughts onto paper. Having a well-designed project will speed up the work process and prevent errors during the manufacture and assembly of the bed.
You can make a drawing of a piece of furniture in different ways:
- Draw it yourself with a pencil on a piece of paper. To do this, you need to have a little understanding of drawings and be able to independently calculate the ratio of sizes of different elements;
- order from a specialized company . Here they will design a drawing for you, according to all the wishes and features of the room;
- find a loft bed diagram on the Internet . PC users often share their experiences with other people. On such sites you can find a ready-made drawing and, if necessary, modify it according to your personal wishes.
Tools
If you decide to make a loft bed with your own hands, you will need to prepare all the necessary tools and materials in advance. For these purposes, it is better to give preference to natural wood, such as pine. It is easy to work with, light weight and beautiful texture.
The materials you will need to prepare are:
wooden beam section 10 by 10 cm for making a frame;- slats for railings, at least 2 mm thick;
- plywood for making the bottom. You can also make a slatted bottom with an orthopedic effect;
- fastening systems: nails, self-tapping screws;
- furniture glue;
- stain;
- paints and varnishes;
- tassels;
- sandpaper.
Now let's prepare the tools :
- grinding machine;
- drill or screwdriver;
- electric jigsaw;
- hammer and clamps;
- tape measure and pencil.
Assembly steps
To streamline the process of how bed houses are made, it was divided into stages. If you follow all the steps clearly and consistently, even an inexperienced craftsman will be able to make furniture.
To make a house, you need a drawing with the dimensions of a children's bed: 91 cm wide, 174 cm long and 177 cm high. Taking it as a basis, you can change the dimensions, both larger and smaller.
Base
What you need to do to get a bed base:
- Take two bars measuring 3.8 by 6.7 cm, 166 cm high. They will serve as the sides of the bed.
- Their tops must be cut at 45 degrees and treated with sandpaper. They will serve as the slope of the future roof.
- Thin strips, repeating their size, 0.9 cm thick are attached to the inner surface of the bars. The screws should be evenly spaced.
- Now, using an eccentric coupler, you need to assemble a frame that will serve as the bottom of the bed. To simplify the work, you will need a template made from a six-centimeter block. You need to make two holes on it for self-tapping screws at a distance of 2.5 cm from each other. Measure out the required sections and use a pencil to mark all four bars on both sides.
- Using a six-millimeter drill, drill through holes at the marked points. They will serve to connect the posts to the sides of the bed. Next, on the inside of the longitudinal beam, mark the place for the eccentric. Drill a hole there with a ten-millimeter drill.
- Screw 7 cm long screws into the holes on the outside of the vertical bars. They will fasten the side of the bed to the support. To strengthen the structure, use glue and additionally pass the joints with it.
The best beds for two children, features of their design and design
After this, all that remains is to insert the eccentric into the lower holes and tighten the bolts tightly. Do this operation in all corners to connect both frames to the sides of the bed.
Take two bars that will serve as the sides of the bed
Cut off their tops at 45 degrees
Sand the surface with sandpaper
Attach thin strips to the inner surface of the bars, repeating their size
Using a template from a six-centimeter block, mark the locations of future holes
Drill through holes at the marked points
On the inside of the longitudinal beam, mark a place for the eccentric and drill a hole there with a ten-millimeter drill
Screw 7 cm long self-tapping screws into the holes on the outside of the vertical bars and additionally coat the joints with glue.
Connect both frames to the sides of the bed
Roof
When the base is ready, you can proceed to making the roof. According to the drawing with the dimensions of the children's bed of the house, you will need four 73 cm bars with the outer edges cut at an angle of 45 degrees, like the vertical bars of the base.
Align the joint of the roof with the vertical support, glue the joint, then step back 3 mm from the edge, screw in the self-tapping screw. You need to act carefully to avoid splitting the wood. Thus, you should get two frames that act as the end walls of the house.
Align the joint between the roof and the vertical support
Tape the joint
Stepping back 3 mm from the edge, screw in the self-tapping screw.
Frame attachment
It is necessary to make the structure stable and secure the vertical posts. To do this, a block 82 cm long is screwed to the end frame at the bottom. If the bed is planned without legs, then the transverse rail is fixed at the very bottom edge of the vertical bars or raised to the required height.
Choosing the best car-shaped bed for a boy, useful tips
The parts can be connected using an eccentric tie or using self-tapping screws. The first method requires great precision in marking, but the connections will be strong and invisible. This DIY children's bed house can be disassembled and reassembled many times:
- For the screed, you need to drill a hole with a ten-millimeter drill, 12.5 cm deep, on the center line of the crossbar, 3.5 cm from the edge.
- Make sure that the hole does not end up through.
- Next, on the side surface of the block, make a recess with a six-millimeter drill exactly in the middle.
- Insert a screw into it and secure with an eccentric.
The second method is simpler, but for it you will have to use flat iron corners 3 by 3 cm. All fastening parts will remain visible. When fastening parts with self-tapping screws, you need to choose the longest ones, and be sure to glue the joints. Corner brackets will help stabilize the structure.
Using a ten-millimeter drill, drill a hole 12.5 cm deep
Make a recess on the side surface of the block with a six-millimeter drill
Insert a screw into it and secure with an eccentric
Fastening the frame
When the sides are securely connected to the ends, all that remains is to strengthen the bed house with three longitudinal roof beams. You will need bars measuring 166 cm, repeating the length of the product. You can connect the parts together using self-tapping screws and glue, or with an eccentric.
Now all that remains is to make the bottom of the bed; the mattress will be placed on it. You will need slats or slats. They are carefully attached with self-tapping screws to the sides of the frame. In order not to spoil the appearance of the structure, it is important to fix them on the inner surface.
The stores offer a large selection of children's furniture, but if it is expensive or does not fit in size or other characteristics, you can make a house bed with your own hands. It is not difficult at all, the assembly work will only take a few hours. Using your imagination, the finished design can easily be turned into a princess castle, pirate or spaceship, which will definitely appeal to every child. Going to bed will become a real holiday and will no longer be torture for children and their parents.
Take slats or slats
Carefully fasten them with self-tapping screws to the sides of the frame
By fixing the fasteners on the inner surface, it will be possible to maintain the attractive appearance of the structure
Instructions on how to make a children's loft bed yourself
The manufacture and assembly of a loft bed is as follows:
All elements of the product are sanded and rubbed so that they are free from chips and other defects. Sharp corners are rounded, especially if the bed is made for a small child.- Boards and timber are treated with antiseptic compounds .
- At the junctions of the beams and boards, holes are drilled for fasteners . This will make the assembly process much easier. Immediately before assembling the elements, the holes are coated with glue for better adhesion.
First, a frame is assembled from four supports and a frame.
For this purpose, a beam with a section of 10 by 10 cm is used. The frame of the product will consist of a support beam and an external board of the side. They are attached to the racks simultaneously with a screw connection. You can fasten the frame with metal corners. The entire assembly process is checked vertically with a square.- For reliability of the structure, it is recommended to fasten it with supports at a height of 30 cm . To do this, we use slats, which we attach to the end of the back wall.
- We fix the fencing slats to the support posts . The height of the sides should be at least 40 cm. Keep in mind, the smaller the child, the more often it is worth installing the fencing slats. For very young children, it is recommended to install only longitudinal boards, but also vertical ones.
- Now we move on to installing the ladder at an angle and securing it to the frame. Ease of use should be taken into account here. The slope of the stairs should be such that the child can easily go up and down it.
That's the whole process of making a loft bed. Now you need to start finishing the product.
Points to remember
- Selection of material - boards and bars for the bed must be very well dried - humidity level no more than 18%. Otherwise, the tree will dry out and warp.
- The best fastening option is to join the tongue into the groove. If you have a milling tool in the house and have experience working with it, it is recommended to form tenons and drill holes for them in the racks. Assembly is carried out using glue and duplicated with self-tapping screws. This connection is much more reliable.
- If you already have a mattress for the bed, then when calculating the lounger you need to take its dimensions into account. In this case, there should be a gap of 2-3 cm between the mattress and the sides of the bed.
Be sure to check the right angles during assembly of the structure. The slightest deviations result in the bed becoming unstable.
The following video shows the results of making loft beds yourself:
Finishing
After making the bed, it needs to be given an aesthetic appearance. If desired, the bed can be covered with stain and varnished in two layers . Some parents get creative and paint the beds in bright and rich colors. This option is more popular with young children. So the bed becomes for them not only a place to sleep and relax, but also for active and exciting games.
Advice : if you are serious about saving space in your apartment, try making a lifting bed, a bed-wardrobe and a bed-chair. For children, it also makes sense to make a sand painting table, desk or children's table.
Interior design options
The children's room should be versatile; parents need to combine several tasks, which will ensure comfort and safety for the child. The room for a preschooler should not be brightly colored. Excessive flashy shades will turn the space into an amusement park. This will interfere with concentration, the child will have poor rest and be distracted during classes.
The house on the bed will fit perfectly into the loft interior
Convenient figway with folding doors
Pink house for a girl with a canopy
Bed for marine interior
Option for a schoolchild or two children
Bed with top play area
House with swing doors
Small country house in an apartment
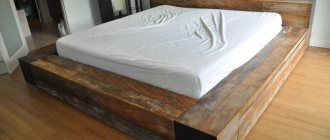
Instead of a bed in the house, you can use a mattress thrown on a skin
A comfortable and properly made bed is a guarantee of quality rest for children. Therefore, you need to think carefully about its design. Before this, you need to find out what requirements are important for this furniture.
Photo
Such a bed will delight children and inspire them to new achievements: