Insulation of balcony areas has become increasingly important in recent years, due to the massive construction of open-plan apartments. So this part of the apartment becomes an additional room or adds square meters to the living room. A separate room can be used as an office or recreation area. To maintain comfort and uniform temperature in the room, it is recommended to install heated floors on the balcony.
The varieties of these designs allow you to choose the ideal option, which is applicable to all types of housing. You can install the structure yourself, thus saving time on finding workers and money.
What errors can you encounter?
Options for laying pipes
Many novice craftsmen believe that it is impossible to completely heat even a small room with a heated floor. This result is possible in case of incorrectly performed preliminary work and insulation.
It is important to know about common mistakes that are easier to prevent than to eliminate later
- The radiator installed on the balcony does not match the size of the window. It should have a width similar to the length of the window sill.
- There is no calculation of energy loss. It must be done before the “snake” of the heated floor is laid.
- Incorrect pipe pitch can also affect the functionality of the installed equipment. It should not exceed 20 cm.
- Poor or no insulation. If there is no reflector before laying the tubular floor, all the heat will generally flow downwards.
- No expansion gaps. Under the influence of heat, the screed will begin to expand and the finish coating will burst.
- An incorrect circulation pump causes increased energy consumption. The energy carrier must circulate evenly throughout the system.
Heating system with cables
Today, the most popular and most affordable system used to create warm laminate flooring is the cable heating system. With its help you can easily heat even the smallest and most compact balcony. The complex is installed under the final coating, in the very top leveling layer of the screed, connected to the control relay, on which the degree of heating is set.
Has the following key advantages:
- Low power consumption.
- It has high quality and degree of protection. It does not oxidize and is completely protected from damage by the cement screed.
- The degree of heating is easily adjusted.
Stages of fixing mounting tapes
Installation of such a device is somewhat more complicated than that of the above systems. We give you recommendations that will help you install it correctly and do it yourself:
- It is necessary to apply a layer of waterproofing and insulate the balcony well.
- The thickness of the screed that is applied to such a system is four to five centimeters.
- The cable is laid in a serpentine shape.
- The interval between the lines should be maintained about ten centimeters.
- You can install laminate flooring on a warm floor after the screed has completely dried in about three weeks.
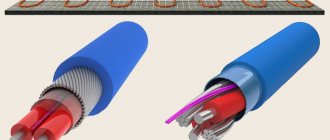
Infrared floor on the balcony
A popular solution for making a warm floor on a balcony is infrared systems. This type of flooring is an extremely thin and flexible film, the thickness of which is 0.3 mm. The infrared heater consists of two conductive strips made using Carbon NanoTube technology. The electricity supply is carried out by a silver-copper wire, the film is completely sealed and laminated using a fire-retardant polymer.
In addition, it has stable resistance to the influence of atmosphere and moisture. The connection of such a film to the electrical network is carried out through a temperature regulator mounted in a convenient place. If the infrared film is damaged mechanically, only the damaged area will stop working, and the rest of the system will function without changes.
Infrared heated floors on the balcony come in two types - rod and film.
The first option is made from interconnected wires and carbon rods. Film models are produced as rolls of thin material with strips that perform the heating.
Film on the left and rod.
Installation of the film type of flooring, which is considered less troublesome, begins with designing its location and taking measurements. After this, a reflective screen is installed so that the thermal radiation is directed to the center of the room. Then they lay the infrared film with the copper busbars down, while remembering that it is cut strictly in sections. All elements of the film are connected using clips and wires, and on the other side - with special insulation.
Then comes the stage of installing the temperature controller; for this, a separate socket is installed and electrical wires are connected. After this, the temperature sensor and the entire system are connected, and the floor covering is laid.
Detailed instructions using an example room can be found below.
Advantages of infrared floors:
- They install quickly. It doesn’t matter at all what type of floor covering will subsequently be placed on the balcony.
- Thanks to the use of a thermostat, it is possible to correctly regulate the room temperature, and since the film heats up quickly, the room will instantly feel warm.
- When heated, the floors do not change the humidity of the surrounding air.
- They operate silently and do not emit harmful fumes or dust.
How can you heat a balcony?
You can heat the room that we equip on the balcony using:
- central heating outlet;
- heated floor equipment;
- installation of an infrared heater;
- the presence of an electric heater;
- placement of oil batteries.
Briefly about central heating
Heating a balcony using central heating is a very profitable way for the long term. It is seduced by reliability and proven over the years. But it also has disadvantages. Heat will only be supplied at the beginning of the heating season. In addition, this method entails quite a lot of hassle, since its equipment requires permission from the BTI.
Remember: under no circumstances should you install additional radiators on the balcony and connect them to central heating. This is primarily due to the fact that due to an unauthorized connection, your neighbors will not receive enough heat. But if your application was reviewed and approved by the BTI, then you can safely install a heated floor on the balcony from central heating:
- To begin with, experts advise covering the part of the wall where the battery will be located with foil. It will become a heat reflector. This way the room will warm up better, and the heat will not escape to the street.
- After this, it is necessary to call a specialist from the organization that supplies heat to shut off the common riser.
- Then holes are drilled in the wall for the pipes. Instead of pipes, experts advise using a plastic-aluminum hose. Then a tee with a valve is mounted on it.
- Next, heating batteries are installed. To do this, you need to fix two brackets on the wall that will hold the radiators at the top, and one bracket at the bottom to hold the battery at the bottom.
Only after all this work is completed are the batteries connected to the central heating
Particular attention must be paid to ensure that no air pockets form in the system.
Warm floors are a great alternative
A more economical option is to install heated floors, since their installation will cost less. They are electric and water. The principle of operation is simple: the air heats up and the top rises. Thanks to this, the desired temperature is maintained in the room.
Installing a water floor on the balcony
Installation of a water floor
- First, you need to insert tees on the supply and return lines when the pipe replacement work is carried out. And also be sure to install shut-off valves (valves) so that it is possible, if necessary, to shut off the supply of warm water.
- Next, a concrete screed is laid on the floor. Its base must be leveled.
- After this, the insulating material is laid.
- Now begins the laying of plastic pipes, which are the basis of the heated floor. They are placed like a snake. The bend should be small. The distance between the pipes is insignificant.
- Next, connect the plastic pipes to the hot water supply system.
- The final stage is laying the concrete screed on the base.
We pour the screed onto the installed water floor on the balcony
For concrete screed, you can use various materials: special building mixtures or ordinary cement mortar (an old proven method).
When laying a water floor, you need to remember several mandatory rules to follow:
- If the main floor is tile or laminate, then the thickness of the screed should be small.
- For a water floor, it is necessary to purchase only high-quality materials with a long service life, since troubleshooting will then cost a significant amount.
- The “warm floor” system is installed from a single pipe. There should be no joints under the screed. Therefore, before purchasing materials, take careful measurements.
- Protect the ends of the pipes to prevent blockages.
- It is imperative to glaze the balcony on which it is planned to install heated floors.
- After completing all work, you must wait several days until all concrete mixtures have completely dried. Under no circumstances should you use a direct heat source to the underfloor heating system to speed up the drying process. But be sure to regularly ventilate the room to remove excess moisture that will form during drying.
Heating connection
The heated floor is installed, the screed is completely dry, now you can connect to the central heating and check the result of the installation. If your central heating system is already running, all you need to do to get your floor working is open the valves. A few minutes - and you can feel a pleasant warmth under your feet.
Which option to choose
Water heated floor
Heating the floor on a balcony can be done in different ways: water, electric, film. Each of them has its own characteristics, which you need to remember when choosing.
Water heated floor
Such equipment has a complex installation process. A lot of additional materials are used for it: reflector, vessels, plugs, clamps. This option is suitable for apartments with centralized heating. Can be connected to a stationary boiler or work autonomously. In most cases, such a design is unacceptable for equipment in high-rise buildings due to its heavy weight.
Electric
Installation of infrared heated floor
Electric heating is quite complex and expensive. To install it, you need to equip special channels and stock up on fasteners. It is mounted similarly to a water one - with a snake. A thermostat must be installed in the kit. It controls the temperature and makes it possible to adjust it. Such a system does not overheat and does not collect air. For this heater, a separate socket with a power of 220-380 Volts is installed, depending on the type of wiring in the house.
Film or infrared
The heating element is a thin film equipped with graphite rods that perform the heating function. These conductors carry the current coming from electricity. Floor heating is uniform and efficient. This design is more suitable for arrangement in small spaces. Heating a sufficient floor area will require large amounts of energy.
How to install a heating structure
The process of installing a water floor is more complicated than others, since it will require checking the pipes before laying them and covering them with screed. The other options are simpler in this regard, but they heat up less than a water floor.
Installation of a water system
Purely technically, installation is carried out according to the same scheme as for electric floors. Installation is carried out on a concrete screed or between wooden joists. Concrete is considered stronger, plus it serves as an excellent heat conductor and retains it for a long time.
Water heated floor
The floor on which work will be carried out must be perfectly level. It is important to take this nuance into account, since during construction, external structures are made at a slight slope so that water does not linger on the roof, but flows calmly down. For a water structure, an additional layer of waterproofing is required.
The material that provides protection from water should extend beyond the floor and be slightly higher than the final coating.
For the flooring itself, a flexible metal-plastic pipe is used. It is fixed to the thermal insulation with small clamps. A rubber corrugation is installed at the place where the clamp covers the pipe. This protects the folds from sudden refraction.
Important: before installing the final screed, the pipe must be tested. To do this, water is run through it under strong pressure and observed for 2 days.
The pipe is laid in coils or snails. The distance between the pipes is 10-15 cm. They should be no closer than 5 cm to the wall. Intersections are not allowed.
A polyethylene tape is laid along the perimeter of the wall so that there is a damping gap when the screed shrinks. The screed is made from a self-leveling material or from a mixture of cement and sand using beacons. Afterwards, wait for the composition to dry completely (7 days) and lay the final cladding (after 1 month).
Dry installation is done on wooden logs. It is not necessary to level the surface for them; just insert the wedges. Logs are placed every 30 cm. The height of the structure is about 7 cm (the width of the insulation and pipe is taken into account).
Polyethylene is placed on the thermal insulation, and lathing is placed on it. The insulation is laid between the joists, securing the free space with polyurethane foam. In order for the pipe to pass through all the joists, grooves must be made at the joints. A layer of plywood is laid before the facing covering.
Cable system installation
The method of laying the cable is the same as for the water pipe. For convenience and ease of installation, you can use special electric mats. This is a thin cable that is supported by fiberglass film. They are easier to attach to thermal insulation.
Connection diagram for cable heated floor
A layer of metal reinforcing mesh is laid in front of the mats. There is no need to secure the mats. The tile covering can be laid directly on them using special glue.
The cable is installed similarly to a water pipe. At the bend points it is intercepted with clamps, which are fixed into thermal protection. A screed is poured on top and tiles are laid.
Recommendations for selection
To make the right choice of heating system, you will have to follow certain rules
It is important to take into account the characteristics of the room - is it an apartment or a house, how is the heating installed, whether the premises have already been finished, what kind of flooring will be installed. The number of storeys of the house, the materials from which it is built, and the size of the heated rooms are taken into account.
Installation of electric heated floor
If you plan to install a screed in your home, then a water floor system can be installed in a private house. In large rooms it will be quite economical. Also, when installing a screed, you can use an electric cable to heat the base.
If the screed has already been poured, then a system of minimats or IR floors is used. The latter are especially relevant if all that remains is to lay the finishing floor covering. In this case, no additional or special materials are required. Also, IR floors make it possible to cover the base with such popular materials as carpet or laminate.
Description of fabric
Felt is a super dense and durable fabric. It is obtained by felting the fluff of hares, goats, and rabbits. Fur waste is often used for this.
Sometimes felt is made together with chemical soft fibers. This fabric can be either smooth or pile.
Heating mats are the best solution for floors under tiles
If you install a warm floor under ceramic tiles on your balcony or loggia yourself, then electric heating mats will be the best solution. Such mats are produced in the form of a fiberglass mesh onto which shielded heating sections are attached.
The sections are manufactured by connecting the cold and hot parts using a coupling-free method, due to which they are unconditionally reliable.
The actual installation of underfloor heating from heating mats is carried out in the following sequence:
A diagram of the location of heating mats is drawn up
Please note that it is not recommended to place electric heating elements in places where furniture is planned to be installed - this will lead to their overheating and failure. The floor surface must be prepared - foreign objects and debris are removed from it. If necessary, the floor surface is leveled. Thermal insulation material is laid, which helps prevent heat loss and increases the feeling of comfort in the room. A cement screed is created, which will serve as the basis for the subsequent installation of the tile covering. Heating mats are laid according to a pre-created pattern
Then the system is connected to the electrical network and the thermostat is installed. As elements of the electrical network, you will also need a temperature sensor and a residual current device.
Electrical wires are connected to the network, which allows you to check the functionality of the entire system. If any malfunctions arise, they need to be eliminated at this stage - in the future, the entire floor will need to be dismantled. Ceramic tiles are laid directly on heating mats using tile adhesive. The adhesive layer during work should not exceed 7 mm.
After 20 days, after the glue under the tiles has completely dried, you can turn on the electric floor.
Operating a heated floor with heating mats requires careful control of temperature regulation. Damage to the floor covering is also not allowed. Such simple manipulations will allow you to create an ideal comfort zone on your balcony.
As a continuation of our article, we recommend that you watch a video that presents an alternative option for laying tiles on a heated floor. The presented technology uses a layer of finishing leveler, and you will learn about its advantages from the video.
Thermal mats
This is probably the most suitable electric heated floor under linoleum that can be laid on the balcony. Its advantages compared to the previous solution are as follows:
- There is no need for a screed here. The mats are laid on the surface in a layer of tile adhesive used for installing tiles and porcelain tiles. Therefore, the layer will be only one to two centimeters.
- The adhesive mixture dries much faster than cement, which will ensure quick commissioning of the system.
- The load on the floor increases insignificantly and the solution can be applied anywhere.
- The raising of the floor surface will be insignificant and comparable to a layer of simple leveling mixture.
The swearing system also has disadvantages, but they are not particularly critical. For example, the mats themselves are quite fragile and can be accidentally damaged during installation. The second disadvantage is the cessation of heat transfer immediately after turning off the electricity. The adhesive layer is not able to accumulate heat. The last drawback is the most important - such a system costs much more than a heating cable.
Logs method of insulation
If you decide that you should put a wooden covering on the floor of an unheated balcony, then you cannot do without the help of logs. By the way, this is one of the most effective ways of insulation. The fact is that the organization of a wooden covering is associated with the creation of an air cushion between the concrete surface and the wooden flooring, which prevents the transfer of cold from the main structure to the floor covering. Also, creating such a niche allows you to place various types of heat-insulating material in it.
Working with lags begins with cleaning the surface, as well as measuring its level. Since concrete can accumulate dampness, it is necessary to first cover the surface with a layer of fiberboard treated with stain. This will prevent the entry of water and dampness. What is better to lay on the floor on the balcony as waterproofing, if not this kind of material? The fiberboard is attached using self-tapping screws. After this, wooden logs are placed on the floor at equal distances. They not only adjust the height of the future floor, but also make it possible to level the surface. To do this, durable, non-sagging material should be placed under the beams in the right places.
Floor insulation with logs and fiberboard
After the procedure is completed, you will have a surface with uniform niches in which the insulation is placed. You can choose any type of insulation material, from expanded clay to all types of fiberglass. What to lay on the floor on the balcony as insulation should be decided according to your personal needs and capabilities. The final stage is fixing the facing board surface, which is then covered with varnish, paint or laminate.
Insulation of walls and ceilings
To maintain comfortable conditions in the loggia, without wasting heat, it is imperative to insulate the walls and ceiling.
To do this, you can use various thermal insulation materials: mineral or polymer, sheet or roll, hard or soft.
Mineral wool
Mineral wool is made from basalt rocks. Pros: low thermal conductivity, fire resistance and affordable price.
However, it is hygroscopic and requires additional protection, so it is not recommended for insulating walls and ceilings on the balcony.
Styrofoam
Polystyrene foam is produced by foaming synthetic masses, resulting in a light and porous product.
It has a low level of thermal conductivity, does not rot and is easy to install.
Expanded polystyrene
Expanded polystyrene is a type of polystyrene foam, but a more modern and improved model. It is an excellent heat insulator, easy to install, lightweight and inexpensive.
Today, polystyrene is one of the most commonly used thermal materials, so let’s consider the process of insulating walls and ceilings on a balcony or loggia from it.
The method of attaching the insulation to the walls depends on their finish:
- on PVA glue or other composition that contains an aggressive solvent;
- using special wedging fungi;
- on wooden slats or metal profiles.
The following finishing is possible on top of the insulating material:
- installation of reinforcing mesh, with puttying, painting or wallpaper;
- cladding with plastic panels or siding.
Installing a heated floor on a balcony or loggia solves several problems at once:
- The floor surface on your loggia or balcony, regardless of the time of year and the temperature outside, will always be warm. The temperature you set on the thermostat.
- After some time, after the system reaches operating mode, the air temperature in the loggia will increase and reach the comfortable range set by the thermostat.
- In an apartment or house, the level of drafts and micro-drafts caused by temperature differences in the rooms will be reduced. Which heated floor is more suitable for a loggia or balcony?
It depends on your choice of finishing floor covering:
- If glue-free floor coverings are used - laminate, parquet boards, linoleum, carpet and others - infrared film heated floors will be the ideal solution. A heated film floor on a balcony or loggia under laminate, linoleum or carpet is the easiest way to warmth. Not only is it very easy to install and connect, it also heats up very quickly in 5-10 minutes and uses little electricity.
- If you need a heated floor for a balcony or loggia under tiles, then it is better to use thin heating cable mats on a mesh, or heating cable sections. Installation of heated floors under tiles, porcelain stoneware, marble is quite labor-intensive, and it is better to entrust it to specialists. Warm floors under tiles heat up more slowly (15-30 minutes), but they also do not cool down immediately. In terms of electricity consumption, heated floors on loggias under tiles are also quite economical.
What to look for when choosing
The rules for choosing heated floors for a loggia or balcony are based on their characteristics. A balcony is essentially a reinforced concrete slab that is attached to the outside of the building. When installing the structure according to the rules, the balcony will be attached to the facade firmly and securely. A standard balcony occupies 3 square meters of area. A load of no more than 200 kg is allowed per 1 sq.m.
Therefore, it is prohibited to install a water version here. It is much more economical and safer to install electric or infrared.
These rules do not apply to the loggia. Any heating system is suitable here, since the loggia is part of the room, and not a separate stove. Its base is a single area with an adjacent room. Experts give preference to infrared heated floors as the easiest to assemble and economical coating.
Types of heated floors
There are only two heat carriers that are used to install a heated floor on a loggia: hot water and electric current. All heating systems are built on their basis. The option with a water jacket can be used in the case of individual heating in the apartment. Connecting to the central system involves obtaining permits and a certain risk. The pressure in the pipes is very strong, and in the event of an accident there will be no direct access to the pipelines, which can lead to trouble with neighbors. Therefore, the electric option can be considered the most convenient for implementation. Among its varieties are the following:
- Heating mats;
- Film infrared;
- Cable systems.
The first two types belong to the category of systems with low thickness and increase the height by only a few centimeters.
For apartment extensions, it is better to use the electric type also because of the convenience and ease of installation and operation.
Which system should I choose for self-installation?
The choice of option for installation on your own will depend not only on the desire of the owner, but also on the thickness of the concrete screed. If its height is allowed around 5 cm, then it is quite possible to use a cable system. In the case of a smaller thickness, preference will be given to mats or infrared elements. When using mats, the thickness of the layer will increase by only a centimeter.
If you plan in the future to make a warm floor on the balcony under tiles or porcelain stoneware, then it is better to choose a cable heating element. It is best to lay infrared film elements under linoleum, carpet, film, laminate. We must not forget that the thermal conductivity of a parquet board or laminate is lower than other types of coating, so a certain power reserve is needed.
Purpose
Soviet-era apartment layouts provided space for installing a radiator. Today, most modern buildings with furnished apartments are built without them. Both in old premises and in new ones, the owners want to preserve maximum free space.
Central heating radiators take up a lot of space and are difficult to fit into the interior unnoticed. If this succeeds, the structure will take up at least 50 cm of area under the window sill. And if the room is large, then the lost territory adds up to tens of square meters.
Heating the floor on the loggia and directly in the apartment is an excellent alternative to central heating. The heat is distributed evenly over the area and the meters remain free for any fantasies of the apartment owners. The air in the apartment is heated from bottom to top, thereby creating a pleasant atmosphere in the room.
The most popular type of heated design is connected to a central heating system. The innovative type is called infrared and is powered by electrical power.
Installation of water heated floor
The heated floor structure is installed in two ways. In the case where the base of the balcony is a concrete slab, the pipes are mounted in a concrete screed. If the floor of the loggia is made of wood, then between the wooden beams. Compared to concrete, the heating efficiency will be significantly higher, since it has excellent thermal conductivity properties. The work is of course more labor-intensive, but the end result makes up for everything.
Options for connecting the collector to central heating risers
Attention! You should start installing a floor heating system only when plastic windows have already been installed and the walls have been insulated.
Laying options
The pipe laying scheme for this design has two types, the shape of a snake and a snail. Regarding the first form, it is used on balconies with a small area. The pipes are laid parallel to each other, during which a snake is formed.
Scheme of fastening water pipes on the loggia
The shape of the snail has a double helix, the supply and return parts of the pipes run parallel to each other. During such a composition, the supply pipe cools the adjacent parts of the pipes. The snail pattern is designed for large balconies and loggias.
Ring piping option
What kind of pipes are used?
Installation of water heated floor structures involves the use of 4 types of pipes:
- Metal-plastic. The tubes have an aluminum inner core which makes them more durable. They cope well with the properties assigned to them, have excellent flexibility, and can withstand high temperatures.
- Copper. The most common and expensive material. The average service life of copper pipes is more than 100 years.
- Polyethylene. Quite flexible, but not at all durable pipes. The cost is much lower than its predecessors.
- Polypropylene. Pipes are famous for their durability, practically do not become clogged and are not subject to corrosion. The disadvantage of the material is poor flexibility.
Properties of the collector system
The collector is necessary to supply water through pipes and regulate temperature. The mechanism consists of a thermostat and a flow meter. There are two types of devices:
- mechanical;
- electronic;
The equipment is placed in a specially designated cabinet, and if the balcony allows you to hollow out a niche of the required size, then the collector is placed in it.
Collector diagram
DIY installation
All three varieties are quite easy to install. The cable is a special circuit that is mounted under the finishing coating. Be sure to install thermal insulation on the balcony. It is better to leave the thermostat in an accessible place so that you can always make your loggia cozy without putting too much effort.
Almost anyone can install heated floors using instructions or master classes on the Internet. This significantly reduces installation costs.
But still, it is better to entrust the wiring itself to specialists; they will be able to connect everything on time and indicate the exact time frame when the heated floor can be put into operation.
How to make a warm floor on the balcony
To heat a balcony, either an electric or film heated floor is suitable. The water one is too heavy for the balcony structure. Before installation, it is necessary to purchase materials taking into account the size of the balcony. Installation should be entrusted to a professional, or installation done yourself. In the second case, you can save a lot of money. If you decide to install an electric floor, try to follow the recommendations of specialists.
Electric floor heating system
- Select the location where the thermostat will be located. Prepare it, create a power line.
- Tackle the base. Remove the old covering and thoroughly clean the floor of debris. If the surface is uneven, make a rough screed.
- Lay a thermal insulation and waterproofing layer.
- Lay out and attach the snake-shaped heating element.
- Check the network for integrity. This can be done by simply measuring the resistance using a multimeter.
- Connect the structure network to the sensor.
- Fill the screed.
- The last stage is laying the finishing layer.
- The floor can be used for its intended purpose after the screed has completely dried.
If heating mats are used, after laying them, install porcelain tiles immediately. In this case, installation is done using special glue. The peculiarity is that the mats are thin and do not affect the height of the floor. They heat the balcony, radiating heat and are absolutely safe for humans. Film flooring saves heat and has high efficiency. In order to install it you will need:
- A foil backing that does not conduct electricity.
- Wires.
- Insulating tape.
- The film is perforated.
- Painting tape.
- Tools.
Installation is carried out in several stages, both water and electric floors:
- Clean the surface, make markings, prime the floor.
- The foil backing should be laid in strips. They must match the film structure in length and width. Make cuts on the film where there is no graphite layer.
- The cut film is laid so that the copper contacts are at the bottom. The contacts must be turned towards the wall on which the thermostat will be located.
- While working, you need to be very careful, try not to damage the integrity of the film and ferrite layer.
- Film flooring does not require pouring, but its installation should only be done on an ideal, flat surface.
Heating mats are sold in rolls.
The best solution for heating balconies and loggias is considered to be laying heating mats. They are made of fiberglass with heating sections. Before installation, draw a diagram of their location on paper. It is not recommended to place mats under furniture, otherwise they will quickly break. Before laying work, it is necessary to prepare the floor surface - remove debris and level it. After that, lay the thermal insulation material. It is needed to create comfort in the room and avoid heat loss. Then a cement screed is made - it is the basis for installing the tiles. After the cement has hardened, you can begin laying the mats according to the chosen scheme, connect the system to the electrical network and install a thermostat. Lay the tiles on heating mats using glue. It is recommended to use the floor after two to three weeks.
Laying heating mats under tiles
Kinds
A warm floor is a structure that consists of many heating elements - cables or pipes. The system can be of three types: water, film and electric. In the latter case, cable, film or heating mats are used. The heat source of the heated floor is water, cable or infrared film. Each design has its own advantages and features, as well as common features. The performance of the two types of floors may be different. What they have in common is installation on special thermal insulation, which is a heat-saving layer. After thermal insulation, it is necessary to make a cement screed and lay the floor covering.
- Water. The water heated floor has a complex installation system. It can be autonomous or connected to central heating. A water floor is not suitable for a balcony, as it is heavy. In addition, it should not be installed in multi-storey buildings with a central heating system. Its advantages include excellent heat dissipation. It is able to warm up even large rooms.
- Electric. It is beneficial to use heating cable elements on balconies and loggias. The thickness of this screed is 4.5 cm. Air does not accumulate inside the structure, so the system lasts a long time and does not overheat. For installation you will need an electrical cable, which is attached in the shape of a “snake”. You need to lay tiles on top. The peculiarity is that the floor can be used only a month after installation. The heating elements should be laid in sections, a screed made of cement and sand should be made, and a coating should be placed on top. Powered by electricity via a thermostat.
- Film. Infrared technology is often used to insulate balconies. A thin film with graphite strips and conductors is used as a heating element. Current flows through the thermostat to the conductors. The advantages of film flooring include high energy efficiency and ease of installation. The main disadvantage is the high price. Experts advise installing it in small spaces. Ideal for loggias and balconies.
On the balcony, a warm floor can replace full heating. It is economical, lightweight, safe, aesthetically pleasing and durable.
Electropol
Another type of heated floors are systems powered by electricity. They can be manufactured in three forms - heating mats, cable and infrared film. Each of these systems works by connecting to the electrical system. They do not require a water supply and do not require permission from the management company to allow their development. There is also completely no risk of flooding neighbors in the event of a problem with the system. And such floors are the best option for arranging a bathroom, kitchen or toilet.
Types of electric floors
Warm electric floor
Cable floor
The most common option for underfloor heating, powered by electricity. It is a thick insulated cable laid according to a certain pattern. The wire heats up under the influence of electricity and then releases the heat to the external environment. This is how the base heats up.
Installation of cable heated floors
Such a heating system can have different power levels, making it easy to select it for a specific room. For example, 120 W/m2 equipment will be sufficient for a kitchen, and 140 W/m2 will be enough for a bathroom. This is also the cheapest option for installing a heating system in an apartment using electricity. The main disadvantage of a cable floor is the need to install a cement screed, which increases the height of the floors.
Heating mats
This is also a cable heating system, but it is unique. The fact is that thin (less than 3 mm) wires are used here, which are fixed by the manufacturer on a special mesh made of fiberglass. Typically, such floors are rolled into rolls or presented as small rugs - mats.
Heating mat
This version of the heating system is optimal for laying tiles, because some types of finishing coating can be immediately glued onto the heating mats. The mats are easy to install, inexpensive, often sold on an adhesive base, and are easy to cut (there are special marks on the surface of the product). In the bathroom, they can even be laid on old tiles, which reduces the amount of preparatory work.
Parameters of Energy heating mats
Infrared floor
A type of electric floor heating that has become quite popular lately. The system is a film with black carbon stripes, which, when heated from the electrical network, transfers thermal energy to the finishing coating. The film can be installed under laminate or carpet and does not require a floor screed. It is flexible, easy to cut and bend if necessary.
Infrared heated floor
Advantages of infrared heated floors
Installation of such a system is very simple - just lay the IR film on the rough base, connect it correctly and cover it with the finishing material. The system is immediately ready for use. At the same time, dust and dirt do not arise during the work, which means that the system can be installed even when the renovation work in the apartment is almost completed.
Laying film flooring
It is interesting that carbon film is sometimes used to decorate not only floors, but also walls and ceilings. This allows it to be used as an autonomous building heating system.
Film floor installation diagram
Having considered all types of electric floors, we will try to compare them with each other. The table will help you draw the necessary conclusions.
Table. Which electric floor is better?
| Principle of comparison | IR floor | Heating mat | Cable floor |
| Installation | The material is laid directly under the finishing coating | The system is laid on the subfloor and ends up inside a layer of tile adhesive or mounted inside the screed | Installation is only possible with a cement screed |
| Maximum power, W/m2 | 220 | 160 | 110 |
| Possible flooring options | Any type of finishing material. The exception is if the coating is attached with glue. Then you need a layer of drywall between it and the IR floor | Laminate, parquet, carpet - with a screed of 2 cm thick. Porcelain stoneware slabs, tiles, wooden boards. | Any type of coating |
| Economy | High | Average | Average |
| Presence of electromagnetic field | Absent | 0.25 µT | 0.25 µT |
Preparatory procedures
The very first thing that needs to be done before repair work is clearing the area of debris, old and unused things, etc. Afterwards, the master needs to decide on the type of future balcony: what will it look like after the renovation? The entire scope of work largely depends on the availability of free time, the desire to create and a certain amount of money.
Balcony floor screed
To make a screed for a heated floor, a home craftsman will need the following materials:
If necessary, level and strengthen the surface by screeding the floor.
- Dry mixture – 2 bags;
- Cement - at the rate of 3 kg per bag of mixture;
- Primer with deep penetrating properties;
- Water.
The entire base of the balcony or loggia is primed. When mixing a dry special mixture, cement and water, you must strive for the consistency of village sour cream. The prepared mass is poured out on the balcony and begins to be leveled using a trowel.
The screed takes 48 to 72 hours to dry. After hardening, the formwork is removed, all defects are corrected with a newly diluted mixture.
Tip: If you press the rule closer to the floor, the finished surface will be much smoother.
Advantages of underfloor heating over classical heating
Radiators and pipes - such a heating system has been actively used for several decades and so far no alternative has been able to completely replace it. Instead of introducing new technologies, existing radiator systems and devices are optimized.
Warm infrared floor on the balcony
However, heated floors have become an exception and are gaining ground every year. One of the reasons is that this type of heating creates temperature conditions that are more pleasant for the human body: heat is supplied from bottom to top, while the main heat is stored at the feet.
Speaking about balconies, the following advantages can be highlighted:
- no need to expand the heating system;
- saving space due to the absence of radiators;
- eliminating the appearance of drafts;
- the emergence of functional living space.
Infrared heated floors
When connected to an electrical outlet, such a floor emits long infrared rays and negatively charged ions. Since all heat is infrared in nature, it can be said that the indication of “infrared” is simply a marketing ploy by manufacturers. The principle of heating is no different from other types of heated floors - they heat the floor covering, and from it the air comes out.
Air ionization is undoubtedly useful. Ions kill fungus, the air becomes cleaner. The only problem is that the entire beneficial effect will be limited to the floor covering. It simply will not let the ions go further.
Advantages of infrared heated floors
Infrared heated floors are in many ways better than cable ones:
- they heat the air more evenly across the entire height of the room. Near the ceiling it will be +20°C, while cable and water floors warm the top of the room to +15°C
- The thermal conductivity of infrared floors is slightly higher than that of water and cable floors. The heat from the first is transferred by 90% to the floor covering, and only 10% can go to the neighbors below
- infrared floor saves 20% energy compared to cable floors
- heating to the set temperature occurs twice as fast as other floors
- heat transfer does not decrease over time. With proper use, the floor can work like new for many years.
- electrical contacts have a parallel connection circuit. This means that if one section fails, the rest will work without noticeable heat loss
- infrared floor is safe to use. It does not burn, does not freeze, and does not give an electric shock. Electromagnetic radiation is less than that of cable floors - the latter emit it throughout the entire volume of the balcony, and in infrared the current flows only along the edges
- To install such a floor, you do not need permission from the authorities. It is convenient to use in apartment buildings with centralized heating, since installing a water floor there is prohibited by law
- Install easily and quickly in a few hours
- if necessary, they can be collected and spread in a new place
Disadvantages of infrared heated floors
The connection diagram for a warm film floor is not simple
Infrared floors also have disadvantages:
- Difficult to connect electricity. If you cannot connect the contact correctly, you will have to throw it away. And there are a limited number of them included
- film manufacturers assure that it can be laid even on uneven floors
However, it is not. The floor needs to be well leveled so that, again, the contacts are not damaged.
We also have an article on our website with several ways to lay the floor on a balcony. It will come in handy when installing flooring.
Types of infrared heated floors
There are two types of infrared floors - film, which are rolls of thin film, and mats made from heating rods.
Rod infrared floor
These are carbon rods that are connected to each other at both ends by black connecting wires.
Unlike film floors, the core floor must be filled with screed. But spreading it out is also easy—roll it out and you’re done. In addition, you won’t have to level the slab as carefully as you would with film.
Film floor
It comes with heating strips and fully heated.
In films with heating strips, individual strips placed between polyurethane layers are heated. Depending on the material of the heating element, such films are divided into bimetallic and carbon (carbon).
Externally, the two types differ little from each other. However, bimetallic films are not common now because they are less effective. They have aluminum and copper strips.
The hydrocarbon (carbon) floor heats due to carbon strips. The service life of such floors is 15 years. Cost of 1 sq. m. - from 500 to 1000 rubles.
The South Koreans released a solid carbon film in 2011. Its difference is that it does not consist of separate strips, but is a solid carbon layer. The larger the coverage area, the higher the efficiency, that is, heating.
Solid carbon fiber is embedded between layers of polyethylene terephthalate (PET). These layers provide such strength that the film can be cut with a knife, and the heat transfer will remain the same. Therefore, the warranty period for it is 50 years. It is sold in rolls with a width of 50 and 100 cm. The cost is 1 sq. m. m. about 1600 rub.
Temperature sensor installation
To regulate the temperature in a room heated by electric floors, you cannot do without a temperature regulator and sensor. The method of connecting devices is simple, it is the same for all systems, the main thing is to follow the instructions.
To install this device, you must:
- make a recess in the wall for the box;
- cut grooves for the wire in the wall from the floor to the location where the regulator is installed;
- install the device in the prepared opening;
- insert the sensor into the corrugated pipe and place it between the heating elements;
- connect the sensor and cable from the floor to the regulator.
The regulator should be placed close to the wiring - this will save on wires.
Features of infrared heated floor
This heated floor design provides room heating using infrared radiation. It is distinguished by its warmth and softness, as well as its complete harmlessness to human health. Infrared flooring is also characterized by a high efficiency - radiant heating is incredibly effective in rooms and is 15-20% more economical than traditional systems.
Laying infrared heated floors on the loggia
To install a film heated floor, you need:
- foil backing that does not conduct electricity;
- wires;
- perforated film;
- thermostat;
- insulating tape;
- masking and bitumen tape;
- standard set of tools.
The actual installation of such a floor involves several stages. First, remove all debris from the floor surface, then mark the surface for laying the film and prime it. The foil substrate is laid in strips - they are prepared in such a size that they completely coincide with the strips of the heated floor (both in width and in number)
It is important that the length of the prepared strips coincides with the total length of the room - it is not advisable to create joints between them. If there is a need to make a cut, then it is performed only in the place where there is no graphite layer
The cut film is laid in such a way that the copper contacts are located at the bottom and the matte surface is at the top. In addition, the contacts must turn towards the wall where the thermostat will subsequently be installed
All work with infrared flooring is carried out with extreme caution so that the ferrite layer is not damaged
Laying diagram of infrared film heated floor
But infrared heated floors, despite the positive technical characteristics and ease of installation, are not the best option for a balcony or loggia. Indeed, it does not require pouring into a screed, as is the case with electrical cables, but the infrared film is so thin that it can only be mounted on a perfectly flat base. In addition, this system will not operate economically at low temperatures (below +20).
Features and Benefits
The design of heated floors has many advantages over conventional radiators. Firstly, it is great for small spaces as well as large rooms. By evenly distributing warm air that does not cool over time, the most comfortable living conditions are created. The main advantages of heated floors include:
- The newest heating system is much more efficient than others. It generates more heat, providing a high level of comfort.
- Despite the huge amount of radiated heat, the heating element has a low temperature.
- Warm floors are a modern and aesthetic heating system. Radiators take up a lot of space and often look unattractive. In addition, the floor does not need to be decorated or maintained, since all elements are hidden under the flooring.
- You can regulate the temperature using installed sensors. The system is automated and functional.
- The main feature of heated floors is long-term operation. The water structure serves the most.
- You can install the system yourself without any skills or experience. No special equipment is required for installation.
- It’s pleasant to walk on a warm floor barefoot; your feet won’t freeze, even if it’s minus degrees outside.