Arches are an architecturally decorative solution for visually separating rooms without installing doors. Basically, arches are installed outside the building and are used to decorate country cottages or private houses.
Arches are not only very stable, they are also almost insensitive to displacements in the bases.
If the wall may collapse, displacements at the base of the arch will only cause distortions, which are harmless and even common for arches. Likewise, arches can withstand earthquakes quite well. Interestingly, among the ancient ruins, arches are the best preserved, and this is partly due to their characteristic stability.
The bricks on which the lintel rests are called heels.
The space covered by any jumper is called a span.
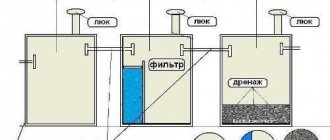
A circle is a wooden form that supports the formwork, on which arched, vaulted and dome structures are erected.
The number of bricks in the arch and rows in the vault should be odd.
The middle upper odd brick is a castle brick.
Arches, designed to cover openings with a width of 2 to 4 m, can have a very different radius of curvature or a different lifting boom.
A brick arch is characterized by the use of a special masonry method - a beam lintel. This design involves erecting the wall to the level of the future lintel, then proceeding to build the arch.
The thickness of the brickwork must be at least 1 brick and, as a rule, it is laid out in two layers of equal thickness, and both layers should be done and “locked” in the upper part at the same time.
Circles are made from boards 40 mm thick.
First, circles are made from boards, cut along the contour of the arch. Circles consist of individual jambs, knocked down in two layers with joints spaced apart. The lower part of the circles is connected with boards and on top of the circles a formwork made of planed boards is sewn with nails, which is sheathed with roofing iron, fiberboard, etc.
d. The masonry is laid along the resulting surface, which repeats the shape of the arched lintel. There are also industrial ready-made arched openings that are supplied disassembled.
Along the edges of the span, side supports are installed on which the template is installed and wedges are used to level it horizontally. A cord is pulled between two boards attached to the wall, allowing you to adjust the position of the bricks laid in the direction of the castle.
A wedge-shaped stone or brick is used, which is laid strictly towards the center. In the absence of ready-made pattern bricks, regular solid bricks are hewn, giving it a wedge-shaped shape. When laying arches, you should strictly monitor the quality of the brick, the direction and thickness of the seams, which should not be more than permissible according to the project.
Arches laid out of ordinary brick are made with wedge-shaped seams with a thickness of at least 5 mm at the bottom and no more than 25 mm at the top.
To accurately mark the distance between bricks and the position of the seams, place a brick in the middle of the template, adjust the compass to the thickness of the brick plus 5 mm for the seam filled with mortar, and, starting from the middle brick, measure the distances along the edge of the template to the last full brick. The width of the remaining gap is divided by the resulting number of bricks and the legs of the compass are further adjusted to the final value.
The masonry of the arches is carried out simultaneously from both sides of the heels to the top with careful bandaging of the seams.
The bricks are laid “on edge” in transverse rows according to the formwork template. The radial position of the seam is controlled by a square template. To properly fix the bricks in the masonry, the mortar is spread over the brick bed in a “wedge shape” (with thickening upwards).
The position of the bricks is checked using a cord fixed at one end in the center of the semicircle.
Thickening of seams opposite to those indicated is allowed only in cases provided for by the project.
The seams must be completely filled with mortar. The mason also monitors the front surface of the masonry - the binding pattern, the quality of the brick, its color and shade.
To ensure uniform stress in large arches, it is necessary to build them so quickly that the solution does not have time to completely harden in all parts of the arches before the circle weakens. Solutions should be used on Portland cement.
Deviations in the thickness of joints in masonry should not exceed: - horizontal…………………………………………………………………………. -2; +3 mm
– vertical……………………………………………………………………………….. -2; +2 mm
Loading of dismantled arches and vaults at an air temperature above 10*C is allowed no earlier than 7 days after the completion of the masonry.
Main types of vaults
1 – box; 2 – quarter-cylindrical; 3 – dome; 4 – domed with sails without a drum; 5 – dome on the drum; 6 – conha; 7 – gable; 8 – cross; 9 – tent; 10 – 12 – stepped-arched; 13 – unbroken cross; 14, 15 – closed on formworks converging to the corner; 16, 17 – vaulted ceiling on formwork converging to the corner; 18 – closed on formwork, receding from the corner; 19 – closed with free arrangement of formwork; 20 – closed on a faceted base (“faceted dome”); 21 – sailing; 22 – dome on tromps; 23 – cross-shaped with horizontal strips of formwork; 24 – cross-shaped with inclined formwork shells; 25 – cross-shaped with stepped formwork; 26 – closed without formwork; 27 and 28 – semi-tray and tray; 29 – vaulted ceiling of formwork; 30 – tray on formwork; 31 and 32 - variants of the illuminated five-domed pillarless temple
In brick churches, the vaults are laid out on formwork resting on circles and walls or on girth arches lowered in relation to them. After the solution hardens, the circles are removed and the formwork is removed.
You are not authorized to post comments.
Architects often use architectural and design elements in their work that give the building originality and beauty. One of these decorative details is the arch.
Internal structures are easily decorated using plasterboard. Brick is used to construct external geometric elements. Many novice craftsmen are interested in the question: how to make a brick arch with your own hands?
Types of arches
Arches in architecture are used in the architecture of different nations. Accordingly, their shape was influenced by the cultural heritage of the countries. An example of this is the Arabian arch, widespread in the architecture of Middle Eastern states.
The most common types of arches are:
semicircular or semicircular: has the appearance of a semicircle, the center of which is at the same level as the heels of the arch.
This design is most often supported by pylons. This type of arch can be classified as a classic; arched: in shape it is an arc equal to a quarter of a circle. Arches of this type adorned the window openings of residential buildings in Ancient Rome; a pointed or broken arch formed by two arches intersecting at an angle.
types of round arches
In modern architecture, the first two types are used as a decorative element - semicircular (they are now called full) and arched. Wedge arches are no less popular - they received this name thanks to the construction technology: bricks are laid out with a wedge and then secured with a “lock.”
Design ideas and design of stone arches
If you want something new in a familiar setting or are planning renovations, but don’t yet have a clear vision of the picture, you should think about designing the arch. Perhaps it is not enough to look at the home environment from a different angle.
The style, color and shape of the structure can set the overall tone of the design project:
- Ragged. Chaoticity is, oddly enough, one of the most popular techniques in interior design. An arch, like the rough surface of wooden furniture or fireplace stones, does not have to be perfect. By giving it a “torn”, deliberately sloppy shape and adding the same “irregular” texture of the external material, you can get an excellent result.
- Carved. In this case, there are no boundaries for the design of the arch, or rather, they are determined by the imagination. Asymmetrical images, flowers - any shape is acceptable.
- With backlight. Capable of taking on the role of one of the central accents of interior lighting.
- With columns. Decoration in the Roman style with neat stone vaults will organically complement the clear and elegant classic interior.
These are the main types of arches, which should not be limited to. The chosen option may not be similar to them, and, therefore, will become a unique idea for decorating a room: corridor, kitchen, etc.
Template calculation
Before making a brick arch, you need to make an auxiliary structure - a template.
Its quality has a direct impact on the final result. For this reason, it is necessary to carefully calculate its dimensions. As an example, we can consider the design of a window with a width of 1500 mm using a beam type.
Please note: for designing an arched opening, it is not its width that is important, but the length of the arc along which the brick will be laid. In order not to create problems for yourself in the future, you need to adjust this size at the calculation stage so that it is a multiple of 70-75 mm.
The width of the template should be 5 mm less than the opening. This small gap will make it easier to install and disassemble (even if it gets damp).
The height of the auxiliary structure must coincide with the same parameter of the arch. By the way, it should not be too low - this is fraught with subsidence of the brickwork under the influence of load.
Now it remains to decide on the thickness of the template. If it is too large, the weight of the structure will complicate the work. In our example, the optimal thickness can be considered 200 mm.
Masonry work
Creating an arch is not much different from ordinary masonry. Difficulties can only be expressed in the calculation and production of smooth formwork. If the structure is cold, then it is best to use a solution prepared taking into account the increased proportion. It involves combining 2.5 parts of sand with part of cement. If we are talking about a barbecue or oven, you should use a clay solution.
When creating an arch under a brick, you must lay out products on both sides of the formwork at the same time. It is important to use the thickness limiters of the lower layer. The plane must coincide with the plane of the supports, while the seams are filled with mortar. The circles can be removed only after 21 days from the date of completion of the work.
Making a template
We begin the work by marking the arch on a sheet of chipboard. To do this you need:
- mark the center line; draw the boundaries of the opening symmetrically to the centerline; mark the top point of the arch on the axis; from the highest point, set down a size equal to the height of the arch, and draw a straight line through the resulting mark, perpendicular to the axis. Mark the intersections of the auxiliary line with the right and left boundaries of the opening with dots; from the same (highest) point, set down a segment equal to the radius of the arched arc - this way the center of the circle is located; install a metal rod (peg) at the central point and tie a piece of knitting to it wire, equal in length to the radius of the circle; attach a pencil to the second end, and using an improvised compass, connect the three previously marked points.
The template consists of two such parts - circles - connected to each other by bars. If the circles are cut exactly according to the markings, then the sharp corners will not make it possible to fasten them to each other. Therefore, before you start cutting, you need to move 100 mm down from the lower points of the arched profile, thus increasing the body of the part.
After this, you can cut out the part with a jigsaw.
Marking the second circle is much easier: to do this, you need to use an already cut piece as a pattern. Just lay it on a new sheet of chipboard and trace along the outline.
The bars intended for fastening the circles must correspond in length to the specified thickness of the template. Twist the prepared parts with self-tapping screws. A strip of fiberboard is nailed along the top of the template - in this way, all possible irregularities in the device are smoothed out.
Circling in a window opening for laying a brick arch
Installation of stone on an arch
You can mount it on cement mortar, but if the weight of the stone is small, then tile adhesive or liquid nails will do. You need to start fixing the stone from below, from the junction of the arch and the wall. The next row is placed in such a way that it protrudes beyond the arch by the thickness of the stone - the adjacent section of the wall is also finished along with the arch, so such overlapping masonry will reliably hide the ends of the stone and will not require subsequent finishing of the corners.
Video:
The most difficult thing is to trim the outer radial contour of the arch with stone; here you need to apply each stone to the arch, mark a line on it with a pencil along the edge of the arch and carefully cut off the excess with a knife and pliers. In order for the stone to have uneven “natural” contours, it can be broken off with a hammer or the same pliers. Each cut and break must be sanded down so that the stone does not delaminate.
Installing the template in the opening
Supports made from edged boards 20 mm thick are installed under the edges of the template. To prevent them from falling, a spacer is inserted between them.
The template is installed on top of supports flush with the edge of the shaped face brick. One nuance should be kept in mind: an arch that is too protruding (more than 60 mm) will be destroyed by frost and rain during operation. If you still decide to take this step, cover it on top with ceramic tiles or metal.
Cleaning the arch from the solution
The seams during the laying process are not always perfectly smooth and clean, so cleaning them is a mandatory procedure. The mortar may be squeezed out of the seams, ending up on the front surface of the masonry, or may not completely fill them. In the first case, the seams are cleaned and wiped with a dry cloth. In the second, the solution is additionally applied to the seams in the direction from bottom to top.
The next day, the wall with the arch needs to be raised several brick rows.
Laying a brick arch with your own hands
First, lay out the right and left heels of the arch.
After this, you can begin marking the order. This is done using a tape measure. For convenience, markings are made on the template every five bricks.
The decision regarding the thickness of the seam is made on site.
After this, you can lay out an arch from the heels to the highest point - on both sides.
The last one or two bricks (depending on whether the number was even or odd when marking) are called castle bricks. After they are put in place, the seams are carefully filled with mortar. If this is not done, the arch may “sit down”.
The arch - front and backing - must be laid out in one go.
The template can be removed two to three hours after the masonry is crimped. If it is not possible to remove the auxiliary structure on the same day, protect it from possible rain with plastic wrap. Otherwise, the swollen tree may undermine the fresh masonry, and the work will have to be completely redone.
A beautiful brick window or door arch will decorate any interior room.
The masonry technology is simple, but still requires certain skills. Therefore, it is better for the arched opening to be designed and covered by a master. However, if you carefully study the instructions and take into account all the important nuances, draw up a project, then you can lay out the arch in a semicircle with your own hands.
What materials are used
For each shape of the arched structure, you can choose a suitable finishing material. When forming large arches in large-scale projects, reinforcement in the form of a span is used at the time of construction. For small objects (apartments or private houses), lightweight structures consisting of metal or wooden profiles are used.
The most common material for constructing arches is a metal profile mounted on a plasterboard frame. This method allows you to create various bends and shapes of the opening and implement various design projects. In addition, it is easy to use and has high resistance to temperature changes and high indoor humidity.
Attention! Metal profiles with a plasterboard frame are not susceptible to the negative effects of ultraviolet radiation. They are also an ideal basis for further decorating the opening with stone, tile or wood. For minimalist designs, plastering drywall or wallpapering is allowed. In some cases, the openings are additionally decorated with stucco.
To visually expand the room, the arch is painted in the color of the ceiling, thus creating additional space in the room.
In various variations of classic and modern interiors, arched structures are decorated with smooth wood or decorative carvings. However, such solutions are only suitable for spacious rooms, since it noticeably “weights” the ceiling and compresses the walls. It should also be taken into account that different colors, textures and types of wood do not combine well with each other. Therefore, in such interiors it is necessary to adhere to one color scheme and texture.
We should also highlight one of the most interesting ways to design arched structures - using artificial stone.
It has the following advantages:
- Convenience and ease of care. There is no need to use special detergents. You can give preference to any chemical that does not contain abrasive particles.
- Artificial stone looks exactly the same as natural stone. Modern manufacturers have achieved absolute similarity to the original, giving the artificial analogue such advantages as low price and light weight. It can also be used for wooden houses that may not withstand the load of natural stone and marble.
- The owner can carry out the finishing with his own hands. You can do cladding yourself by watching an instructional video on the Internet.
- Various variations of artificial stone will suit different interior styles - classic, modern and antique.
- Most manufacturers offer various color variations to suit any interior.
When choosing decorative stone for renovation, preference is given to narrow plates, which are easier to finish curved vaults. The specialist is also advised to choose an artificial stone with water-repellent properties or cover it with an appropriate composition after installation. This treatment will extend the life of the materials.
Types of brick covering openings
A lintel is the covering of a door or window opening. Reinforced concrete lintels are most widely used in construction. They can span long spans and withstand heavy loads.
Brick lintels are used only for non-load-bearing walls, as they do not have sufficient strength for this. The span width should not exceed 1.7 m.
1 - private; 2 - wedge-shaped; 3 - arched; 4 - arched beam
Ordinary brick lintels are called ordinary lintels. The bricks in them are supported by reinforcement. Wedge, bow, lancet, arched, semicircular and box lintels are used as an architectural detail of facades.
1 - semicircular; 2 - lancet; 3 - box
Their variety is determined by the shape of the opening, or more precisely, the outline of its upper part. According to the principle of an arched lintel, vaults are laid out, which are the ceiling of buildings.
Before the invention of concrete (late 19th century), openings were covered with brick lintels. It was not only a tribute to beauty. Wedge and types of arched openings held the load from the wall due to the expansion, which ensured the fan arrangement of the bricks in the masonry.
In temple architecture, arches and vaults, as a way of covering openings and rooms, over time became the canon of church architecture. Modern brick arched openings and vaulted ceilings are only an architectural solution.
The use of arched or wedge lintels is necessary when reconstructing buildings and structures of the 17th–19th centuries.
Stoves and fireplaces are still being built today in almost every country house, where arched or wedge-shaped lintels and cylindrical vaults are often used when constructing a stove or guardianship.
Ordinary jumpers
Ordinary lintels are made according to the principle of ordinary brickwork. It is also carried out with dressing and ensuring horizontal and vertical seams. Its difference from simple masonry is the observance of a special quality of work. Careful filling of the seams is necessary to create a joint work of all the bricks covering the opening.
Ordinary lintels, unlike ordinary masonry, not only compress under the weight of the overlying wall, but also bend, having no support in the opening. The size of the brick lintel is taken based on its bending performance in the opening. The height is 5, 6 rows of masonry. In length, the size is calculated by the width of the opening plus 500 mm on each side of it.
Due to the special importance of the design of the ceiling of any opening, the brick selected for masonry is selected, the grade of mortar used is no lower than 25. In an ordinary lintel, the brick rests on reinforcement, which is embedded in a layer of cement-sand mortar.
Reinforcement is assigned by calculation and depends on the magnitude of the load on the opening. For small values, the reinforcement is installed structurally from round steel with a diameter of 4–6 mm. Its quantity is one rod per half brick of the wall. The reinforcement must extend into the masonry beyond the edge of the opening by at least 250 mm. Their ends are bent upward around the brick.
1 - fittings; 2 - solution; 3 - formwork
To install an ordinary lintel, like any other, you will need a tool that is used for ordinary brickwork. To make reinforced support for bricks, it is necessary to install formwork. It can be made from boards 40–50 mm thick.
You can avoid leakage of the solution and give the bottom of the lintel a more even appearance by laying any rolled waterproofing or simple plastic film on the boards. It must be remembered that unevenness on the surface of the formwork will affect the appearance of the upper part of the opening.
A mortar layer is spread on the formwork, on which reinforcing bars are laid and embedded into it. Then a second layer of mortar is laid, which covers the reinforcement. It is important to observe the thickness of the protective layer for metal products. It is at least 3 cm.
When hardening, the solution must gain the necessary strength so that further laying of the lintel can be carried out. The period of keeping it in the formwork is at least 12 days in the summer, in the fall - at least 20 days. During periods of negative temperatures, it is necessary to observe special measures developed for winter masonry.
To support the formwork, bricks are made from the masonry, which are subsequently cut down after the mortar has gained full strength and the boards have been removed. You can make a furrow in the masonry and insert formwork into it, after removing which a brick with a masonry joint is installed in this place.
1 - formwork; 2 - brick release
Large openings (wider than 1.5 m) require the installation of racks under the formwork. You can install the support boards under the flooring on the edge for rigidity.
Wedge lintels
Wedge lintels do not require reinforced mortar support. The load-bearing capacity of such a lintel occurs due to the expansion in the wedge-shaped installation of the brick.
Exists for the option of installing wedge jumpers:
- wedge-shaped vertical joint of masonry;
- wedge-shaped brick.
In the case of a wedge-shaped seam, its thickness at the bottom is taken to be at least 5 mm, and at the top - no more than 25 mm. If wedge bricks are used, the joint in the masonry is made of the same thickness of no more than 10 mm. Wedge lintels are installed using formwork with circles.
If a window or doorway is placed with quarters, then to construct a wedge lintel you will need three circles. One is made shorter and installed at the level of the quarters, the other two - inside the opening. Longer circles are covered with formwork, which can be made from boards.
The wall is laid to the level of the upper part of the lintel with a heel (support) device. In this case, the angle of inclination of the edge of the lintel (bricks) relative to the vertical is immediately determined. Next, you need to mark all the rows on the formwork of the future floor. Their number must be odd. When calculating the design of each row, it is important to take into account the thickness of the seam.
The central brick row is inserted vertically and acts as a lock. It creates compression in the lower part of the lintel and makes it possible to withstand the overlying load without reinforcement.
1 - lock; 2 - heel
They begin laying the wedge lintel from the heels to the middle on both sides, in order to ultimately approach the central brick - the castle. You can maintain the exact direction of each seam by finding the point of intersection of the direction lines of both heels. A nail is driven into this place on the formwork and the line of each seam is determined using a rope tied to the nail.
Types of brick arches
A brick arch is a decorative element, so it is often used to decorate openings in residential premises. But before you build beautiful arched openings in houses and apartments, it is useful to study information about what types of arches exist. The most common varieties are:
Wedge-shaped. Lovers of Gothic style interiors often resort to the wedge shape.
In this case, the bricklaying should form a wedge arched vault, the upper point of the tip is fixed with a special building element. Romance. In this situation, the opening must be laid out in a rectangular shape, and the corner part must be semicircular. An admirer of oriental-themed interiors can make this type of arch in their own home.
In this case, the bricks are laid in such a way that a vault is formed in the shape of a truncated cone. Classic. This semicircular arch can be framed with decorative pillars if desired. In order for the design to look harmonious, it is important to adjust the size of the semicircle to ½ the width of the main opening.Modern.
Externally, the opening looks like an arc. Porta. A simple design, laid out in the shape of a rectangle. Ellipse. Such an arch is round on the arch and can have different widths.
Return to contents
What styles is the arch suitable for when creating an interior?
Modern interior specialists are introducing arches into various room concepts and styles. Depending on the initial idea, the ways of their design are divided:
- for the classic style, a traditional arch in the shape of a semicircle is used. Its radius, as a rule, does not exceed half the width of the doorway. In this case, additional bends, turns, and unusual contours are not allowed - only classic, regular lines. Most often, wood, stone or polyurethane holdings of suitable shades that fit into the overall concept of the room are used to design such doorways. In the photo you can see how the arch is decorated with decorative bricks in an apartment with a classic design:
- For modern high-tech homes, colorful colors and an abundance of decorative elements are not used. Therefore, it will be difficult to find an arch in such an apartment. But such solutions also occur. If properly decorated in plain and preferably pastel colors, it will become the highlight of the interior;
- for houses and apartments in the Art Nouveau style - another modern and popular design direction - you can safely use wide arches with a clear line between the semicircle and straight lines of the walls. This form vaguely resembles the classic style, but looks much more restrained and elegant.
Advantages and disadvantages
Despite the fact that semicircular arched window and door ceilings are considered an interesting interior solution, they have their pros and cons, which are important to consider before starting construction.
This decor is used for window openings.
The main advantages of such structures are as follows:
Unique atmosphere in the house.
The vaults of an entrance or interior door laid out in a semicircle create a special, pleasant atmosphere that will be felt by the owners of the room and their guests. Simple design and installation. Even without construction experience, after carefully studying the construction diagram, you will be able to build a red brick door arch in your house yourself. Reliability of the structure. The arch is a monolithic structure that can withstand increased loads. Versatility.
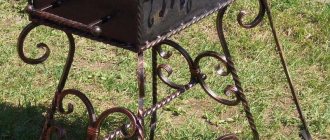
You can fold an arch not only inside the house. It is often used to frame entrance gates, gates, and window openings. Even the hole in the stove can be lined with brick in the shape of an arched arc, which is also an original solution and a beautiful addition to the overall interior of the room.
However, this structure also has disadvantages, for example:
- A semicircular arch requires the creation of a unified interior style, which includes specific cladding of walls, windows, and floors. The implementation of these ideas will require significant expenditures of labor, materials and finances, which not everyone can afford. Strict, step-by-step adherence to masonry technology. If you incorrectly calculate the dimensions or form a brick vault not according to the design, there is a high risk that the structure will not hold up and will fall apart.
Return to contents
Advantages and disadvantages
The designs of brick arched floors, interesting for their solutions, have their own advantages and disadvantages, which are taken into account during construction.
The advantages include the following:
- an unusual atmosphere is created in the house. The door arch laid in a semicircle gives the room a coziness that is felt by all present;
- design and installation work does not cause any difficulties. Without the proper experience, but having studied the construction technology, you can build an arch in an apartment with your own hands;
- The design is reliable. Arch is a monolithic structure subjected to increased loads;
- universal application. Arches are laid out not only indoors. They are often used to decorate wickets, windows, gates, etc.
Unfortunately, there are also some negative aspects:
- a semicircular arch implies the creation of a unified interior style, which includes a special cladding of the surface of walls, floors and window openings. To turn all the ideas into reality, you will have to incur significant financial costs and work hard;
- you will have to strictly adhere to the existing masonry technology. Errors in sizing calculations or deviations from the design solution will result in bad consequences - the arched lintel will collapse.
Design and drawings
To make a design project, you need to measure the height of the wall.
If the decision to lay a brick arch is final, first of all you need to draw up a template with which you can evaluate the shape and dimensions of the future structure. To create a template, it is recommended to measure:
- the thickness of the supporting structures; the distance of the top point relative to the ceiling; the height of the walls; the required width of the opening.
When these parameters become known, an initial sketch of the future template is created, which is made from chipboard. For drawing:
- an arc with an optimal bend is drawn; the optimal radius of the structure is set, taking into account the width of the opening underneath it.
If the masonry of a brick arch is complicated, and the number of bends and levels is non-standard, each element should be calculated and drawn separately.
Afterwards, when preparing the sketch, all the elements are added together. It is important to pay attention to the fact that the size of the template should be smaller than the actual parameters of the arch. This will help remove the layout from the opening without additional effort.
Return to contents
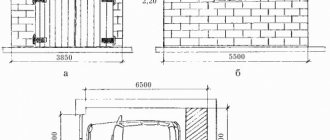
Design features for the garage
You can give a sufficient number of photos of brick arches that are used in garages. To ensure its durability, it is recommended to take into account several features.
For example, many strive to make the arc minimal, but this only reduces the reliability of the design. It is also recommended to compare the strength of the template and the weight of the arch.
The posts must fit tightly so that the arch does not sag. Before starting the process, you should determine the required amount of bricks. If the arch is large, thick seams should be avoided. The thickness of the bottom seam should be 3-6 mm. Laying is done from the edges to the center. We lay the central brick last.
If the arch is made for a garage, the distance in the opening will be greater. To increase the strength of the wall above the arch, it is worth laying reinforcement.
Calculation of material and design parameters
The parameters of the finished structure need to be calculated.
Before you start modeling the sketch, it is worth measuring the wall, the height of the ceiling and the desired width of the opening. The calculation of a brick arch is carried out as follows:
- The radius of the semicircle is determined, as well as the width; using a compass, the required radius is drawn.
The calculation of the arch and its dimensions is carried out using the following formula:
- R=L2+H2/2H, where R is radius, L is ½ chord, H is height.
Return to contents
How to post?
After installing the template, they begin to lay the brickwork of the opening itself. Bricks in columns are laid out from bottom to top, from both sides at the same time. All seams are carefully filled with mortar; voids can subsequently cause destruction of the structure. The last brick is hammered into the central upper part, a “lock” is installed, it will secure the structure. The template is dismantled only when the entire structure is completely ready. Then the excess mortar is removed, the seams are leveled, and the masonry is prepared for facing work. For finishing, you can choose decorative plaster.
Arched doorway masonry
When all the parameters become known, the wooden sketch is installed, followed by the brickwork itself.
The distribution of bricks is carried out from below, while the laying is carried out on both sides of the future arch. In order not to violate the distance between the supports, a board of the required length is placed, which is supported on the pillars and moves as they increase. Afterwards, it is necessary to install a beam on both sides of the structure, which will serve as a support.
When laying out columns, it is worth considering that the number of rows laid out to form an arch should not be even. It is important to carefully fill all seams and jumpers with mortar, otherwise the structure will be unreliable. Having reached the central arch, you need to install a “locking” brick, with which you can fix the entire lintel of the opening.
When the structure is completely laid out, the wooden template is removed. To finish the arch, you can use decorative plaster that imitates red brick. If the arched structure is erected on the street, for example, over a gate, plaster for external use is selected for cladding.
Return to contents
Brick finishing
The finishing of the arch with brick is carried out after smoothing out the irregularities with sandpaper. Treated areas must be primed and covered with putty. Then an adhesive solution is prepared, which has a cement-sand base. You can also use liquid nails to lay decorative bricks.
The work is carried out from the bottom up, it is necessary to follow from the corner of the wall opening. A distance of 5 mm is maintained between bricks. The edges are sanded with a file. Once the solution has dried, you can create the seams. To do this, use grout of the desired color. A construction syringe is filled with it. You can also use a rubber spatula. The grout is rubbed into the seams, but the composition should not get on the front of the stone.
Risks of breakdown
If the structure is not built correctly, cracks may form on it.
A brick arched opening may break if constructed incorrectly and the calculations are not followed. If the radius of the structure is large, the load increases several times.
As a result, cracks form first, so the opening gradually collapses. The reasons why arched windows sag are the same - incorrectly calculated opening width. Also, the structure collapses if the foundation of the house is unstable; in this situation, the structure needs to be strengthened along the entire perimeter, because even a reliably built arch will not withstand such a load.
Return to contents
How to finish an arch from the outside?
Stone laying is carried out according to the following sequence:
After covering the arch, at least 24 hours must pass, after which all seams must be rubbed with a special solution.
- Laying the 1st row. The walls bordering the arch also need to be finished. The first tile is attached at the junction of the arch and the wall. Work starts from the very bottom. To obtain a neat, even row, you need to use a building level and plastic crosses.
- The 2nd row is also placed at the intersection of the arch and the wall. However, the 1st stone of this row should protrude beyond the joint at a distance equal to the thickness of the tile. The facing tiles are overlapped at the outer corners. This will allow you not to seal them in the future, and the masonry will become more durable. It turns out that the tiles should be laid in a checkerboard pattern. The number of tiles depends on the length of the rows.
- Approaching the curve, the finishing tile is first applied to the wall on which it will be mounted, and then, being careful, it is cut along an arc (maintaining the radius of the curve). Using a pencil, the stone is marked according to the rounding.
- You can carefully cut the stone by first passing several times with a construction knife along the drawn markings. After this, all excess is removed with ordinary pliers. In addition, you can cut the tiles using special tile cutters or a grinder. The cut surface is treated with sandpaper. All other elements bordering the arch, if necessary, are adjusted in the same way.
Preparation for the start of work: installation of the formwork base
Oriented strand board is best suited as a material for the base of future formwork. You need to cut out several round-shaped elements from it. In order for them all to be the same, it is worth thinking about a template.
The formwork supports must be tied together with boards and also attached to the wall. Supports should be installed from below; after all, the weight will be considerable. A substrate must be installed under the supports. Otherwise, problems may arise when dismantling the formwork.
PHOTO: YouTube.com The base for the formwork is made of oriented strand board
A nuance that must be taken into account at this stage
It is clear that when installing formwork, boards on plywood arches can be laid on top. However, in this case, it will not be possible to carefully disassemble everything when the brick vault is ready. Therefore, it is necessary to leave some space near the wall. It should be enough to pass the board.
PHOTO: YouTube.com A small gap will allow you to easily dismantle the formwork boards
Laying bricks on slatted formwork
Before laying, each brick must be slightly trimmed and chamfered. When laying between the bricks, you need to place a round rod. It will not only prevent the solution from flowing down, but will also simplify the subsequent jointing, and therefore reduce the time.
PHOTO: YouTube.com A steel bar should be installed between the bricks and then removed
The steel rod can be removed after the mortar has been applied and the brick has not yet taken its place. Otherwise, it can be removed only after dismantling the formwork. The question arises, where, in this case, to collect rods for all the seams?
PHOTO: YouTube.comThe main thing is not to forget to remove the metal bar in time
When the two sides of the arch are ready (the arch closes last in the middle), it is necessary to make a marking on the wall along which the remaining brick will be placed. It is better to make the gaps between the bricks a little larger than to break them lengthwise. But you shouldn’t make the gaps too wide either. We'll have to look for a middle ground.
The following can be said about the solution. If the master is confident that he will complete all the work in one day, then the solution is best mixed with five hundredth cement, in a ratio of 1/5.
PHOTO: YouTube.com In the middle, it makes sense to make markings for each row of bricks so that the surface is uniform and even.
Ideally, the first part of laying bricks should look like this - in the middle one third is not closed, two thirds on different sides are finished. Further work will need to be done a little differently. Laying should be carried out not along the arches, but across them, laying the bricks in a wedge. At first it may seem too complicated, but after laying two or three rows everything becomes easier. It was not for nothing that old people said that the eyes are afraid, but the hands do.
A small digression. Don't be afraid to start new jobs. The main thing is to collect as much information about them as possible. And if a master has golden hands, then he is capable of any task. It is clear that at first the work may progress very slowly, but over time the skill will come, and with it the speed of execution.
Stretch ceiling in the shape of a dome
The material allows you to quickly assemble complex structures. The film is made in different colors and textures, and photo printing is applied. Images of the sky, architectural objects, reproductions of frescoes or mosaics look good.
The dome is made up of several petal parts. First, a frame is assembled from arched profiles, secured to the rough ceiling and walls. Then the film cut to size is heated and stretched. The seams between the sections are thin and noticeable only from a close distance. This ceiling is not afraid of moisture, does not collect dust and is easy to clean.
Domes and arches are combined with other types of structures: half-columns, waves, etc. The cost depends on the complexity and size of the project. It is important to correctly calculate the dimensions and location of the frame parts and cut the fabric. The construction of the tension dome will have to be entrusted to professionals.
Articles on the topic
Expansion joint in a brick multi-storey building, instructions, advice from masons
How to rebuild a brick house - options, techniques, instructions, advice from masons
Brick plinth on a strip foundation - masonry technology, instructions, advice from masons
Preparing a brick surface for plastering - rules, instructions, advice from masons
Wooden floors in a brick house - types, how to install, instructions, advice from masons
Brick foundation for a wooden house - types, instructions, advice from masons
How to paint the outside of a brick house - types of paint, instructions, advice from masons
How to renovate an old brick house - methods, preparation, instructions, advice from masons
Reviews ()
Polyurethane dome
This is a decoration that is placed in the center of the ceiling. Used as a design element in Baroque, Empire and other historical styles.
Polyurethane is a moisture-resistant material that is not susceptible to mold or rot. Tolerates temperature changes. Products made from it are placed in wet areas: kitchens, bathrooms, bathhouses, home pools.
The dome is hemispherical in shape, often complemented along the edge by a frame with an ornament. The design is varied, from laconic to lush and richly decorated. The diameter of the product is from 72 centimeters to 2 meters 113 cm, depth - 5-33. The cost starts from 10,000 for small models, and can go up to 75 thousand and above.
For installation, a plasterboard niche is made in the center of the ceiling into which the dome is inserted. The decor is attached with self-tapping screws or glue. The products are white, less often painted gold or silver. Primer is applied to those not factory decorated. They can later be given any color.
Vaulted plasterboard ceiling
Drywall is often used for finishing rooms. Although the material is sold in sheet form, it can be used to create not only straight, but also curved shapes.
The material is environmentally friendly and easy to process. Arched plasterboard ceilings can be made with your own hands, although construction or repair experience is required.
First, the hanging frame is assembled, which requires a curved profile. They buy it or make it from regular straight (which is cheaper). To do this, markings are applied to the guide with a constant step; the distance depends on how strong the bend is required. Cut along these lines with metal scissors or a grinder.
Important! After this treatment, the profile becomes less durable. Therefore, the entire structure is further strengthened.
The prepared guides are attached to the ceiling. It is better to use anchor hangers with traction to further adjust the height. Ordinary straight lines are laid perpendicular to the bent profiles.
The frame is covered with plasterboard. You can use special bent sheets. They are more durable as they are reinforced with fiberglass. But the thickness is less than standard, which is not always convenient. In addition, such drywall is more expensive and more difficult to work with (due to its increased strength).
GCR can be bent independently. For this, two methods are used: wet and dry. In the first case, the sheets are rolled with a toothed roller and spilled with water. When wet, drywall becomes flexible. GCR is laid on a semicircular surface with a suitable radius. After drying, the shape of the arch is preserved.
Another option is the cutting method. The sheet is laid on a suitable base and parallel cuts are made (not all the way through). The gypsum boards are bent and the cuts are puttied. You can lay a reinforcing mesh on top, this will add strength.
The prepared sheets are attached to the frame with self-tapping screws. Then the final finishing is carried out: the seams are puttied and painted.
Common Mistakes
The arch must distribute the load from the center to the columns; an incorrectly built structure can crack and sometimes fall apart. The most common mistakes made during installation are:
- the load will be distributed unevenly if the very wide opening does not have sufficient height;
- You cannot replace the template with metal corners; chipboard, unlike metal, promotes natural shrinkage of the entire structure;
- untimely dismantling of the template can swell from the moisture of the solution and partially destroy the structure;
- a weak foundation creates a risk of subsidence of the structure, which leads to its destruction;
- Large radii should be calculated especially carefully, since such structures experience special loads.
Fabric dome
This method does not require significant investment or much effort. But with skillfully selected drapery, the room transforms and becomes more comfortable. This method is well suited for a bedroom or nursery.
You will need durable fabric. The length and width of the piece depend on the size of the room, and the color and pattern are selected to match the interior. The middle is fixed in the center of the ceiling (nails or glue are used). Beautiful folds are formed, and the edges are fixed on the walls.
Read more: How to drape a ceiling with fabric
Dome-shaped structures transform the interior. Thanks to the smooth transition from the partitions to the ceiling, the space expands. There are many options for arranging a vault, from which you can choose the one that best suits your personal tastes and situation.