Warm floors create coziness and comfort in a living space. But it is not always possible to install such structures in multi-storey buildings. In addition, it is unclear whether pipes inside the floor can completely replace conventional radiators. The presented instructions will help you correctly install underfloor heating (HF) in an apartment using central heating.
What is a water heated floor
In panel houses, the outer walls and floors in winter most often do not provide sufficiently comfortable living conditions. This problem is especially acute if the family has small children who like to play on the floor.
If you warm up the entire surface of the flooring, drafts will be eliminated. Dusty carpets, warm slippers, and woolen socks at home will no longer be needed even during the most severe frosts. To do this, it is necessary to lay pipes under the floor throughout the entire area of the heated room, in which warm water will circulate.
What does it consist of?
The design of TP is technologically more complex than traditional heating using radiators. Typically, heating pipes are poured on top of a concrete monolith. There are more modern methods of dry installation with standard blocks.
To reduce heat loss, polystyrene foam is laid on concrete floor slabs. Waterproofing made of polyethylene film is placed under it, wrapping the edges and securing with tape.
Before pouring the concrete screed, a damper tape is installed around the perimeter of the room. It compensates for the thermal expansion of concrete.
List of main components of a monolithic warm circuit:
- Waterproofing film of concrete base.
- Insulation - polystyrene foam 3-5 centimeters thick.
- Damper tape around the perimeter of the room.
- The heating pipe is metal-plastic or cross-linked polyethylene with a diameter of 16–20 mm and a wall thickness of 2 mm.
- Concrete, layer thickness 80–100 mm.
- Flooring: laminated boards, linoleum, ceramic tiles.
- Three-way valve of mixing unit with thermostat.
- Circulation pump.
- Manifold with shut-off valves for supply and return pipes.
- Automatic air vents.
- Heat exchanger.
- Filter.
- Expansion tank.
- Pressure gauge.
Operating principle
Since the entire floor in the room is heated, the temperature of the heating system coolant (CO) is usually maintained within 25–35 degrees. This is quite enough to compensate for heat loss through external walls, windows, and balcony doors.
The heating intensity is controlled manually or by thermal heads on the shut-off valves. In this case, the dependence on the temperature of the coolant of the centralized CO remains.
Advantages
The main advantage of TP is reflected in the name of this system. Increased comfort is also explained by the absence of drafts, since the air inside the room is heated evenly over the entire area.
Heating costs are reduced by 10–15% compared to using conventional radiators, which first heat the ceiling. Hot air from the batteries rises, then, as it cools, it falls down and moves in a cooled stream to the heating devices. The floor remains cold.
TP has other advantages:
- Creates and maintains an ideal microclimate in the apartment. Children can play on the floor without the risk of catching a cold.
- Uniform heating eliminates the appearance of dampness and mold on the walls.
- Service life - up to 50 years.
- There is no harmful electromagnetic field, which is inevitable for electric floor heating in a living space.
Flaws
Thin pipes must be reliably protected on top by a concrete monolith to support the weight of heavy furniture. Additional load on floor slabs can negatively affect the stability of an apartment building.
Setting up all TP branches takes a lot of time due to the inertia of the entire system. The length of one pipe reaches 60–80 meters. In addition, a change in the temperature of the floor surface will become noticeable only after the concrete monolith has warmed up.
There are other disadvantages:
- High installation cost. Specific skills, knowledge, and experience are required.
- If the pipes were of poor quality, then repairing the concreted system is almost impossible.
- Difficulty in obtaining permission to change the design of the heating system.
- The payback period for the costs incurred is tens of years.
Technologies for improving thermal insulation
All floor reconstruction technologies using bulk, sheet, and block heat insulators are built on the principle of creating an artificial obstacle made of materials with low thermal conductivity in the path of cold air.
When planning insulation, you need to calculate their weight, volume, and method of placement.
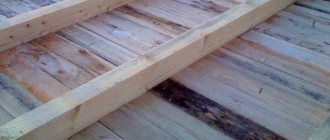
The most popular is the construction of an additional volume under the wooden floor, into which heat insulators are placed.
Simple structures are built by laying a wooden frame (lag) under the floor, between which a heat insulator is placed.
A new floor is laid on the outer surface of the joist.
The disadvantage of this method is a significant reduction in the useful volume of the apartment - when reconstructing the floor, its height can increase up to ten centimeters.
For old apartments, an accurate calculation of the weight of the heat insulator is required, which may be excessive for worn-out floors.
Is the installation legal?
Any unauthorized changes to the central heating scheme are prohibited. Such actions are punishable by significant fines. To obtain permission to install a transformer substations, you need to agree on the design of changes with the heat supply organization.
To maintain the thermal balance of the entire house, there are only three options for legally connecting the TP of a separate apartment to central heating:
- Initially, the project provided for a two-pipe connection scheme for heating radiators in each apartment. Then a resident of any floor can obtain permission.
- If the main pipeline is located in the basement, then for the first floor you can obtain permission to separately enter the supply and return pipes.
- If the house has upper wiring in the attic or technical floor, then residents of the last upper floor can obtain permission for an individual connection.
Only in these cases there is no likelihood of deterioration in the heating conditions of other apartments. Tapping into a single-pipe CO will definitely disrupt the hydraulic balance. Other residents of the house will be cold. Complaints will follow, the violator will be identified and fined.
If it is not possible to connect the indoor heating system directly to the main pipeline, then it is impossible to obtain legal permission to install heated floors.
The procedure for obtaining a permit consists of the following steps:
- Contact the heating supply organization with the appropriate application and obtain permission. Along with the document, technical specifications for the installation and connection project of floor heating circuits are issued.
- Develop and approve the project.
- Install, launch the system and commission it to a special commission from the heat supply organization.
Using mineral wool
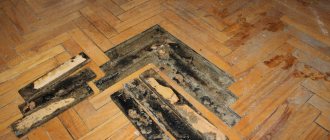
When choosing mineral wool as a thermal insulation material, the first thing you will need to do is dismantle the floorboards. In this process of dismantling work, you definitely need to number them with a marker or chalk, and then carefully fold them in the order of disassembly. Next, you should check the tightness of the vapor barrier and the subfloor. If cracks and crevices are found, they need to be treated with polyurethane foam.
When inspecting the base, if you have no complaints about the vapor barrier regarding tightness, then you can leave it, otherwise it is better to replace it. Afterwards, all that remains is to lay strips of mineral wool between the joists and lay the removed flooring back in the same sequence.
Types of connection diagrams
There are many options for TP schemes for connecting to a centralized CO. At the same time, you need to know that without forced circulation of liquid, stable operation of the TP is impossible.
The contour under the floor is at the same level, so natural movement of water is excluded. It is also impossible to connect directly to the main pipeline. A coolant can circulate there with a temperature 2 times higher than the permissible temperature for the TP.
There are only two options for connecting to a common CO:
- with mixing unit;
- with heat exchanger.
With mixing unit
In such a TP system, coolant circulates from a centralized CO. As it cools, the water is gradually discharged into the return pipeline, and hot water comes from the supply pipeline. The speed of this process is controlled by a three-way valve with a thermostatic head.
Central heating coolant always contains suspended particles and hardness salts. Installing a filter at the entrance to the TP system cannot completely protect the heating circuit from gradual clogging. Hardness salts are initially in dissolved form, so they freely enter the pipes and then settle on their walls in a thick layer.
In order to extend the service life of the TP to several decades, it is better not to use a connection diagram with a mixing unit. Over time, the circuit will gradually become clogged, the resistance to movement will increase, and the flow rate will decrease. The pump power will no longer be enough to ensure the design temperature regime.
With heat exchanger
The long service life of the transformer substations is ensured by the completely autonomous circulation of pre-prepared coolant. The ideal option is distilled water. You can simply boil tap water and then let it sit.
Heat transfer occurs in a heat exchanger, where coolants from a centralized CO and TP circulate separately from each other. Usually this is a non-demountable structure, so filters must be installed at the inlet.
Equipping the TP system with a heat exchanger has the following advantages:
- Regulation of floor heating in relation to changes in outside air temperature occurs automatically. The temperature of the centralized CO coolant changes in the boiler room in accordance with current weather conditions.
- Rust, suspended particles, and hardness salts do not enter the TP and do not clog the circuit, so the system will serve properly for decades.
- Plate heat exchangers are made of corrosion-resistant steel and therefore have a long service life.
- There is no risk of water hammer.
- The hydraulic resistance of the centralized CO does not change.
- The temperature of the heating circuit does not exceed 40 ºС, so a relatively inexpensive pipeline made of cross-linked polyethylene can be used.
What to do if the apartment has a rough finish
You can prepare floors for laying ceramic tiles, laminate, parquet or linoleum using thin slabs of polystyrene foam or polystyrene foam. In addition to the insulation itself, to prepare the floors of the 1st floor for final finishing you will need:
- cement mortar;
- vapor barrier material;
- polyethylene film;
- edge tape;
- mesh for reinforcement.
In this case, first the floors in the apartment are cleared of debris, then a layer of vapor barrier, insulation and film are laid. The last layer needs to be a cement screed. It is quite difficult to do this work perfectly with your own hands, so it is best to use not an ordinary solution, but a special mixture that creates an ideal surface. A mesh is placed in the screed to create structural rigidity and an edge strip. To do everything correctly, watch the video, which provides detailed instructions for this type of work.
Nuances of installation and selection
Design work is needed not only to obtain a permit. The customer will receive a fairly accurate list of necessary materials, parts and components. After carrying out simple marketing, the exact cost of creating additional comfort will be calculated.
How much higher will the floor become?
For apartments with high ceilings, raising the floor level by 10–15 cm will be almost unnoticeable. But for most of the housing stock this can be a problem, with the exception of balconies and loggias.
A layer of insulation - expanded polystyrene with a thickness of at least 30 mm - will need to be laid on the floor slabs. A heating circuit will be located on it, which is poured from above with monolithic concrete 85 mm thick. Finishing with tiles or laminated boards will add at least another 10 mm of height. As a result, the total height of the mounting layer will be 125 mm.
You can reduce the rise in floor level in the following ways:
- Completely dismantle the old screed down to the floor slabs.
- For thermal insulation, instead of polystyrene foam, use multifoil up to 1 cm thick.
- Reduce the screed height to 60 mm. In this case, there must be at least 30 mm of concrete above the pipes, the strength of which will need to be increased by reinforcement with steel mesh.
- Use flooring systems - “dry” heated floors 6–10 cm thick. They are installed without concrete.
Thermal insulation mats
As the floor temperature rises, possible additional heat losses through the ceiling to the lower floor increase. Therefore, pipes must be laid only with thermal insulation. Usually this is foil polystyrene foam. The foil should be at the top, then this significantly increases the heat-reflecting ability of the insulation.
Thermal insulation materials come in various types:
- Rolled. Made from foamed polyethylene with a thickness of 2–10 mm. On one side there is a coating of aluminum foil. It will not be possible to fix the pipes on such a base, so a reinforcing mesh is laid on top.
- Expanded polystyrene mats. They have a film on the surface with markings along which it is easier to lay pipes in accordance with the design drawings. You will also need to lay reinforcing mesh on the mats to secure the pipes. Expanded polystyrene has high thermal insulation properties, a service life of up to 60 years in conditions of temperature changes from -40 to +40 ºС, and does not accumulate moisture. To increase fire safety, fire retardants are added to the insulation during production, which makes it a self-extinguishing material.
- Profile mounting plates EPS (extruded polystyrene foam). The most technologically advanced and convenient for installation. Protrusions with a certain pitch are formed on their surface for fixing pipes with a diameter of up to 20 mm. The ends of the mats have locking projections for connection with adjacent blocks. This results in a continuous surface with minimal heat loss. Mats are available in thicknesses from 10 to 35 mm.
Which pipes to choose
All elements that are laid under the floor are subject to increased requirements for strength, reliability, durability, and corrosion resistance. The pipes must be seamless, capable of withstanding a pressure of 8 bar, as well as dynamic loads in case of water hammer.
Polypropylene and steel pipes cannot be used. The heating circuit of the TP must be laid under the floor without joints or couplings.
The following types of pipe products are most often used:
- Products made from cross-linked polyethylene. Produced by extrusion under high pressure. Crosslinking occurs at the molecular level. The result is three-dimensional structures that increase the strength characteristics of the polymer. Such products are characterized by minimal hydraulic resistance to the movement of the coolant. They tolerate pressure changes well. Corrosion resistant.
- Metal-plastic. The walls of the pipes consist of several layers, so they combine the strength of metal and the resistance of polymers to corrosion.
- Copper. They have a long history of use, are durable and reliable in operation. Copper transfers heat very well to the surrounding space, but is rarely used for the TP circuit due to its high cost.
How best to lay pipes (diagrams)
The uniform heating of the entire floor area depends on the correct location of the circuit. When designing, it is necessary to take into account that areas near external walls and windows are cooled more intensively. In addition, we must remember that as it moves along the circuit, the coolant gradually cools down.
The following laying schemes are distinguished:
- simple snake;
- double snake;
- corner snake;
- snail.
The arrangement of the contour with a simple snake is the most common scheme. The best option for a room with one external wall. The supply pipe with the hotter coolant is located in the cold part of the room.
Double snake and volute are used for interior rooms when equal heating is required over the entire area. In such schemes, the hotter pipe is located next to the cooler one. The “snail” version has lower hydraulic resistance.
A corner snake is the best option for a room with two external walls. Here, the maximum heat transfer of the circuit occurs in the corner part of the room.
Pipe distribution rules
In places adjacent to external walls, to increase the heating intensity, installation is done with a smaller distance (step) between adjacent pipes.
To maximize the effectiveness of CO, you should adhere to the following rules:
- Installation of the circuit begins from the cold outer wall.
- A gradual reduction in the intensity of floor heating is achieved by laying pipes using the “simple snake” technology.
- Uniform heating is achieved by spiral laying from the edges of the room to the center with a double pitch of turns. Then the return contour will fall into the resulting gaps.
- The greater the heat loss in the room, the more often the pipes must be placed. The standard step is usually 10–30 cm. In this case, the foot should not feel the difference in floor temperature in different areas. For border areas, a minimum pitch of 100 mm is recommended.
- The number of bends and turns should be minimal to reduce the hydraulic resistance of the CO.
- It is prohibited to join pipes under the floor.
Selecting a collector-mixing unit
The layout of the collector depends on the number of heating circuits. Installation of shut-off valves, automatic air vents and control thermostats is provided for each lash.
The collector and mixing unit must be equipped with the following parts:
- thermal head with remote temperature sensor;
- pump;
- pressure gauge;
- safety valve;
- expansion tank.
Work from the basement
It is possible to insulate an apartment on the ground floor from the basement side. For this purpose, thermal insulation material is attached to the ceiling in the technical room. It can be polystyrene foam or polystyrene foam, which are simply glued on. Mineral wool is also suitable for this purpose. But attaching it will be more difficult. To do this you need:
- fix the bars a couple of centimeters thick than the insulation layer;
- lay mineral wool between the elements of the installed structure;
- Using a stapler, install a vapor barrier membrane on the surface
- cover the structure with plywood or fiberboards.
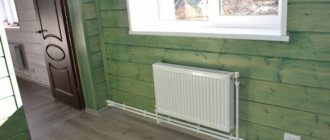
Which is better - warm floor or radiator?
Radiators are a common method of heating at a very affordable price. Warm floors are comfortable and cozy, but the cost of their installation is high. Most people who do not have a special heat engineering education find it difficult to make the right choice. Contrasting these heating systems is a common mistake. In fact, they organically complement each other.
One of the advantages of TP is the absence of drafts, since the entire floor in the room is heated. But there is also a drawback - inertia. If the outside air temperature drops sharply, then the TP circuit simply will not have time to sufficiently warm the apartment.
This happens often in winter. During the day the sun warmed up, the thermometer showed -5 ºС. At night, the temperature can quickly drop to -10 degrees, and if a strong wind blows, the frost will intensify. External walls will cool quickly.
In this case, radiators come in handy. Experts call them “draft cutters.” The coolant temperature in them can be twice as high as in the TP circuit. Therefore, radiators effectively cope with the cold air flow flowing down the external wall.
It remains only to decide whether the TP system will be the main or supplementary heat source. In the first case, it should compensate for approximately 70% of the total heat loss of the room, and in the second - about 30%. The rest of the heat will be provided by traditional radiators.
Which insulation is better to choose?
There are several types of insulation, produced in the form of blocks, bulk materials, rolls and even in liquid form. Each of them is quite suitable for insulating the cold floor of the first floor.
Mats and slabs
Insulation of this type has low thermal conductivity and light weight; they are ideally suited for insulating the concrete floor of the first floor.
They can be used in conjunction with thin roll materials, which increases the overall thermal insulation.
Insulation in the form of mats and slabs is made from foam plastic, mineral wool, basalt fiber, based on polystyrene foam and other composite materials.
Since ancient times, mats made from plant fibers, such as straw, have been used to insulate floors in private homes, which is an excellent environmentally friendly insulation material. The only negative is that organic matter decomposes over time.
Bulk insulation materials
Bulk materials include expanded clay as floor insulation, sawdust, foam chips, slag and others.
They are used for insulating floors in ground floor apartments, as well as in private houses.
The advantage of bulk insulation is that it completely fills the space between the sheathing bars.
This material is suitable both for placement in open ground under the floor in a private house, and in apartments with an unheated basement below.
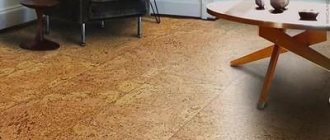
Roll materials
Foamed polystyrene, mineral wool, cork or cork-based composite mats, multilayer foil insulation, etc. are produced in the form of rolls.
Some of them have a small thickness, and therefore will not fully cope with the task of retaining heat - they are good to use in addition to thicker insulation.
Rolled mineral wool, 7-10 cm thick, is an excellent thermal insulator, so it is quite suitable for insulation.
Liquid insulation
Cement mortars mixed with foam chips, wood shavings, expanded clay and other light airy materials are used as liquid insulation materials.
A modern version of liquid insulation is a polymer with a foamed structure - penoizol. To work with it, special equipment is used, with the help of which the cavities between the sheathing guides are filled with material.
DIY system installation
Design, installation, startup, regulation of the TP system - all these technological processes require a fairly high level of knowledge, skills, and experience. Therefore, even at the stage of obtaining permission, it is advisable to acquire a qualified consultant. Any alterations will then be expensive, because the TP will be covered on top with a concrete monolith.
Material calculation
The design of the heating system must be carried out taking into account all factors affecting the thermal balance of the room: the size of the area, the material and design of the external walls, the type of finishing floor covering, the size of windows and entrance doors.
To calculate the length of pipes in TP circuits, use the formula:
L=S/N x k.
Here:
S is the area of the heated room;
N—step;
k is the safety factor for bending, which is usually taken equal to 1.1.
One linear meter of pipe is capable of transmitting approximately 11 W of heat. Multiplying the estimated pipeline length by this figure, we obtain the total thermal power of the designed heating system.
To overcome the hydraulic resistance of the CO, the pump must create an appropriate pressure, which can be calculated using the formula:
H=L x Q x 2/k.
Here:
L—pipe length;
Q - coolant flow, usually in the range of 0.3–0.4 l/s;
k is the hydraulic resistance of the system, which can be determined from reference literature.
When choosing a circulation pump, it is necessary to take into account that the speed of water movement should not exceed 0.8 m/sec. Otherwise, additional sound insulation will have to be provided. This will not only increase the cost of the project, but also the amount of floor level rise.
Specification for a room of 15 m2:
- Metal-plastic pipe 16 x 2 - 100 m.
- Damper tape 10/0.1-25 - 20 m.
- Thermal insulation TP-25/1.0-5 - 18 m2.
- Three-way mixing valve 3/4″.
- Circulation pump 25-40.
- Nipple adapter 1″ x 3/4″ – 2 pcs.
- Nipple 3/4″.
- Tee 3/4″.
- Collector 4 outlets 3/4″ x 1/2″.
- Shut-off valve 3/8″.
- Adapter B-H 1/2″ x 3/8″.
- Adapter 1″ x 1/2″.
- Ball valve 1/2″ - 2 pcs.
- Straight connector with transition to internal thread 16 x 1/2″ - 2 pcs.
- Tee 1/2″.
- Barrel 1/2″ x 60.
- H-B adapter 3/4″ x 1/2″.
- Automatic air vent 1/2″ – 2 pcs.
- Drainage tap 1/2″ – 2 pcs.
- Bracket for manifold.
Preparatory work
Before starting installation, it is advisable to clean the floor down to the floor slabs. Then the rise in its level will not be so noticeable. The old screed will have to be dismantled. A regular hammer drill with a chisel attachment will not work here. You must use a jackhammer.
The mounting brackets must be cut with a grinder. Joints of floor slabs, irregularities, and cracks should be puttied. The surface must be level in a horizontal plane.
Collector installation
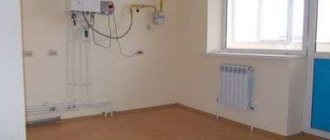
The TP system control unit is mounted in a standard metal box located above the level of the heating circuit. The size of the case depends on the dimensions of the equipment. The installation location is selected next to the input from the centralized CO.
System installation
The circuit must be laid in one piece, without connections under the floor. The length of one lash should be up to 60 m. If such a segment is not enough to cover the entire area of the room, then install two segments of equal length.
Perform installation work in the following order:
- Treat the cleaned surface with a polymer primer.
- Glue the damper tape around the perimeter of the room to the height of the future concrete screed with a small margin.
- Spread waterproofing - polyethylene film with an overlap of the edges of the sheets of 100-150 mm. Along the perimeter, make an overlap on the walls at the height of the damper tape. Secure the joints and edges of the film with tape.
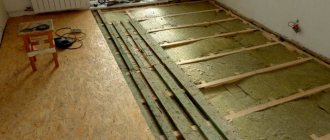
- Lay the insulation boards tightly.
- Lay out and secure the reinforcing mesh.
- Roll out the coil, straightening the pipe. Lay the contour according to the design drawing. Secure the hinges with harpoon brackets and mounting rails.
- Connect the ends of the circuit to the manifold.
- Fill the circuit with water and perform a pressure test (check the system for leaks) with a pressure of 4–6 bar. Do not drain the water so that the pipe does not float in the liquid concrete.
- Prepare the concrete mixture and pour the screed.
- Finish the floor surface after 28 days.
Launch
After installation is complete, rinse the pipes thoroughly with water under maximum pressure. Then drain this water completely. Blow out the circuit with a compressor.
Now you can fill the pipeline with the working coolant - distilled or boiled water. If there are several contours, fill them one by one. The air must be completely forced out through the air vents.
Now you need to briefly turn on the pump to create pressure in the system. As a result of coolant circulation, air pockets will be displaced. Add water again and turn on the pump. Repeat the process until the system is completely filled.
The launch of the TP into operation begins with a minimum thermal regime. The coolant temperature is set at 20–25 ºС. Then add 5 degrees every day until the maximum mark of +40 ºС is reached. Then the thermostat is set to design mode.
Recommendations for use
It is important to remember that TPs are an inertial heating system. Therefore, noticeable changes in room air temperature occur several hours after adjustment.
Recommendations:
- Heating of the floor surface of residential premises should be maintained within 25–30 ºС. In the hallway, bathroom, along the outer walls, the temperature can be increased to 35 degrees.
- To reduce the shrinkage of the concrete screed, fiberglass and other fillers are added to the solution. The dosage is indicated on the packaging.
- It is necessary to add liquid in a timely manner, and also periodically monitor the heating temperature. The water transformer practically does not require additional maintenance.
The temperature control of heating circuits is usually done manually. But it is possible to install automation with a programmable controller that controls the thermostat servo drives and the pump. Such high-tech work should only be performed by experienced specialists. You can find out the warm floor in the apartment by following the link. Insulating the loggia floor you will find the answer in the link.
Prices for underfloor heating systems
warm floor
Final coating
We lay it only on a rough base or screed.
To install parquet flooring, we use heat-resistant bitumen mastic or an adhesive mixture. What you should not do with parquet is install it directly on rough wood.
We first leave the linoleum on the floor unrolled for several hours. This is how the wrinkles come off. When varying it with an image, we move the joint areas until the patterns are harmonious. Trim if necessary to match the patterns. During the gluing process, eliminate bubbles and carefully glue all areas.
Important
We lay the laminate dry. Then we adjust the images on the panels. Next, carefully glue it on the basis of the drawing.
We glue cork tiles only on a thoroughly leveled and cleaned floor.
The permissible humidity of the rough base is a maximum of 5-6%, room temperature: +22.
We fix the skirting boards only on the wall.
We place the interlocking cork plates directly on the floor without gluing. Their installation is identical to working with laminate.