All repair and finishing work has been completed and, it would seem, nothing else will disturb you - you can enjoy life in a clean home. But there is another problem - the remains of materials, of which a lot accumulates. Just throwing it away is irrational, since they cost a lot of money. You can put them on the balcony or in the barn, but over time they will deteriorate, never surviving until the next repair. In fact, almost every material can be given a second life. If you don't know what to make from leftover laminate flooring, then you should read this article, which shows various options.
Laminate: material features
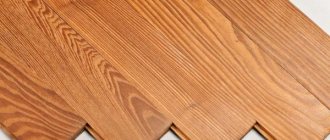
Laminate flooring, or laminate, is a special building material that is made from high-density fiberboard by covering it with facing films. The film top serves as a protective and decorative layer, giving the material wear resistance and resistance to mechanical damage. Laminate is resistant to temperature changes, antistatic, protects the floor from water, and in appearance it strongly resembles a more expensive floor covering - parquet.
Structure of laminated parquet
Laminate flooring is low priced and attractive. This increases its popularity among apartment and house owners. Laminate is suitable for decorating any room, as it can have a wide variety of designs and textures. On sale you can find imitation stone, tile, and leather materials.
Conclusion
Covering entrance doors with laminate flooring using the method described above can be installed quite quickly and is relatively inexpensive. Naturally, in addition to laminate flooring, there are several other options for cladding entrance doors, you can find out about them “here”.
External entrance doors can only be covered with laminate in warm entrances.
Kitchen ideas
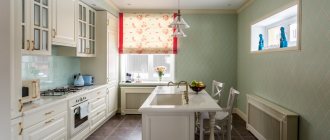
To prevent the remains of the laminate from gathering dust in the pantry, on the balcony or in the garage, they can be used wisely and profitably. Depending on the amount of remaining material, you can make small or large things: from boxes to pieces of furniture. A laminate apron looks great in the kitchen. This product lasts a long time, and caring for it is very easy.
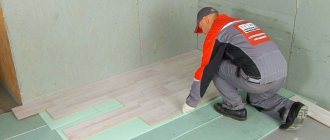
Creating a kitchen apron from leftover laminate flooring will help save money, protect walls from dirt, and completely transform the room. To arrange it, you need to stick the lamellas on the walls one by one and snap their fastenings into place. In the corners at the joints it is necessary to trim the end locks of the laminate, and then cut holes for sockets.
In addition to the apron, the following kitchen items are assembled from pieces of this material:
- False beam or decorative box. Allows you to hide wires, hide ugly pipes, exhaust system.
- Cutting board. Even one lamella makes as many as 4 boards for cutting food. If you decorate them in different ways, you can make a whole set for working with meat, fish, vegetables and fruits, and bread. True, such boards will have to be washed carefully so that the laminate does not swell from water.
- Hot stand. Thanks to the laminated coating, the product will last for several years. You can place even the hottest dishes on it, because its thermal conductivity is quite low. Making a stand is very simple: just cut out a square or rectangular piece of material with a jigsaw. If you have a special jigsaw file, you can even make a small round stand for a cup of tea and coffee.
- Shelves for kitchen utensils. Before making the shelves, you need to make all the necessary measurements so that the furniture fits exactly in the right place. By the way, on the shelves of the bookcase you can place vases for small items and sweets, which are also made from laminate scraps.
Laminate cutting board
How do sliding systems work?
The compartment door is designed in such a way that its doors slide apart to the sides. This can be either one or two door leaves, moving parallel to the ceiling or sliding inward. And if the general operating principle of such doors is the same, then the installation and opening methods are different. Let's talk about this in more detail.
Table No. 1. Main types of sliding systems.
| View | Description |
| Mounted | In this case, the canvas is fixed on guides - on the ceiling or directly above the opening. This way the doors will move along the wall with a slight indentation from it. It is not recommended to install furniture or any other objects near the door - they will be an obstacle to the door panels. |
| Hanging | In this case, the door leaf is fixed to the cut of the opening. Accordingly, the door moves close to the wall, which looks more neat and aesthetically pleasing. Hanging doors allow you to place pieces of furniture next to the opening - they won’t get in the way. |
Table No. 2. Types of interior sliding doors by opening method
| View, illustration | Description |
Coupe | This is the most primitive version of sliding doors, so even an inexperienced person can handle the manufacture of such a model. The design comes with either one or two panels. |
Radial | The movement of the canvas does not occur along a smooth guide, but along a circle. This option is ideal for rooms with curved ceilings and is good for corner cabinets. The design has a very original appearance, but not every person can handle its manufacture. |
Cassette | They also come with one or two doors and move in different directions according to the same principle as sliding doors. The difference is that they slide into special recesses in the wall, which makes this design very convenient, because you can place furniture near the wall without any problems. Of course, making such a door will be a little more difficult, because you will have to provide for a niche in the ceiling. |
Telescopic | The design is designed in such a way that a separate guide is fixed for each blade. Such doors are often installed as interior partitions and for decoration. They can be assembled in a single part of the opening - just pull one panel by the edge, and the others will follow it. Of course, this is also a rather complex system, just like the radius, so it’s not easy to make. |
Intra-opening | The canvases are fixed in the opening and move towards each other. The design assumes the ability to open only one half of the opening. However, you can place various objects against the walls that will definitely not interfere with the opening of the doors. |
Harmonic | This is a very simple hinged door design. The canvas moves on rollers attached to the top. The disadvantages include not the best sound insulation. |
Design diagram with top movement mechanism
Drawers and shelves
Laminate is used to produce various items for storing things, shoes, toys, books, magazines, bags. For example, at the dacha, such boxes will help you maintain order by neatly arranging all the things lying around or placing them in winter storage. In the same boxes it is convenient to store vegetables, fruits, fertilizers and other country “attributes”.
In the bathroom, powders, household chemicals, and various household supplies are left in a decorated laminate box. Floor drawers will replace chests of drawers and bedside tables, and small boxes will help to successfully organize storage in a small space.
Shelf made of laminated parquet
You can use leftover laminate flooring to create shelves for any room. They are sawed to obtain strips of the required size, the locks are cut off, connected to each other and mounted on the wall using brackets. Such products cannot withstand heavy loads, so you should not put too large loads on them. Usually framed photographs, stationery, and toys are placed on laminated shelves. Also, shelves for shoes are created from laminate, while the outer frame is made of strong wood.
Unusual use of laminate in the interior: photo
There are two options for attaching laminate to the wall: adhesive and using locks. Please note that for wall finishing it is best to use the adhesive option. Because for its installation there is no need to install a specific substrate. While keyhole laminate requires a soft underlay, exactly the same as what is laid on the floor. We recommend using adhesive material for wall decoration; it is quite easy to lay it on the wall.
You just need to spread a thick layer of glue and apply it, we recommend starting work from the lower left corner. This greatly simplifies the situation. Please note that some manufacturers have taken advantage of the trend of using laminate for walls rather than floors. Therefore, certain series have appeared on sale, which are specifically designed for wall decoration. They are distinguished by their density, as well as their resistance to some aggressive agents. For example, they can be safely glued to the apron area in the kitchen, and they are not afraid of any moisture or high temperature. Accordingly, the cost of such a laminate is slightly higher than the usual one, which is glued or laid on the floor.
Bathroom
In the living room
In the kitchen
Under the stairs in the living room
In the restroom
Restroom
Kitchen
As you can see, despite the fact that laminate is a classic floor covering, there are also non-standard options for its use. Don't be afraid to get creative and find new ways to use laminate flooring.
Furniture
Laminate can be used to make new furniture or update old furniture. This will require several packages of material. The simplest option would be to build a small coffee table on which you can put a lamp and books. Afterwards, you need to strengthen the legs of the product so that it can withstand the weight of lying objects. Also, with the help of laminate, old tables are updated, which are suitable for various purposes at home or in the country.
Table with laminate top
If desired, you can even make a wardrobe from a laminated board, if the amount of material is sufficient. Additionally, you should purchase all the necessary fittings, components, and fasteners. You can find a drawing of the cabinet on the Internet, and then transfer it to the material and assemble the entire structure. Also, if there is a large volume of laminate, shelving for a garage or workshop is built.
Small pieces of laminate are used to make a new coating for old cabinet furniture and doors. They think over the pattern, select the necessary pieces and stick them on liquid nails. Laminate with imitation stone will help to beautifully decorate the fireplace, giving it a noble look. Laminate cuttings are no less suitable for the following tasks:
- making a lid for an aquarium;
- door arch pasting;
- renovation of the stairs in the living room.
Laminate aquarium cover
Craftsmen even make beds from laminate with space for storing linen and drawers. A new bed will require solid laminated boards, and old furniture can be restored in pieces by covering its surfaces.
What are the benefits of laminate flooring?
Important! There are doors with laminate finishing and laminated floor boards. In the first case, we are dealing with a solid laminated MDF panel, which is made specifically for decorating the door leaf, and in the second, the doors are lined with a simple floor laminate.
In terms of installation technology and appearance, finishing a door with a floor laminate differs significantly from lining entrance doors with laminated MDF panels
Classic laminate flooring has a multi-layer structure; leading manufacturers keep the detailed production technology of the material secret, but in general terms a laminated board looks something like this:
- The so-called HDF board acts as a load-bearing board; this material has the same base as MDF, but its density and mechanical strength are an order of magnitude higher;
- The bottom stabilizing substrate is thick cardboard impregnated with paraffin or the like;
- Paper is responsible for the decor of laminated boards; it is glued on top of the HDF board;
- A layer of transparent synthetic resin is applied to the paper. It is traditionally believed that melamine compounds are used here, but since it is this layer that is responsible for the wear resistance and decorative appeal of the material, manufacturers keep the actual coating formula strictly secret.
The classic layout of laminated boards is the same for all manufacturers; the secret of quality lies in the composition of the individual layers of material
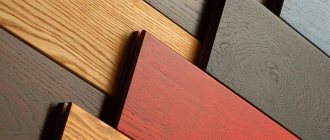
There are hundreds of laminate decor options, mainly the theme of natural wood prevails here in all its angles, but stone finishes and combined patterns are also found, so choosing something extravagant for your doors will not be difficult.
Finishing doors with a combined laminate would be an interesting solution, but the price for such a board is quite high
Advantages and disadvantages of laminate flooring
Upon closer inspection, a door finished with laminated floor boards has a lot of undeniable advantages.
- If you move a little away from stereotypes and combine several types of laminate on one door leaf, then even without purchasing expensive combined models it is quite possible to make an exclusive door decor with your own hands;
- From personal experience I can say that finishing a door with laminate with your own hands does not require exorbitant professional skills and expensive tools;
- Covering a door with laminate does not take much time; in fact, it can be done in 1 day; if you are not in a hurry, it will take a maximum of 2 days;
- The floor covering is initially made anti-vandal, so scratches and chips do not threaten such doors;
- In the middle and upper price categories, all laminated board models are protected from ultraviolet radiation; in other words, the coating does not fade or change color over time;
- And finally, the price of a simple MDF card is at least 2 times higher than the cost of two square meters of good laminate.
But there are no absolutely ideal materials in the world; finishing a door with laminate also has its drawbacks. So, this material is not suitable for external cladding of entrance doors, although there is a caveat here.
If the doors are installed in the entrance of a high-rise building, then waterproof board models can be used for cladding the entrance. But direct contact with the street will be disastrous for laminate flooring. This material, in principle, is not designed for low temperatures and sudden changes in humidity; such doors will peel off within a year.
In outdoor conditions, due to sudden changes in temperature and humidity, the laminated coating warps and peels, and even expensive waterproof models are not able to withstand such a test
How to choose laminate for doors
The entire laminate is divided into 7 classes, 6 classes are widely available - these are 21, 22, 23 and 31, 32, 33 classes. Conventionally, the material is divided into 2 directions, so all models whose markings begin with a two are classified as household, and laminate beginning with a three are classified as commercial.
The table below describes the scope of application and resistance to loads of different classes, plus there you will also find links to European standards to which this or that type of laminate conforms.
Classification of laminated floor boards by purpose and performance characteristics
If we summarize all the information, we can see a relationship: the higher the number in the marking, the more durable the coating will be. But there is also class 34 of laminate, according to experienced craftsmen, this material has unique strength and can even withstand blows with an axe, but it is expensive, so it is rare.
The thickness of the board is also directly dependent on its strength, that is, the thicker the material, the stronger it is. On average, the thickness ranges from 6 to 12 mm.
Now let's move on to choosing a laminate for cladding entrance doors. On the Internet, most craftsmen advise buying expensive, high-strength material. Personally, I think that one half of these advisors have a percentage of the laminate sales, and the second half simply does not have the information.
Let's think rationally. You and I are just finishing the front door, this is not a dance floor in a nightclub, no one will dance on the doors and knock on them with a hammer. The maximum that threatens them is the claws of your pet, and any type of laminate can handle such a load.
As practice has shown, for door cladding it is necessary to take a laminate no thicker than 8 mm, otherwise problems may arise with the installation of lock plates and a peephole
Important! By covering the doors with any material, you increase the thickness of the door leaf. Metal doors are already not small, but if they are also sheathed with a 10-12 mm thick laminate, there may be problems with installing lock plates and the door peephole.
The appearance of a laminated board often does not depend on its performance characteristics, in other words, a class 21 laminate can look exactly the same as a class 33 laminate.
The appearance of cheap and expensive laminate can be the same
High resistance to abrasion and impact, in this case, is not the main thing for us, the only parameter that you should pay attention to is moisture resistance, and even then, if you are sheathing the outside of the doors. We conclude that class 21 – 23 laminate with a board thickness of 6 – 8 mm is quite suitable for doors.
Advice! When purchasing laminate flooring, ask a consultant about the presence of misgrades and substandard ones. You don’t need a lot of material for a door with slopes, and in any construction supermarket they sell surplus and mismatched materials at a bargain price, as a result you can get a beautiful laminate for reasonable money.
Also an important parameter is the choice of board dimensions. The maximum length of the laminate is 1488 mm; with vertical cladding, these strips will not be enough to cover the entire height of the doors, so you will have to install them staggered.
Accordingly, it is better to take standard, relatively inexpensive planks with a length of 1200 mm; they can be mounted either vertically apart or horizontally (the width of a standard door leaf ranges from 800 to 1100 mm).
Important! The width of the laminate planks does not play a big role, since the outermost plank will have to be trimmed in any case.
Range of dimensions of common laminate flooring models
Window decoration
Window slopes and window sills are finished with laminate. The result is a beautiful combination of window and floor, and the room takes on a harmonious appearance. It is always recommended to lay a whole board on the windowsill, rather than individual cuttings. Before starting work, they dismantle the old slopes, clean the surface, foam the space, and then begin finishing the window.
Finishing window slope with laminate
Crafts
For handmade lovers, laminate can become a popular material. From different types of laminate they create unique accessories, useful items and interesting things. Handmade crafts will fill your home with coziness and replace expensive store-bought decor.
Laminate makes beautiful and durable doll houses. Girls of any age can enjoy this toy. For the safety of the child, there are no sharp corners or elements that could cause injury. To make the house, only safe adhesives without an unpleasant odor are used. The corners are covered with soft cloth, felt, foam rubber. Using saws and other tools, they cut windows, doors, build fireplaces, tables and chairs, and other doll furniture. Other materials are also used to furnish the premises of the house:
- paints;
- paper;
- foil;
- fabrics;
- colored cardboard.
Homemade bird feeder
Also, bird feeders, birdhouses, and cat houses are made from laminate, where animals will rest and play. The inside of the cat's housing is covered with material on which the pet will sharpen its claws, and soft bedding is placed on the floor. In addition, the laminate will become the basis for the manufacture of boxes, pencil holders, boxes for stationery, buttons, threads, and jewelry. Beautiful velvet or other soft material, or artificial suede is placed inside such boxes, and a variety of decor is glued to the outside: beads, buttons, coins.
Accessories for children's games
Only real specialists and craftsmen will be able to make a real miniature house from laminate with their own hands. This product is one of the most complex. It is important to think through everything down to the smallest detail. It should contain elements such as:
- doors;
- window;
- benches;
- fireplace;
- table.
Doll house
This element will be dangerous to the child’s life due to the sharp corners of the boards. To avoid this, you will have to cover everything with felt. It is also advisable to upholster the inside of the house with soft material, the same felt or thin foam rubber. For fixation, you can use PVA glue or a construction stapler.
To fill the resulting house with all the accessories, you can connect the child and use other, safe materials, for example:
- cardboard;
- colored paper;
- paints;
- textile;
- foil.
They will make window sills and indoor flowers. Cardboard is used for pots and window sills. Polystyrene foam is placed inside, and flowers are cut out of colored paper. Everything is fixed with glue. Do not forget that to decorate a window you need curtains, which can be any scraps. They also cover the table.
As a result of time-consuming and painstaking work, you can get a real house from your child’s favorite fairy tale or cartoon. Each element will be thought out and taken into account, which will allow the child to come up with a variety of games and, importantly, study everyday life and develop fine motor skills.
Panel
Using your imagination, you can make a stylish designer item. For example, laminate is used to create interesting wall panels. Such paintings look harmonious when the shade and texture match the floor covering or have a contrasting color. For large panels, solid lamellas are used, which are laid in a horizontal or vertical direction. The choice of arrangement of elements depends on the size of the room: in small rooms, panels with horizontal laying look better, in large rooms - with vertical laying. For rooms with low ceilings, you should choose a product that is slightly below the ceiling.
Wall panel made from small pieces of laminate
Laminate panels can be original in appearance. For example, individual elements are arranged diagonally, in a herringbone pattern, in a checkerboard pattern, like parquet. This type of work will require more patience and accuracy, as well as a significant amount of laminate. If desired, a drawing is applied to the finished panel with paints or photo printing is done in a special studio, and then it is placed in a frame.
Photo background
A photo backdrop is a background surface for creating beautiful photographs. This product is ideal for people who are interested in the art of photography. The photophone will also be useful for needlewomen who prefer to take photographs and post the results of their work on social networks, and for culinary bloggers.
Nowadays, aged wood is a very popular material for photo backdrops, so you can easily find a suitable laminate. Also suitable for making a photophone is a material with colors that imitate leather, marble, and other types of stone. Textured laminate looks best. Smooth lamellas look less impressive, but are still used in design.
To make crafts, they look for pieces of laminate of a suitable size of one type or combine several textures together. The dimensions of the photophone depend on the needs of the user. To photograph small works (jewelry), items with a side of 15–20 cm are made. To display medium-sized objects (toys, hats, dishes), it is better to make a larger photo backdrop (50 x 50 cm or 60 x 60 cm). Large items are photographed using photophones up to 1 x 1 m.
Photophone made of laminated parquet
Making a photo backdrop is quite simple. You just need to connect the lamellas together, leave them in their original form or scratch them a little (aging them) and treat them with acrylic paint. To enhance the effect of aging, it is worth rubbing the half-dried paint with a sponge or cloth in certain places. Since the edge of the stand still does not fall into the frame, it is not necessary to process it, and defects in the middle can be hidden by the exposed objects.
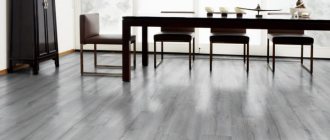
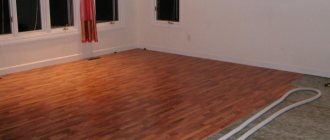
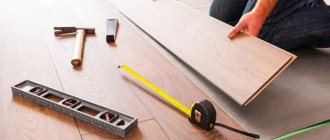
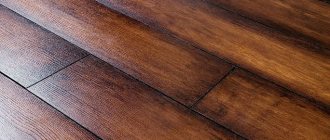
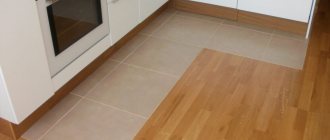
Laminate flooring
The flooring is made from solid laminate, as well as from its trimmings. This flooring option is only suitable for rooms with normal humidity, and in damp rooms it will quickly fail. The operating procedure will be as follows:
- Level the floor in the room.
- They lay waterproofing, carefully combining the joints.
- They make a test layout of laminate pieces, choosing an interesting combination.
- If necessary, combine the laminate with the remains of other floor coverings, or combine different types of slats.
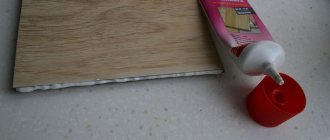
- The material is glued.
Laminate flooring
Advantages and disadvantages of sliding doors
Before you start manufacturing sliding doors, you need to carefully study all the advantages and disadvantages of such structures. It is worth considering that sliding doors are also not suitable in all cases.
Interior sliding doors can be incredibly aesthetic
The following advantages of sliding doors should be highlighted:
- such doors take up minimal space compared to any swing models;
- you can open and close the canvas without much effort; even a child can handle such actions;
- even if there is a draft in the room, the door will definitely not slam or open from it;
- this is the best way to divide a room into several zones, because glass sheets are often used as decorative partitions;
- some door designs do not provide for a threshold, so this option is suitable if disabled or elderly people live in the apartment;
- the design is perfect for any room, including the bathroom, kitchen, bedroom;
- If you have additional funds, you can install an automatic door opening mechanism.
Installing this design allows you to visually expand the wall
However, it is necessary to note the disadvantages due to which some people refuse to install interior sliding doors:
- if the canvas moves along the wall, then it is impossible to place furniture near it (it turns out that the design conceals useful space);
- poor sound insulation from extraneous sounds is often observed - this is due to the fact that there are gaps between the canvas and the frame;
- Because of such doors, heat in the room is worse retained;
- the cost of installing sliding doors will be significantly higher compared to the standard option;
- if you buy budget components, the door may fail within a few months;
- If you are going to install compartment doors with two leaves, then it will be more difficult to cope with this process, because these parts should be perfectly matched to each other, so you will have to involve a professional craftsman in the work.
Video - Installation of sliding doors in thin ceilings
Only if it is assembled correctly will you be able to evaluate the ease of use of sliding doors, so when installing it yourself, you must carefully take measurements. Even minor deviations will lead to the design not functioning properly. The work must be carried out slowly and carefully, then the result will definitely please all household members.
You can learn more about how to make sliding doors with your own hands by reading our article.
Key holder and hanger
Leftover laminate flooring is used to make interesting household items. For example, in the hallway, a key holder that is cut from just one piece of material looks great. The key holder is attached to the wall using double-sided tape or fastenings in hooks. To prevent the ends of the key holder from becoming unusable, they are coated with transparent silicone sealant.
For a hall or corridor, a laminate hanger is suitable, especially if an ordinary wardrobe does not fit here. To make it, cut out a piece of the required size, sand the edges with fine-grain sandpaper, and secure the top through the holes of the hooks. The lower part is glued to liquid nails, but this type of hanger is only suitable for light clothes. To place any, even heavy things on the hanger, you should attach it with self-tapping screws directly to the wall.
How to sheathe doors yourself and cover slopes with laminate flooring
Now it's time to find out how to sheathe the door leaf and veneer the slopes. But before that I will say a few words about choosing a tool.
The most important stage in the work is cutting the laminate; it is important for us not to leave chips on the edge. The best option is to use a miter saw, but it is expensive.
An angle grinder equipped with a metal disc also copes well with this task. At worst, you can use a jigsaw, but it leaves chips. Personally, at one time I took an ordinary hacksaw for metal and used it to line the doors along with the slopes, but there will have to be a lot of sweat.
If your budget does not yet allow you to buy a power tool, you can cut the laminate using a hacksaw
From the auxiliary tool you will need:
- Roulette;
- Hammer;
- Construction square;
- Screwdriver or screwdrivers;
- Metal scissors;
- A pair of files, round and flat;
- Level;
- Hammer;
- Glue gun in tubes.
An auxiliary tool that can be useful for covering doors with laminate flooring
For materials other than laminate, you need a good polymer adhesive, for example “Liquid Nails”. The perimeter of the door leaf can be trimmed with a corner or a wooden plank, depending on what you like. Decorative corners come in plastic, aluminum and pressed MDF. MDF looks better, but it’s easier to work with plastic.
Entrance door cladding
Most entrance iron doors are made on the basis of a profile pipe. There are models where the frame is welded from a 50x50 mm corner; it is even easier to work with them; a wooden beam is placed in the corner and the laminate is screwed to this crate.
We will consider the cladding of metal doors based on a profile pipe. We lay the laminate horizontally across the door leaf, it’s easier. To make it more convenient for you to work, it is advisable to completely remove the doors from the awnings and lay them horizontally on a table or some kind of platform.
| Photo | Recommendations |
| Installing the gasket · The laminate should not directly touch the metal. First, we clean the surface and degrease it with an alcohol-containing solution; · We glue the perimeter and stiffeners with foil penofol or thick foam tape. | |
Marking the starting bar
We attach the strip to the doors and mark the width. We leave a couple of millimeters around the perimeter of the sheathing for attaching a decorative corner. The corner should not protrude beyond the canvas. | |
| Cutting the bar In this case, a grinder with a metal circle is used. It is advisable to fix the bar so that the cut is even. | |
| We fasten the bar The bar is fixed with metal screws. It is impossible to drive a screw directly into the laminate, as it can crack, so we drill holes for the screws and immediately countersink them. When marking the holes, we start from the width of the decorative corner. The fixation points must be covered with a decorative overlay. Usually 10 - 15 mm retreat from the edge. It is not necessary to drill a profiled pipe; when using a screwdriver, metal screws can easily penetrate it. | |
| We fasten the subsequent planks In the next plank, the mounting holes are drilled and countersunk, after which the tenon of the new plank is inserted at an angle of 45º into the groove of the previous plank and snaps into place with pressure.
| |
| Keyhole holes The entire door leaf is sewn in the same way. When you reach the castle, you need to accurately measure the location of the keyhole and arrange holes for it. Under the English cylinder cylinder, you need to drill 2 - 3 holes of 10 mm, and then bring these holes to the desired shape with a round file. A flat file is used for the lever lock. | |
| Installation of the end strip The edge strip is trimmed along its entire length; here it is important not to forget to leave allowance for the decorative corner. Further according to the plan: holes for fixing are drilled, the tenon is inserted into the groove and the strip is fixed with self-tapping screws. | |
| Additional fixation The starting and finishing boards along the horizon must be additionally secured with self-tapping screws. To do this, a series of holes are drilled in the laminate with a known indentation, the fixation step is 200 - 250 mm. | |
| Attaching the lock plate The lock escutcheon can either be secured immediately or after hanging the door leaf on the hinges. I recommend doing this at the end, this will make it easier to install the decorative corner around the perimeter.
| |
| Trimming the trim at the corners The photo shows trimming an aluminum corner at 45º, but plastic, MDF and wood are trimmed in the same way. | |
| Fixing the corner If a corner is used for decoration, then it is better to fix it with self-tapping screws from the end of the door leaf. Naturally, the holes are countersunk so that the heads of the screws become flush with the plane of the angle. | |
| Gluing the perimeter It is advisable to glue the decorative strip around the perimeter; this can be done immediately or after fixing it with screws.
| |
| Cleaning up the defects Now all we have to do is remove minor defects, clean up the exposed glue, and we can hang the canvas on the hinges. |
We examined the installation of laminate on a door frame made of a profile pipe or wooden beam. I recommend sheathing a smooth metal sheet on the outside a little differently.
Here, only the first and last boards are fixed with self-tapping screws; all intermediate planks are easier to install with polymer glue. The contact area between the sheet and the laminate is large and the cladding will hold quite firmly. The decor around the perimeter can also be fixed with glue.
How to sheathe slopes
Since our doors are covered with laminate, it would be logical to cover the slopes to them in the same style. If the floor laminate on the slopes does not suit you for some reason, the installation of alternative options for arranging the slopes is described in detail, with photos and videos, “HERE” .
| Photo | Recommendations |
| We fasten the sheathing We install the sheathing from wooden beams with a cross-section of 30×40 mm. The beam is fixed with anchors, but before this the verticals are set plumb and the horizontals level. If the base is not level, then wedges are used. | |
| Fixing the laminate In principle, the planks can be attached to self-tapping screws, like on a door leaf, but there are laminate models in which it is possible to fix them with clamps. If you bought such a laminate, you can install hidden cladding. | |
| The principle of fixation with clamps A clamp is a metal hook, the base of which is attached to the sheathing, and the tongue clings to the edge of the groove. | |
| Finishing the edge The easiest way is to cover the perimeter with a wide plastic corner to match the laminate. But if the plastic does not fit into your interior, then door trims are mounted along the edge. A detailed selection and step-by-step instructions for installing door frames in 3 options can be found “HERE” . |
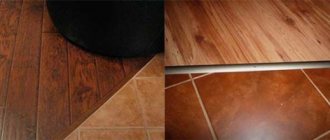
Mosaic
Often, after repairs, there are pieces of different floor coverings that differ in appearance, color, and texture. They are used to make a mosaic, which is suitable for creating a picture, a functional area or finishing an entire wall. Various interior items are also decorated with mosaics. It is important that all materials have approximately the same thickness and similar technical parameters. Lay out the mosaic in any order on a sheet of plywood, starting from the border. This decor looks very beautiful if its outline is dark and the center is light.
Interesting ways to use leftover laminate flooring
An unusual solution would be a watch with a dial made from waste multilayer material. Work order:
- Make a round or square shape.
- Drill a hole in the center for the axis of the clock mechanism.
- Fix the arrows on the outside.
An interesting way to use a laminated board is to make a frame for a photo, painting, or panel. If you make frames in the same style and in several variations, and place them on different walls, you can achieve an original design for the room.
The step-by-step process looks like this:
- Cut the planks to suitable sizes.
- Cut the ends at a 45 degree angle.
- Glue all the frame elements together.
If the board is wide, then you can cut out a rectangle inside and insert a picture or photo there. If you need to decorate the embroidery beautifully, then it should first be stretched onto a thick base (plywood, cardboard) and secured on the other side with metal strips.
Battery finishing
Laminate waste can be used to make screens for batteries and radiators. Such a device will hide an ugly heating device that spoils the appearance of the room. The screen also has a practical function - it protects against accidental burns. When creating such a device, you need to connect the boards in the standard way, covering the ends with self-adhesive tape. Afterwards, the shield should be drilled to the window sill, leaving holes at the bottom for air circulation.
DIY screen for a heating battery
You can make a lot of useful things using pieces of laminate or leftover solid boards. The main thing is to approach the issue with soul and imagination, and the time spent will turn out to be beneficial for your home and family.