How to increase the power of a gas burner in a gas stove?
A woman came to us, a big fan of hiking and all kinds of river rafting. She brought with her a small tourist single-burner stove PGT1 model 802 and asked “Is it possible to increase the power of the burner in such a stove”?
Let's take two Hephaestus burners assembled and consider these two designs.
When assembled it looks like this:
A pipeline that ends with a tip into which a nozzle with a through hole of a certain diameter is screwed, directing the gas flow into a mixer installed on the burner body.
It is worth noting the following:
– the distance from the nozzle to the entrance to the burner mixer tube is approximately the same, about 14 mm, – the holes in the nozzles are different (small burner 0.5 mm, medium burner 0.75 mm nozzle hole diameter, i.e. 25% more gas is supplied to medium burner than small)
Do you know, for example, that in order to take and burn 1 cubic meter of natural gas, we need to mix it with and burn 10 cubic meters of air? Standard formula.
This is the idea
The gas from the nozzle in a thin stream hits the inside of the mixer (burner) tube in a straight line 14 mm long, sucking in or taking with it, as you wish, a certain amount of air, where in this tube, or rather its outlet, mixing of gas and air occurs (hence we have The factory name of the burner is the name of the mixer).
What is the secret meaning?
The distance of 14 mm was not taken by chance by the factory!
1 . If you start to increase this distance , then there will be an excess of air and the combustion power of the resulting gas-air mixture will drop.
2. And if we reduce this distance, we will get an excess of gas, and the air will not have time to mix in the required amount. We get a red flame, soot that the kettle cannot be washed, but the power, of course, will increase by some amount.
3. And the distance between the nozzle and the entrance to the mixer tube cannot be increased indefinitely either, since the gas stream simply breaking into the air will not enter the mixer tube at all.
Based on the data obtained, we see that simply increasing the diameter of the nozzle in order to increase the burner power will not be entirely correct. But we did just that , although to be fair, we would also have to increase the diameter of the burner so that there would be more mixture. But the housing did not allow inserting a mixer of higher power.
As a result, we gave the lady two types of nozzles with a diameter of 0.85 and 0.95 mm M6 pitch 0.75. According to the state, the tile has a jet with a diameter of 0.75 mm. Haven't called yet. Usually, if they don’t call us, then everything is fine)))
Below is a burner and nozzles to increase power for PGT 1 (gas tourist)
Cooking, unfortunately, takes a lot of effort and time. Often, the duration of cooking depends not so much on the complexity of the dish, but on the power of the gas stove: with a nominally weak technique, everything takes longer to cook and fry. Finding ways to increase the power of a gas burner is so relevant because spending a free evening on yourself is much more pleasant than standing at the stove.
But are these modernization methods really safe? And are gas games worth the time savings? We will consider these pressing issues in detail in this material, providing it with visual photos and useful videos.
The best gas stoves according to buyers
Stove GEFEST 1200С7 K8 on Yandex Market
Stove GEFEST 900 on Yandex Market
Stove GEFEST 5100-02 0010 on Yandex Market
Gorenje GI 62 CLB stove on Yandex Market
Electrolux EKG 95010 CW stove on Yandex Market
Latest articles:
- Safety when working with power tools Safety precautions when working with power tools The following safety measures when working with power tools are universal and are suitable…
- Fire safety of a private home Every person at least once in his life has had to break some rules - cross the road when it is red...
- How to hang a sink on drywall? Installing a sink on drywall in three ways Introduction Most bathroom sinks are wall-mounted. Enough…
- Provence hood Types of hoods and their photos in the interior The correctly chosen hood in the kitchen interior works great when…
Features of installation of the accounting device
Installation of the meter must be carried out exclusively by specialists with appropriate qualifications; compliance with the required installation standards and requirements is mandatory. As for the cost of installation work, it depends on a number of individual features, including the specific model of the device, the location of gas pipelines and gas-powered equipment.
Which gas stove to install
When installing the stove, you should know that the main gas is supplied to the apartments at a pressure of 1.5 kPa (15 mbar) and the stove itself is set to the specified value, and the liquefied gas tank reducer is usually set to the gas boiler pressure of approximately 2.3-5 kPa (23-50 mbar). Because of this, increased pressure occurs, which can be judged by the red flame (normally blue) coming out of the burners of the gas stove, and the black “marks” of soot that appear on the bottom of the pans. There are two ways to solve this problem: install a lowering pressure stabilizer or purchase a stove that matches the gas pressure.
The production facility produces professional gas stoves of various modifications. Industrial gas stoves "Vulcan-Heidebrenner" are designed for use in catering establishments, in the kitchens of large and small restaurants and cafes, in canteens of preschool and school institutions, sanatoriums and hospitals. The main advantage of using gas stoves is significant savings in money, since today gas is the cheapest source of energy.
All Vulcan-Heidebrenner gas stoves are equipped with a piezo ignition system for all burners and a safety system against gas leaks (gas control).
Large control handles of the taps have a fuse against breakage of the tap (and, accordingly, gas leakage): if the load on the gas tap is exceeded, the fuse is triggered, which avoids breakage of the tap and gas leakage.
Massive cast iron burners securely hold and allow you to safely move heavy cookware across the surface, and the most powerful gas burners cook large volumes of food in a minimum amount of time.
Our series includes 2, 4, 6, 8 or even 10 burner models with or without one or two ovens.
The edges of the protruding internal elements are specially processed, which protects your hands from cuts and scratches during operation.
Upon request, the stove can be configured to operate on natural gas from the city gas network or liquefied gas from cylinders.
You can expand the functionality of the professional Vulcan-Heidebrenner stove by installing a kebab grill on a lava stone or a lava grill instead of one of the open burners on the table.
Hidden fastening elements on the body provide a more aesthetic appearance.
If your kitchen has narrow doors, then by unscrewing the adjustable feet, you can carry the stove into a standard doorway 80 cm wide.
We care about the convenience and safety of our consumers!
Oven
Gas stove ovens are:
- gas;
- electrical;
- combined (with electric grill).
The optimal choice of the last two types of ovens, since they distribute heat evenly. However, with this choice, you must definitely consult with an electrician to see if the wiring can withstand the resulting load.
Gas ovens can be of 2 types:
- without convection;
- with forced air circulation.
The best choice is a gas oven with forced air circulation, since in this case the likelihood of cooking food that is not cooked through or that is burnt on one side is minimal.
Setting the mode
It is advisable to choose uniform heating from above and below for cooking. This mode is ideal for baking, roasting fish and meat. Many modern devices have several modes, one of which is strong heating of the lower heating element and standard heating of the upper one.
Equipment at medium and high prices is equipped with a fan on the rear wall. It is used to heat food evenly. Typically, the technique is used for baking whole pieces of meat and fish.
The bottom heating mode is necessary for creating dishes that are topped with fruit or cheese to prevent burning. It is suitable for heating prepared foods. Top heat is used to create succulent dishes. The Indesit gas stove with gas oven is equipped with several modes that allow you to cook different foods.
Some types of equipment have low heating, in which both heating elements operate. The mode is suitable for defrosting food and drying food. Modern appliances are equipped with a grill mode, with which food can be cooked as if it were roasted over a fire.
Gas burner selection parameters
Once the type of device and its functional features, as well as the operating conditions, have been determined, it is necessary to carefully study its characteristics and compare it with the closest analogues
You need to pay attention to the following technical points
Battery type
All of the above burner models operate on liquefied gas - propane or butane, which, in turn, can be supplied in completely different containers.
The most compact and portable burners, used for domestic and tourist purposes, use compact collet gas cartridges as a battery. Some devices have a separate compartment for such a can, others are fixed on top of it.
Classic tourist burners with one or two burners operate from five-liter gas cylinders connected through a special reducer. Such devices are widely used for both cooking and heating;
! Preference should be given to models that allow the use of several power sources with equal efficiency, and also have the ability to connect to a stationary gas pipeline.
Gas used to power the burner
- Isobutane mixture is the most common and versatile type of fuel. Provides clean combustion without large amounts of emissions and high heat transfer;
- Propane is a gas that is prone to clean combustion and does not tend to emit harmful substances during the combustion process. It is less common on sale than isobutane mixture;
- Butane is similar in properties to propane, but its combustion process is less clean, and it is also quite unstable in the cold season.
How to choose the power of a gas burner
The power of a gas burner is a parameter that reflects its operating efficiency and efficiency. It is impossible to achieve one hundred percent effect from gas combustion, however, many modern models have an efficiency rate of 80-90%. Power is traditionally measured in kilowatts and indicated in the technical specifications. In field conditions, the power of the burner is calculated quite simply - one kilowatt of energy is enough to cook one liter of food. For example, for a company of four people it is necessary to prepare about 2-2.5 liters of food, and therefore the most suitable burner will be capable of producing a power of 2.5-3 kilowatts. The same principle is used to determine the power of a gas burner used for other needs - heating a tent, water heating.
Ignition type
- Inexpensive gas burners in this regard are deprived of all conveniences - the valve opens the gas supply to the nozzles, and ignition is carried out using matches or a lighter. This principle is both reliable and not - there are no mechanical elements that can fail, but matches tend to get damp, and a lighter tends to fail at the most inopportune moment;
- Piezo ignition is used in advanced devices. It is a compact piezoelectric element that produces a spark and ignites the gas-air mixture when the button is pressed. It should be remembered that such ignition requires careful handling and periodic maintenance, and also that it may not work at altitudes above 4 kilometers. Even if your burner is equipped with piezo ignition, matches will never be superfluous;
Results of the work done
After gas supply and control washing, no gas leaks were detected! The faucet is sealed and works much more pleasantly, without jamming!
Alexander Birzhin, rmtn.ru
Details Published 12/20/2016 16:38
What should we do if we smell an unpleasant gas smell in the kitchen? There is a high probability that this is leaking from the gas valve, which is located directly in front of the device.
As soon as you hear the smell, you should call emergency services, because the gas is highly explosive.
But it’s also worth knowing how to deal with such situations yourself. If the valve is to blame for the leak, then it is better to replace it; for polypropylene pipes, a frialen 63 ball valve is suitable. But simply lubricating the faucet may be enough. To do this, we will study in detail the instructions on how to carefully lubricate the faucet.
Flat slot screwdriver
Rag
Gag
Graphite, solid oil or technical Vaseline
Soap
1
Examine the gas tap, paying attention to how the main part of the tap is made. It can be made in the form of a cone with a hole all the way through, or pressed with a twisting spring using a special plug. Unplug all electrical appliances;
Unplug all electrical appliances;
Ask all uninvolved people to leave the room, if possible, the premises.
Make sure there is no open flame in the room and never smoke while working.
3. Next, unscrew and remove the valve from the faucet and gag it to reduce the gas flow. Carefully remove all old grease with a dry cloth and apply new grease without filling the holes.
4. After everything is done, you need to very quickly replace the gag in the gas tap with a bolt. Carefully twist the spring and clamp it with a plug. We resume the gas supply if you shut it off earlier.
5. Ventilate the room well. Then prepare a solution of soap and apply it to the tap. If there are no bubbles, then you have done the job. But still, when there are bubbles, try to assemble the faucet again and check for leaks in the same way. When the problem persists in this case, urgently call the gas service. Since even the smallest leak can lead to a destructive explosion.
Gas is the main assistant to the cook and fireman; with it you will not be cold and hungry. Knowing the safety rules and behavior patterns during emergency situations will protect you from harm and help strengthen your “friendship” with the gift sent to us by Mother Nature. Still don’t know what to do when the gas tap in the kitchen leaks and how to check if there is a leak? Well, let's get down to business then.
Troubleshooting color changes
The most common mistake that users of gas equipment often make is purchasing the wrong equipment.
Some products are only suitable for one type of gas, but may be used for another. Then it is also possible to change the color of the flame.
In everyday life, propane stoves are often used, which require a slightly different ratio of gas and air. If they are connected to the main gas supply system, the color of the flame will changeFor example, a household appliance may run on propane. It requires a slightly different proportion of gas and air than natural gas.
Therefore, before purchasing a stove, it is important to ask whether it is intended for the gas mixture that you will use.
So, if the color of the gas flame has changed to yellow, orange or red, first of all, it is necessary to recognize the presence of danger. Many begin to blame everything on low-quality gas or problems with the supplier, but most often the reason is in the burners themselves.
It is important to find the source of the color change and troubleshoot it. If you cannot do this yourself, it is recommended to contact the company with which you have an agreement for the maintenance of gas equipment
They will carry out diagnostics and repair the device if necessary.
Most often, the problem is solved by simply cleaning your gas equipment. Sometimes it may be necessary to replace burner nozzles or take other steps to fine-tune the supply of air-fuel mixture to the burner
It is also important to take preventive measures. Most often, gas changes color due to the fact that the burners inside become clogged with household dust and food debris
If you use the stove more carefully and do regular cleaning, you can avoid unnecessary objects getting inside the burner. This is an effort that absolutely every user can make.
Cleaning can be done using special detergents. This should be done when the burners have cooled completely.
Try to follow these cleaning rules:
- Clean enamel and metal surfaces without using abrasive cleaners;
- do not use chlorine-containing cleaners;
- Clean glass ceramic surfaces with soapy water;
- For the holes themselves, use a stiff-bristled brush.
Finally, wipe the cleaned stove with a dry cloth, wait until it dries, and try to light the gas.
If cleaning the burners does not correct the situation, and the gas is still orange, then there is only one way out. You should immediately contact a specialized service center that repairs gas equipment.
The burners must be kept clean after absolutely every food preparation. Use available products and high-quality detergents to achieve the desired effect.
If you don't know how to disassemble and clean them, you can look at the instructions for your gas stove. There should be descriptions of how to clean these mechanisms
In addition, it is important to keep the entire stove clean, even the parts furthest from the fire. Indeed, in some cases, contaminants from those places can be accidentally transferred and fall under the damper
Most of the recommendations described above may seem elementary and frivolous at first glance. Many people think that they handle their stove normally and are in control of the situation. In fact, completely different processes can occur inside the slab.
The dust that you did not remove immediately ends up inside the burner, where it melts and chars. And in this case it becomes very difficult to clean it. And if the household appliance continues to be used in this spirit, its condition will deteriorate more and more. Ultimately, this will lead to complete failure.
Do not delay contacting gas services and specialists. If the stove systematically malfunctions, it needs repair. Preventive examinations from specialists will also be useful.
In addition, you should not neglect the rules for the safe operation of gas equipment, because even the slightest mistake can lead to dire consequences.
Burner flame
One of the indicators of proper burner operation is the color of the flame. Gas equipment is characterized by an even bluish flame without admixtures of other colors. The presence of yellow or red splashes indicates that the burner is not working well, which reduces the efficiency of the heating equipment.
First of all, this applies to injection burner devices, but sometimes it is also typical for fan burners. The flame may simply lack oxygen. Also, dust and other small debris can get in with the air, which will clog the device, reducing the efficiency of the boiler. All this directly affects the flame. If it hums, the burner is loud, or the fire has changed color, you need to adjust the correct operation of the device.
An atmospheric gas burner for heating equipment often fails. It is equipped with models of both wall-mounted and floor-standing boilers. The injection burner of floor-standing equipment reduces its efficiency for various reasons:
- Burner power is too high. This happens when a high-power burner is purchased for small heating equipment. At the same time, there is not enough space for combustion, the air flow for such power is weak, which leads to the transition of the flame from blue to yellow, sooting of the combustion chamber and chimney.
- If the chimney is poorly cleaned, the boiler draft deteriorates. At the same time, waste combustion products are poorly removed, and the air flow is small. This worsens combustion and the flame turns yellow.
- A defect in the burner itself does not make it possible to correctly adjust the complete combustion of the fuel.
- Due to pressure changes in the gas supply system, well-regulated equipment can release large amounts of unexhausted gas into the chimney. Partially it settles with soot and soot. A large layer of soot reduces traction and increases fuel consumption.
- Starting heating equipment after repair.
- The presence of extraneous noise during operation of the boiler or gas burner.
- Changing the type of fuel.
How to light a fire
If you have never encountered gas stoves before, then the question of how to light a gas stove may be very relevant. To do this, you need to adhere to a certain algorithm. First of all, you need to ventilate the room. The following steps should be followed step by step:
- Open the tap on the pipe or valve if using a gas cylinder.
- Light the burner.
This process occurs differently depending on the type of stove and the source of fire. The stove can be lit in the following ways:
- from an open source of fire - matches;
- using an electric or silicon lighter;
- electric ignition
Modern models of gas stoves are equipped with a built-in electric ignition system. This function can be displayed on a separate button, or it can be built into the burner tap. This is the only case when turning the stove tap can simultaneously light the burner. In other models, you must first provide a fire (spark), and then open the burner valve. The tap opens clockwise when slightly pressed inward. Read about how to light a gas stove oven here.
The flame should be a distinct blue color and evenly distributed around the burner. If it slips in, close the tap and re-ignite the burner. The optimal flame height should not exceed 2-2.5 cm and is adjusted by turning the valve handle. If there is a draft in the room, the flame will tend to break away from the burner, which is dangerous from a fire safety point of view. If there is too much air, you need to close the window. If there is a lack of air, the color of the flame will clearly change from blue to yellow, and carbon monoxide will be released, which is dangerous to human health.
Which one should I do?
Low-power gas burners for everyday life and small private production are classified according to performance indicators as follows. way:
- High-temperature – for precision soldering and welding, jewelry and glassblowing. Efficiency is not important, you need to achieve the maximum flame temperature for a given fuel.
- Technological – for metalworking and forging work. The flame temperature is highly desirable not lower than 1200 degrees, and subject to this condition the burner is brought to maximum efficiency.
- Heating and roofing systems achieve the best efficiency. The flame temperature is usually up to 1100 degrees or lower.
Regarding the method of burning fuel, a gas burner can be made according to one of the following. schemes:
- Free-atmospheric.
- Atmospheric ejection.
- Supercharged.
Atmospheric
In free-atmospheric burners, gas burns in free space; air flow is ensured by free convection. Such burners are uneconomical; the flame is red, smoky, dancing and beating. They are of interest, firstly, because with an excess supply of gas or insufficient air, any other burner can be switched to free-atmospheric mode.
Ejection
In ejection burners, at least 40% of the air required for fuel combustion is sucked in by the gas flow from the injector. Ejection burners are structurally simple and make it possible to obtain a flame with a temperature of up to 1500 degrees with an efficiency of over 95%, therefore they are used most widely, but cannot be made modulated, see below. According to the use of air, ejection burners are divided into:
- Single-circuit - all the necessary air is sucked in at once. With a properly profiled gas channel at a power of more than 10 kW they show an efficiency of over 99%. Can't be repeated with your own hands.
- Double circuit - approx. 50% of the air is sucked in by the injector, the rest into the combustion chamber and/or afterburner. They allow you to get either a flame of 1300-1500 degrees, or a CPL of over 95% and a flame of up to 1200 degrees. Used in any of the ways listed above. Structurally they are quite complex, but repeatable on their own.
- One-and-a-half-circuit, often also called double-circuit - the primary air is sucked in by the flow from the injector, and the secondary air freely enters a limited volume (for example, the furnace firebox), in which the fuel burns out. Only single-mode (see below), but structurally simple, therefore they are widely used for temporarily starting heating stoves and gas boilers.
Supercharged
In pressurized burners, all air, both primary and secondary, is forced into the fuel combustion zone. The simplest supercharged microburner for benchtop soldering, jewelry and glass work can be made independently (see below), but the manufacture of a supercharged heating burner requires a solid production base. But it is the supercharged burners that allow you to realize all the possibilities of controlling the combustion mode; according to the terms of use they are divided into:
- Single-mode;
- Dual mode;
- Modulated.
A few words about the internal structure of gas burners
Gas is blown into the burner cavity through an injector, which is often called a nozzle. But this is not where we need to start.
In modern kitchen appliances, burners consist of several parts:
- the divider is a flanged bushing with teeth, thanks to which the gas is distributed in a circle and forms a uniform flame;
- divider cover - this thing complements the design and is located in the upper part of the burner. In modern stoves, the lids can be made of different materials, but most often it is stainless steel.
In more sophisticated devices, all this is complemented by an electric spark plug, which is placed on the side. If you remove the divider and cover, you can see the jet. Essentially, it is a small bolt with a tiny through hole, made of brass or bronze. The hole has numbers stamped on it indicating its diameter. Passing through its cap, the fuel enters the divider and burns. When the stove smokes, the hole is too large.
Therefore, it makes sense to check whether the type of nozzles matches the raw materials used. Most gas stoves use jets designed for city main gas - methane. Here the pressure is less and the hole should be larger. And vice versa, in a propane tank the pressure is higher, which means the hole in the nozzle should be smaller.
Externally, nozzles operating from mains or liquefied gas are no different. The only difference is the holes. If upon inspection it is clear that the nozzle is not correct, it should be replaced. I note that the jets must match the specific stove model, otherwise they will not work correctly or you will not be able to install them at all. In addition, an incorrectly installed unit is a direct path to a gas leak and explosion.
Equipment setup
The open chamber is a fairly simple combustion device. It looks like this: above the burner there is a heat exchanger in the form of a coil of thin copper tubes. Thanks to the open design, the air required for the combustion reaction is supplied to the point of ignition of the gas from the environment.
As a rule, there is enough air from the room (provided good ventilation is organized). But there are wall-mounted models with air intake from outside, for which a special hole is mounted in the wall. Open combustion chambers require a chimney.
Most often it is installed for models of floor-standing gas boilers, and was also used to complete an old-style boiler (in this case, ignition was carried out by a pilot burner).
Combustion chamber design diagrams
The closed combustion chamber is distinguished by the design of the heating block. The heat exchanger is located above the burner. The unit body is closed, combustion air is pumped by a fan installed in the chamber. Coolant is passed through the double walls of the chamber, heating it, increasing the efficiency of the boiler. The gas is burned almost completely, the combustion products are removed by a coaxial pipe under air pressure.
Floor-standing gas boilers with an atmospheric burner can be configured independently. Pressurized systems are regulated by an automatic control unit and do not require additional configuration.
Scheme of actions for setting up single-stage equipment:
- Install the device on the boiler.
- Connect to the gas pipe.
- Check for absolute tightness.
- Remove the burner housing.
- Using a pressure gauge, measure the gas pressure at the inlet.
- Connect to electricity. Make sure that the jumpers and phases are connected correctly.
- Place a gas analyzer in the chimney pipe.
- Start the device.
- Using a pressure gauge, take pressure readings at the outlet of the burner block. Pressure readings must correspond to the parameters indicated in the data sheet.
- Adjust the air flow using the air damper.
- The gas analyzer readings must also comply with all gas equipment installation standards.
Setting up gas equipment should be carried out by specialists. The simplest open-type boilers can be configured independently if you have certain skills and knowledge of the design of the burner unit. The efficiency of the boiler, its level of efficiency, and fuel consumption depend on the quality of the burner. It is possible to superficially determine that the equipment is malfunctioning by the changed burner flame.
How to achieve safety
Here the matter is in the so-called. Reynolds number Re, showing the relationship between flow speed, density, viscosity of the flowing medium and the characteristic size of the region in which it moves, for example. cross-sectional diameter of the pipe. From Re one can judge the presence of turbulence in the flow and its nature. If, for example, the pipe is not round and both of its characteristic sizes are greater than a certain critical value, then vortices of the 2nd and higher orders will appear.
Not all homemade gas burners are accurately calculated according to the laws of gas dynamics. But, if you arbitrarily change the dimensions of the parts of a successful design, then the Re of fuel or sucked air may jump beyond the limits that it adhered to in the author’s product, and the burner will become, at best, smoky and voracious, and, quite possibly, dangerous.
Injector diameter
The determining parameter for the quality of a gas burner is the cross-sectional diameter of its fuel injector (gas nozzle, nozzle, nozzle - synonyms). For propane-butane burners at normal temperatures (1000-1300 degrees), it can be approximately taken as follows:
- For thermal power up to 100 W – 0.15-0.2 mm.
- For a power of 100-300 W - 0.25-0.35 mm.
- For a power of 300-500 W - 0.35-0.45 mm.
- For a power of 500-1000 W - 0.45-0.6 mm.
- For a power of 1-3 kW - 0.6-0.7 mm.
- For a power of 3-7 kW - 0.7-0.9 mm.
- For power 7-10 kW – 0.9-1.1 mm.
Power
Under no circumstances should you make a gas burner with a power exceeding 10 kW. Why? Let's say the burner efficiency is 95%; for an amateur design this is a very good indicator. If the burner power is 1 kW, then it will take 50 W to self-heat the burner. A 50 W soldering iron can get burned, but it does not threaten an accident. But if you make a 20 kW burner, then 1 kW will be superfluous; this is an iron or electric stove left unattended.
Armature
The third factor that determines the safety of the burner is the composition of its fittings and the procedure for using it. In general the scheme is as follows:
- Under no circumstances should the burner be extinguished using the control valve; the fuel supply is stopped using the valve on the cylinder;
- For burners with a power of up to 500-700 W and high-temperature ones (with a narrow injector, excluding the transition of Re gas flow beyond the critical value), powered by propane or isobutane from a cylinder up to 5 liters at an external temperature of up to 30 degrees, it is permissible to combine control and shut-off valves in one - standard on the cylinder;
- In burners with a power of more than 3 kW (with a wide injector), or powered from a cylinder of more than 5 liters, the probability of “overshooting” Re beyond 2000 is very high. Therefore, in such burners, between the shut-off and control valves, a reducer is required to maintain the pressure in the supply gas pipeline within certain limits.
Choosing gas
You can only make a gas burner using propane, butane or a propane-butane mixture with your own hands, i.e.
on gaseous saturated hydrocarbons and atmospheric air. When using 100% isobutane (see below), it is possible to achieve flame temperatures of up to 2000 degrees. Acetylene allows you to achieve a flame temperature of up to 3000 degrees, but due to its danger, the high cost of calcium carbide and the need for pure oxygen as an oxidizing agent, it has practically fallen out of use in welding work. It is possible to obtain pure hydrogen at home; hydrogen flame from a forced-air burner (see.
further) gives temperatures up to 2500 degrees. But the raw materials for producing hydrogen are expensive and unsafe (one of the components is a strong acid), but the main thing is that hydrogen cannot be smelled or tasted, there is no point in adding a mercaptan fragrance to it, because Hydrogen spreads an order of magnitude faster, and its admixture with air of only 4% already produces an explosive explosive gas, and its ignition can occur simply in the light.
Methane is not used in household gas burners for similar reasons; in addition, it is highly poisonous. As for flammable liquid vapors, pyrolysis gases and biogas, when burned in gas burners they produce a not very clean flame with a temperature below 1100 degrees. Flammable liquids of medium and below average volatility (from gasoline to fuel oil) are burned in special liquid burners, for example, in burners for diesel fuel; alcohols are used in low-power flame devices, and ethers do not burn at all - they have low energy, but are very dangerous.
— productive power — noise level during operation (applies to supercharged models) — type of heating equipment for which the burner is purchased — type of fuel — pros and cons of this device — provide for possible malfunctions in the operation of the local gas supply line.
Taking these factors into account, you can choose the most suitable burner device for your boiler so that it operates as efficiently as possible without the burden of frequent preventative maintenance.
Gas stove burner design
To understand how you can increase the flame in a household gas stove, it is worth familiarizing yourself with the structure of the burner itself, the principle of gas supply and combustion.
The first thing worth remembering once and for all: what burns in the stove is not just pure gas, but a gas-air mixture. It is its final composition, the ratio of gas and air, that largely determines the size and efficiency of the fire that the consumer receives from the burner.
Burners in burners, depending on the method of air intake, are of three types:
- Diffusion ones are usually used in ovens. There is no air leakage in such structures; mixing with gas occurs naturally.
- Kinetic burners use line pressure to capture the right amount of air to create the right fuel mixture.
- Combination burners successfully use both methods of adding air to gas. These are the devices used in most household gas stoves.
The design of the burner itself has a simple, but precisely calibrated configuration.
The pipeline ends at a tip into which a nozzle is mounted. Its passage hole has a certain calculated diameter. It is through this that gas is supplied to the mixer, in which fuel is mixed with air. From the mixer, the flammable composition enters the burner, in which a flame is produced.
It is worth paying attention to the area between the jet and the mixer. While the gas overcomes this segment, exactly the amount of air that is necessary to obtain the optimal combination of fuel and oxygen is mixed into it
This distance is also strictly calculated, so that the gas burns completely and with the highest possible efficiency.
Burn, burn, my stove.
(review of the gas stove market)
- Issue: No. 4 (72) April 2004
- Material prepared by: Boris Bezel
“And we have gas in our apartment. ” – not so long ago, this children’s rhyme was perceived by many residents of the USSR with understandable envy. In fact, in the land of stoves and primus stoves, gas stoves were an unattainable luxury for many, much more desirable than the notorious “view of Red Square.”
In developed countries, gas heating of kitchen fires has been successfully used in everyday life for more than a century. To this day, gas stoves are widespread - especially in Russia, where in Moscow alone there are about 2 million gasified apartments. There are many reasons for this popularity. Gas stoves and built-in hobs are reliable and simple in design; they can last for decades without the need for any repairs. In addition, the use of gas in Russia (at least today) is economically beneficial, since it is cheaper than electricity. Gas stoves, when turned on, do not require time to warm up the massive burners, and after work, they do not need time to cool down. Finally, many cooks prefer to work with a gas stove out of habit - they believe that cooking with gas is more convenient.
Rules for using gas at home
- Carry out unauthorized gasification of a house or apartment, rearrangement, replacement and repair of gas appliances, cylinders and shut-off valves.
- Carry out redevelopment of the premises where gas appliances are installed, change the area of heated premises without coordination with the local government.
- Make changes to the design of gas appliances. Change the design of smoke and ventilation ducts; seal ventilation ducts, brick up and seal “pockets” and hatches intended for cleaning chimneys.
- Disable automatic safety and regulation. Use gas if gas appliances, safety automatics, shut-off devices (taps) and gas cylinders are faulty, especially if a gas leak is detected.
- Use gas if the integrity and density of masonry, plaster (if cracks appear) of gasified stoves and their chimneys are damaged.
- Install and use a valve (gate) on the smoke channel, chimney, chimney. If there is a valve (gate) in the furnace design, ensure that it is removed and sealed from the outside of the wall of the smoke channel of the resulting hole (crack).
- Use and install gasified stoves in apartment buildings.
- Use gas appliances when there is no draft in the smoke and ventilation ducts, closed vents (transoms), or the closed position of the louvre grille on the ventilation duct. In this case, at the bottom of the door or wall opening into the adjacent room, it is necessary to provide a grille or a gap between the door and the floor, as well as special air supply devices in external walls or windows.
- Use forced ventilation devices (hood, fan) when gas boilers or water heaters are running.
- Leave operating gas appliances unattended (except for appliances designed for continuous operation and having appropriate safety automatics for this purpose).
- Allow preschool children and persons who do not control their actions and do not know the rules for using these appliances to use gas appliances.
- Use gas and gas appliances for purposes other than their intended purpose. Use gas stoves for space heating.
- Use rooms where gas appliances are installed for sleep and rest.
- Dry clothes over or near a gas stove.
- Check the operation of ventilation ducts and the tightness of connections of gas equipment using open flame sources, including matches, lighters, candles and others.
- Store empty and filled liquefied gas cylinders in rooms and basements. Unauthorizedly, without special instructions, replace empty cylinders with filled gas cylinders and connect them.
- Have in a gasified room more than one cylinder with a capacity of more than 5 liters, not connected to a gas stove.
- Place cylinders at a distance of less than 0.5 m from a gas stove, 1 m from heating appliances, 2 m from stove burners, less than 1 m from an electric meter, switches and other electrical appliances and equipment.
- Expose liquefied gas cylinders to sunlight and heat.
- Allow damage to gas equipment and theft of gas.
- Twist, crush, bend, stretch or clamp gas hoses connecting gas equipment to the gas pipeline.
Inadmissible actions during operation
In addition to all of the above operating requirements, you should also know the list of actions that are strictly unacceptable when using the stove. So, IT IS PROHIBITED:
- drying clothes over the stove - there is a high risk of fire;
- leaving the stove turned on unattended is also likely to cause accidental ignition, for example, of a nearby towel, or a gas leak resulting from the fire dying out when the tap is open;
- allow preschool children to use the gas stove;
- heat the premises using the burners turned on;
- independently install and change gas equipment, including a kitchen stove - in this case, in addition to the above risks, punishment is provided for by the gas service and administrative authorities.
Despite the numerous advantages of a gas stove over its electric counterparts, it causes greater harm to the health of household members and requires increased caution during operation. The use of natural gas makes it more economical, although modern models of induction and electric furnaces of class A+ and A++ allow optimizing electricity costs, minimizing them
Therefore, taking into account the desires of the surrounding world for environmental friendliness and energy saving, when choosing a stove, you need to analyze all the pros and cons of each type, and adhere to safety requirements during operation.
If the jet needs to be replaced
Here you can also do something yourself. To work, you will need a set of keys and a Phillips screwdriver: if the nozzles for bottled gas are 8 mm, for burners - 14 mm, for pipelines - 17 mm. Don't forget to turn off the tap.
In old-style plates, the jets are hidden deep down. To begin with, remove the dividers, burners, and table top. The type of fastenings depends on the type of stove, however, in most cases you need to unscrew a couple of screws. Here you can see traverses - metal strips on which the burners are fixed. All of them are made in the same design and differ only in the length of the aluminum pipeline connecting the nozzle and the divider. There is one metal frame for every two burners. The body of each burner is rigidly fixed to the traverse, and the pipes are fastened in pairs with ears inside the body.
As I said, at the end of each pipeline there is a nozzle where the gas is supplied. Then, through a hole in the nozzle, it comes out to the burner and is fed to the divider. To replace the plates in older models, you need to release the tip with the nozzle by bending the special lock. In the new ones, everything is done much simpler, you don’t need to bend anything. When you have found something to replace, you can start repairing. Assembly is carried out in reverse order.
Jet maintenance
For most popular models from well-known brands, there is no need to remove the nozzles for subsequent cleaning. It is enough to remove the burners to open access to contaminated parts. In some cases, it may be necessary to dismantle the hob if it is a closed type.
A regular needle or copper wire is suitable for cleaning the nozzle. We pass the tool into the hole and rotate it around its axis. When the needle has reached the bottom, turn on the gas and only then remove it. Thus, the jet from the nozzle pushes dust and fine dirt out. Two to three seconds is more than enough to clear the air.
Cleaning the nozzle
If there are problems with on-site maintenance, or the design of the stove does not allow for this, the nozzle must be completely removed, cleaned, rinsed and dried. In a good half of cases, the detailed procedure is described in the operating instructions for the equipment.
Required tool:
- jets – 8 mm wrench (7 mm for propane);
- burner fastening – 14 mm;
- pipeline nuts – 17 mm.
On some specific slabs, the fastening may differ from that indicated. As a universal option, you can use a wrench with a variable head diameter.
Rules of operation and repair
The serviceability of equipment and your personal safety largely depend on how you treat the equipment. This includes correct installation, careful operation, regular maintenance and replacement of parts that have a limited service life.
Here are the basic rules for using a gas stove:
- regularly clean the grate, stove surface, burners, control knobs;
- keep in touch with representatives of Gorgaz and regularly carry out maintenance of equipment;
- ventilate the room, even if you use a hood;
- in case of prolonged absence, close the shut-off valve;
- Make sure that the knobs are in the “off” position while the hob is not in use.
You also need to be careful when using the oven. It, like any equipment, requires cleanliness and serviceability of all parts.
It is not recommended to use the oven as an ordinary cabinet for storing dishes, especially cluttering it with easily flammable or melting objects.
Only “working” accessories should be inside the oven: baking sheets, racks, grill equipment and utensils or molds, if they are involved in cooking
If the ventilation is faulty and it is not possible to open a vent or window, it is prohibited to use gas equipment.
If a specific smell of gas appears, it is necessary to open the fuel supply valve, open the windows and call the emergency service. During the waiting period, you should not turn on electrical appliances, light a flame, or better yet leave the room altogether. It is recommended to even make a call from the landing or from the street.
Repair of gas equipment should be carried out either by invited specialists from the service organization, or by employees of a specialized service center.
GOST indicators
The power of a gas stove's burners is measured in kilowatts (kW). According to the requirements of GOST 10798-85, this household appliance must meet the following technical characteristics:
- have several burners - from 2 to 4, each of which must ensure normal maintenance of a flame that is resistant to air flows;
- have reduced (0.6 kW), increased (2.6 kW) and normal (1.7 kW) thermal power;
- have a power of the main burner per oven unit of 0.08 kW/dm³, of the oven fry burner - 3 kW.
Typically, the parameters of burners are indicated in product data sheets and differ depending on the model and country of manufacture. On average, the total power of all burners is 10 kW. GOST standards apply to all household gas stoves, except for tourist stoves and those that discharge combustion products into the chimney.
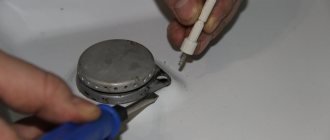
How to increase the power of a gas burner in a gas stove? Example.
How to increase the power of a gas burner in a gas stove?
A woman came to us, a big fan of hiking and all kinds of river rafting. She brought with her a small tourist single-burner stove PGT1 model 802 and asked “Is it possible to increase the power of the burner in such a stove”?
Let's take two Hephaestus burners assembled and consider these two designs.
When assembled it looks like this:
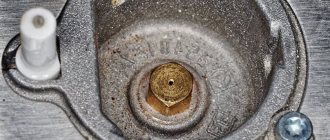
A pipeline that ends with a tip into which a nozzle with a through hole of a certain diameter is screwed, directing the gas flow into a mixer installed on the burner body.
It is worth noting the following:
— the distance from the nozzle to the entrance to the burner mixer tube is approximately the same, about 14 mm, — the holes in the nozzles are different (small burner 0.5 mm, medium burner 0.75 mm nozzle hole diameter, i.e. 25% more gas is supplied to medium burner than small)
Do you know, for example, that in order to take and burn 1 cubic meter of natural gas, we need to mix it with and burn 10 cubic meters of air? Standard formula.
This is the idea
The gas from the nozzle in a thin stream hits the inside of the mixer (burner) tube in a straight line 14 mm long, sucking in or taking with it, as you wish, a certain amount of air, where in this tube, or rather its outlet, mixing of gas and air occurs (hence we have The factory name of the burner is the name of the mixer).
What is the secret meaning?
The distance of 14 mm was not taken by chance by the factory!
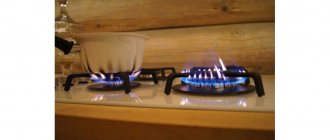
1 . If you start to increase this distance, then there will be an excess of air and the combustion power of the resulting gas-air mixture will drop.
2. And if we reduce this distance, we will get an excess of gas, and the air will not have time to mix in the required amount. We get a red flame, soot that the kettle cannot be washed, but the power, of course, will increase by some amount.
3. And the distance between the nozzle and the entrance to the mixer tube cannot be increased indefinitely either, since the gas stream simply breaking into the air will not enter the mixer tube at all.
Based on the data obtained, we see that simply increasing the diameter of the nozzle in order to increase the burner power will not be entirely correct. But we did just that, although to be fair, we would also have to increase the diameter of the burner so that there would be more mixture. But the housing did not allow inserting a mixer of higher power.
As a result, we gave the lady two types of nozzles with a diameter of 0.85 and 0.95 mm M6 pitch 0.75. According to the state, the tile has a jet with a diameter of 0.75 mm. Haven't called yet. Usually, if they don’t call us, then everything is fine)))
Below is a burner and nozzles to increase power for PGT 1 (gas tourist)
Source
What is a jet?
The jet is one of the main components of a gas stove. It ensures the supply of blue fuel to the burner in sufficient volume and the required pressure. Without a nozzle, the operation of a gas stove would be impossible.
Deviations in the operation of the jets are immediately visible, they are noticeable by yellow and red flames and soot on the dishes
The shape of the nozzle resembles a bolt, in the head of which there is a passage hole. The diameter of the hole must correspond to the pressure of the supplied fuel and the power of the burner.
It must be taken into account that the pressure of the main gas and bottled gas is significantly different, therefore the diameter of the nozzle for these types of fuel will be different. The jet regulates the pressure and ensures that gas enters the burner in the required volume, equivalent to the volume of air required for the normal combustion process
The jet regulates the pressure and ensures that gas enters the burner in the required volume, equivalent to the volume of air required for the normal combustion process
To ensure the most efficient operation of the stove, eliminate the release of harmful products, the smoking factor, and normalize fuel consumption, you need to install nozzles whose dimensions and diameter of the outlet hole comply with the requirements of the gas stove manufacturer.
Types of jets and their main characteristics
Jets or nozzles with a hexagonal head, external thread and a longitudinal internal hole. The vast majority are made of bronze.
Nozzles for main and bottled gas differ in thread length and diameter of the gas supply channel, which is associated with different fuel supply pressure
There is a marking on the end part that displays information about the throughput of the nozzle. Units of measurement are the volume of gas in cubic centimeters that the nozzle can pass in 1 minute.
Jets can be of two types - for natural gas (differing in larger hole diameter and shortened body), for liquefied gas (differing in smaller hole diameter and elongated body, which is associated with higher pressure).
The pressure in the cylinder exceeds the pressure in the gas line, which explains the smaller diameter in the head of the corresponding nozzle. The power of the burner is determined by its size, therefore the diameters of the holes in the corresponding jets will be different.
The diameter of the hole in the nozzle must correspond to the gas pressure:
- Large burner - 1.15 mm (20 Bar); 0.6 mm (50 Bar); 1.15 mm (20 Bar); 0.75 mm (30 Bar).
- Medium burner - 0.92 mm (20 Bar); 0.55 mm (50 Bar); 0.92 mm (20 Bar); 0.65 mm (30 Bar).
- Small burner - 0.75 mm (20 Bar); 0.43 mm (50 Bar); 0.7 mm (20 Bar); 0.5 mm (30 Bar).
- Oven burner – 1.2 mm (20 Bar); 0.65 mm (50 Bar); 1.15 mm (20 Bar); 0.75 mm (30 Bar).
It must be taken into account that incorrect operation of the jets may not be caused by a change in the type of fuel, but by a simple clogging of the outlet. In this case, you can clean the injectors without having to replace them.
Injector cleaning technology
From time to time you have to change the nozzles or clean them. The recommended frequency of performing the procedure is once a year.
Clogged nozzles impair the quality of the flame and lead to a decrease in the amount of heat generated. In addition, fuel consumption increases, which is undesirable for owners of liquefied gas equipment. This fact will not suit homeowners with installed gas meters either.
To clean the jets you will need:
- Universal products - soda or vinegar, dishwashing detergent;
- Dish cleaner;
- Toothbrush;
- Thin wire or needle.
Work begins with removing carbon deposits, soot and grease from the area where the nozzle is located. The nozzle must be unscrewed and soaked in detergent, soda or vinegar solution.
To clean the injectors, no special tools are required; all you need is a thin wire, a toothbrush and detergent.
The outer surface can be cleaned with a toothbrush and regular household cleaning powder. The nozzle hole should be cleaned with a needle; sometimes blowing with a pump or compressor is justified.
The cleaned and dried jet must be replaced
Please note that if there is a sealing gasket under the nozzle, it must be replaced
How to clean injectors
First, turn off the gas and check if the stove has cooled down. To clear the blockage, you need to remove the cover and dispenser. As I said, there is a small hole inside. Take a sewing needle and carefully clean it. There is no need to crush and put pressure on him. Simply insert the tip and gently rotate the needle between your fingers.
Care and operation of gas stoves
At the same time, if there is dirt, it is useful to clean the divider itself and the cover. You can use a toothbrush, dish soap and a stream of warm water. You cannot pick with wire or nails. Modern burners are not the same as those used 50 years ago. They won't stand such vandalism. Then you wipe the whole thing dry, dry it for half an hour or a little longer, assemble it and put it in place. When assembling, make sure that the grooves and projections of the burner match. The lid should be in place exactly, without displacements or distortions.
Tips for saving gas
Follow these simple tips to reduce gas consumption when cooking on the stove.
- Use only the heat that is sufficient for the cooking, frying or stewing process, and do not exceed the heat.
- After the water or broth boils, the flame can be pressed to a minimum.
- The fire heats the bottom of the pan faster and more efficiently if it touches it lightly, rather than covering it from all sides. It has been proven that the highest burner temperature is at the top point of the flame.
- When the container is placed on the burner, close it with a lid. The boiling and cooking process then goes faster. Some food is cooked only with the lid open, but heating water to a boil or heating the dishes initially with the lid closed will not harm the dish itself.
- Make sure that there is no draft in the room where the cooking appliance is located, in which part of the thermal energy is directed to the side and wasted.
- Close the valve when the dish is already cooked. Or press immediately as soon as the water boils.
- Do not heat the contents in a container with a flame turned on. In this case, the walls of the containers give off heat faster, and gas consumption reaches 10–15%.
- Try to cook small dishes in the oven less often. Warming it up takes a lot of resources.
If you have a gas water heater installed in your apartment, you should save water that needs heating. Fill the sink with water when washing dishes, and use running water for rinsing. It has been noticed that if you take a shower rather than a bath, much less hot water is consumed. To save money, special nozzles for shower heads are sold.
If there is individual heating, the largest amount of gas is spent on heating the home. Insulate the house, install a boiler with an automatic thermostat. Reduce the temperature 2 degrees below comfortable. If possible, use a solid fuel boiler, as it is more economical than a gas one.
It would be useful for any utility user to know the fuel consumption and power of their gas stove, boiler, or water heater. Then monthly invoices will not surprise you with their numbers. The ability to independently make calculations will help you compare the maximum and minimum consumption of gas devices and choose the right meter in accordance with the parameters.
When purchasing a metering device, do not destroy the technical documentation for it; it may be useful when installing or replacing them. For old-style gas stoves, the documents for which have been lost, you can take average indicators.
The gas consumption test is shown in the following video.
Gas stove burner design
To understand how you can increase the flame in a household gas stove, it is worth familiarizing yourself with the structure of the burner itself, the principle of gas supply and combustion.
The first thing worth remembering once and for all: what burns in the stove is not just pure gas, but a gas-air mixture. It is its final composition, the ratio of gas and air, that largely determines the size and efficiency of the fire that the consumer receives from the burner.
Evidence that the optimal amount of air is added to the gas is a blue color, the absence of soot and obvious yellow “flies”
Burners in burners, depending on the method of air intake, are of three types:
- Diffusion ones are usually used in ovens. There is no air leakage in such structures; mixing with gas occurs naturally.
- Kinetic burners use line pressure to capture the right amount of air to create the right fuel mixture.
- Combination burners successfully use both methods of adding air to gas. These are the devices used in most household gas stoves.
The design of the burner itself has a simple, but precisely calibrated configuration.
The diagram shows the structure of a gas burner. Only at first glance the design seems simple. However, a failure in any unit can affect the quality and composition of the gas-air mixture and reduce the efficiency of the stove
The pipeline ends at a tip into which a nozzle is mounted. Its passage hole has a certain calculated diameter. It is through this that gas is supplied to the mixer, in which fuel is mixed with air. From the mixer, the flammable composition enters the burner, in which a flame is produced.
It is worth paying attention to the area between the jet and the mixer. While the gas overcomes this segment, exactly the amount of air that is necessary to obtain the optimal combination of fuel and oxygen is mixed into it
This distance is also strictly calculated, so that the gas burns completely and with the highest possible efficiency.
How to fix an electric ignition yourself
In order to repair the electric ignition of a gas stove, you first need to find the cause of the problem. If you are unsure of your knowledge, you should not start repairing it yourself; it is better to entrust this matter to a specialist. Well, if you decide to repair a gas stove with your own hands, below are the methods in the form of instructions for this process:
- Initially, you need to light the faulty burner manually or using matches. If the gas burns properly, the flame will be blue and uniform. The faulty element burns with a yellow or sluggish flame. If gas combustion occurs only on one side of the burner, it means that the divider is uneven or deformed. The problem occurs due to a malfunction in the fuel mixture ratio, which is why the burner does not ignite from a spark. You can fix the problem with electric ignition yourself by cleaning the injectors and reinstalling the divider.
- All electrodes, ignited by a spark, are powered through the ignition unit, and in order to turn on the unit, you need to use different buttons. Try using the following ignition scheme: light one burner by pressing the button while holding down the second one. This method is relevant if the first part did not ignite manually when the gas tap was open, but a spark did not form. If this burner did not give a spark this time (one of the two clamped), we can conclude that the electric ignition switch is broken.
- If, when trying to light the hob, the ignition starts to crackle continuously, this may be due to the contacts of one of the switches closing. This can happen due to moisture or grease getting into the middle of the structure, as well as due to oxidation or bending of the contacts. In order to solve this problem with a gas stove, you need to clean and dry all the elements. Carrying out preventive maintenance will affect the return of equipment to serviceable condition.
The burner burns weakly or goes out
The burner of the table or oven burns weakly when the tap is open fully and the oven is cold. If there are problems with only one burner (the rest are working fine), then the reason is that the nozzle of the corresponding burner is clogged. The repair is simple. It is necessary to clean the nozzle (nozzle, injector). This is done with a thin wire or needle. First, you can try cleaning the nozzle without removing it. The nozzles of the table burners are installed under the burners (Fig. 1. A). The oven burner nozzle is installed on the side of the stove (Fig. 2. A). Getting to the oven nozzle is not always easy. Then you need to remove the bottom wall of the oven, unscrew and remove the burner (it is secured there with one or two screws). The nozzle will be accessible from the oven.
If you cannot clean the nozzle without removing it, you can easily unscrew it with a suitable key.
If all the burners burn weakly, then the reason is low gas pressure. The burner of an oven with a thermostat should be checked when the oven is cold. Otherwise, the thermostat may reduce the gas supply when a certain temperature is reached. This is, in fact, its standard function.
Design examples
Understanding the designs of gas burners, we will take the path of increasing power, this will allow us to better understand the material. And from the very beginning we will get acquainted with such an important circumstance as supercharging.
Mini from a spray can
Mini gas burner device powered by a spray can for refilling lighters
Pressurization - from an aquarium compressor. Since without the resistance of the sprayer under water it gives a noticeably pulsating flow, you need a receiver made of 5 liters of eggplant. Soda is not produced in these, so the receiver plug will need to be additionally sealed with raw rubber, silicone or just plasticine.
The stumbling blocks when repeating this design are, firstly, adjusting the gas supply. There are no problems with air - its supply is set by the standard compressor regulator. But adjusting the gas by bending the hose is very rough, and the regulator from the dropper quickly breaks down, since it is also disposable. Secondly, pairing the burner with the can - in order for its valve to open, you need to press on the filling fitting
The first thing that will help solve the problem is the node shown in pos. B; they make it from the same pair of needles. First, you need to select a piece of tube for the sleeve that fits onto the canister fitting with a little effort, and then, also with a little effort, push it into the needle cannula; it may need to be drilled out a bit. But the sleeve should not hang either on the fitting or in the cannula separately.
Then we make a clip for the canister with an adjusting screw (pos. B), insert the canister, put the regulator on the fitting according to pos. B, and tighten the screw until the required gas supply is obtained. The adjustment is very precise, literally microscopic.
Soldering torches
The easiest way to make a soldering torch is approx. by 0.5-1 kW, if you have any gas valve available: oxygen series VK, from an old autogen (the acetylene barrel is plugged), etc. One of the design options for a soldering torch based on a gas valve is shown in Fig.
Simple gas torch for soldering
Its peculiarity is the minimum number of turned parts, and even those can be selected ready-made, and quite wide possibilities for adjusting the flame by moving the nozzle 11. The material of parts 7-12 is quite heat-resistant steel; in this case, the relatively inexpensive St45 is suitable, because the flame temperature, due to the complete lack of profiling of the gas channel and ejector windows (which do not exist as such), will not exceed 800-900 degrees. Also, due to the fact that this burner is single-circuit, it is quite voracious.
Conclusions and useful video on the topic
It is not always possible to figure out how to clean a gas burner from scale and dirt the first time. The video below offers detailed instructions on how to do this:
So, the normal color of a gas flame is blue. If your burners burn differently, this is a reason to clean them or call a specialist for a more complete diagnosis. You shouldn’t delay this issue, because it’s not just the color of the flame that changes, but the composition of the combustion products.
The accumulation of carbon monoxide can lead to undesirable consequences. Therefore, gas safety issues must be addressed first.
Have you ever experienced a change in flame color? How did you act in such a situation? Leave your comments, share your experience, ask questions - the contact block is located under the article.
Scheme
A homemade soldering torch is extremely simple. Its body is a tube with a nozzle at the end. At the other end there will be a tap with a pipe for connecting the gas supply hose.
To make it easier to adjust the power of the torch, we will equip the nozzle with a divider.
Gas burner diagram