A technical hair dryer is a universal power tool that is used in the household for construction or repair work. With its help, they prepare surfaces for painting, bend plastic pipes of any diameter when installing water supply and sewerage systems, perform operations with heat-shrinkable materials, solder and perform many other works. If at the right time a construction hairdryer is not at hand, you can make it yourself. This task is especially relevant for those who do not have a constant need for this tool, so it is not economically feasible to buy it for one-time work.
Connection and setup
Changing the jets yourself is not difficult, but if the equipment is under warranty, then such manipulations can void it. If possible, it is better to consult a specialist. A professional will correctly change the jets and will be responsible for the safety of the further operation of the gas stove.
Connection to bottled gas
Have you decided to buy a new gas stove, but the old one is still functional? The best option would be to take it to the dacha and connect it to the cylinder. To do this, you just need to replace the standard jets with nozzles for a stove for liquefied gas, and also connect the cylinder itself to the stove.
The process of connecting bottled gas to the stove is technically simple, but you need to carefully approach all manipulations:
- Screw the reducer onto the cylinder, while installing the gasket.
- Screw the fitting onto the inlet pipe of the stove. And here you will need a gasket.
- Connect the gas hose to the stove using a fitting.
- Secure the hose with clamps.
- If the gas cylinder is installed outside the room, on the street, then a piece of pipe must be installed in the hole in the wall so that the hose does not fray.
Requirements for the hose:
- the length must be at least 1.5 m;
- the hose must be secured and motionless;
- it should not bend or break;
- You must use only a special hose for gas equipment;
- Replace at the end of its service life;
- systematically check the hose for damage.
Once the connection is complete, check the stove for leaks. Open the gas and coat all joints with soapy water. If a leak is detected, tighten the nuts, harnesses, and replace the gaskets. When replacing a cylinder, such a check is also necessary.
Watch this video on YouTube
Causes of soot
Currently, most gas stoves are connected to a main gas pipeline that transports methane to points of consumption. The jets of such devices are often equipped with a wide through hole.
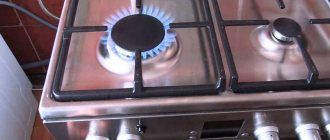
Remember, the specific gravity of a propane-butane mixture is four times higher than that of natural gas. That is why, after connecting standard units to bottled fuel, there is a sharp increase in pressure in the network, as a result, the color of the flame changes (from blue to yellow-red) and the stove begins to smoke.
Let's consider the main factors that contribute to the appearance of soot
Clogged jets (injectors). To eliminate the problem, you should clean the stove from dirt, and you must first disassemble the burner.
To avoid foreign elements getting into the gas passages of the device, which inevitably lead to clogging of the nozzles and the formation of soot, dismantling parts and cleaning the nozzle holes must be done with extreme care.
Poor quality burner material. Budget models of gas stoves are often equipped with a silumin flame divider. Intensive use of the device over a long period of time contributes to the gradual deformation of the alloy. This process is often accompanied by the formation of a significant amount of toxic smoke.
Remember, most often a malfunction occurs in the design of the most powerful burner. To eliminate soot, it is enough to replace the divider.
The gas stove nozzle does not match the type of fuel used. In urban networks, in contrast to cylinder tanks, the pressure of the energy carrier in the system is much less. That is why in standard furnaces, the nozzle holes are adapted directly to the pressure of the main gas. However, when the device is “powered” by a liquefied mixture, the diameter of the nozzles should be significantly smaller. Otherwise, when connecting a standard stove to bottled gas, heavy soot formation often occurs. To fix the problem, you should re-equip the kitchen unit by installing jets designed for propane.
Remember, drilling or caulking injector holes is strictly prohibited.
As a rule, it is almost impossible to obtain the required nozzle diameter at home.
Incorrect inclination of the burner passage can lead to uneven distribution of the gas flame, fuel getting under the hob of the unit, while it is important to take into account the fact that the accumulation of the air-gas mixture poses a potential threat of explosion, which absolutely cannot be allowed
Remember, smoking of the device may occur as a result of changes in the chemical composition of the main gas. However, in this case, solving the problem that has arisen at gas distribution stations is often quite problematic.
Connection and setup
Connection to the cylinder
To connect and configure the stove we will need the following materials and tools:
- Metal box for cylinder.
- Reducer with gasket for liquefied gas cylinder.
- Rubber gas hose (select the diameter for the reducer).
- Fitting with gasket for hose for stove.
- Set of nozzles.
- Screwdriver.
- Socket or open-end wrench 7 or 8 mm.
- Gas wrench for installing the gearbox and fitting (it’s better if you have an open-end wrench).
Install the metal box outdoors. It would be better if there was a lock on it
Screw the reducer to the cylinder, positioning it horizontally (this is important). Screw the fitting to the plate
In both cases, you can use a special sealing tape. It is sold in stores. Run the hose through a pre-made hole in the wall from the box into the house. Place one end on the gearbox, the other on the fitting and secure with worm-drive clamps.
What is a hair dryer
A hair dryer heats the air up to 60 °C and has limited power to avoid burning the hair and scalp. Its construction modification, designed for non-contact heating of parts and surfaces, can reach temperatures up to 650 °C and has greater productivity.
The construction modification of the hair dryer is designed for long-term operation. For this purpose, heat-resistant materials and systems for maintaining a constant temperature and controlling overheating are used in its manufacture.
The device comes with a set of nozzles that shape the hot air flow in different ways. Special attachments allow you not only to heat surfaces and remove old coatings from them, but also to weld sheet polymer materials and even solder polypropylene pipes.
Nozzles for a hair dryer
There are dozens of models of hair dryers of different functionality and from different manufacturers on the market. Despite this, the simplicity of the design of the device allows you to make it yourself.
Purpose and design of jets
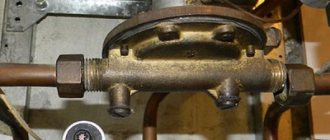
Of the three systems existing in a gas stove, the gas system, consisting of shut-off valves, pipelines, burners and burners, is the basic one. We wrote in detail about the structure of the stove in this material.
Regardless of the stove model, the composition of its components is the same, and together they serve to transport the gas supplied to the stove, mix it with air (for oxygen saturation), and dose it to the divider holes. On the gas path, the stop valve and burner nozzle, otherwise called a nozzle or nozzle, are responsible for the dosage and pressure of gas.
Operating principle and design of the nozzle
The gas supplied to the burner of a gas stove (the device where the gas-air mixture is formed) can be of different types - natural (methane) or liquefied (cylindered propane).
For efficient, stable operation of a gas stove, gas mixing and supply to the burner divider must be carried out evenly, at a certain speed. For this purpose, the design of the gas burner has an important part - a nozzle.
Let's take a closer look at what jets are in a household gas stove. This is a part of the burner designed to ensure that gas enters the burner with the appropriate pressure in the required volume. For this purpose, a calibrated passage hole is made in the nozzle, which determines the parameters of the gas jet that meet the conditions specified by the manufacturer.
These conditions correlate with the optimal power of the gas stove, determined by the most complete combustion of the gas consumed, indicated by the manufacturer among the technical characteristics of the equipment.
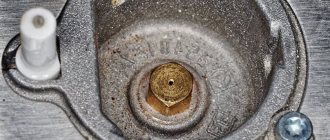
Diameter and thread of injectors
The injectors are bolt-shaped, equipped with an external thread and a hexagonal slot head. The through hole (nozzle), located in the center of the part, has a diameter calculated according to the type of gas, its pressure, as well as the method of supplying the gas-air mixture and the power of the burner.
For bottled gas, the nozzle diameter (with the same design and burner power) is needed a little smaller, for natural gas – a little larger.
If you install jets for natural gas on a stove connected to bottled gas, the pressure of the gas entering the burner will be greater, less air (and oxygen) will be captured, the flames will be noisy and long, have an orange color and smoke. In this case, the situation can only be changed by replacing the jets with parts with a smaller nozzle diameter.
In most models, the hexagonal slot of different jets has the same standard size, so to unscrew the replacement part of different plates, you need a 7 mm wrench.
The diameters of the holes, the pitch of the thread and the length of the part are different in the jets (for natural fuel - the length is shorter, for liquefied fuel - longer). The dimensions of the channel diameter are stamped on the head of the part (in hundredths of mm, much less often the marking is in mm).
Jets are replaceable parts. When stoves are sold, they are usually equipped with nozzles designed for natural gas. The components of many modern models of gas stoves also include nozzles designed to switch them to bottled gas. If this is not the case, then a set of jets can be purchased separately there, in specialized stores, or via the Internet.
The nozzles are made of brass. It is thermally stable, durable and corrosion resistant. During operation they heat up slightly. In the old-style stoves, the vertical nozzles were made of brass, and the base into which they were screwed was made of an aluminum alloy. Therefore, when replacing or cleaning the nozzle, you must be careful not to damage the threads.
If the documents for the unit are lost, determining the nozzle thread of gas stoves when purchasing replacement parts may cause some difficulty. However, determining the thread pitch of the nozzles of most plates is not difficult, since there are only two values - 0.75 and 1.0 mm.
Until 2009, jets for plates were produced with a thread pitch of 1 mm. Most new stoves produced since 2009 have nozzles with a 0.75 mm thread. To determine the size, simply apply a ruler with clearly visible millimeter divisions to the thread.
When converting the stove to gas from a cylinder, not only the nozzles are replaced. The gas reducer is also replaced.
How to calculate and wind a spiral for a hot air gun
To make a construction hair dryer with your own hands, you need to be able to calculate a nichrome spiral, that is, determine what length of wire of a certain cross-section will be required for the spiral made from it to produce a certain power. The duration of the continuous operating cycle of the tool, and, accordingly, the ability to perform large volumes of work with it depends on this indicator. Depends on the power and heating temperature. But it will also be influenced by other technical parameters of the hair dryer, for example, performance or volume of air supplied per unit of time (usually per minute).
Calculation of the required length of nichrome wire
Having decided on the required power of a technical hair dryer, and for home work it can be from 800 to 1500 W, you need to calculate how long the wire needs to be taken for winding the spiral. To do this, you need to perform a series of sequential calculations:
- Determine the current by dividing the power by the voltage. For example, if you need to get 900 W of power from a 220 V household electrical network, the current should be equal to I = P/U = 900/220 = 4.09 A.
- Calculate how much resistance the spiral should have. Why divide the voltage (U) by the current (I). We get R = 220/4.09 = 54 Ohms.
- The length of a nichrome wire with a resistance of 54 Ohms is determined from the formula R = ρ L / S, where R is the resistance, ρ is the resistivity coefficient of the material (for nichrome it is in the range of 1–1.2), and L and S - length and cross-sectional area of the wire. Let's say wire diameter D = 1.00 mm. Then its cross-sectional area will be equal to S = 3.14 · D2/4 = 0.785 mm2. Therefore, the length of the wire is given by R · S / ρ = 54 · 0.785 / 1.1 = 38.54 m.
The thinner the wire, the less it will be needed to make a hot air gun of the same power. The data obtained by calculation must be verified in practice. After all, the wire may have deviations in chemical composition or uneven thickness along its entire length. Before cutting it off from the coil, you need to measure the resistance of the measured piece with an ohmmeter.
Nichrome spiral winding
To wind a spiral from nichrome wire, you must first determine the length of the cylindrical rod or tube on which you will wind it. This is quite easy to do, knowing the diameter of the spiral and the length of wire that is required for this. Be sure to take into account that after winding the spiral rings are slightly springy, so its diameter will be slightly larger than the size of the rod .
Having decided on the length of the rod, you need to make a simple device. There are several types of such devices. For mechanized winding you will need:
- bench vice;
- electric drill with controlled speed;
- two wooden blocks with a cross section of 20 x 50 mm;
- coiling rod (mandrel).
The simplest device for mechanized winding of a nichrome spiral consists of the following parts: 1 - vice, 2 - wooden block, 3 - nichrome thread, 4 - mandrel, 5 - electric drill
Semicircular grooves are cut into the bars, forming a hole of sufficient diameter to accommodate a coiling rod with wound wire. The rod itself is inserted into the drill chuck, and a nichrome wire is attached to its end. The structure is clamped in a vice tightly enough to hold the bars and allow the wire to pass between them when winding.
For manual winding, the same principle is used, but instead of a drill, a wrench is used, and the free end of the mandrel is enclosed in a supporting surface with a bearing. You can slightly modify the design by removing the vice and supporting the rod at both ends for winding onto the bearing assembly.
Video: hand-winding a spiral of nichrome wire
When winding a spiral, you need to follow some rules:
- winding should be carried out without stopping and without loosening the thread tension;
- do not guide the thread with your hand, but only with wooden blocks, to avoid serious cuts;
- avoid bending the wire, which may not break immediately, but will very quickly burn out at the bend;
- you need to choose the length of the rod for winding with a margin and taking into account the possibility of securing it in a vice or on supporting surfaces.
When winding, the turns should be laid close to each other. It is better to then stretch the spiral to the desired length.
In order to make a construction hair dryer with your own hands, you do not need complex devices and tools. You just need to be smart and come up with the most convenient design possible. It is advisable that your homemade product be made taking into account the needs that arise, as well as with a view to using it in the future. After all, a hot air gun will certainly be useful to you in the future for construction, repair or installation work.
Replacing injectors
A specialist from the gas service will be able to change the jets efficiently and professionally. He has the necessary knowledge and qualifications to correctly adjust the gas supply when switching to another fuel. Especially considering that to use bottled gas it is necessary to additionally connect a reducer. But if you rely on the data contained in the correspondence table, then a home master can confidently cope with such work.
Below in the table you can find the required diameter of the gas nozzle depending on the fuel used.
On the burners
For those who decide to change the jets with their own hands, below is an algorithm of actions that must be followed:
- to gain access to the burner, you need to remove the top cover of the gas stove, which is secured with screws;
- then you should remove the tips with nozzles from the traverse with the burners, for which you first need to find the latch (outwardly resembling a clothespin), effortlessly squeeze its ends and carefully remove it;
- Next, the tip should be released from the socket and removed from the gas pipeline tube;
- an O-ring will remain in the tip, which needs to be removed from there and put back on the tube;
- the next step is to carefully unscrew the jets using a socket wrench counterclockwise (if the nozzle is stuck and does not budge, it is recommended to use a vice);
- and finally, new nozzles need to be screwed into each tip, and then reinstalled.
Advice! In order not to confuse old jets with new ones, you should check them according to the markings. The sizes of the nozzles are indicated there.
Due to the low pressure in the network, sealing the threaded connection is not required. How to lubricate the o-ring. How smoothly the burner will burn depends on how carefully and correctly the reassembly of the structure is carried out.
Important! It must be remembered that gas fuel is a source of increased danger
Therefore, it is imperative to follow all rules and precautions when working with gas equipment.
In modern gas stoves, the process of converting to use other fuels is even simpler. To get to the burners, you only need to remove the grates with the burners. After this, you can easily remove the tips and replace the jets with new ones.
In the oven
To change the jets in a gas oven, you need to follow these steps:
- open the oven door and the lower oven compartment completely;
- pull towards you and pull out the floor of the oven compartment;
- unscrew the fastenings of the gas burner and move it to the side;
a nozzle is hidden in a special housing on the left (if the stove has not been in use for long, the nozzle will easily unscrew from this position, and if the nozzle has become stuck, then you need to continue disassembling so as not to strip the thread);
remove the left side wall by unscrewing the three fastening screws;
Using a 17mm wrench, unscrew the nut and move the pipeline to the side;
unscrew the last two screws that secure the nozzle body to the wall;
- treat the stuck thread with kerosene or WD-40 and use a vice for convenience when unscrewing the jet (if necessary);
- install a new injector.
Then you need to carefully install the oven in the reverse order.
Nozzle shapes
The nozzle that forms the flow of hot air is the main working part of the device. Depending on the shape of the nozzle, it is intended for a specific range of work:
- Flat. Form a wide flat flow. Used for removing paint and film coatings, wallpaper, and directional deformation of plastic sheets.
- Round. They form a cylindrical flow and are used when working with copper pipes.
- Reflector. They have a rounded petal that forms an annular shelf. Used for bending plastic pipes
- Slotted. Create a narrow, flat stream of high intensity. They are used to weld sheets of plastic.
- Lateral. Used to remove coatings and dirt from window frames. They have a separate petal to protect the glass.
- Cutting. They create an even narrower flat flow and are used for cutting foam sheets.
- Ring. Create a flow in the form of a ring. Used for welding polypropylene pipes.
A self-made hair dryer can use all these attachments; it is enough to make its nozzle with the appropriate diameter. Nozzles can be made from sheet metal or with your own hands.
Alternative injector operation
The classic solution for kitchen stoves is a gas government-supplied device. It includes the burner, transport channels, shut-off valves and, indeed, the burner itself. Regardless of the model type and price segment, these elements remain unchanged.
The volume of supplied gas and its pressure are borne by the shut-off valve and burner. This tandem is most often called a jet and an injector, where the first is part of the second. Both liquefied gas - propane (in cylinders) and natural gas - methane (pipeline) can be used as fuel.
For correct operation of the equipment, clearly adjusted gas supply proportions are required. So, fuel must flow at a certain speed and in equal shares. This is exactly what a jet in the system is for.
In addition, you cannot choose injectors without taking into account the type of fuel. For example, an element designed to work with propane will no longer smoke dishes and emit harmful substances if it is installed in a system operating for methane.
To maintain the required volume of gas and pressure in the nozzle, an adjustable well is provided. On new slabs, the elements are calibrated to optimal/universal measurements. The latter are calculated based on the power of the equipment and the maximum rate of fuel combustion.
Where to buy the kit
Internal manifold of a gas stove. Automatic devices for gas stoves. Maintenance of household gas stoves
Of course, every user is interested in the question: where can one purchase such a set, and how much does this pleasure cost? It all depends on the brand of your meal prep aid. Jets for popular brands of gas stoves can be purchased at any specialty store that sells spare parts for gas equipment. For rare ones, you can order them on the manufacturer’s official website or at a service center.
Approximate prices for injectors:
- Belarusian plate Hephaestus - 150 rubles;
- Ariston or Indesit (liquefied gas) - 200 rubles;
- Zanussi - 230 rubles;
- for a stove from Gorenje from Slovenia - 700 rubles.
All prices are for a set of injectors or jets. Very often, users are confused about the names of the parts of a gas stove: burners with flame dividers are installed in the upper part of the stove, they look as shown in the photo - they should not be confused with burners.
Purchase and replacement of jets
When purchasing a gas stove, do not forget to check the availability of suitable jet kits. If you miss this important point and direct the gas through unsuitable nozzles, you can get unstable operation. The burner will smoke, periodically go out, or will not be able to light up at all when ignited.
If for some reason the stove does not come with jets that match the type of gas, you can easily purchase them separately. Information about the diameter of the jets must be indicated in the instructions for the gas appliance.
Table of average jet parameters for most gas stove models:
| Burner type | Gas type (pressure) | |||
| NG G20 (20mBar) | LPG G30 (50 mBar) | NG G25 (20mBar) | LPG G30 (30 mBar) | |
| Small burner | 0.75 mm | 0.43 mm | 0.70 mm | 0.50 mm |
| Middle burner | 0.92 mm | 0.55 mm | 0.92 mm | 0.65 mm |
| Large burner | 1.15 mm | 0.60 mm | 1.15 mm | 0.75 mm |
| Oven burner | 1.20 mm | 0.65 mm | 1.15 mm | 0.75 mm |
| Grill burner | 0.95 mm | 0.60 mm | 0.95 mm | 0.65 mm |
Replacing (installing) the nozzle will not be difficult - you just need to unscrew the old one with a wrench and screw the new one in its place. Only in some cases may additional adjustment of the primary air supply and adjustment of the minimum stable flame level be required.
Simple design of a homemade construction hair dryer
Before you start making a hair dryer with your own hands, you need to make drawings or at least a sketch. This will allow you to avoid sizing errors and repeated rework.
Frame
Making a hair dryer with your own hands starts with the body. The high temperature developed by the heater will not allow the use of plastic for it. Therefore, it must be bent on a blank made of metal sheet and welded by contact welding or connected with rivets. Soldering will not work - at the operating temperature of the hair dryer, the tin will melt.
Some craftsmen suggest making a body from high-temperature glass, for example, from the bulb of a high-power halogen lamp. You should not saw it, it may crack. To process glass, use cotton thread dipped in kerosene.
Drawing of a homemade case
The thread is wound along the cut line, set on fire, and immediately after burning, the flask is lowered into a jar of water. An even break will appear along the thread line.
Heater
This is the most important unit; it must be treated with all possible attention and care.
The best material for the core is mica plates. They provide free passage of air flow. The easiest way is to take ready-made ones from a faulty hair dryer.
When calculating the number of spiral turns, it is better to provide two separate sections of different lengths, connected alternately or together. This way it will be possible to provide two- or three-stage temperature control.
First you should measure the resistance of a meter piece. Based on it, you need to calculate the length of the wire for the heater. Based on the length obtained when calculating, winding is carried out directly on a structure made of mica plates, or a spiral is formed on a stick with a diameter of 5-8 mm. Next, a spiral is wound onto the mica.
After winding, the multimeter should show resistance:
- for the first spiral: from 80 to 100 Ohms;
- for the second - from 200 to 250 Ohms.
The spiral wound around the insulating structure should be placed in the body of the heating element in such a way that there is 4-6 mm left to the outer walls.
Important! When winding and installing, make sure that the turns do not touch each other. When winding, it should be taken into account that when heated, the wire expands and sags. Therefore, you need to wind it with a little tension.
Fan
This unit can be taken from a household hair dryer or from a powerful computer power supply. Check that its operating voltage is 220 V AC. It is also possible to independently manufacture fan blades from tin strips.
If the control circuit of a household device is working properly, you can also borrow a speed controller from it.
The fan must be mounted at the greatest possible distance from the electric heater.
Be sure to use thermal insulating gaskets made of fluoroplastic or textolite.
Lever
If a broken household appliance was chosen as the basis, then it would be reasonable to use the handle with switches from the same one. The main thing is not to forget about thermal insulation of the fastenings to the heating element body. The fastenings also need to be placed as far as possible from the high temperature zone.
If the entire device is made by hand, then it is better to make the handle from wood or thick PCB.
Homemade soldering gun with wooden handle
After attaching the handle, care should be taken to thermally insulate the heater body and air duct. Typically, asbestos or fiberglass cloth is used, strips of which are wrapped around the body. Thermal insulation will help avoid burns from accidental touch and reduce unproductive heat loss.
Electrical wiring and switch
When making an electrical circuit with your own hands, you need to calculate the electrical parameters of the device. When using an 80-ohm coil and a voltage of 220 volts, the current will not exceed 2.8 amperes. The electrical power developed by the device will be about 550 watts. Wires and switches must be taken with a double current reserve, in order to avoid burnt contacts and premature failure. When using two heating modes, you will need a three-position switch, the extreme positions will be switched along one of the spirals, and the middle position will be left in the “Off” state.
The middle pair of contacts is supplied with input voltage, and the outer ones are connected to the spirals. In industrial-type devices, the heater is connected in series with the fan motor. This is done in order to prevent the coils from turning on without blowing air over them. A structure that you assemble yourself can be made simpler. One switch supplies voltage to both the heater and the motor. In any case, if the fan does not turn on for any reason, the device should be turned off immediately.
Makita hair dryer diagram
The construction hairdryer, assembled with your own hands, is ready for working tests. When you turn it on for the first time, you should listen carefully and sniff to see if there is a short circuit or a burning smell.
Oven door won't close
The most common oven breakdown is poor closing of the oven door. It occurs most often when there is a small child in the house who simply sits on an open door, as a result of which the brackets holding this part bend and do not fulfill their function of pressing the sash.
To repair the oven of a gas stove Indesit, Brest 1457 or Flama stove, you will need to disconnect the door from the unit. To do this you need:
Since the door is held on hinges equipped with latches, they must be bent on both sides of the unit. After this, you must carefully close the door until it stops against the latches. Next, you need to pull the door slightly towards you and up, after which it will easily detach from the stove. To get to the brackets when repairing a Gorenje gas stove or when repairing a Darin gas stove, as well as a Brest unit, you need to remove the side walls of the oven. After removing the sides, you will see the brackets that are responsible for the clamping. The brackets must be removed from the gas stove oven and visually determined in which places they have become deformed
Using a hammer and pliers, you can try to straighten the deformed areas. But if this part is broken, it must be replaced with a new one. Stores sell different types of spare parts for repairing ovens and stoves. Select brackets that match the model of your gas stove.
To summarize, we can say that only the above faults can be eliminated with your own hands. All types of troubleshooting of a gas stove related to the disconnection of gas supply tubes and hoses must be carried out by a gas service employee, after which he draws up a report on the repairs performed. The same rule applies to connecting a gas stove to the mains - it must be carried out by a specialist. To carry out independent repairs, it is a good idea to familiarize yourself with how a gas stove works.
Possibilities of a hair dryer
Before you start making a device with your own hands, it would be wise to consider what capabilities this device has. The most common use of the device is in construction:
- Softening and removal of old paint and film coatings, plastic decorative elements without the use of strong and hazardous solvents and with minimal mechanical impact.
- Bending plastic pipes without the use of bulky pipe benders, anywhere, of any diameter and at any required angle.
- Heating and melting bitumen, wax, resins in preparation for their application.
- Drying of building materials and coatings.
- Soldering copper pipes with tin solder.
- Soldering of polypropylene pipes and fittings.
There are no fewer options for use when repairing and eliminating household troubles with your own hands:
- Unscrewing stuck nuts.
- Defrosting heating and water supply systems.
- Thawing frozen locks, doors, windows.
- Soldering a plastic hose.
- Removing stickers, labels, etc.
- Drying walls and ceilings after a flood from neighbors.
- Reliable ignition of the grill, regardless of weather conditions.
Welding with a construction hair dryer
Hair dryers are also highly valued by car service workers. They are used to remove old paint and straighten dents on bumpers and plastic parts of the car body.
Jet maintenance
For most popular models from well-known brands, there is no need to remove the nozzles for subsequent cleaning. It is enough to remove the burners to open access to contaminated parts. In some cases, it may be necessary to dismantle the hob if it is a closed type.
A regular needle or copper wire is suitable for cleaning the nozzle. We pass the tool into the hole and rotate it around its axis. When the needle has reached the bottom, turn on the gas and only then remove it. Thus, the jet from the nozzle pushes dust and fine dirt out. Two to three seconds is more than enough to clear the air.
Cleaning the nozzle
If there are problems with on-site maintenance, or the design of the stove does not allow for this, the nozzle must be completely removed, cleaned, rinsed and dried. In a good half of cases, the detailed procedure is described in the operating instructions for the equipment.
Required tool:
- jets – 8 mm wrench (7 mm for propane);
- burner fastening – 14 mm;
- pipeline nuts – 17 mm.
On some specific slabs, the fastening may differ from that indicated. As a universal option, you can use a wrench with a variable head diameter.
Tools and materials
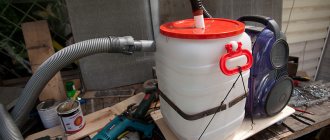
A home craftsman with average plumbing and electrical skills is quite capable of making the device with his own hands. It is not very suitable for long-term professional use, but it can warm up a frozen pipe or remove a layer of old paint.
As a basis for assembling the tool yourself, you can take an ordinary household hair dryer. You will have to replace the heating element in it and throw away all the plastic parts - because a hair dryer will heat up much more. The case will have to be ceramic or made of metal.
To make the device you will need:
- nichrome spiral for electric heater;
- metal plates for fan blades;
- copper cable with a cross-section of at least 5 mm2;
- rubber tube for heat protection of the handle
- a piece of thin-walled metal pipe for the nozzle.
Homemade hair dryer
To make a hair dryer with your own hands, you will need a drill, a soldering iron, hand tools, a vice and a multimeter.
Replacing jets
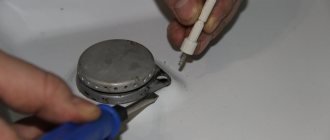
Remove the burners and install new nozzles for each of them. In order not to make a mistake when replacing nozzles, make a sketch of the plate. Write down the nozzle markings for each burner and refer to it during operation. On some stoves, you need to remove the top panel to get to the jets. They are usually attached with screws using a Phillips or straight screwdriver
Using a socket or open-end wrench, carefully unscrew the injector and install the prepared replacement. Proceed in the same way with the remaining injectors.
In the oven, you need to remove the bottom panel to gain access to the jets.
Please note: bronze is a soft material. Too much force on the wrench may strip the threads.
Having finished the work, screw the removed panels into place, install the burners, each in its place.
We changed the nozzles for the gas stove. Do the test. Open the valve on the cylinder. To comply with safety regulations, use a soap solution to check the quality of connections on the gearbox and fitting. Apply a soap solution with a brush to the junction of the rubber hose and the gearbox. ,
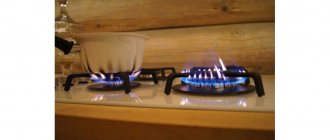
If bubbles appear, tighten the clamps and check again. Do the same procedure with the joint of the fitting. Do not neglect safety when working with gas appliances. The consequences can be severe. Light the gas on the burners one by one. If the flame is blue, without yellow or red tints, then the job is done well.
A little about the connector
I used COM dad-mom. From somewhere on the boards. I wired it like this: two groups of three contacts each for heating (more than enough for 5 amperes), one for the fan. Then I fixed it with hot glue and insulated it.
Thus, the power supply is stabilized (if it is not operating at maximum voltage), the fan power supply is stabilized, and therefore the outlet air temperature is stabilized.
I'm happy with the design. For amateur purposes it is quite enough. At maximum heating, the metal pipe in the area of the handle heats up quite noticeably, but the hand is quite tolerable. During normal operation, the pipe is simply warm. Those. nothing will melt there. The air flow through the tube does a good job of cooling. And it is advisable to place the air duct like mine, closer to the handle. To prevent backflow of air from the hot zone. The hairdryer was tested by turning off after maximum heating. I was simply deprived of power. Along with a fan. Nothing melted.
For beginners: to start constructions of this kind, you need to get into bins, stashes, etc. and contemplation of previously accumulated wealth. And with a high degree of probability you will find something that can be used quite easily. What I mean is that the design does not have to completely replicate mine. Good luck. 03/05/2017. Trishin A.O. Komsomolsk-on-Amur.
Ignition type
All burners can be divided according to the type of ignition:
- Electronic type. They do not have a constantly working igniter. Requires electricity to operate. Electric ignition is one of the most convenient inventions for modern heating units. Thanks to him, the operation of the stoves has become as comfortable as possible. Electric ignition makes it possible to light the burner flame safely, without using available wicks or lighters.
- Burners with piezo ignition. No electricity needed.
Sometimes special working conditions are required, for example, burners are placed in a sauna stove, which must distribute the flame well. These are dividers or ordinary distribution tubes. This is how kitchen gas ovens work.
The fuel consumption passing through the burner can vary widely and depend on its design.
Gas burners for your furnace should be safe and energy efficient. This can be achieved if all technical requirements are met. Self-indulgence in this matter can only do harm. Therefore, the installation of gas burners must be carried out by specialists.
What kind of gas is in household stoves? Jet for a gas stove: replacement features
The nozzle for a gas stove is a very important element that requires replacement from time to time. Most often, this procedure is performed if it is necessary to change the type of fuel. For example, if the old stove should be taken to the dacha and connected to a cylinder stove, although it has always been running on natural gas, then the nozzles should be replaced. If this is not done, the device will begin to smoke heavily and fuel consumption will be much higher. The fact is that the presented element has a different cross-section, which is intended for one or another type of flammable substance.
If the nozzle for the gas stove is not replaced and it is left in the apartment, then the burners will work very poorly. The first signs that a new nozzle needs a new nozzle are smoking or low heat. The element is a small bolt that has holes of different diameters in the center. For example, for propane a nozzle with a large hole is required, for propane - with a small one.
Replacing the nozzle for a gas stove is quite simple, but during operation all safety rules must be followed: the supply of flammable substances must be turned off. Now you can remove all the burners and use a special wrench (7 mm) to unscrew the nozzles. This must be done one by one. Each element has a corresponding number.
In order to replace jets for gas stoves in older models, you must remove the top part of the device. There is no other way to unscrew the bolts. The process of assembling the plate is done in reverse order.
In addition to nozzles, the device is equipped with special nozzles that are installed in each burner. Thanks to them, the gas is atomized. Gas stove nozzles have different diameters, depending on the size of the burner. In addition, the size of the presented element depends on what kind of combustible substance is used. If the type of gas changes, then new injectors should be installed.
Modern stove models can be sold with two sets of blowers. It should be noted that not all injectors can be easily found on sale. Although, if your stove is from a well-known manufacturer and you go to a specialized store, then there should be no problems finding it. If the purchased elements do not fit, then you should not try to reduce or increase the diameter of the holes yourself. This can only be done efficiently in a factory environment. In addition, you may make a mistake with the angle of inclination of the passage channel, which will lead to the wrong direction of the gas stream. In the worst case, an explosion may occur.
If stores do not have suitable equipment, then you can contact manufacturing plants or service centers. To replace the injectors you will need a socket wrench. The procedure itself is not difficult. The new elements can then be adjusted.
So, both the nozzle and the nozzle for a gas stove are mandatory elements, without which the device will not be able to work. It is advisable to choose those spare parts that are intended specifically for your device.
A small part of any gas stove, without which it cannot work properly, is the nozzle. They have to be changed very rarely and only when the incoming blue fuel is changed to a liquefied version from cylinders instead of stationary gas. You can replace the nozzles in a gas stove with your own hands, only to do this you need to know all the nuances of dismantling and visually distinguish the nozzle from other parts.
All modern gas stoves can operate on natural or main gas, as well as from a replaceable cylinder containing liquefied gas. When propane is used, it is necessary to change not only the jets on the stove, but also the gearbox.
The jets are made in the form of a small bolt with a thread and a hole in the head - through it gas is supplied to the stove burner. Next, in the burner it is mixed with air, this mixture is ignited, an open flame is formed, on which food is cooked.
Nozzles are available in two types: for natural gas
the hole is slightly larger in diameter, and the part itself is shorter and visually different;
For liquefied gas,
bolts with longer threads are made.
This is what the jets look like - a complete set for the Hephaestus gas stove:
Design and design drawings
The basic design of a hair dryer is similar to the design of a household hairdressing device. The main nodes are:
- Housing with handle, air inlet and nozzle.
- Electric heater.
- Fan.
- Diagram and controls.
The operating principle is also very simple:
- Cool air is drawn in by a fan through openings in the rear.
- Next, the air is forced through an electric heater. There the air heats up.
- The heated air is released under pressure through the nozzle. The nozzle gives the heated flow a given shape.
- The control system maintains a constant heater temperature and engine speed.
The construction dryer diagram includes the following main blocks:
- voltage transformer;
- electric motor control unit;
- electric heater control unit.
The performance of the device is determined by the engine power and is in the range of 120-650 liters per minute.
Construction hair dryer design
Construction hair dryers offered on the modern market, depending on the configuration of a particular model, are equipped with some additional functions, such as:
- Performance management system.
- Stepwise adjustment of heating power.
- Smooth temperature control.
- LED and liquid crystal display of main operating parameters.
Most of these additional functions are only worthwhile in highly specialized applications.
Important points when choosing a nozzle
Sales consultants can help you choose a gas burner. But as you know, rely on others, but don’t make a mistake yourself. Therefore, it is recommended that you familiarize yourself with a number of points before purchasing.
Features of the premises. First of all, this is the area. If it is less than 12 sq. m., then it would be more reasonable to buy a supercharged type, if more - atmospheric
Ventilation also plays an important role. If the speed and volume of air circulation leaves much to be desired, it is worth purchasing a forced-air gas burner. Oven type
If the stove runs only on gas, you need to purchase an atmospheric version. In other cases, the supercharged variety is perfect. Power. The expression “the higher the power, the better” does not apply here. This value should be calculated based on the area of the room. So, for 10 sq. m. requires 1 kW of energy. Manufacturer country. When choosing gas equipment, you should remember that foreign products are of higher quality and more durable than domestic ones. Therefore, first of all, it is recommended to pay attention to American, German and Italian injectors.
Purchasing a gas injector will first of all help strengthen your financial situation, and only then free you from constant running around with firewood or coal. A gas stove is a very convenient and practical invention, but you must remember about the explosiveness of this fuel. Therefore, you should not purchase the cheapest and low-quality products.
please
Installation of an air duct for a kitchen hood. An air duct is an element connecting a kitchen hood to a ventilation shaft. Its purpose is to remove exhaust air generated during the cooking process outside the room.
Installing an air conditioner: recommendations for choosing a location for the unit and the sequence of work. The key to reliable operation of the air conditioner over a long period of time is the correct installation of it, as well as the quality of the components from which the structure is made.
Design and principle of operation of water heaters. Furnishing a home with an autonomous hot water supply system involves installing a device for heating water. As a rule, the way the equipment is operated is directly influenced by the design features of the water heater.
Microwave oven design. A universal device for quickly preparing a hot sandwich, diet food without oil or heating ready meals is a microwave oven. Thanks to its many advantages, the device has gained wide popularity all over the world and, rightly so,
Possible faults
Summarizing the story about the design of LPG injectors, it would not be amiss to pay attention to their possible malfunctions. In fact, there are few of the latter, or rather only three:
- The first option is that the injectors or individual ones have failed. The problem is solved by disassembling, cleaning and, if possible, repairing faulty elements. If this approach does not produce an effect, then you will have to install new nozzles;
- The second option is that there was a malfunction in the injector-control unit system. The malfunction can be eliminated by “dialing” the network and setting up the equipment “newly”. Often, a problem of this nature is solved by contacting an HBO specialist;
- The third option is that the injectors are simply clogged. The easiest way to get rid of this “breakage” is to simply remove the dispensers, disassemble them and clean them thoroughly.
Note that on older generations of gas equipment (up to 3), problems may occur with confrontation between the car’s mono power systems and gas equipment. It seems possible to solve them by introducing an injector emulator into the LPG system (the most preferable copy is from BRC). On most third and all subsequent HBOs, the conflict between mono power systems and equipment is resolved automatically in the control unit, so a similar equipment failure cannot happen with them.
Any malfunction of the injectors is indirectly manifested by the following symptoms:
- instability of the motor;
- loss in power and dynamics;
- inability to switch to gasoline;
- increased fuel consumption;
- failures in engine operation when driving.
In general, the most important provisions on the issue being considered today have been successfully addressed. We hope the material presented above was useful to you. Good luck on the roads!