Purpose
The diaphragm is installed in the water unit of the gas water heater and is responsible for separating the cavities of the water regulator. The main function of such a membrane is to regulate water pressure. When it bends, it leads to a displacement of the rod, which opens the gas supply to the burner.
How to change the membrane fabric of a geyser: reasons + instructions for repairs
Heat exchangers for home use, especially gas water heaters, are popular everywhere. Devices of a similar type are mainly used to organize hot water supply in a private home where there is no centralized supply of hot water.
Like any equipment, gas water heaters over time require replacement of some parts that are subject to wear during operation of the equipment. Very often, such a part of the gas water heater becomes the membrane fabric of the water reducer. How to change the membrane fabric of a geyser and whether this work can be done with your own hands will be discussed in this article.
Purpose and structure of the water unit
The membrane is an important part in regulating the gas supply. To understand its purpose and operating principle, you should study in detail the structure of the water block of the column, of which it is a structural element. This knowledge will help when replacing the membrane, because in order to get to it, you have to dismantle the entire assembly and disassemble it.
We also recommend that you become familiar with the general structure of a geyser to make it easier to find a water block in its design. But first things first.
Water reducer device
One of the components of almost any gas heat exchanger is a water reducer (water unit - WU, water regulator). It is designed to regulate the uniform supply of water and gas. The practically designed shape of the regulator (in common parlance – “frog”) facilitates compact placement of the unit in the speaker body. The technically simple device works automatically.
The functions of the gearbox are as follows:
- starting and stopping the operation of the gas water heater when opening/closing the tap;
- regulation of water and gas supply;
- protection of the column from overheating when there is insufficient water pressure.
The design of the gearbox is well thought out and visually uncomplicated. The body is made of brass, polyamide (containing fiberglass), silumin or plastic.
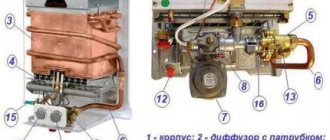
Parts of the water unit: cover (1) and base (2), connected with screws; plate (4); rod that opens/closes the gas valve (5); membrane (6); Venturi fitting (7); gland nut (8); water outlets (9); adjusting screw (10); mounting screws (3); strainer (11); retarder ball (12)
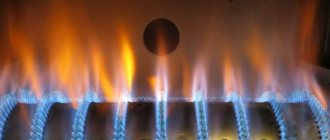
Operating principle and importance of the regulator
The hollow cavity of the gearbox, divided in two by a membrane, is filled with water. Water enters the cavity from the water supply. From the lower part, passing through the Venturi fitting, it enters the upper compartment through the bypass hole. However, water coming from the water supply to the lower part always presses on the membrane with the force of water pressure in the pipeline, and in the upper part the pressure force changes, depending on whether the water flows through the heat exchanger.
The fact is that in pipelines that have narrowed sections, the pressure of the flowing liquid in a bottleneck decreases. When the tap is opened and water passes through the Venturi fitting, the pressure in front of the local narrowing (nozzle) of the fitting increases.
Due to the increase in flow velocity in a bottleneck, the pressure decreases both in the fitting and in the upper cavity of the frog. This is similar to flattening the end of a garden hose. With a difference in the diameters of the nozzle of the fitting (0.3 cm) and the main chamber (2 cm), the pressure drop reaches 1 atmosphere. This is enough for the membrane to bend upward and press on a plastic plate rigidly fixed to the axis of the rod. The rod presses forcefully on the gas valve, causing the valve to open and gas to flow to the gas burner.
When the membrane is lifted, water from the upper compartment begins to exit through the bypass channel, where the steel retarder ball is located. The ball, moving to the right, partially blocks the channel, so the gas is turned on and supplied to the burner smoothly. Smoothness is adjusted using an adjusting screw.
The Venturi nozzle is located in the outlet pipe (on the right side of the frog). This is a local narrowing that provides a pressure drop when the tap is opened. A clogged fitting must be cleaned
When the hot water (HW) tap is closed, the flow of water stops and the pressure in the Venturi nozzle is compared with the pressure in the cavity under the membrane. Due to the action of the springs, the rod together with the plate moves down, and the membrane returns to the middle position.
The gas valve closes automatically. The gas valve is turned off quickly, since the reverse flow of water in the culvert moves the ball to the upper cavity (to the left) and ceases to impede the flow of liquid. We recommend that you look at the information on what to do if the gas valve does not work.
If the hot water flow rate is less than 2-3 l/min, the required pressure drop does not occur, and the springs do not allow the rod to open the gas valve at all or enough to fully heat the water. Also, the necessary pressure difference does not arise when the integrity of the membrane is violated.
The water regulator, based on the principle of operation of the Venturi nozzle, is a safety device, as it allows the water heater to be turned on only when there is sufficient water flow through the heat exchanger. Thus, the reducer automatically protects the geyser from overheating.
The overflow hole connects the Venturi nozzle and the upper cavity of the frog. This hole must be left open when installing the diaphragm for the gearbox to operate correctly.
Replacing membrane fabric in a dispenser running on Neva gas
Replacement of the membrane fabric of the water unit of the geyser Neva 4510, Neva 4511, Neva 4513, Neva 4011
So ! Let's start with something very simple. (The topic is important for all gas-powered speakers).
The weakest point in any gas-powered column is the membrane fabric. Why? Since in 99% of cases the following happens.
You open the tap, but the dispenser does not start. The first and most possible reason is that the membrane tissue has burst. You opened the tap, but the column does not produce a flame at full power. The flame is “small” and the water does not heat well. This is due to the fact that there is not enough gas supplied to the burner. The membrane fabric does not press hard on the rod, which is necessary for its full opening. The first and most possible reason is a crack in the membrane tissue . You opened the tap, but the column does not stop working unstably. It often turns off or turns on only the 3rd or 5th time. The first and most possible reason is stretched over time .
This means that before you panic, you should always start with replacing the membrane tissue. In general, we advise you to simply change the membrane fabric once every 2 years, without waiting for the troubles described above. What's the matter?
Membrane fabric is one of the important elements during normal startup of the column. Why? When you open the tap, the flow of water creates a vacuum behind the membrane fabric, and the membrane fabric bends. For its part, it moves the rod, which opens the gas supply to the burner, but it does not stop working; it is all purely mechanical, which means it is prone to wear.
Price issue. The cost of membrane fabric for any geyser starts from 200 rubles. up to 500 rub. We purchase membrane fabric. When we have a brand new membrane fabric in our hands, to replace it we will need: a pair of screwdrivers, 8 mm and 24 mm open-end wrenches, a glass (exclusively for plumbing specialists) and 30 minutes of time.
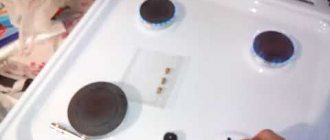
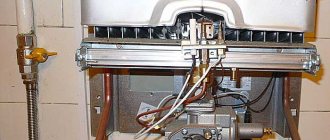
To keep your eyes from wandering, first of all take a look at the photo of the NEVA 4511 column with a water-gas unit installed in the middle. Red dots mark screws and nuts that need to be unscrewed to separate the water part and further work with it. When your eyes get more or less accustomed, let's move on to the first point.
1. Before us is a water-gas unit operated in gas water heaters NEVA 4510, NEVA 4511, NEVA 4513. These units have a tiny difference between themselves, but this will not interfere with the matter. First, a couple of situations to understand what it is. It consists of two halves: a gas unit (this part is gray) and a water unit (this part is yellow). We take a “plus” (phillips) screwdriver and separate the gray part from the yellow one.
2. The 3rd photo shows how they are fastened together: with the help of two screws, simply squeezing this “cylinder in lubricant” of the water unit from the ends. Let's look at the water part. Photo 4. Here, where the lubricant is, do you see a hole on the cut of the cylinder? It is from this hole that the rod comes out, which opens gas access to the column. Actually, when the tap is opened, it (the rod) is pushed by our membrane fabric.
3. To get to the membrane fabric, you need to carefully unscrew all six screws and the water unit will open in two, like an oyster.
4. If you carefully examine the two resulting halves, it is not difficult to guess that the membrane fabric is this black elastic band lying in the right half. The membrane fabric, as you can see, has an eyelet that fixes its position. Carefully remove the membrane fabric from its containing halves.
5. What are these other little parts in the middle? One of them is a plate with a rod, the second is a spring. Our membrane fabric presses on this plate with a rod. The spring returns the rod to its previous position when the tap is closed, gas access ends and the column turns off. If everything in the middle of our oyster is dirty, we take out the plate and take out the spring.
6. Clean and wash everything in the middle of this yellow saucer thoroughly. We replace the membrane fabric with a new one. Remember about the eyelet of the membrane fabric, which fixes the position correctly. Remember about the sides of the membrane fabric. It should, as it were, hug the plate with the stem with its own depression. Then everything will work correctly.
Now we scroll everything in the opposite direction (both the drawings and the screws). Open the tap. And finally, we wash ourselves. Membrane fabric section.
Where is the membrane located and how to get to it
To remove the membrane and check its condition, you need to find the entrance to the water and gas water heater. Depending on the type of water heater, there may be a fine water filter in front of the water-gas unit. If it is not there, then you need to install it. This does not have to be done in the housing at the entrance to the column. It is best to install a coarse and fine filter at the water inlet into the apartment. Thus, all water entering the apartment will be purified.
Water block disassembled
Remember: The fine and coarse filter traps large and small particles of sand, silt and other impurities in the water. It cannot protect the water-gas group from dissolved calcium salts. The mesh filter, which is equipped with a unit for receiving water, often becomes clogged with rust or debris from the incoming water. Rinse it under strong running water.
Advantages
Neva 4510 has several strengths:
- affordable price;
- low cost of spare parts and repairs made with their help;
- small dimensions;
- company warranty for 24 months;
- ability to operate with low liquid pressure;
- wide availability of service departments.
Types of membranes for columns
The gas water heater diaphragm is a round gasket made of black rubber or silicone. Depending on the speaker manufacturer, the membrane may contain hard plastic or metal elements. Some diaphragms are reshaped.
Gas water heaters made by European manufacturers use diaphragms that are difficult to counterfeit. For example, the Ariston Fast GIWH has a so-called “figure eight”, while the Electrolux GWH or Vaillant MAG has a diaphragm with a special eye. You can only purchase such a gasket at an official service center. A frog membrane for a European water heater costs from 200-500 rubles. For comparison, a repair kit for the domestic NEVA Lux 5013 (5016), together with plastic parts, costs only 150-200 rubles.
If we talk about the material from which diaphragms are made, there are several types:
- The black rubber membrane is a classic look. Most manufacturers prefer to make gaskets from black rubber. Such a diaphragm will last 7-8 years, provided that there are no defects.
- Silicone membrane - guaranteed to work for 10-12 years. On the market you can find gaskets for domestic and Chinese equipment. Owners of European water heaters will have to make do with black rubber diaphragms.
- Red membranes - low quality material is used. The rubber breaks after turning on the speaker several times. Suitable as a temporary measure. It happens that the necessary gasket has to be ordered directly from the manufacturer. Having installed the red membrane, you can continue to use hot water while awaiting delivery of the original part.
You can fully find out which diaphragm is used in the technical documentation supplied with the instantaneous water heater or after disassembling the water regulator.
Required water pressure
The minimum pressure required to turn on the selected column is indicated in the equipment documentation
Paying attention to this parameter is especially important when installing a heater in old houses built in the 60-70s, since the pressure in their pipes is often insufficient for the heater to operate. If the manufacturer states that the minimum requirement is a pressure of more than 0.15 bar, then in an old building there may be problems with the functioning of this column
Another point is the ability of the column to withstand the hydraulic shock that periodically appears during water supply. This is the name for a short-term increase in pressure in pipes, which can cause leaks and damage to connections. With a value in the range of 11-12 bar, the column is able to withstand such changes.
Signs of membrane failure
How do you know when it's time to change the rubber diaphragm? You need to pay attention to:
- The pressure force of gas and water in the system. Open the tap and count how many liters are consumed per minute. Normally there should be at least two to three liters. The gas supply can be calculated visually by looking at the strength of the fire.
- Flame location. In devices with wick ignition, the fire should burn from the edge of the burner and be at least 3-5 centimeters high. Does not match? Then check the jets for blockages. After cleaning, look at the flame again. If the situation does not change, the problem is in the diaphragm.
- Equipment with piezo ignition should click when the button is pressed. This means that the diaphragm has worked. If you do not hear any sounds, the part may be damaged or torn.
- In some models, a rod that controls the operation of the control unit will help determine the breakdown. Remove the protective cover and open the water. If the rod does not move, the diaphragm needs to be replaced.
Once you have found the breakdown, you need to select the correct replacement part.
Peculiarities
The Neva 4510 geyser evokes conflicting feelings among consumers. It is made by the Baltgaz concern, and there are no cheaper offers in its line of gas-fuelled instantaneous water heaters. But at the same time, components supplied from China are used in production. The name of the model briefly describes its technical characteristics, which correspond to those included in the product passport. Thus, the numbers “45” indicate the series, “10” the amount of water heated per minute, and sometimes the letter “M” is also present, indicating deep modernization.
The specificity of the system in comparison with other products under the Neva brand is that it is powered by a pair of batteries. Smooth modulation of fire is not provided. That is, a change in water pressure in the supply channel will be reflected in its temperature after heating. You will have to deal with this problem manually. The front panel is equipped with a pair of control knobs - the blue one is responsible for the flow of liquid, and the red one for the achieved heating.
The space between the handles is equipped with a digital screen showing the existing temperature. This allows you to minimize the risk of error.
The column, like other Russian-made models, is equipped with:
- draft sensor;
- fire presence indicator;
- thermal sensor;
- gas control equipment.
The column has an efficiency of 88% and is designed for natural gas pressure from 1274 Pa. For liquefied fuel this figure is 2940 Pa, the nominal consumption value for 60 minutes is 1.95 and 0.77 cubic meters, respectively. m. For the device to function normally, water must be supplied to it with a pressure of 300 kPa or more. If it heats up to 25 degrees, you can get over 8 liters of liquid. With stronger heating (40 degrees), the consumption drops to 5.3 liters.
Neva 4510 reaches a height of 0.65 m, a width of 0.36 m, and a depth of 0.21 m. The weight of the system does not exceed 10.4 kg. Prevention of excessive water heating is provided. Control of the presence of flame in the burner is realized thanks to the ionization effect. The design also includes a viewing window.
Indications for repair
During the use of the column, due to the pressure on the membrane and the hard water entering the device, small cracks and areas of deformation appear on the diaphragm. To see them, you need to remove the membrane and inspect it carefully. Quite often, an assessment of the condition of the diaphragm and its subsequent replacement is performed during the annual maintenance of the column.
Problems with turning on the column will tell you that the membrane has worn out before the scheduled check. In this case, you should first make sure that gas is supplied to the column, and that water is supplied with sufficient pressure. If your column uses piezo ignition, clean the pilot burner(s). If after such cleaning the device does not turn on, most likely the membrane is damaged and the device needs to be disassembled.
If your column turns on via electronic ignition from batteries, when you turn it on and hear clicks, then everything is in order with the membrane, and the problem most likely concerns the gas path or the ignition electrode. If there are no clicks when turning on, damage to the membrane is the most likely cause of failure, which can be easily verified by disassembling the unit.
In some columns, the condition of the membrane can be determined by the rod that controls the switch of the electronic unit. After removing the column casing and opening the hot water, look to see if the rod has moved. If it's the diaphragm, the rod will stay in place.
In situations where damage to the membrane is minimal, but increases over time and leads to rupture, water will flow inside the cavities of the water regulator, which leads to the device not operating at all possible power. Gradually the power drops and eventually the speaker stops turning on completely.
Flaws
Obviously, any domestic water heating equipment has a number of disadvantages. In this regard, the NEVA 4511 model is also far from ideal. With a rated power of 21 kW, it produces up to 11 liters of hot coolant per minute.
Experts are confident that the equipment will “not cope” with its work if water is simultaneously drawn from two points. For example, washing the dishes when someone in the household is taking a bath will not be easy. The power of the unit is not enough to provide two water points with a sufficient amount of hot water. In addition, the design does not provide for a system of smooth flame modulation, which cannot be said about more modern speakers.
How to choose a new part
For each column (Termet, Ariston, Beretta), the membrane is selected individually. For foreign models, it is most difficult to find a replacement, since the product can only be purchased from an official supplier. In this case, you have a choice: spend money on a new element or buy a new speaker.
With domestic technology everything is simpler. Replacements can be found in stores or ordered online.
Experts recommend choosing a silicone diaphragm. It is more elastic and durable.
If you think that the principle of construction of all membranes is the same, this is not so. For example, in Ariston water heaters special elements are installed - “eights”. They are made of dense rubber and have a special shape. Their cost ranges from 300 to 500 rubles.
The membrane in Electrolux devices works according to the figure-eight principle. But its price is much lower - from 200 rubles.
The easiest membranes to operate and replace are “Neva” and “Astra”.
There are also universal options, but they are only suitable for temporary installation. It is impossible to fine-tune equipment without factory parts.
What is a gypsum tongue-and-groove board?
Gypsum tongue-and-groove board is a building material shaped like a scalene parallelepiped. If the working (rough) brick is made from clay (ceramic brick) or sand and lime (sand-lime brick), the base of the PGP slabs is gypsum.
By design, the sides of the tongue-and-groove slab have a tongue and groove for a strong connection of adjacent slabs. The side with the groove is called the supporting side, the side with the tenon is called the docking side. In documentation and construction documents, gypsum tongue-and-groove board is abbreviated as GGP. The plate produced by Knauf is called Knauf-gypsoplate.
DIY repair
For repairs, you will need to disassemble the entire water-gas unit. You will need:
- slotted and Phillips screwdriver;
- wrenches 19 and 24;
- repair kit;
- new part.
First of all, turn off the water and gas supplies. After this, open the tap in the bathroom and drain the remaining water.
- Remove the regulators from the housing by pulling them towards you.
- If you have a display, disconnect the wiring leading to it.
- Now you need to remove the casing. In some models it is fastened with bolts at the top and bottom, in others it “sits” on latches. Pull the facing towards you and up.
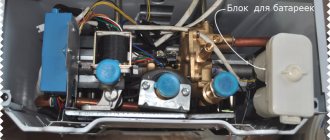
A water node will open in front of you. In earlier models it is located separately, vertically. A gas block is installed on top, a water supply is organized on the left, and a heat exchanger on the right.
To dismantle such an element:
- Unscrew the two nuts on the water pipes. Use the key for 24.
- Unscrew the two mounting screws, pull down and remove.
In the latest models, the water unit is placed horizontally. There is a special tap at the bottom through which the remaining water is drained.
- Unscrew the fastening nuts with a 19mm wrench.
- Disconnect the supply sensors.
- Remove the bolts that secure the block to the base.
- Remove the burner.
- Unscrew the fasteners of the water-gas unit with the manifold.
You can start disassembling. In the old Astra and Neva variations, you need to unscrew eight bolts to separate the assembly. In modern models “Neva” 4513, 4511, 4510, “Oasis”, “Vector”, only four screws hold it.
If the fasteners are rusty and stuck, spray them with WD-40.
All that remains is to remove the worn membrane and install a new one.
Reassemble in reverse order. Upon completion of work, carry out an inspection. Gradually opening the water supply, inspect all connections for leaks. Then open the tap fully. Everything is fine? Put on the casing, supply fuel - enjoy hot water to your heart's content.
In the video they change the aperture for some models:
How to replace the membrane fabric of a geyser Neva 3208
1. First, we need to dismantle the body of the water heater in order to gain access to the water part and more, this is done simply. Remove the throttle control knob. Under it there are two screws, which should be unscrewed using a previously prepared screwdriver (-). The body itself can be removed very simply, you’ll figure it out.
As soon as the housing was removed, you had free access to all components of the gas water heater. You will be able to visually inspect the gas water heater for mechanical defects, and also clean it from dirt and dust. If such measures to clean the water heater and its key burner are done once a year, then you will reduce the frequency of calling a specialist for emergency repairs of the gas water heater by half.
2. Below in the photo the arrow indicates the water part. The membrane fabric of the geyser is placed in the middle of this mechanism, so in order to replace it we need to dismantle and disassemble it.
3. Use a Swedish wrench to unscrew and separate the tubes from the water part. When unscrewing, water may flow out; there is no need to be alarmed; these are remains. Prepare and set out some dishes in advance.
4. Once the tubes have been unscrewed, we should disconnect the water part from the gas block. We unscrew the three mounting screws and lightly hold the water unit with our hand. If the water unit is not “stuck” to the gas block from oxide and rust, it should come out freely and remain on the palm.
5. Next we need to unscrew the tightening bolts in a circle and disconnect them.
6. Remove the old membrane fabric and place a new one. During installation, make sure that all holes line up. We assemble the entire mechanism in reverse order and start the column. If you did everything correctly, the heating temperature of the geyser becomes several times higher.
Informed means armed! Do you know that most of the reasons why a gas water heater does not turn on is due to the fault of the ignition wick. Go to our publication: How to clean the pilot wick of a gas water heater yourself.
Detailed replacement instructions
Next, we’ll look at how to properly replace the diaphragm. But before starting work, it is important to remember that working with gas equipment belongs to the high-risk class. Therefore, repairs to the column must be carried out by a qualified specialist.
You should not overestimate your skills and strengths - if in doubt, you need to contact the gas service. It is also necessary to contact gas specialists if you smell gas in the room, because if safety measures are ignored, the dispenser may explode.
What you need to know before starting work
In other words, owners of gas water heaters are prohibited from carrying out work on gas equipment themselves. And even taking into account that the water reducer is theoretically not related to the gas system, disassembling this structural part and changing the membrane with your own hands is also prohibited.
Gas water heater servicing by a specialist. According to the service rules, any service or repair work is carried out only by representatives of specialized companies
Sometimes the desire to do everything yourself, without having practical experience in performing this kind of work, can result in disastrous consequences. As evidenced by the numerous accidents associated with household gas equipment.
However, premature wear of the membrane and other components of the water heater under pressure can be prevented by promptly cleaning the equipment with your own hands or by a gas service representative.
A bitter example from life when, due to self-repair of a water dispenser, a gas explosion occurred. As a result, the destruction of a significant part of a multi-storey residential building. And many such cases are recorded every year.
There are often craftsmen who are ready to independently change the gearbox membrane on a gas water heater. Moreover, it is, in fact, not at all difficult to perform such an operation if you have plumbing skills.
Do this easy job as follows:
- Using documentation or by opening the column housing and examining the internal contents, determine the brand (model) of the installed gearbox.
- Based on the technical information obtained, they purchase a new membrane on the market.
- If the equipment is imported, you may have to purchase the membrane only to order.
- If there is a membrane, shut off the gas supply to the equipment and close the cold water supply tap from the central heating system.
- Drain the contents of the gas heater heat exchanger using the service drain valve, the location of which is determined according to the documentation.
After these operations, you can begin dismantling the gearbox. However, there is no need to rush here. You need to work carefully and carefully so as not to damage other nearby parts of the gas water heater.
Membrane shapes and materials
The design of geysers is varied. Accordingly, a change in the design of the pressure reducer cannot be ruled out. Therefore, the existence of reducing membranes of various shapes also seems to be an obvious phenomenon.
If a round-shaped product, which can often be found when disassembling the valves of domestic geysers, is considered standard, imported devices are often equipped with “exotic” ones.
The so-called exotic version of the rubber membrane. As a rule, most often products of this kind are found in imported designs
One such example is the geysers of a well-known foreign company that produces household appliances under the Electrolux brand. Many models of equipment from this brand are equipped with figured membranes in the form of a “figure eight”.
The devices of the foreign company Vaillant are somewhat less popular compared to Electrolux, but they also stand out from the entire range of household geysers due to the non-standard production of gear membranes. When disassembling their valve, there is a chance of colliding with the flag membrane.
Another “exotic”, not so expressed figuratively and quite a bit different from the classics, but still. Such accessories are also used on foreign devices
For the sake of objectivity, it should be noted: products of non-standard shape show finer regulation of flow pressure, however, in terms of long-term performance, they are often inferior to standard ones. Often the degree of durability is determined by the quality of the material.
In practice, it has been noted that silicone membranes last longer than rubber ones. However, for silicone, an important criterion is careful filtration of network water. Even a small amount of sand or rust that gets into the area where a silicone product is located will dramatically reduce the service life of the material.
Manufacturing a membrane using a relatively new material – silicone. In terms of the quality of work, an accessory in this design is characterized by more expressive parameters compared to technical rubber.
Technical rubber is less sensitive to the effects of suspended particles, but for the most part “suffers” from insufficient chemical resistance. That is, if the composition of the water has an aggressive component to some extent, under these conditions, products made from technical rubber usually do not last long.
Stage #1 - preparatory work
First of all, cut off the flow of gas and cold water to the column. The gas must be turned off before starting work, even if you do not plan to inspect the gas part of the equipment. The water unit is connected to the gas unit, and if you touch it, you can get into big trouble.
Water is drained from the system by opening the tap into which hot water flows from the boiler. If several hot water taps are connected to it, open the one located below the device. Then the maximum amount of water will drain from the system. To drain the remaining water, place a basin under the water regulator.
There is no need to mention that the replacement membrane needs to be purchased ahead of time. It is also better to purchase gaskets to seal the rod and union nuts of both pipes. You can purchase a complete repair kit.
It is best to install a silicone membrane when replacing. This is not easy to find right away for all modifications of geysers. Often you have to take the option from stock that suits your speaker model
Prepare tools for work: screwdrivers, wrenches or gas wrenches, pliers. Fine-grit sandpaper may be useful. It is also worth stocking up on rags and a rust dissolving agent (frog screws often turn sour).
To open access to the water unit, open the column housing. Removing the casing is usually not difficult; it doesn’t take long to find and unscrew the mounting screws.
Finding the water regulator is also not difficult - it is the first block on the path of cold water entering the column.
The water regulator of the Neva Group of Companies is located under the gas block. On the left, cold water enters the reducer through the inlet pipe. Through the right outlet pipe from the frog, water flows to the heat exchanger
Stage #2 - step-by-step description of membrane replacement
You can get an idea of the process of replacing a worn membrane in a gas water heater using the example of a household flow-through heat exchanger “Neva”.
When unscrewing the union nut of the outlet pipe with a wrench, as well as unscrewing the screws connecting the water block to the gas block, hold the frog with your hand
Next, consider the process of dismantling the water unit:
- Armed with a wrench, first unscrew the union nut of the inlet pipe on the left side of the gearbox. We take the phone away so that it does not interfere with further actions.
- Holding the frog with your hand, unscrew the nut of the outlet pipe. Let the water drain.
- Using a screwdriver, unscrew the three screws connecting the water and gas blocks. It is not necessary to completely unscrew the fastener; just release the rod. We remove the gearbox.
Now we unscrew the screws securing the cover and base of the block (8 screws). If the bolts are soured, use WD-40. We open the cavity of the block and remove the damaged membrane.
We inspect the condition of the removable parts - plates, rod and bushings, filter mesh, fittings. If necessary, clean the cavity and other surfaces of the frog and its parts from scale or rust. We replace unusable parts or install old parts in the appropriate places.
It is important not to forget to check the condition of the retarder ball. Just shake the lid like a rattle and listen to whether the rolling steel ball is knocking
We install the membrane, not forgetting to accurately align the hole in the rubber part with the hole in the bypass channel. If the channel is blocked, then water will not flow into the upper cavity. The water pressure on the gasket from below will keep it in a curved position, the gas will be open by the rod even when there is no water flow.
We return the cover to its place, install and tighten the fastening screws crosswise (one against the other). After making sure that everything was done correctly, tighten all the screws in the same sequence.
Then we install the assembled block:
- We mount the gearbox in the reverse order. It is advisable to install new sealing gaskets with a diameter of half an inch on the pipes.
- We check the quality of the connection by opening the hot water tap. If there are no leaks when the tap is open, turn off the water and check for leaks under pressure. Then turn on the gas supply. After applying a soap solution to the gas connections, we check for gas leaks.
- If no leaks are found, we check the column in all operating modes.
After making sure that everything is done correctly and the column is working, we mount the removed housing cover.
The gearbox should be dismantled in the sequence indicated by the numbers, tightening all connections in turn. Only after completing this step can you carefully remove the water block. After replacement, its installation should be performed in the reverse order.
Stage #3 - putting the entire water block in order
To avoid the situation that you replace the gearbox gasket, and in a few days you will need to disassemble the water heater to eliminate another malfunction, it is more rational to linger and do preventive maintenance.
While the gearbox is removed, in addition to replacing the membrane, you need to check the ease of movement of the rod. The rods of the water and gas units interact.
Due to leaks, the gearbox rod may become covered with scale or become sour. It must be cleaned, polished with 240-grit sandpaper, and lubricated with mineral oil, such as lithol. The stroke of the rod should be smooth and easy.
It would be a good idea to inspect the stem bushing and seals to prevent leaks. The seal on the stem bushing must be changed periodically. In order to change the seal, unscrew the nut and remove the bushing. If there is scale, it is cleaned off. After replacing the seal, reassemble the assembly in the reverse order. The rod seal should be replaced every three years.
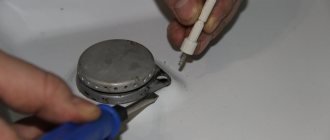
You should also check the Venturi nozzle (fitting) for cleanliness. Even slight contamination greatly affects the performance of the frog. You can clean the fitting with a thin wooden stick. The O-rings on the Venturi tube may need to be replaced.
Then it is advisable to check the following elements:
- Check the operation of the magnetic switch button. If the button is working, but the burner does not ignite due to lack of gas supply, the reason may lie in the reed of the switch. It can be slightly pressed to ensure a tight fit.
- Replace the defective filter mesh or install a new one if it was missing before.
Preventative inspection of the water unit should be performed at least once a year. Likewise, you should not forget about cleaning and regular maintenance of all structural elements of the gas water heater.
Instructions for replacing the membrane
The removed pressure regulator will need to be disassembled to get to the rubber (silicone) membrane. The disassembled part looks roughly like a plate.
The two halves of the disc housing of the pressure regulating device, inside which the membrane is located. Now the defective accessory can be easily removed and replaced with a new one
Disassembly/assembly sequence:
- Unscrew the fastening screws on the top of the plate;
- carefully use a flat-head screwdriver to bifurcate the plate;
- remove the defective membrane;
- install a new one;
- articulate the halves of the plate;
- secure the joint with screws in a circle.
The correct location of the membrane on the gear plate is determined by a special “key” recess or pin, which, in turn, is located on the radial edge in the same row as the holes for the mounting bolts.
You need to align the membrane “key” with this notch before connecting the plate halves and screwing in the screws.
The same pin on the body of one of the halves of the body, thanks to which the membrane is precisely fixed in place. The accessory itself has a hole for mounting on a pin.
The moment of screwing in the mounting screws is a traditional action. However, you should keep in mind the uniformity of tightening of the gearbox parts. Technically competent tightening is performed using the “crosswise” method. That is, first, four screws located one opposite the other are tightened sequentially, and only then all the others are tightened.
The assembled gearbox, equipped with a new membrane, is installed in place in the reverse order. Carefully insert the rod inside the tube of the control device, align the device to the level of the water pipes. The nuts are then manually screwed onto adjacent sections of the pipe.
The picture shows the uniform distribution of screw tightening torques when connecting two parts of the housing. This condition must be adhered to in order to avoid water leaks through leaks in the future.
As a rule, pipe connections require the presence of sealing gaskets and their correct installation. This point must be taken into account when installing the gearbox at the installation site. Next, all that remains is to tighten the fastening nuts, applying a little force and do not forget to tighten the drain plugs under the plate.
Possible malfunctions of the “frog”
The body of the water regulator is durable and designed to operate at high water pressure (flow rate up to 3 m3/hour). There are few parts in the water unit that can become unusable and cause breakdowns of the gas water heater.
Possible malfunctions:
- membrane rupture;
- violation of the integrity of the plastic plate - the membrane cannot move the rod;
- scale formation on the rod , slowing down the movement of the rod or leading to its jamming, which occurs due to leakage of the stuffing box;
- destruction of the retarder ball (very rare, but it happens), clogging of the channel, jamming of the ball;
- the filter mesh is filled with debris , which reduces the water pressure due to blocking the passage;
- debris getting into the Venturi fitting due to which the pressure in the hot water tap decreases, the column does not work;
- wear of gaskets and seals is the cause of leaks leading to scale formation.
Most of these malfunctions have characteristic symptoms that can be identified during an external examination.
Leakage of the oil seal gasket leads to the formation of scale and souring of the rod. All scale should be removed. Unscrew and clean the bushing, replace the gasket and seals, clean and lubricate the rod
Any leaks require intervention, which should not be delayed for long. Prolonged exposure to water oxidizes contacts. As a result, the microswitch becomes irreparable and completely unusable.
Tips for choosing
You can purchase a silicone membrane rather than a rubber one to replace it. This part is more elastic and lasts longer (from 10 years).
A white or red rubber membrane is the least preferred option, since such a part wears out very quickly. Sometimes it breaks immediately after replacement.
- When choosing a suitable membrane for a gas-powered water heater, you need to take into account the brand of the device, since some columns have round diaphragms, while others have parts with a rather complex shape.
- If you were unable to find a round diaphragm specifically for your speaker, it is permissible to purchase and install instead a part of the same diameter for a speaker from another manufacturer, for example, a membrane with a diameter of 73 mm.
- If the column has been serving you for more than five years, buy the membrane immediately with the plastic parts that are adjacent to it (over time, plasticizers are washed out of them, which leads to fragility).
About the gearbox and the location of the membrane fabric
A device called a water reducer is part of virtually every design of gas heat exchangers.
This part can have a very different configuration, it all depends on the model of the water heating apparatus, but the operating principle of similar devices does not change.
A water reducer installed on a gas-powered column serves to stablely maintain water pressure specifically in the water heater heat exchanger system. Due to the uniformity of pressure, the same flow is ensured, which means similar, uniform heating of the liquid.
The gearbox component that facilitates smooth pressure regulation is a rubber membrane fabric. This gear element, made in the form of a gasket in most cases based on technical rubber, has the shape of a circle. It is placed in the middle of the gearbox housing.
Due to the long operation of water heating equipment, being regularly in motion, the membrane fabric gradually wears out.
Wear of technical rubber in some places leads to tears in the material. Naturally, the function of regulating water pressure ceases to operate according to the specified method.
In such cases, it becomes inevitable to replace the rubber membrane fabric of the gearbox in a gas-powered water heater, since the water heater does not work properly.
The quality of individual hot water supply quickly decreases, and in other cases it is simply impossible to put the column into operation. Comfort for the client is lost.