Here you will learn:
- How does a heat exchanger work?
- Disturbances in the operation of the column and their elimination
- Reasons for heat exchanger failure
- How to solder a geyser heat exchanger
- How to solder a geyser radiator if the fistula is in a place inaccessible for soldering
- Restoring geyser pipe flanges by soldering
- Repair of a geyser heat exchanger due to scale formation
To learn how to repair a gas water heater, you must first understand how it is designed and how it works.
Units can be of the following types:
- With an open combustion chamber or atmospheric.
- With a closed combustion chamber or turbocharged. They are also called inflatable.
The air required for gas combustion enters the atmospheric column from the environment naturally. It enters the device through an opening located at the bottom of the column. To remove combustion products, a chimney with natural draft is installed.
Turbocharged or inflatable speakers differ from atmospheric ones in one feature: their combustion chamber is closed, and a built-in fan provides forced draft. Air inflow and exhaustion is carried out forcibly through a coaxial chimney (double-walled).
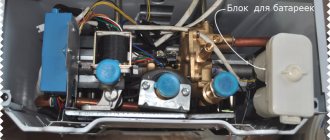
You can familiarize yourself with the structure of a gas water heater in general terms by looking at the following illustration.
The photo shows the structure of a typical gas water heater. A design feature of this water heater is piezo ignition of the burner. Also, batteries (or from a 220 V network), a hydraulic turbine can be used to ignite various models
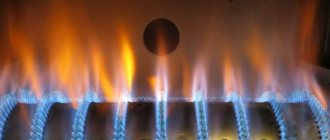
Below is the operating principle of a modern gas burner with an automatic ignition system:
- The column starts working when the mixer tap is opened. The water flow passes through the water supply unit and the heat exchanger of the gas device.
- Inside the column body there is a water regulator membrane, which pushes the rod under the influence of pressure arising from the water. This allows the rod to compress the spring of the mechanical gas valve in the block to allow fuel to reach the burner itself.
- At this stage, the solenoid valve circuit is closed, which occurs when the microswitch button is released by the rod. The valve provokes the release of gas into a special tube, which is a supply tube. Gas flows to the already open spring valve.
- The pulse device is triggered. It delivers a discharge to the electrodes that are located next to the burner. Sparks are formed, as a result of which ignition begins. This allows the water passing through the heat exchanger to be heated.
The electromagnetic circuit consists of 3 sensors that are switched on in series. These include a draft, overheating and flame sensor. When the last element of the chain fixes the fire, at this moment the formation of sparks ends.
We discussed the operating principle of the column in more detail in this material.
Old gas water heaters had one contact and a constantly working igniter. Now they are making devices with two electrodes that ignite the burner
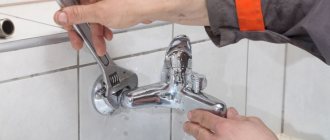
How to properly disassemble a water heater
Before you begin disassembling the water heater, you must:
- turn off the water supply, then drain the remaining water from the heat exchanger by opening the hot tap;
- shut off the gas supply;
- disconnect the pipe from the chimney;
- disconnect the device from the power supply.
Now you can carefully disconnect the speaker from the communications. To disassemble, the device can be completely removed from the wall, or only the housing and the problem unit can be removed.
If disassembling the gas column is needed only to flush the circuit, then the procedure is carried out in three stages:
- Removing the handles located on the front panel of the device. They can be easily removed by simply pulling them towards you or prying them with a screwdriver.
- Removing the housing - the panel is secured with screws. Their position differs depending on the model. The screws can be on the top, bottom or back. They are found and twisted. After this, the panel is removed. In some cases, the body is additionally secured with hooks. Then you will have to pull the panel a little so that it comes out of the hinges.
- Dismantling the heat exchanger - it is usually attached to the pipes, gas burner and hood with screws. They should be unscrewed and the element carefully removed without touching the wires and contacts.
To carry out all the manipulations, you only need a screwdriver. When removing the screws, you need to collect them in one small jar or box so as not to lose them. After dismantling, you can begin washing the heat exchanger.
We service the igniter and water intake unit
If there is a need to clean the water unit, do not rush to disassemble the entire device. Take a look at the operating instructions for the water heater, find the “frog” in the diagram and follow the following algorithm:
- Remove the adjuster knobs and front cover.
- Dismantle the water unit by disconnecting the pipes.
- Unscrew the screws holding the cover, remove it and get to the membrane.
- Clean the filter - mesh and water holes in the frog body using a wooden stick or soft copper wire. Remove scale with a brush.
- Rinse the parts with water and assemble the assembly. Replace damaged or cracked membrane immediately.
Clean the pilot burner jet (wick) with thin copper wire or a toothpick moistened with alcohol. Wipe the ignition electrodes and the flask of the flame sensor (thermocouple) thoroughly from soot, otherwise over time the column will begin to turn off spontaneously.
Necessary documentation for installing a gas water heater
Before installing a gas water heater, you should prepare a package of documents:
- act on the technical condition of the existing chimney (a special service is engaged in drawing up such acts);
- technical passport for a new gas water heater or the name of the model you are going to buy (it is necessary for submission to GorGaz for drawing up a project);
- project for installing new equipment;
- application from the apartment owner for the installation of new gas equipment;
- application for work.
The replacement itself can be done either by professional craftsmen or with your own hands if you have the necessary experience and skills. What should you remember when replacing a column? When installing gas equipment, you should remember that there are special standards regulating the work. Installation of a gas water heater is possible in the following cases:
Diagram of the internal structure of a gas water heater.
- the volume of the room where the equipment will be located should be from 7.5 cubic meters;
- there must be ventilation (a window with opening sashes, a window, etc.);
- the ceiling height should be from 2 meters;
- a chimney is required, the diameter of which must be from 120 mm. It is provided for by the general design in those houses where the installation of such equipment is permitted;
- the pressure in the connected water supply should not be less than one tenth of an atmosphere;
- speakers for apartments can only be installed in the kitchen; their placement in bathrooms is prohibited;
- Gas equipment cannot be placed above the stove or at a distance closer than 10 cm. The wall on which the column is hung must be made of non-combustible materials.
When to call a professional
If you notice such problems, it is better to contact the service. But before that you need to make sure that it is broken:
- The draft, overheating and flame sensors are constantly triggered.
- The column is clogged.
Often the pipe responsible for the gas supply becomes clogged. How to clean it:
- Remove the temperature control knob.
- Remove the cover of the device.
- There are clamps on top of the pipe. Unfasten them.
- Remove the pipe, clean it, and wash it under the tap.
- Dry and reinstall the part.
- Test the operation of the equipment. While holding down the power control, press the piezo ignition button. Hold for 10 seconds.
If all else fails, it is better to contact a technician to replace the sensors. Many reasons for the damping of the Junkers heater can be eliminated with your own hands. If you connect the device correctly and keep it clean and in good working order, such problems will not arise.
How to remove scale without removing the radiator
To perform this procedure, simply remove the front panel of the water heater and disconnect the heat exchanger tubes from the water unit. Do not ignore the second step and do not rinse the coil together with the “frog”! You don’t know how the detergent will affect the membrane and other parts of the water valve, so it’s better not to take risks so as not to repair the unit later.
There are 3 ways to internally flush a heat exchange device:
- Connect hoses to the heat exchanger pipes and pour the cleaner manually through a funnel.
- Remove the gas heater from the wall, turn it upside down and place it on the floor. Periodically pour a solution of citric acid into the coil and wash away the scale with water through the hoses.
- Make a booster from a heating circulation pump - a device for pumping liquid through a heat exchanger. The scheme is simple: a pump, connecting hoses and an open container with detergent.
The burner and the chamber of the gas water heater will have to be cleaned with a brush with long soft bristles. Use a household vacuum cleaner to remove dust.
Reasons for heat exchanger failure
The period of operation is determined primarily by how the water in the city water supply is disinfected. In Russia, either pure chlorine or chlorine dioxide is used. When the water flowing through the copper tube heats up, it causes a violent chemical reaction. Copper chloride is inferior to pure metal in strength, and therefore fistulas appear quite quickly. The luckiest people are residents of cities where tap water is ozonated.
But there are still very few such settlements. The high cost of the modern solution does not allow us to count on the rapid spread of ozonation. Moreover, now manufacturers have begun to save in every possible way. And if previously troubles happened quite rarely with thick tubes of heat exchangers, now thin, low-quality copper is used everywhere. The service life of products has significantly decreased.
The structure of the stove gas tap
Gas valve (Fig. 1) Let's start with the valve body 6, which is rigidly screwed with a clamp to the gas pipeline of the stove. At the bottom of the tap there is a hole 4, which leads gas to the stove burner. There is a small nipple in the faucet opening that connects the pipe and the faucet. To burn gas, air and gas are mixed (injected) in a Venturi tube in certain proportions. Also in the gas valve, it is equipped with an idle speed adjustment screw.
Inside the tap there is a bronze plug 5 of conical shape, which, when turned, regulates the gas supply to the thermostat of the stove, and then to the burner. In order for our plug to be reliable and fixed in the valve body, a pressure spring is installed, which rests against the plug, preventing it from jumping out from the gas pressure. There is a groove in the housing cover that guides the plug during rotation.
Faucet not working? We diagnose over the phone, so the cost of this service for you is
We will charge 500 rubles for the call if the repair is refused, but this service costs
The cost of the repair work performed without the cost of the required spare parts in our company varies
Before leaving, our employees will issue a guarantee from our company for the work done for a period of
Design
The heat exchanger for any gas water heater with an atmospheric burner is built according to virtually the same template. The central part is a coil of copper or steel tubes with a frequent row of transverse plates.
A track for the tubes is formed in the plates and tight contact is ensured at the junction using crimping or soldering.
A casing made of thin sheet steel or copper is attached to the heat exchanger. The casing forms the combustion chamber of the column and the channel through which hot air and combustion products from the burner rise to the heat exchanger.
It is typical for all geysers that the inlet pipe of the heat exchanger, through which cold water is supplied, is made elongated and wrapped three to four times around the casing, moreover, in high-quality models the tube is soldered along its entire length to the casing material. This is necessary to preheat the water before entering the heat exchanger.
When the column has already reached operating mode and the temperature in the combustion chamber reaches several hundred degrees, and the surface temperature of the heat exchanger is over 100ºC, supplying cold water with a temperature of only +5-15ºC will lead to a sharp acceleration of corrosion processes, the coil simply crumbles .
For this, a long route of the inlet pipe around the casing is used, where the water has time to heat up from the walls of the combustion chamber by an additional 10-15 ° C, which reduces the risk of damage to the tube inside the heat exchanger, where its repair is impossible.
Sources of danger
There are, in fact, only two of them.
The fact is that independent work related to opening the gas pipeline will inevitably lead to a gas leak.
- At a certain concentration of natural gas or propane-butane mixture in the air, it will become unbreathable.
- Long before this, the gas-air mixture will become explosive. The slightest spark when turning on an electrical appliance, triggering any relay (for example, a convector thermostat) or clicking a light switch will lead to exactly the consequences that we tried to warn the reader against in the first section of the article.
The rules that will help avoid negative consequences are quite obvious.
- All work is carried out with windows wide open throughout the entire apartment or house. Yes, yes, regardless of the time of year. Don’t be afraid that your favorite cactus will freeze: if everything goes well, forced ventilation will last no more than 10 minutes.
- The room must be completely de-energized. What the instructions relate to is, I think, clear from the previous explanation. Take it seriously: as already mentioned, the cost of a mistake can be the highest.
Let's get started
Tools
What should you prepare before opening a gas pipeline?
- We have already mentioned a pair of gas keys. Precisely a pair - because in most apartments of the old building, the supply to the stove is made of rigid pipes; To unscrew the locknut and coupling, you need to hold the drive in a stationary position, not allowing it to turn the valve.
- To seal gas threads, FUM tape or synthetic thread with Tangit Unilok sealant can be used. Linen with paint is also suitable, but the paint takes a relatively long time to apply to the threads and winding, and in our case, seconds will count.
- When repairing a tap, a special graphite lubricant for gas taps or regular grease can be used. The graphite base is more practical: it retains its properties longer.
- In addition, when repairing the valve, you will need a 1/2-inch female plug and a flathead screwdriver.
Audit
So, what to do if the gas tap smells like gas and replacing it is not in your plans?
- We close the valve by turning its handle perpendicular to the pipe.
- We use one of the gas keys to fix the outlet after the valve and then hold it in a stationary position.
- Using the second wrench, we tighten the locknut and coupling onto the long thread of the drive.
- We partially unscrew the valve with a key until it starts to rotate by hand.
- We completely unscrew the valve and immediately attach a plug to the thread. Do not be afraid that excess pressure will interfere with you: it is only 3 - 5% higher than atmospheric pressure.
- We wind the thread under the plug and tighten it by hand until the end.
- We unscrew the valve from the surge.
- We unscrew the plug with a groove for a screwdriver on the back side of the valve and remove the spring hidden under it; then we push the conical plug out of the body.
- We clean the body and plug from the remnants of the old lubricant and apply a thick layer of new one.
- Reassemble the valve in reverse order.
- We put it in place of the plug, not forgetting to replace the thread winding.
- We screw in the drive and, having re-winded the threads, we drive the coupling and locknut into the working position.
Replacement
What to do if the gas tap in the kitchen is leaking and you want to replace it with a new one?
If the new valve is the same length as the old one, the actions are completely similar to those described above - with the difference that manipulations with the plug are, for obvious reasons, made unnecessary.
How to change a gas tap in an apartment if its length does not match the length of the old one?
- The drive with the coupling and locknut is thrown out.
- The short thread after the drive is equipped with a short extension with internal and external threads. This will allow the union nut to press the gasket against the smooth, wide edge of the extension rather than against the jagged end of the pipe.
A special case
How to change the tap on a gas cylinder if it cannot be opened with a regular key? Heat the valve with a hair dryer - and its expansion will make the force required to unscrew it quite feasible.
Troubleshooting the Electrical System
If the electric heated towel rail does not heat up, then to determine the malfunction you will need:
If the heated towel rail malfunctions, check the power supply and the phase of the heating element.
- measuring device, tester;
- indicator screwdriver, voltage indicator.
Before claiming that the heating element is faulty, it is necessary to check the 220 V power supply circuit. To do this, use an indicator to check the presence of a phase on the heating element. The presence of phase voltage does not always indicate correct voltage supply, since there may be a break in the neutral conductor (absence of “zero”). A break in the neutral conductor can lead to partial operation of the heating element. In this case, the heated towel rail heats, but not well enough. You can more accurately check the presence of supply voltage using a tester by measuring the network voltage. Do not forget to configure the device before taking measurements. The measurement parameter is AC voltage, the measurement limit is above 250 V. If it turns out that the supply voltage of 220 V is present, we begin to check the heated towel rail itself.
To check, disconnect the heater from the network and use an ohmmeter to measure the resistance of the heating element. The resistance should correspond to a value of several ohms. Simultaneously with the continuity test of the heating element, we check its short circuit to the housing. The absence of resistance of several ohms indicates a malfunction of the electric heater and it should be replaced.
When working with electricity, follow safety precautions and use tools with insulated handles.
Areas of responsibility
The first and main thing that the reader should pay attention to is that the inlet valve in the apartment falls under the responsibility of GorGaz or a similar organization operating in the area where you live. Both the repair and replacement of valves, and their periodic inspection, and the connection of gas equipment (stoves, boilers, convectors, hobs) should be carried out by mechanics of this organization
- you have quite a lot of experience in locksmith work; in particular, you have had to change valves and valves under pressure;
- you know where the power is cut off in your apartment, and you have access to the switchboard and the machines in it;
- the gas pipe in front of your valve has no visible signs of corrosion;
- at your disposal are plumbing tools (at least two gas wrenches No. 1 and/or No. 2), sealing material for threads and grease or graphite lubricant -
the following text will help you replace or repair the gas stove tap yourself.
Why does the gas water heater not work?
There are several common reasons why a gas water heater does not work. You can detect and correct them yourself.
Lack of traction
Any geyser has a function that controls the presence of draft. If there is a shortage of it, the gas is automatically shut off and the ignition on the gas water heater does not work.
It is very easy to check the presence of traction yourself. You need to bring the match to the vent or chimney. If the flame burns evenly, it means there is no draft. If the fire is drawn into the hole, then the chimney is working correctly. It happens that backdraft occurs, and then the air flow blows out the fire in the burner.
If there is no traction, then it is necessary to determine the reason for this. Most likely, there is a blockage in the ventilation or pipe that needs to be removed.
The batteries are low
In an automatic gas water heater, the cause of the problem is often dead batteries. They give a spark when ignited. Basically, the batteries last for 7-15 months of operation.
In this case, the problem can be solved very simply by replacing the old batteries with new ones.
Insufficient water pressure
Each geyser operates only at a certain water pressure in the main. There are models that can heat water only at 0.2 or 0.3 bar. If the pressure is lower, the device will not work.
After detecting low pressure in the line, it is necessary to find out the cause and eliminate it:
- If the pressure has decreased throughout the water supply network, then you need to call the utility service and report the problem.
- Sometimes the cause of a drop in pressure is a clogged pipe or filter. It is recommended to check the filter and clean it if necessary.
Note! If a drop in water pressure in your main is not uncommon, then you can improve the situation by installing a pump that will increase the water pressure or replace the device with another one that can operate at 0.1-0.15 bar
Gas burner clogged
Most often, the piezoelectric element in a gas column does not work due to a clogged burner. If it is clogged with soot and soot, it is necessary to disassemble the structure and thoroughly clean each of its elements. Then you should collect all the parts and try to light the column again.
No gas supply
Usually, when you turn on the column, you can hear the sound of incoming gas and smell it slightly. If there is neither one nor the other, then fuel is not supplied. This is one of the reasons why the ignition of the gas water heater does not work.
If gas does not flow, it is recommended to first check whether the gas filter is clogged. If so, the filter is cleared of blockages. In other cases, you need to call the gas service and find out the reason for the lack of fuel.
Note! If there is a gas leak and you smell it in the room, then you cannot turn on the gas water heater. Call a gas specialist immediately
Problems in the water unit
After 3-4 years of intensive use, the membrane of the column water unit gradually loses its elasticity and may even break. If this happens, the device will not be able to work.
To check the membrane, you need to remove the device body and unscrew the bolts that hold the assembly. Then remove the cover of the water block and inspect the membrane. If it is damaged, replace it with a new one. It is better to purchase an element made from silicone. This membrane will last longer.
Replacing the elements of the water unit should only be carried out if you are confident in your abilities and have the skills to repair such devices.
If you cannot identify the reason why the geyser does not work when turned on, call a specialist. He will quickly figure out what's wrong and fix the problem.
Principles of cleaning
To clean the column from scale, you need to understand the assembly features of the device, study the instructions, prepare a cleaning solution, and a set of tools for removing screws and tightening valves.
To clean the unit you will need:
- a set of keys;
- screwdrivers;
- rubber hose up to 1 m;
- set of paronite gaskets;
- funnel;
- folk or chemical means for descaling.
A gas water heater is a metal box to which two pipes are connected - one supplies gas, the other supplies liquid. Inside the structure there is a heat exchanger, burner, jets, etc.
In the first element, water is heated, which comes from the water supply when the wick-burner is started. Combustion products exit through the ventilation hole.
Elements must be cleaned according to the algorithm:
- heat exchanger;
- water supply unit;
- jets;
- other constituent components.
The process of removing scale is not complicated; the main thing is to correctly tension the membrane during the assembly process so that it springs, but does not hang down or is tightly fixed. When cleaning a gas water heater for the first time, it is recommended to act under the supervision of a specialist.
How often to clean the column
The geyser needs to be serviced at least once every 2-3 months, visually inspecting the surface of the parts. Once every six months, clean the unit using folk remedies or household chemicals.
Do I need to remove and disassemble the column?
To thoroughly rinse the heating device, you need to remove and disassemble it. Open the housing, inspect the filter, membrane, radiator, clean using chemicals or traditional methods. To reduce the appearance of scale, which will allow you to disassemble and clean the entire column less often, you can wash the radiator once every 2 months without removing it.
Cleaning the heat exchanger without removing it
To carry out the procedure you need:
- Disconnect the water supply pipe.
- Place a rubber hose onto the outlet pipe.
- Open the tap and drain a small amount of liquid, no more than a liter.
- Use household powder to clean rust, first dilute the mixture with hot water.
- Pour the solution into the pipe in a thin stream. Leave the radiator in this state for 2 hours.
- Open the tap, drain the contents, and rinse the structure.
It is recommended to use strips of corrugated paper to check whether they move or not. But the fire of a lighter or candle can be dangerous, especially if there are problems with fuel leakage.