Here you will learn:
- Features and purpose of the pressure switch
- Functions: operating principle of a pressure switch
- Choosing an installation location
- Connecting a pressure switch
- Equipment selection rules
- Setting up the pressure switch
- Review of popular models
- An example of a pumping station with a “Malysh” pump.
Before connecting the pressure switch to the Malysh pump, you need to decide on the relay model, select the installation location and connection method.
Features and purpose of the pressure switch
The water pressure switch for the pump is designed to ensure the normal operation of the entire water supply system. As a rule, almost no automatic control devices are installed at pumping stations. A certain level of control is provided by the relay itself.
The pump control relay is a small unit in a plastic box with springs inside. Springs are necessary to adjust the two extreme positions of the system. One position is responsible for turning the system on, and the other for turning it off.
The relay itself works in conjunction with a hydraulic accumulator. It consists of a metal tank filled with water. Inside the tank there is a bulb made of rubber or a special membrane. Air is pumped into this bulb. The air expands the membrane walls and creates the required pressure in the tank.
As the amount of water in the accumulator decreases, the bulb receives less resistance and the pressure drops. At certain pressure levels, the well pump activation relay will do its job. The pump will turn on and begin pumping water until the pressure in the container is equalized to the highest level.
Thus, a relay for a water pump is perhaps the most necessary device that completely controls its operation and ensures the autonomy of all processes. All you need to do is connect and configure the relay. These devices are connected to water supply and electricity.
There is also special automation for pumps; the pressure switch in this case is an electronic device with a regulator or screen. The electronics feature more flexible and simpler setup. Yes, and it has many more functions.
It is worth noting that pressure switches or its analogues are used not only at domestic pumping stations. It is also used to regulate the operation of heating systems and even the fuel supply in a car.
The relay for the heating pump does not operate on pressure, but by measuring the temperatures of the incoming and outgoing liquid. Which, however, is completely natural. After all, in heating it is not so much the pressure that is important, but the efficiency of heating radiators or heating circuits.
The thermostat for the heating pump has thermometers for measuring the temperature of the liquid. You only need to set the upper and lower temperature thresholds, and the relay itself will then control the operation of the system.
Few people know where the fuel pump relay is located or even what it looks like. Meanwhile, it is the fuel pump relay that allows you to protect the system from possible breakdowns. Typically, the fuel pump relay is located under the glove compartment.
It is designed to respond to the pressure level in the fuel pump. Too high a level causes the relay to switch and stop completely.
What does automation for a well pump include?
In addition to the electric motor control functions, the automation is assigned several additional tasks, such as protecting and preventing the consequences of pump acceleration in the absence of water and preventing possible problems in the electrical circuits of asynchronous motors.
The automatic on/off and protection system includes:
- A pressure switch or similar device designed to start the motor when the pressure in the water supply system drops to a minimum level and turn it off after the pressure rises to the operating value;
- Automatic device for protecting the engine from destructive conditions without water in the pumping part of the unit;
- Protection of motor windings from winding overheating and power supply phase imbalance.
Functions: operating principle of a pressure switch
Pumping stations are usually not equipped with automation to monitor and control work. At the same time, turning on and off the pumping equipment in autonomous mode is extremely necessary, because performing these operations manually will require constant attention to the system and will not allow the inhabitants of the house to go about their business, work and rest.
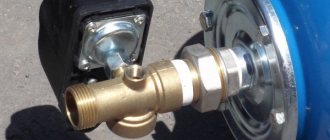
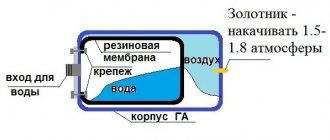
A sufficient level of control is provided by the pressure switch. It is a block with a plastic casing. Inside the housing there are two springs, each of which is “responsible” for setting the value of the extreme position (parameters for turning the pump on and off).
Diagram of a water pressure switch for a pump
The relay is functionally connected to a hydraulic accumulator, which contains water and compressed air; the media come into contact through a flexible elastic membrane. In the working position, the water in the tank presses on the air through the dividing partition, creating a certain pressure. As water is consumed, its volume decreases and the pressure decreases. When a certain value (set on the relay) is reached, the pump turns on and water is pumped into the tank until the value set on the second spring is reached.
The connection diagram for a water pressure switch for a pump provides for connecting the equipment to a water supply system, a pump and an electrical power supply network.
Equipment selection rules
- For autonomous water supply systems, you should choose a relay for household use. Such systems are characterized by basic parameters: the maximum pressure value is no more than 5 atmospheres, operating pressure values are usually in the range from 1.4 to 2.8 atm.
- When setting up the relay, it is important to remember that the magnitude of the difference between the limit values (settings on the springs) directly affects the volume of water that the pump, with such settings, will pump into the accumulator reservoir. A large volume means that the pumping unit will turn on less often, but the technical capabilities of the system must not be exceeded in this regard.
- You should not save excessively by purchasing a relay of unknown origin. Such equipment will not only fail to ensure correct operation, but will also most likely cause damage to other equipment included in the system.
- Connecting the automatic pump and pressure switch together with a high-quality pressure gauge installed next to the relay will allow you to monitor the operating parameters of the system and help detect violations at an early stage, when there are still no external manifestations.
Choosing an installation location
For correct operation of the equipment, the pressure switch must be connected to the pump in such a way as to avoid the influence of turbulence and sudden pressure changes when the pumping equipment is turned on and during its operation. The best place for this is in the immediate vicinity of the hydraulic accumulator.
Before installing the pressure switch, pay attention to the operating mode recommended by the manufacturer, in particular, the permissible temperature and humidity values. Some models can only work in heated rooms.
In the classic scheme for connecting a pressure switch to a deep-water pump for an autonomous water supply, the following equipment is installed in front of the relay:
When using many modern models of surface-type pumping units, installing a water pressure switch for a pump can be much simpler: block installation is carried out when the relay is installed together with the pump. The pumping unit has a special fitting, so the user does not need to independently search for the most suitable installation location. The check valve and filters for water purification in such models are often built-in.
Connecting the pressure switch to a submersible pump can also be done by placing the hydraulic accumulator in the caisson and even in the well itself, since waterproof design of the control equipment is often required and the operating conditions of the pressure switch may allow its location in such places.
The connection diagram for a pressure switch and a pumping station with a surface pump differs slightly from the diagram with a submersible unit in the sequence of arrangement of some elements
Obviously, the choice of installation method and location depends on the design of the equipment; usually all recommendations in this regard are indicated by the manufacturer in the accompanying documentation.
Operating principle
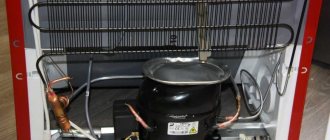
The Malysh submersible pump is a vibration unit, the operating principle of which is based on the conversion of electrical energy into electromagnetic vibrations. They are transmitted to the piston, the vibrations of which lead to the injection of liquid and its expulsion from the device. Every second the piston makes about a hundred reciprocating movements.
A coil with a core is responsible for converting electricity into electromagnetic energy. Its winding is quite sensitive to overheating, which occurs when the pump is idle. Therefore, you must always monitor the water level in the source or equip the device with an automatic switch that is triggered when it drops critically.
Depending on the location of the suction valve, Babies are divided into two types of design:
- With top water intake. In it, the working elements are located in the lower part of the body, so they are always in the water and are better cooled, and less sand, silt and other contaminants from the bottom of the source enter the suction hole;
- With bottom water intake. Less resistant to overheating, they require constant monitoring, and when working in a low-flow well (see Well flow rate or how to calculate its level) - installation of mechanical filters on the suction pipe.
Advice. Do not ignore the recommendations for installing a filter; this will protect your pump parts from rapid wear. Moreover, the price of the most popular EFVP filter for vibration pumps is only about one hundred rubles.
Connecting a pressure switch
There are two commonly used schemes for connecting the pump automation and pressure switch. The method recommended by the manufacturer is always indicated in the accompanying documentation, but it will be useful to familiarize yourself with the possible schemes.
Important: When working, you must follow the sequence: first, the relay is connected to the water supply, and then to the electrical network.
On the pipeline
The relay is mounted on the pipeline (the choice of location is made taking into account the above rules and recommendations). Installation is carried out using a tee connected to a transition fitting (it can be replaced by a drain hose).
Review of popular models
There are two types of pressure switches: mechanical and electronic, the latter are much more expensive and are rarely used. The market offers a wide range of devices from domestic and foreign manufacturers, making it easier to select the required model.
RDM-5 Gilex (15 USD) is the most popular high-quality model from a domestic manufacturer.
RDM-5
Genebre 3781 1/4″ (10 cu) is a budget model made in Spain.
Genebre 3781 1/4″
Italtecnica PM/5-3W (13 cu) is an inexpensive device from an Italian manufacturer with a built-in pressure gauge.
Italtecnica PM/5-3W
The pressure switch is the most important element in the water intake system, providing automatic individual water supply to the house. It is located next to the hydraulic accumulator, the operating mode is set using adjusting screws inside the housing.
“Aquarius” is the best solution for home water supply
The market offers consumers a huge selection of pumping equipment. For a home water supply system, the best option is a submersible pump for wells and wells “Aquarius” from domestic manufacturers. The units have long proven themselves to be high-performance, long service life and high-quality workmanship. In addition to these advantages, the price of the product is several times lower than that of imported analogues with similar characteristics.
The submersible pump operates underwater. It is often undesirable to remove the unit from there. “Aquarius”, like all submersible analogues, is made in the form of an elongated capsule. The body is made of stainless steel. There are 2 loops on the top for securing the safety rope. In the center there is a pipe for fixing the supply pipe. The power cable enters the housing through a sealed connection. Inside the housing there is an electric motor, on the shaft of which impellers are mounted in a separate working chamber. In terms of design and method of water intake, Aquarius is classified as a centrifugal unit.
The surface-mounted unit is superior to a submersible well pump in its ease of start-up. It is enough to apply power, and the blades will immediately begin to capture water, supplying it to the system. To start a surface pump, you will have to pump water into the intake pipe and working chamber with an impeller through the filler hole. Aquarius pumps are produced in various capacities and sizes. In everyday life, models with a diameter of 110–150 mm are used, depending on the cross-section of the well casing pipe.
The video tells how to choose a pump and what models there are:
An example of a pumping station with a “Malysh” pump.
For an automatic pumping station you will need (minimum equipment):
— 3/4″ inch reinforced hose, for pressure up to 6-8 atm (for connecting a pump in a well with a hydraulic accumulator in the house and further to the point of water collection)
— coarse filter 50 rub.
- hydraulic accumulator, capacity min. 20 l - about 1000 rubles.
— 3/4 inch check valve (placed in front of the hydraulic accumulator) 100 RUR.
- 6 atm pressure gauge. 160 rub.
— pressure switch model RDM 5 price approx. 500 rub.
— a fitting with 5 nipples (five-piece) for connecting the entire equipment to each other.
— clamps for securing hoses, sealing gaskets, flax for sealing threads.
The water supply system is installed as follows. A hydraulic tank with an automation system is installed in a barn or in a house and is connected to a pump in the well with a hose and electrical wiring. Water is supplied to consumers from the hydraulic tank through a pipe. And now more details. We assemble the automation unit: we connect two electrical wires with plugs to the pressure switch, screw a filter, a pressure gauge, a pressure switch onto the five-piece, and screw the entire structure into the hydraulic accumulator. We connect a check valve to the filter with the flow direction towards the hydraulic tank.
We connect the “Baby” pump with a flexible hose to a check valve. From the five-piece on the hydraulic accumulator we lead a pipe or hose to the consumer. Everything is done with hydraulics, now electrics. We install two sockets for the pump control system - one in the well and connect the pump plug to it, the second in the barn or in the house where the hydraulic accumulator with automatic equipment is located and connect the pressure relay output voltage plug to it. We install another socket next to the hydraulic accumulator, connect 220 V to it, lower the pump into the well and plug in the second plug of the pressure switch into the network. ALL. The water supply for the dacha is ready! The pump works and supplies water to the tank with an automatic system. As soon as the pressure in the tank reaches the set value, the relay will operate and turn off the pump. The maximum and minimum pressure in the system is regulated by a pressure switch.
This type of water supply to my dacha has worked for two seasons without any problems - I plugged it into the socket and the water started flowing. I leave the pump in the well for the winter. I drain the water from the pipes of the water supply system and the hydraulic accumulator at the very end of the season, much later than in the first option with a self-priming pump. The hydraulic accumulator has a rubber container inside and is not afraid of freezing. And one more tip - to easily drain water from the system, I recommend placing a tee and a ball valve between the check valve and the filter.
Source
Rewind the reel
If you need to rewind the vibration pump coil, prepare the following consumables and tools:
While rewinding the coil, you will need to melt the epoxy compound. It is toxic, so carry out the work outside or in the garage. Place the filled electromagnet on the tile and wait until the epoxy heats up to 165 degrees. This will be visible from the toxic haze that appears.
Carefully knock the electromagnet out of the housing on a wooden object, while the electromagnet looks straight down. When the magnet changes its position, remove it. We clean the heated body from epoxy resin, using a screwdriver or a metal brush.
We knock the electromagnet out of the coil with a wooden wedge.
We do not clamp the coils in a vice, we only hold them with our hands.
Once the magnet is removed, unwind the coil, removing all the epoxy.
Using a winding machine, wrap the spool completely. Here you can do without a machine, but it will take longer to wrap it by hand.
Solder the ends of the wire to the main part, now we mount the electromagnetic core into the coil body. We solder the power cable to the beginning of the new winding. It is permissible to “seat” the coils by lightly tapping the core.
After mixing the epoxy with the plasticizer and adding the hardener, we pour it into the vertically fixed body of the device. Fill the compound to the top of the electromagnet, wait 10 minutes and add the compound again (after filling all the cracks, it will settle). After 24 hours, we assemble the pump and check its functionality.
Content
The information will be useful not only for assembling a pumping station from scratch, but also if it is necessary to replace certain parts that have failed. It is not necessary to buy a new station when only the storage tank is faulty: using the diagrams below it is easy to understand how to replace the part.
If you want to assemble a pumping station yourself, not because the parts are available, but because the finished system or its parts do not meet your dreams, you must understand that the cost of the equipment may be higher than the average price of the system on the market. This should be remembered when you need a larger hydraulic accumulator, more powerful devices, “higher pipes, thicker smoke.”
Submersible pump with automation
When the tap is opened, water flows from the storage tank (hydraulic accumulator). At the same time, the pressure in the tank decreases. As soon as it reaches the minimum value, the automation will work: the relay will start the station. The pump will begin pumping water: first covering the flow rate, then filling the tank. The pump operates in permanent mode. The relay will stop it when the pressure in the storage tank reaches the specified maximum value.
After the pump stops, the relay de-energizes the equipment, putting it into sleep mode, but the station is always ready for operation. Automation monitors the smooth execution of functions. Human participation is kept to a minimum: it would not be necessary at all, but before putting it into operation it is necessary to check the pressure in the tank and, if necessary, increase it using a conventional pump according to the instructions supplied with the equipment.
Note! The wonderful, but too weak “Baby” is not suitable for a pumping station. A more powerful pump is required.
The hydraulic accumulator is installed for a specific purpose - accumulating water and adjusting its pressure in the system. Without a storage tank, the relay will turn the pump on/off too often, which is why the pressure will begin to rise (the water either trickles or gushes).
Theoretically, modern equipment equipped with automatic equipment with integrated dry-running protection and a pressure regulator can operate without a storage tank. Practice shows otherwise: the said equipment needs equal voltage, but this is precisely not the case; in Russian conditions with a traditionally dancing current, a storage tank will eliminate problems with water pressure and endless stops/starts of the pump.
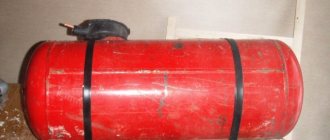
Hydraulic accumulators of various sizes
To make a pumping station from a submersible pump, you need to connect it to a storage tank and install automation.
Briefly about the main thing
There are several versions of the Baby pump on the market. All its modifications, like any other devices, are subject to breakdowns. They are observed in the electrical or mechanical part. Another common reason why the Baby pump does not pump is deformation of the housing and its liming.
You can deal with problems on your own. To do this, you need to study the structure of the device and disassemble it sequentially. Electrical and mechanical checks are carried out. Quality assembly completes the process.
It is recommended to check the Baby’s readiness for work in a small container before diving to depth.
Ratings 0
Pumping station or submersible pump
Autonomous water supply is important for owners of dachas, cottages and other country houses, that is, for those who do not have a centralized water supply, but have a constant need for it. There are only two options for organizing such a water supply - a pumping station with a submersible pump or just a submersible pump. What is the difference between them, what are the advantages and disadvantages of each system, what to choose for yourself and how to assemble a pumping station if this is the one you choose? You will find all this in our article.
Manufacturers
The names “Baby” and “Stream” have long become household names. This is what small submersible vibration pumps are called today. Initially, they were produced exclusively in Russia or in neighboring countries, but today there are plenty of Chinese “Kids” on the market. In general, there are several manufacturers of such pumps in Russia:
- In the city of Livny in the Oryol region and in Bavleny, Vladimirskaya, it is Babies that are produced. Most come with an upper water intake, Little M - with a lower one.
- Babies are also produced in Klimovsk, Moscow region.
- In Kursk and Kirov (Lepse plant) they produce pumps of the same type, but under different names - Aquarius.
- In Bryansk (Topol enterprise) Rodnichki are produced. Submersible pumps with the same name are produced in Chelyabinsk, as well as by the company Zubr.
- Rucheek units are produced in Mogilev (Belarus).
Different names and companies, some differences in characteristics, but all these are submersible vibration pumps of the Malysh type
The rest of the brands are Chinese. How to determine? Carefully examine the packaging and passport. If it is a Russian manufacturer, there must be an address, the name of the enterprise, a list of service providers, etc. If there is no such information, this product comes from the DPRK.
How to choose correctly
The choice of equipment depends on the calculated indicators, and we can talk about both the submersible pump itself and the station. Moreover, it makes sense to assemble the latter only when the basic equipment is available.
Basic parameters for choosing pumping equipment:
With the correct determination of all calculated indicators and selection of a pump that fully corresponds to the statistics of the well, the operation of the system and equipment will be comfortable throughout its entire service life.
What is the difference between a submersible pump and a pumping station
There are no difficulties in identifying such equipment. The pump, as the name suggests, is immersed directly into the well and remains there all year round. There is no need to remove the equipment after pumping is complete; simply turn it off.
Pumping station is a separate equipment, covered or installed in a room, through which a well is pumped out.
The big advantage of submersible equipment is that its engine is constantly cooled by a cool environment and, accordingly, cannot overheat. In addition, even on a small dive you cannot hear the characteristic motor noise.
The advantage of piece equipment is its small size. The diameter of some wells does not exceed 50 cm, including the casing, so it is impossible to use anything other than a submersible pump. At the same time, its power is enough to raise water to a height of 800 cm. You can lower it deeper, but in this case the operating pressure will not be stable and the slightest drop in network voltage may cause interruptions in the water supply.
The operation of the equipment will be facilitated by automation, which, when the level and pressure of water in the well changes, will, accordingly, turn on or off the pump.
If the dynamic and statistical water level in the well is always less than 800 cm, a submersible pumping station is not needed. Installing a submersible pump will be much more rational and correct.
First, let's look at the principle of its operation. When any tap connected to the general water supply system opens in the house, water is drawn from the storage tank. As water is consumed in the accumulator, the pressure decreases accordingly. As soon as it reaches the calculated minimum, the switch-on sensor is triggered and the missing water begins to be pumped into the storage tank. No human participation is required in this process, everything is automated.
This set is standard for both expensive and budget equipment, but more expensive models are additionally equipped with a protective relay that prevents equipment from overheating.
Considering that the unit is very noisy when turned on, it is usually installed in technical rooms - garage, utility room, technical floor, etc. It can even be a separate building, provided there is sufficient insulation.
It is clear that the operating principle is the same in both cases - the liquid is pumped out and then supplied to the house. But if the pump pumps up and turns off, then the pumping station always has a “strategic reserve” of water, which may be enough for some time if there is no water in the well. In addition, the use of a hydraulic accumulator makes it possible to neutralize the effect of water hammer that occurs with each switching on of the equipment.
There are situations when the pumping station works, but does not pump water. This can happen in three cases: there is a lack of water in the system, the pressure of the pump has dropped, or the equipment has broken down. If the pressure drops, it can be pumped up with a regular bicycle pump.
Features of operation of downhole equipment
Regardless of the location and volume of groundwater, at some point in time the water in the well may disappear. This period lasts from several hours to several weeks. Accordingly, if there is no water in the well, the pump will simply burn out. The simplest but most effective means of protecting against dry running is a float system (“frog”), which, if there is a lack of liquid, simply opens the circuit and does not allow it to close until the system is filled to the required level. The protection of a well pump from dry running in an autonomous water supply system is described in more detail in the corresponding article.
What to choose?
Since the modern market offers a large assortment of equipment for supplying water to the house from individual sources, you can make an objective choice only when you are well versed in the pros and cons of each system.
Structurally, both are, first of all, a pump, which can be either a downhole (submersible) or surface (with a hydraulic accumulator).
Advantages and disadvantages of the surface system
Downhole equipment
extended service life due to pump cooling;
Application area
The operating power of the Malysh pump is small, so it cannot be used to extract water from deep artesian wells. But it works great in wells and wells “on sand”, and can also pump water from rivers and lakes containing mechanical impurities.
What problems can be solved with its help:
- Raising water from a depth of up to 40 meters;
- Its pumping into the water supply system of the house and site;
- Watering garden plants;
- Pumping water from swimming pools, flooded basements and cellars;
- Washing cars, paths and areas, building facades, etc.
Note. The design of the vibration pump Malysh allows it to be used for pumping liquids contaminated with insoluble impurities - sand, silt. But if their quantity exceeds the maximum permissible, a filtration system is needed.
We assemble the pumping station ourselves
In what case is it profitable to assemble a station with your own hands? Before you jump on the idea of assembling a pumping station with your own hands, you should know when such feasibility exists. Moreover, if you have all the necessary parts for it at hand, purchased in advance in a store or somehow found yourself at the right time and place of assembly.
Moreover, we are usually talking about self-assembly, if existing components or assemblies mean the most expensive hydraulic accumulator and/or pump. Indeed, in terms of its value, the same pump represents the actual half of the station, based on its total cost. The same value of a hydraulic accumulator is about a third.
Therefore, having both at hand, there is no need to purchase an entirely new station. If one of the above is missing, then you can simply supplement this main pair of components by replacing a failed burnt pump or a hydraulic accumulator crushed in winter. This solution is also supported by the fact that they are attached to each other without any problems, in any of the available modifications.
Another reason to assemble the station with your own hands is that if the ready-made one, the one available in the store, does not meet some technical characteristics. For example, if you are not satisfied with the parameters of the pump, if you need a unit of greater power, or the reliability is not the same, the dimensions are not the same, the cost is not what was calculated, and so on. The third reason may be the deep location of the water lens or a significant distance from the object to which water should be supplied.
To install or not to install a hydraulic accumulator?
There is a separate question about the advisability of using a hydraulic accumulator. Some believe that this part of the pumping station is simply not needed. But if there is a regular automation unit at the station, then the picture is quite predictable when the constant turning on and off of the pump will turn into one big headache. And this is not such an unattainable prospect: at the slightest water flow, the pressure will quickly drop, and as soon as the pump turns on, on the contrary, it will quickly increase. In order to prevent the pump from twitching in each such case, there is a hydraulic accumulator that acts as a damper that regulates the process of accumulation and flow of water.
However, currently in service there are already automation units with built-in protection that facilitates smooth starting and stopping of the pump. However, there is still a danger here: at the periphery, the voltage can “jump” in a fairly noticeable range, and stabilizers will not save you from this disaster. And the cost of such a station is unreasonably higher.
Advantages of a pumping station
The pumping station is an excellent alternative to the vibration pump, to which most Russian summer residents are accustomed. Compared to it, the station will simply be a blessing to civilization. Its advantage also lies in the fact that it is easily assembled before starting work in the garden, and in the fall it is disassembled and transported to the city. In this case, there is no need to be afraid that it will be kidnapped by some hucksters or torn apart by frost. However, even in this case it is impossible to solve the problem of a stable supply of water, for example, at home.
The most common version of the station has a centrifugal pump, which requires an automation unit. Such a unit is assembled quite simply, from a pressure gauge, a pressure switch and a manifold, which are available for sale in any specialized store. Buying a ready-made block may be more expensive. It's just a small matter: the block is installed on the pump pressure.
There are a wide variety of blocks available for sale, including in price ranges. Of course, more expensive ones will regulate the operation of the stations more efficiently and reliably. In particular, they are equipped with up to three degrees of protection against pressure pipeline rupture, pump overload and dry running. The biggest negative property of all these blocks is their block nature: if the slightest part fails, then the entire unit must be replaced.
From “pump on a barrel” to “like in an apartment”
According to the most common scheme, the pumping station is a type of “pump on a barrel”. An automation unit is mounted on the pump pressure, and water is supplied to the hydraulic accumulator using a separate tube or flexible connection. Thus, an independent space can be created between the pump and the accumulator, including using a longer outlet.
Another good option is when the hydraulic accumulator is connected to the automation unit; this “tandem” can be placed in a permanent place in a warm place, and the unit’s manifold is connected to the pump using a pipe. This scheme is called a distributed pumping station, and the pump itself can be located directly in the well (if the pump is submersible) or a well.
Further improvement of the circuit may concern the automation unit, which can be installed on the cold water distribution manifold. In this case, the automation will “take” control of the necessary pressure parameters, which is, in fact, what is required. In this situation, the location of the hydraulic accumulator is under the bathroom or in any other free place in a warm room.
Thus, it is quite reasonable to install the pump as close as possible to the reservoir from which the water is taken, and as far as possible from the house. After all, his work, and even a fairly constant one, may not be to the liking of anyone at home. If you manage to put everything in its place, you get the most comfortable option, “like in an apartment.” Agree that it is strikingly different from the original version, and provides maximum convenience with a full water supply.
Do-it-yourself automation for a well or with the help of professionals
General operating principle of automation ↑
Despite the difference in price and functionality, modern automatic units work according to the same scheme - various sensors monitor the pressure level and adjust it as necessary.
A good example is the operating principle of a simple pressure switch:
- The device is installed in two positions - maximum and minimum pressure in the system - and connected to the hydraulic accumulator.
- The accumulator membrane reacts to the amount of water, that is, to the pressure level.
- When the minimum permissible level is reached, a relay is turned on, which starts the pump.
- The pump stops working when the upper sensor is triggered.
More advanced systems that operate without a hydraulic accumulator can be equipped with additional options, but the main principle of operation of the automation for a well pump remains unchanged.
Types of automation for well pumps ↑
First generation ↑
The first (simplest) generation of automation includes the following devices:
- Pressure switch;
- Hydraulic accumulator;
- Dry running blocking sensors;
- Float switches.
The pressure switch was mentioned above. Float switches react to a critical drop in liquid level by turning off the pump. Dry running sensors prevent the pump from overheating - if there is no water in the chamber, the system stops functioning. As a rule, a similar scheme is used in surface models.
The simplest automation for a well pump can be easily installed with your own hands. The system is also suitable for drainage equipment.
Second generation ↑
The second generation automatic blocks are more serious mechanisms. It uses an electronic control unit and several sensitive sensors attached to different places in the pipeline and pumping station. Signals from the sensors are sent to a microcircuit that fully monitors the operation of the water supply system.
The electronic “watchman” reacts in real time to any deviations from the norm. In addition, it can be equipped with additional functions:
- Temperature control;
- Emergency system shutdown;
- Checking the fluid level;
- Dry running blocker.
Important! The big disadvantage of this automation scheme for well pumps is the need for fine tuning, the tendency to break down and the rather high price
Third generation ↑
Important! If you do not have experience in water supply, you will not be able to install automation for a well yourself. Only a specialist can determine which algorithm is best to program the system with
Automatic block with your own hands ↑
Do-it-yourself automation for a well pump is often cheaper than a factory set of equipment. When purchasing components separately, you can always choose the best option for the purchased pump model without overpaying for unnecessary additional options.
Important! Such amateur activities require a certain level of knowledge. If you cannot call yourself a specialist, it is better to purchase pumping equipment with pre-installed automation
Basic assembly diagrams ↑
Among the automation circuits for well pumps, the following types have proven themselves well:
All automation units are collected in one place. In this case, the hydraulic accumulator can be located on the surface, and water is supplied to it through a pipe or flexible connection. The circuit is suitable for both surface and deep-well pumps.
Control unit on the hydraulic accumulator
With this placement, it is recommended to connect the system manifold to the pump supply pipe. It turns out to be a distributed station - the unit is located in the well, and the control unit with a hydraulic accumulator is installed in the house or utility room.
Distributed pumping station
The automation unit is located near the cold water collector, maintaining a constant pressure level in it. The pressure line extends from the pump itself. With this scheme, it is better to use surface models.
Installation tips ↑
In order for automatic equipment to serve you faithfully, you need to take care in advance about the correct location for its installation:
- The room must be heated year-round.
- The closer the remote block is to the well, the better. The ideal option is to equip a small boiler room near the caisson.
- To avoid pressure losses, install the pumping station in close proximity to the collector.
- If the equipment will be located in the house, ensure high-quality sound insulation of the room.