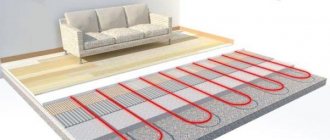
The most comfortable and most economical way to heat your home is to install heated floors. This method retains a significant amount of heat - up to 20-30% with a ceiling height of about 2.5 m and up to 50% with higher ceilings (3.5 m and above). But a water heated floor is a rather complex engineering system; its design requires certain knowledge.
I welcome my regular reader and bring to his attention an article about what is the optimal distance between underfloor heating pipes and what factors it depends on.
There are many advantages to heating a house using underfloor heating:
- The entire room is heated, and in the most physiologically comfortable way - it’s warmer downstairs, cooler at head level.
- There is no strong convection, heat does not rise to the ceiling and is not wasted, so this heating is more economical.
- Dust and dirt do not collect on heating devices.
- Devices and communications do not take up space, curtains and furniture do not block the heated floor structure and do not interfere with its operation.
But comfortable heating is achieved only with proper installation and adjustment of the heating system. One of the main factors determining the power of a heated floor is the distance between the heating pipes.
Common installation steps
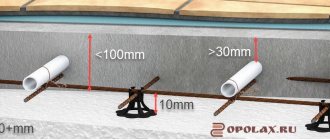
Typically, pipes are laid so that the distance between them is 100-300 mm. More precisely, the step is determined only after calculating the total length of the pipeline and determining the heating area (room area minus the area of bulky furniture). In practice, the distance is calculated approximately (see below), and then a diagram of laying the heated floor is drawn and the step is specified.
The approximate distance in bathrooms is 100-150 mm, in living rooms - 250 mm, 300-350 mm in corridors, lobbies, kitchens, utility rooms, storage rooms, etc. The interpipe distance may vary in different parts of the same room - it can be smaller near the outer walls and more in the rest of the room. Any method of arranging warm pipelines may have different pitches in different parts of the room.
Advantages of the system
The advantage of a water-heated floor circuit is its durability when installed correctly.
When arranging a residential building, it is important to pay attention to heating. A comfortable and economical way is to create a heated floor. It allows you to save up to 30% of heat at a ceiling height of 2.5 m and about 50% at a height of more than 3.5 meters. A water heated floor is a complex design, the creation of which must take into account many factors.
The advantages include:
- Heating the entire area of the room. For this, the most comfortable method is used - the greatest heat at the bottom and lower temperatures at head level.
- Lack of strong convection. The heat does not rise to the ceiling level, so there are no unnecessary costs or losses. This also leads to savings.
- No contamination of the system and its hygiene. Dust quickly accumulates on radiators, which can interfere with the operation of the equipment. A water floor accumulates less dirt and is easier to remove.
- Warm floors take up minimal space. Providing maximum heat will not be hampered by furniture and partitions.
- Safety. The design does not harm the environment and human health.
- System availability. All the necessary materials can be found in any hardware store for different budgets.
- Strength. Subject to installation conditions and proper use, the floor will last for decades.
- Self-regulation of the system. It turns on and off when preset temperatures are reached. This also leads to significant savings and no waste of thermal energy.
Comfortable heating can be created only after careful calculations of the heated floor and communications that ensure the movement of the coolant.
How to calculate pipe length
Traditionally, in calculations it is assumed that 5 m of pipe is enough to heat 1 m² of floor (see plate above). The nominal distance will be 200 mm. Based on this ratio, you can calculate the nominal length of the entire pipeline: multiply the total area of the room by 5 and round up.
For corner rooms with one window, it is better to increase this length by 20% (1.2), with two windows - by 30% (1.3). For the northern regions of the Russian Federation, it is necessary to multiply the resulting length by another 20% (by 1.2).
For example, for a corner room with an area of 20 m² with two windows and in a cold region of Russia, the length of the pipeline will be:
This calculation uses the total area of the room without deducting the area of large pieces of furniture. This is done because the air above the sofas (and even cabinets) also needs to be heated; part of the heat is spent on heating the furniture itself. If you calculate based on the reduced area, the room will be cool, but in a small room filled with furniture it can simply be cold.
When purchasing, you need to add a small margin for turns and inaccuracies (6%, or a coefficient of 1.06) and double the distance from the collector to the room.
Determining the maximum length of one contour
The maximum length of one circuit should under no circumstances exceed 100 m - otherwise the pump simply will not push the coolant into the circuit. And it’s better to divide a hundred-meter circuit into two - heating will improve, and if there is excessive heating, you can always adjust the heating of each circuit using a three-way valve in the manifold assembly.
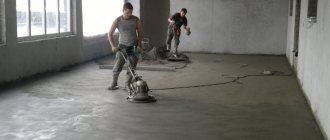
Solution
Cement mortar for this purpose is prepared simply; you can make it yourself. Purchasing a ready-made mixture will save time, but financial costs will increase.
So, a modern heated floor is able to function independently. But it can be combined with other methods of heating a home.
In this case, it is necessary to calculate the distance between the pipes of the water heated floor - Correctly applied technical design features can warm the home in any season.
- Related Posts
- What characteristics does a two-core heated floor have?
- How to lay a heated floor on the ground?
- How to set up a heated floor?
- How to lay cable heated flooring?
- How to lay heated flooring under laminate on a wooden floor?
- How to install Energy heated floors?
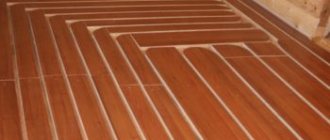
Laying forms
There are various ways to lay pipelines in a screed.
Snake
When laying in a snake or meander pattern, the pipelines are placed in parallel. The room is heated unevenly. The method is suitable for small rooms. The snake is used for a combined installation method - communications are laid along the outer wall and cold air is cut off.
When laying with a snake, a short distance or additional heating (radiators) is required.
Corner snake
The pipe is laid along the outer corner, the next turns are laid in parallel so that the pipeline occupies a square. Suitable for warming up corners. The double corner snake is used for rooms that have three external walls.
Double snake
The beginning and end of one heating circuit are laid in parallel. Of all the snake options, it provides the most uniform heating of the room.
Snail
Otherwise, this method is called snail, shell, spiral. The pipelines are laid in a spiral, ensuring maximum uniform heating of the entire area. This makes it convenient to place pipes in large rooms.
Which way is better
The combination of two installation options allows for optimal placement of communications in the room. In large rooms, it is better to use a snail or combine it with a snake - lay several pipes in a snake near the outer wall, and arrange the pipes in a spiral along the rest of the area.
A snake near the outer wall will cut off the cold from the walls and windows. You can adjust this circuit to a higher coolant temperature.
In small rooms, such as a bathroom, a corridor, a snake is optimal. In medium-sized rooms there is a double snake. When laying pipes using the corner snake method, the room will warm up unevenly; the use of a corner snake is appropriate only when heating corners during combined installation.
Often, combined options or changing the distance are used deliberately - to compensate for unheated areas (under upholstered furniture) or to heat a workplace, a play corner for children, etc. For example, it is better to heat it up a little more:
- An area near a desk, sewing machine or piano - there a person sits motionless and can freeze.
- Part of the room where children often play a lot.
- Warm areas around the bed, a relaxation area with upholstered furniture in the living room.
In any case, before installation with your own hands, you need to draw a pipeline laying diagram, calculating the length of the pipeline and the distance between turns. Then arm yourself with a pencil and graph paper and draw a diagram taking into account the arrangement of furniture and the method of laying out the heated floor. At the same time, take into account the increase in the frequency of installation of upholstered furniture, beds and other places that require warmth.
The intricacies of laying and connecting pipelines can be seen in our video.
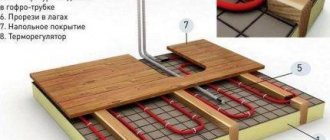
Installation recommendations
It is convenient to lay pipes on mesh or cellular insulation.
You can do high-quality installation with your own hands. To do this you need to adhere to the basic rules:
- Do not change the approved pipeline layout during installation. The developed plan has been calculated, so the slightest changes will lead to disruption of the system.
- The coolant should not be subjected to mechanical stretching, heating, or deformation.
- Pipes should be cut before connecting them to the pump.
- Do not step on the coolant during installation work.
- To make it more convenient to lay the pipes, you can use a lined foil backing.
By following the recommendations listed, you can make high-quality installation of pipes for heated floors.
Features of pipe fixation
You can secure pipes under a heated floor using one of the following methods:
- plastic strips;
- rugs that have laying grooves;
- metal tapes;
- separate brackets.
The most convenient installation method is to attach the circuit to clamps. When using point brackets, maintain a distance of 20-25 cm. They are used to uniformly heat the screed, regardless of the chosen installation method.
Is it possible to join a pipe for a heated floor?
When laying a copper system in a screed, the pipes will most likely have to be joined together. This connection is reliable and durable. Soldered connections of polypropylene pipes and welding of polyethylene using a thermistor coupling are also reliable. The issue is more complicated with the use of fittings for HDPE, PE-X and thermostable polyethylene (PE RT).
Press fittings can be used, although it is not advisable (anything can happen, any connection can leak). But when connecting pipelines to the collector, you cannot do without press fittings. It is not allowed to connect pipes with each other using push and compression fittings. The same applies to collet connectors for HDPE.
It is advisable to use flexible pipes in one whole piece - it is more reliable. Drying the floor, repairing the lower room and breaking the screed in case of leakage are more expensive.
What components are needed
To perform this type of work with your own hands, you will need the following additional materials:
- Thermal insulation for laying under pipes. Styrofoam is a good choice for this;
- Waterproofing - most often dense polyethylene is used for this purpose;
- Damper tape to compensate for the expansion of concrete screed as a result of heating;
- Reinforcing mesh - necessary to ensure the strength and rigidity of the entire structure;
- Special clamps that will ensure high-quality fastening of the pipeline;
Output of heated floor pipes - Collector - will ensure the distribution of water throughout all circuits of the system. If the design is multi-circuit, then install a manifold with a regulator that allows you to set the water pressure in each of the circuits;
- Mixing unit – ensures maintenance of a comfortable temperature and controls the mixing of hot and cooled water in the system;
- Fittings for connection.
In addition to all the components, you will also need various tools, such as:
- Hammer or drill - for drilling the necessary holes;
- Screwdriver – for fastening pipes to the floor;
- Special soldering iron if plastic products are used;
- Adjustable wrench;
- Hacksaw for cutting pipes.
When all the tools and materials are ready, you can begin installing the heated floor.
Possibility of connection to one unit and pump
The number of loops that can be connected to one collector and one pump is determined depending on the power of the equipment used, the number of thermal circuits, the diameter and material of the pipes used, the area of the heated premises, the material of the enclosing structures and many other various indicators.
Such calculations must be entrusted to specialists who have knowledge and practical skills in carrying out such projects.
Design of cable heating
The main differences between electric heated floors are heating elements consisting of cables or cable sections.
Let's consider the varieties and calculation methods. A resistive heating cable is a heating element made of a single or two-core cable in a protective screen, with a constant resistance, which is laid over the floor area.
The cable has standard lengths, and therefore resistance and heat generated. The cable length cannot be changed, this will lead to a change in current and malfunction.
Specific power and length
This is the capacity of one sq.m of heated floor. The length of the heating electric cable is selected based on this indicator.
For example, the power of the cable system for proper heating should be about 100-150 W/m2; if the heated floor is planned to be used as the main heating, then 150-200 W/m2 is needed. If we need to heat 10 m2, then we need a cable with a power of 10*100=1000 W.
How many meters of cable is this?
What to pay attention to when performing work
When installing a heated water floor structure, you need to take into account some important points that will improve the efficiency of the entire system.
- If rigid pipes are used to construct a pipeline, they are fixed at a distance of a meter from each other. When elastic materials are used, fastenings are performed more frequently;
- To achieve maximum structural rigidity, it is necessary to attach it to the floor in several places using self-tapping screws and dowels;
- It is advisable to assemble the entire underfloor heating system with a minimum number of joints - this will reduce the likelihood of water leakage;
- When pouring a concrete screed, you need to carefully level the floor surface; it is better to do this under the control of the building level. A perfectly level screed will help in the future to lay the flooring efficiently;
- The distribution system is installed in a location convenient for maintenance. In a private house this may be a basement, or in an apartment a small niche in the wall;
- You should not save when choosing materials for installing such a floor heating structure, since water heating is not done for one year and requires a lot of costs, both time and money.