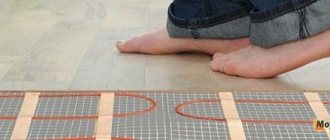
Warm water floor is a special heating system that is distinguished by its simple installation technique, affordable price and low costs during use. It is also worth noting that the water system, unlike the electric one, is completely safe for people and animals.
There is nothing complicated in the installation technology, so with the desire and certain knowledge, anyone can install heated floors. As a result, this will reduce costs, which directly affects the cost and operation of the heating system.
Advantages and disadvantages
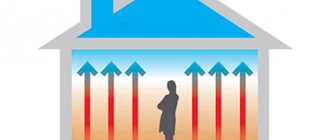
The main advantage of a hydraulic heating system is uniform horizontal heating of the room. The heat in the room spreads vertically, thereby providing a healthy microclimate, which radiator devices cannot provide. Warm floors are an ideal option for rooms with high ceilings.
Also, water-heated floors benefit from an aesthetic point of view. They are completely invisible and do not take up free space. In addition, they are more economical when used.
The efficiency of the system will depend on the quality of the thermal insulation. This is due to the fact that the level of heat loss directly affects the reduction in heat transfer. But it is worth considering that installing such a system in a bathroom or toilet has certain disadvantages. The heating element is usually connected to a heated towel rail, which can cause the floors to overheat.
Also, water-heated floors “take away” the height of the room due to the thick concrete screed. In addition, concrete pouring makes the entire structure heavier, so sometimes there is a need to strengthen the coatings.
Laying forms
There are various ways to lay pipelines in a screed.
Snake
When laying in a snake or meander pattern, the pipelines are placed in parallel. The room is heated unevenly. The method is suitable for small rooms. The snake is used for a combined installation method - communications are laid along the outer wall and cold air is cut off.
When laying with a snake, a short distance or additional heating (radiators) is required.
Corner snake
The pipe is laid along the outer corner, the next turns are laid in parallel so that the pipeline occupies a square. Suitable for warming up corners. The double corner snake is used for rooms that have three external walls.
Double snake
The beginning and end of one heating circuit are laid in parallel. Of all the snake options, it provides the most uniform heating of the room.
Snail
Otherwise, this method is called snail, shell, spiral. The pipelines are laid in a spiral, ensuring maximum uniform heating of the entire area. This makes it convenient to place pipes in large rooms.
Which way is better
The combination of two installation options allows for optimal placement of communications in the room. In large rooms, it is better to use a snail or combine it with a snake - lay several pipes in a snake near the outer wall, and arrange the pipes in a spiral along the rest of the area.
A snake near the outer wall will cut off the cold from the walls and windows. You can adjust this circuit to a higher coolant temperature.
In small rooms, such as a bathroom, a corridor, a snake is optimal. In medium-sized rooms there is a double snake. When laying pipes using the corner snake method, the room will warm up unevenly; the use of a corner snake is appropriate only when heating corners during combined installation.
Often, combined options or changing the distance are used deliberately - to compensate for unheated areas (under upholstered furniture) or to heat a workplace, a play corner for children, etc. For example, it is better to heat it up a little more:
- An area near a desk, sewing machine or piano - there a person sits motionless and can freeze.
- Part of the room where children often play a lot.
- Warm areas around the bed, a relaxation area with upholstered furniture in the living room.
In any case, before installation with your own hands, you need to draw a pipeline laying diagram, calculating the length of the pipeline and the distance between turns. Then arm yourself with a pencil and graph paper and draw a diagram taking into account the arrangement of furniture and the method of laying out the heated floor. At the same time, take into account the increase in the frequency of installation of upholstered furniture, beds and other places that require warmth.
The intricacies of laying and connecting pipelines can be seen in our video.
Premises requirement
Since the structure has significant weight, a large length of pipes and many connecting nodes, the installation of the system has its own characteristics.
As a result, each layer must be laid strictly according to the instructions. But before that, you need to carefully study all the features of preparing the premises.
Warm water floors are most often used in private homes. In multi-storey buildings, they create a large load on the floors, and the risk of flooding the neighbors below cannot be ruled out.
It is also worth considering that the coolant circuit is connected to a general heating system, which most often is not intended for such purposes. As a result, cold risers may appear in your or a neighboring apartment. As a result, the relevant authorities rarely issue permission to install the system in high-rise buildings.
At the moment, two systems are often installed in new buildings at once. The first is intended for standard heating, and the second is specifically for heated floors.
The optimal solution is to install heated floors yourself at the construction stage.
When installing the structure in a finished structure, it is necessary to take into account:
- foundation strength;
- door frame size. The minimum height must be at least 2 meters 10 centimeters;
- distance from floor to ceiling, since the concrete screed is quite voluminous.
In addition, the heat index should not exceed 100 W/m2.
Purpose of pipelines and their characteristics
Types of pipelines in heating systems
Before starting calculations and selecting materials, you should find out the operational features of heating mains. Their main task is to deliver coolant from the heating boiler (distribution unit) to radiators and radiators.
At first glance, installing a transport highway does not present any difficulties. It is enough to take into account the specifics of the material of manufacture, install compensators for heating pipelines in the right places, and ensure tightness. But in fact, after such an unprofessional approach, problems may arise during work. To avoid them at the design stage, you need to know in advance the basic requirements for the organization of pipelines:
- Nominal pressure value and temperature mode of heating operation . Pipes must withstand the maximum value of these parameters without deformation or change in their performance;
- Take into account the features of the chosen scheme - one-pipe or two-pipe. To carry out repair work in certain areas, jumpers are required in the heating pipelines. In particular - when tying radiators;
- External factors - exposure to direct sunlight, the possible influence of negative temperatures and the quality of the coolant. To maintain the original flow capacity, heating pipelines are periodically flushed;
- Observe the installation rules - angle of inclination, distance between heating pipelines and provide for the presence of shut-off valves. Availability of a safety group to compensate for excessive pressure and thermal effects from the coolant.
Where should you start designing heat mains in an autonomous system? First, a diagram is drawn up - one-pipe, two-pipe, collector. Then it is necessary to perform a full calculation of its characteristics. First of all, select the thermal operating mode, hydraulic resistance and optimal pressure. Based on the data obtained, pipes are selected.
For systems with natural circulation, it is necessary to install pipes of large diameter - from 24 mm and above. In this way, it is possible to compensate for the friction of the coolant on the inner surface of the line.
Water heated floor design
The water heated floor includes:
Pump
The control system for a warm water floor includes a pump, since without forced circulation it is simply impossible to achieve uniform flow of coolant. In addition, this device helps maintain a constant temperature in the system.
For warm water floors, only centrifugal pumps are used. They are designed for different operating modes; accordingly, to change the temperature of the coolant, the device pushes water into the circuit at different speeds.
Boiler
A boiler is necessary to heat the coolant, but if the floor is connected to a central hot water supply, then it is not necessary. It is usually installed for autonomy.
Its distinctive feature is the operating temperature, which does not exceed 45°C. This fact is worth paying attention to if the system is powered by a gas boiler.
Collector
The circuits, boiler, pump and other elements of the control unit are connected to each other using fittings. This creates several contacts, seams and joints. The risk of leaks will depend on their number. In order to minimize the chances of a breach occurring, a collector is used. It consists of two combs, each of which is represented by a pipe with holes. Their diameter varies from 8 to 12. The first pipe is designed to distribute hot liquid along the circuits, and the second to collect cooled coolant.
Thermostat
A water heated floor system rarely consists of a single circuit. Each of them is regulated separately. Servo drives and thermostats allow you to control the system automatically. As a result, the user will be able to save up to 30% of energy consumption.
In addition, thermostats with touch or remote control are often installed. They have full functionality. They are often used in the smart home system.
Pipe insulation
More detailed information about the insulation of pipes in horizontal ceilings can be studied in the standards SP 41-102-98.
Corrugation or shell is used to maintain a certain temperature in the pipeline. At the sites. Condensation sometimes accumulates with cold liquids, and insulation helps significantly reduce the risk of excess condensation.
When arranging a concrete screed, corrugation is most often used. As a result, the pipes are additionally protected from solution pressure. It is possible to find materials in blue and red colors on sale.
If the height of the screed exceeds 10 centimeters, then use rigid corrugation. If an additional shell is put on, the layer height can reach up to 7 cm. Double protection helps to cope not only with the pressure of the concrete screed, but also with subsequent loads.
Calculation rules and installation options
The material consumption and thermal efficiency of the finished system directly depend on the chosen installation method.
There are three ways to place pipes: snake, snail and combined.
Snake
The method is characterized by simplicity of calculations and ease of installation, which makes it very popular. This scheme is best suited for industrial buildings, rooms with low heat losses and objects that require year-round heating.
We recommend that you read: How to install a chimney for a potbelly stove?
Note! The maximum temperature in the room is regulated by SNiP and is +25°C for facilities with permanent occupancy and +32°C for periodic ones.
The main disadvantage of this installation method is the noticeable temperature difference in different areas of the floor. In addition, pipes often bend at quite large angles, which makes the implementation of projects with small pitches problematic. Partially solving this problem will be the use of a steel spring, which is stretched to the location of the future bend and prevents the formation of a break.
Snail
The designation “spiral” or “shell” is also found. In this scheme, the temperature field is distributed more evenly over the floor surface, since the direct and reverse circuit pipes are laid alternately.
The pipes are placed parallel and mounted in the direction from the walls to the center. In the middle part of the room, the supply line ends with a loop that turns into a return circuit, running, on the contrary, from the center to the collector.
Advantages of this installation method:
- Uniform heating of the room.
- No sharp bends and, as a result, low hydraulic resistance.
- Reduced consumption of pipe material.
This method is considered the most labor-intensive for design and practical implementation.
Combined method
As a rule, this installation method is chosen for large rooms, the floor surface of which is divided into separate zones. For each zone, the optimal method of pipe arrangement is selected: in the area of windows, doors and along the perimeter - in a snake, in the center of the room - in a spiral.
Pipe laying is carried out using the floor or concrete method:
- In the first case, ready-made rack or modular panels are used, equipped with grooves and posts for convenient fixation of pipes. After laying the pipes, the structure is covered with gypsum fiber boards and flooring. Despite the convenience and speed of installation, this method has not yet become widespread.
- Installation in a concrete screed will require much more time. Just drying and strengthening the concrete layer will take at least 28 days (depending on the thickness of the layer).
We recommend that you read: How to make and install a protective exhaust hood on a chimney
The procedure for laying the screed is carried out in the following sequence:
- Waterproofing layer. Placed in the lower part of the structure, it prevents the formation of condensation.
- Thermal insulation. Any sheet insulating material will do. Its task is to prevent heat from escaping downwards, and the thickness of the layer is determined according to external climatic conditions.
- Foil film. Redirects the maximum volume of warm air into the room, allowing you to save on coolant consumption.
- Reinforcing mesh. Provides the screed with the necessary strength.
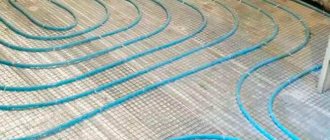
- Pipeline installation. One or more circuits through which coolant circulates.
- Control tests. Coolant is supplied to the installed system.
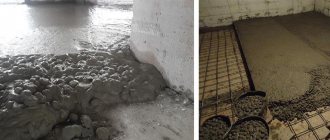
- Screed. Pouring the finished pipeline with a cement-sand mixture. The layer thickness usually does not exceed 35-50 mm.
- Flooring. Ceramic tiles show the best heat transfer rates.
Which pipes to choose
Currently, manufacturers offer a large number of pipes that are suitable for laying warm water floors.
They are made from a variety of materials:
- Stainless steel corrugation. This type of pipe can be spliced with confidence. In this case, they use fittings that are among the most durable and reliable. The material bends easily while maintaining position.
- Copper. Copper pipes cost quite a lot. In addition, during the pouring process you will have to take care to protect the base from alkaline influence.
- Polypropylene. This type of pipe is not used for heated floors. This is due to the fact that the material is too strong to bend, so it is simply impossible to organize a 20-centimeter hose without soldering. This is unacceptable.
- Polyethylene. Pipes are made from cross-linked polypropylene. The material has two classifications: PEX-a and PEX-d. Only the first group is suitable for heated floors, since the second shrinks over time.
- Metal-plastic. Metal-plastic pipes do not cost too much, and besides, there are no problems with their installation.
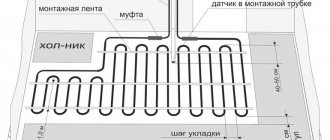
Increasing the distance between individual strands of the heating cable.
For all manufacturers, the permissible distance between adjacent threads can vary from 5-6 to 15-17 cm (when laid in a screed 3-5 cm). There is no need to greatly increase the distance between the individual threads, because uneven heating will become noticeable. On the other hand, reducing the distance leads to excessive cable consumption and the risk of unacceptable proximity of adjacent cable strands. When installing cable heating, the floor temperature sensor should be placed in a plastic corrugated tube. This is done so that in the event of a malfunction, the broken control device can be easily replaced.
Laying schemes for water heated floors
Water heated floors can be laid in a spiral, snake, double snake and corner snake.
Spiral pipe laying is considered the most effective, since the floor is heated as evenly as possible. In a “snake”, the further the pipes are from the collector, the lower the temperature. The “double snake” slightly compensates for this difference, but installing such a system yourself is quite difficult.
Common installation steps
Typically, pipes are laid so that the distance between them is 100-300 mm. More precisely, the step is determined only after calculating the total length of the pipeline and determining the heating area (room area minus the area of bulky furniture). In practice, the distance is calculated approximately (see below), and then a diagram of laying the heated floor is drawn and the step is specified.
The approximate distance in bathrooms is 100-150 mm, in living rooms - 250 mm, 300-350 mm in corridors, lobbies, kitchens, utility rooms, storage rooms, etc. The interpipe distance may vary in different parts of the same room - it can be smaller near the outer walls and more in the rest of the room. Any method of arranging warm pipelines may have different pitches in different parts of the room.
How to calculate pipe length
For water heated floors, three main pipe sizes are made: 16x2, 17x2 and 20x2 millimeters. The first and third types are most often used.
It is very important to carry out sizing calculations before purchasing a heating cone. If you doubt your own abilities, then you should seek help from professionals.
To do this, you need to have a layout of the water heated floor and areas of the floor where furniture and plumbing will be placed. It is important to consider that pipes are not installed under furniture.
It is important that for a product with a diameter of 16 millimeters the contour length does not exceed 100 meters, and for a product with a diameter of 20 millimeters - 120 meters. Accordingly, each of them will occupy no more than 15 m², otherwise the system will not be able to provide the required pressure.
If the area of the room is much larger, then it is divided into several such circuits. It is important that they are the same size. The difference should not exceed 15 meters. If there is good thermal insulation, then the standard laying step is 15 centimeters, but if desired, it can be reduced to 10 centimeters.
In the first case, 6.7 meters of pipes will be needed per square meter, and in the second - exactly 10 meters.
Also, when calculating the size of the system, you should take into account the material of the pipes, heat loss, power of the system and floors, flooring, etc.
To determine the size of the outline, you can use a standard formula. That is, the heated area (m²) must be divided by the laying step (m). The size of the curls and the distance to the collector are added to the resulting value.
How to determine the area of a room?
Before installing a heating structure, you need to calculate its power depending on the area of the room, so that the structure can heat the rooms evenly. In order for the pipeline to function optimally, you need to install a circulation pump. When choosing power, you need to pay attention to some factors:
- tube diameter;
- number of additional branches, connecting fittings, pipeline footage;
- required pressure;
- amount of coolant.
Installation of a warm water floor on a concrete screed
It is important to consider that self-installation of a warm water floor with a concrete screed is a labor-intensive and time-consuming process, since it takes at least a month for the concrete to harden.
When constructing a structure, it is necessary to proceed in several stages, which will be discussed below.
Layers of water heated floor
Water heated floors are a “pie” that consists of several layers. Place them in a certain sequence. Typically, the thickness of the structure varies from 8 to 14 centimeters, and the load on the floors reaches 300 kilograms per square meter.
The heated floor includes:
- reliable and solid foundation;
- a vapor barrier layer with a thickness of 0.1 millimeters;
- insulation, that is, extruded polystyrene foam;
- reinforcement, which gives the structure strength;
- heating elements, that is, pipes that are laid according to the diagram;
- concrete screed with a plasticizer, the thickness of which can reach 5 centimeters.
After the concrete has hardened, a finishing floor covering can be laid on its surface.
Waterproofing
The waterproofing layer is laid on a previously prepared subfloor, which must be clean and as level as possible.
The most commonly used waterproofing material is polyethylene film, which is overlapped one on top of the other and 20 centimeters apart on the walls. To make the joints as tight as possible, they are usually glued with tape.
Damper tape
The damper tape is used to compensate for the expansion of the screed as the system heats up. It helps protect the surface from cracking. The thickness of the tape usually does not exceed 8 millimeters, and the height is 15 centimeters.
The tape is glued around the perimeter of the room, at the junction of the floor and walls. It is important that it is higher than the screed. After completion of work, the excess can be trimmed with a knife.
Laying insulation
Choosing the right insulation is very important. The efficiency of the equipment largely depends on it, since it should not waste heat.
Experts advise using extruded polystyrene foam or profile polystyrene mats.
When installing yourself, it is very important to choose the right thickness of the material. If the installation of a heated floor is carried out above a warm room, then 3 centimeters is more than enough, then if the system is located on the ground, then at least 10 centimeters.
It is important to lay sheets of insulation around the perimeter of the area and fix them to the base.
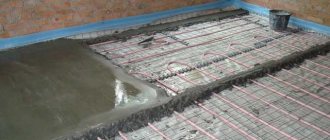
Reinforcement
The mesh helps to significantly increase the strength of the structure. In addition, it is responsible for the uniform distribution of heat, since heating elements are attached to it.
Typically, the diameter of the reinforcing mesh rods does not exceed 5 centimeters, and the size of the cells depends on the laying step.
It is best to lay two reinforcing layers. The first is located on the insulation, and the second is laid on top of the pipes. The meshes are connected to each other using wire.
Laying and fastening of pipes
The most important step is laying the heating elements. It is worth considering that a device is needed that makes it possible to unwind pipes in coils, because removing them with rings is prohibited due to the high voltage, which interferes with the installation process.
The installation process will become simpler if the insulation has markings. Otherwise you will have to apply it yourself. Marks are made in accordance with each step of the heating elements. It is possible to mark a line and draw a route using masking tape.
It is necessary to retreat 15-20 centimeters from the walls. Ideally, each contour should be uniform, that is, without seams and with a maximum size of 10 centimeters. Installation is carried out according to a certain scheme. The permissible step near the walls is 10 centimeters, and closer to the center - 15.
It is important to install the circuit in the most distant areas from the collector. Transit sections are usually insulated with foamed polyethylene, thereby saving energy and preventing heat from being lost along the way. It is worth considering that both ends must go to the place where the manifold cabinet is located.
To fix the contour, fastening profiles are used. They are screwed to the floor using dowels. After this, the pipes are pressed against the reinforcing mesh and secured with plastic fasteners. It is not recommended to pinch the pipe, since the loop should fit freely against it.
Since the material is subject to deformation, the contour must be bent carefully, especially if the pipes are made of polyethylene. Polypropylene pipes are difficult to bend, as they tend to spring. As a result, during installation they are fixed directly to the mesh with a significant degree of angle. If streaks or white spots appear on the materials, it should not be used.
Pipes with a diameter of 16 to 20 millimeters can be bent with your own hands, without the use of special equipment
Hydraulic tests
Immediately after installation, the system must be connected and checked for integrity and operability.
The collector, which is responsible for supplying coolant, has a ball valve to which tap water is connected. In this case, a pressure testing pump must be connected to the outlet of the connecting pipes.
The system filling process looks like this:
- all channels except one are closed, and the air vents are opened;
- water is supplied, after which its cleanliness and exit from the system are monitored through the drain hose;
- when the air is completely released and the water becomes completely clean, the tap is closed and the filled system is shut off;
- if the system has several circuits, then each one must be checked;
- as soon as all circuits are washed and filled, you need to close the tap that supplies water.
As soon as the procedure is completed, only air should remain in the works, and the water should be crystal clear.
If a leak is detected, the pressure in the system must be relieved and repaired.
Installation of beacons
In order for the screed to be level, it must be poured along the beacons. Most often, a plasterboard profile is used as beacons.
Beacons are installed in accordance with the level of the finished floor, subtracting the thickness of the coating itself. To secure the guide profile, use mortar pads on which the plasterboard product is placed
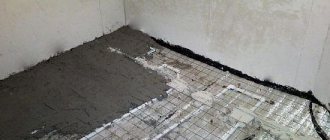
Filling the screed
The solution must be laid from the far corner of the room. Filling is carried out in accordance with the beacons. The process must end with a strip at the exit. During the leveling process, you should not try to immediately create an ideal surface. The main thing is that there are no large holes. The minimum layer thickness is 3 centimeters.
In this form, the screed must be left for a couple of days for it to set. Only after this is it possible to begin cleaning work.
Expansion joints
If the temperature gaps are located incorrectly or are not there at all, the screed may collapse.
The need to install shrinkage joints arises if:
- the room has a curved shape;
- room area more than 30 m²;
- the size of the walls exceeds 8 meters;
- the difference is more than double in the length and width of the room.
It is necessary to lay damper tape around the perimeter of the seams. The reinforcement at the seams must be separated. The thickness of the gap for deformation should be 1 cm.
The upper part of the seam must be treated with sealant. If the room has a non-standard shape, then it is divided into parts that have a rectangular or square shape.
Cracks in the screed
After hardening, cracks often appear on the screed. This can happen due to incorrect ratio of components in the solution, poor compaction of the solution, or a variety of other factors.
To avoid cracks, you must:
- prevent the concrete from rapidly hardening by covering it with plastic film a day after pouring;
- dividing large rooms with shrink joints;
- using insulation with a density of at least 40 kg/m3;
- using a more plastic solution for pouring, which contains fibers and a plasticizer.
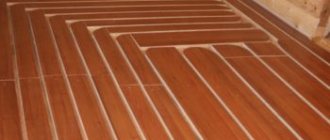
Laying the finishing coating
It is important to choose only a topcoat that is specifically designed for installation on heated floors. It is best to use ceramics and porcelain stoneware. You can also use laminate, linoleum or parquet if there is a marking that allows installation of the material on heated floors. It is important to lay the flooring only on a well-dried concrete screed.
Installation nuances
In order for the flooring to turn out to be of high quality, craftsmen advise adhering to a number of rules.
- It is not recommended to adjust the approved pipe layout directly during the installation process.
- Heat transfer fluids must not be subjected to mechanical stretching, deformation or heating.
- The pipes are cut before connecting them to the hydraulic pump.
- Careful placement and connection of all components guarantees the tightness of the heating system as a whole.
- It is not recommended to step on it while laying the coolant.
For ease of pipe laying, you can use a lined foil backing
Selecting pipes and determining the optimal step for laying the flooring yourself is not so difficult. The main thing is to remember that all manipulations are aimed at creating a comfortable and cozy home environment.
Rules for calculating pipe footage
You can calculate the footage of elements for assembling heated floors after drawing up a diagram of the entire system.
When calculating, the following nuances are taken into account:
- Pipes are not laid in places where furniture, large floor equipment, and household appliances are placed.
- The length of contours with different cross-sectional sizes must comply with the following parameters: for 16 mm it should not exceed 70 m, for 20 mm - no more than 120 m. The location of each circuit corresponds to an area of 15 m2. If you do not follow these recommendations, the pressure in the heating network will be low.
- The discrepancy between the length of the lines is no more than 15 m. For a large room, several heating branches are installed.
- Provided that effective heat-insulating materials are used, the optimal pipe spacing is 15 cm. If the house is located in an area with harsh climatic conditions, where the temperature drops below -15°C, the distance should be reduced to 10 cm.
- If the installation option was chosen in 15 cm increments, the material costs are 6.7 m per 1 m2. Laying pipes at intervals of 10 cm - 10 m per 1 m2.
Warm floors can only be equipped with a solid pipe. Depending on the footage, several or one coil with pipes for the water circuit is purchased. Then it is divided into the required number of lines.
When laying pipes, it is necessary to take into account hydraulic losses, which increase with each subsequent turn. It is considered that contours exceeding 70 m should not be used
Work on installing heated water floors always begins on the coldest side of the room. The issue of choosing the optimal route for the coolant is very important - the water temperature decreases closer to the end of the circuit.
Calculate the maximum length of one contour
If we consider heated floors, then they encounter the effect of a locked loop. When coolant circulation is impossible at any pump power. This effect occurs with a pressure loss of 20 kPa (0.2 bar).
It is quite problematic to calculate on your own using formulas, so it is better to use a number of recommendations that have already been developed by experts.
If you have a pipe with a diameter of 16 mm made of metal-plastic or polyethylene, then the loops need to be made no more than 100 m, and to further protect yourself, it is better to increase it to 80 m.
With a diameter of 18 mm, the maximum is taken to be 120 m, and better not more than 100.
With a diameter of 20 mm, the maximum is 120-125 m. Ideally, it should not go beyond 100.
Commissioning
Full maturation of the cement screed occurs after a month, which is when balancing needs to be done using collector flow meters.
Using balancing valves, the coolant flow is regulated; it should become the same in all circuits. If you have no experience with self-balancing, it is better to invite a specialist.
After manipulating with cold water, if the system is working correctly, you can conduct tests with heated coolant. At this point, the installation of the heated floor is considered complete.
Testing the connected system.
Before pouring the floor, be sure to test the connected circuit. This will allow you to identify possible leaks and malfunctions.
A test pump will be required for testing.
Procedure for filling the system:
- Only one circuit being tested remains open on the collector
- Once all the air has escaped and the water is completely clean, the drain valve is closed. Then the circuit under test is closed. (already washed and filled with coolant)
- The operation is repeated with each circuit separately
During the test, it is necessary to check the presence of air in the system and the cleanliness of the coolant. The test must be carried out until the water is completely clean.
The purity of the water is checked using the drain hose. Excess liquid is drained into the sewer through a drain hose connected to the collector. During the test, automatic air vents are open.
Finally, the entire system must be tested:
- Each of the circuits in your manifold is open
- Clean water is poured into the pump
- By means of a pump, a pressure is created in the system approximately 2 times greater than the working pressure (6 atm.)
- System integrity is visually assessed
- The system remains at a pressure of 6 bar for one day
- If you find no leaks, the system has passed the test
The role of the collector unit
Not everyone knows that heated floors with a water circuit can function normally without a collector. But even less people know what this looks like in practice.
Manufacturers recommend using pipes with a length of no more than 70 m. If the coils are arranged with a maximum pitch gap, then this length will be enough for only 7 m2, which will ensure the arrangement of three circuits in a room with an average area
However, in most cases, a heated floor system is installed in several rooms. In this case, without a collector unit it is impossible to ensure uniform distribution of the coolant.
Installing floor heating without a collector has a number of disadvantages: the coolant can only be supplied at the same temperature as in a general heating system, automatic air outlet is not possible, the same applies to pressure regulation.
Is it possible to join pipes to each other?
If a water floor made of copper pipes is laid in a screed, then the pipes will have to be joined to each other. This will make the structure more reliable and durable. When installing polypropylene products, the connection is made by soldering, and in cases with a polyethylene circuit, the connection is made by welding a heat-resistant coupling.
The situation is more difficult when connecting PE-X and PE-RT pipes with fittings. Installation of press fittings is acceptable, but not recommended, as leakage may occur. But to connect the pipeline to the collector unit you cannot do without press fittings.
Important! Connecting circuits using push and compression fittings is prohibited. This also applies to push-in connectors for HDPE.
It is better to take a flexible pipeline for a warm floor, in one solid piece. This is more reliable and practical, since if there is a leak, repairing the lower floor will cost more.
Warm floors are a modern heating system that, with the correct choice of material and accurate calculations of the distance for laying loops, can create an ideal microclimate in the house.
The final stage. Choice of flooring.
Ceramic tiles are considered the best option, since when they are heated, no harmful chemical processes occur. This option is ideal for bathrooms, toilets and kitchens. When choosing a coating for other rooms, the main thing is to choose a coating with special markings. Heated floor coverings are marked with a special sign.
Warm floor sign
Collector connection diagram
The choice of a ready-made mechanical or automatic collector model depends on the characteristics of the heating system.
The first type of control module is recommended to be installed for heated floors without a radiator, the second can be used in all other cases.
Valtec collector groups are the most popular. The manufacturer provides a 7-year warranty on its products. The installation diagram for the liquid circuit manifold is already included in the package of the finished mixing unit
According to the diagram, the assembly of the distribution comb for heated floors is carried out as follows:
- Installation of the frame. The following can be selected as the installation area for the collector: a prepared niche in the wall or a collector cabinet. It is also possible to mount directly to the wall. However, the location must be strictly horizontal.
- Connection to the boiler. The supply pipeline is located at the bottom, the return pipeline is located at the top. Ball valves must be installed in front of the frame. They will be followed by a pump group.
- Installation of a bypass valve with a temperature limiter. After this, the collector is installed.
- Hydraulic test of the system. Check by connecting to a pump, which helps build up pressure in the heating system.
In a mixing unit, one of the required elements is a two- or three-way valve. This device mixes water flows of different temperatures and redistributes the trajectory of their movement.
Shut-off valves and fittings are installed on both pipelines, return and supply, connected to the manifold installation, designed to balance the volume of the coolant, as well as to block any of the circuits
If servo drives are used to control the manifold thermostats, then the mixing unit equipment is expanded with a bypass and bypass valve.
Construction of a base for a heated floor.
Warm floors must be installed on a solid foundation. For example, on a concrete slab. Then the thickness of the “general” floor layer will not exceed 8 cm. When laying the floor directly on the ground, it is necessary to level it as much as possible and insulate it as best as possible. The thickness of the insulation will depend on the weather conditions of the area and the specific location. In the event that the warm floor is laid above the basement, or on floors above the first, the thickness of the insulation will be minimal. About 3 cm.
Insulation and waterproofing.
Professionals advise laying waterproofing (for example, a thick film) to protect the insulation from cement-sand mortar and to avoid the formation of condensation.
Instead of thick plastic film, you can use roofing felt. Pieces are cut from a roll of film or roofing felt along the length of the room and laid overlapping each other (overlapping about 20 cm). Also, the waterproofing must be wrapped on the walls.
Insulation is placed on top of the laid waterproofing, which serves to retain heat in the room. Of the many options that modern manufacturers can offer, professionals advise choosing from two options:
- Extruded polystyrene foam. It has all the necessary advantages. It has reduced thermal conductivity and increased moisture resistance. It is also very wear-resistant.
- Expanded polystyrene in the form of profile mats. The main feature of this type of insulation is the surface with protrusions. This makes it easier to lay pipes. The pitch of the protrusions in this insulation is 5 cm. The main disadvantage is the increased cost compared to EPS.
When choosing the thickness of the insulation layer, several important conditions should be taken into account.
- When laying insulation directly on the ground, its thickness must be at least 10 cm. You can also consider the option of two-level installation. Two layers of insulation 5 cm thick.
- When laying insulation in the room under which the basement is located, a layer of 5 cm.
- When laying on all subsequent floors, its thickness can be up to 3 cm.
To attach the insulation you will need umbrella dowels or disc dowels. Harpoon clamps are required to secure the pipes.
Procedure for laying out insulation:
- Level the surface where the thermal insulation will lie. This is best done with sand or rough screed.
- Laying pieces of waterproofing. The seams must be taped.
- Direct laying of insulation boards joint to joint. (marked side should be up)
- The seams between the plates must also be taped.
- Secure the insulation with dowels.
If you lay insulation in two layers, you should follow the principle of brickwork. The seams of the top and bottom layers should not match.