assets/from_origin/upload/resize_cache/iblock/421/600_450_2/42190ed1a75fec22d035991d5c2876f8.jpg From this article you will learn:
- Where should the stages of apartment renovation begin, be it a resale or a new building?
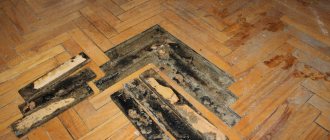
- What are the stages of renovation in an old apartment?
- In what order should repairs be done in a new building?
- What little things to consider anyway
The need to renovate an apartment evokes a lot of different emotions in people. On the one hand, this is the anticipation of novelty, beauty and comfort, on the other – inevitable inconveniences, unforeseen expenses and eternal fears that the result will not coincide with expectations. In order to psychologically prepare for the upcoming interior remodel, it would be good to take a closer look at what stages of apartment renovation you will go through. This will help you decide whether you will try to realize your idea of an ideal home arrangement yourself or invite professionals.
Step-by-step apartment renovation from scratch: where to start?
When determining the sequence of actions when renovating an apartment,
start with the dirty work! These include:
- demolition of walls and partitions;
- cleaning surfaces from old coatings;
- removal of bulky waste.
Apartment renovation time frame
When starting your own work, know that there is no clear answer. But you can take the following steps as a working diagram:
- installation of an electrical network (without light, it will not be possible to provide normal working conditions for any team);
- installation of windows and entrance door;
- dismantling old and installing new plumbing;
- changing radiators and meters;
- replacement of interior doors;
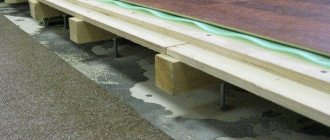
- work with flooring (dismantling and laying);
- finishing of ceramic tiles in personal hygiene rooms (bath, toilet, toilet) and kitchen;
- work on the ceiling and walls (painting, plastering, wallpapering).
Advice! If you need to carry out a major renovation, you will have to go through all the stages. And it’s better to have one team of craftsmen do it. Then both rough and fine finishing fit equally well.
Apartment renovation: stages and order of work
When the time comes for work in the apartment, defining the stages and order of the procedure is an important basis for achieving your goals. You should prepare for both the cosmetic and capital varieties.
TOP 7 stages of preparation for apartment renovation
Follow this simple plan and you will succeed:
- Consider what you'll do once you've determined which type suits you best.
- Determine who will do the repairs (yourself/a team/several craftsmen).
- Calculate your expenses. This can be done either independently or using special programs. For example, on the website of the Repair Master there is a calculator, when you enter basic data on the apartment, area, type of building and expected results, you will be given future costs that are as close as possible to real ones. Having received the total amount of finances, you can estimate whether you can handle such expenses. Although, it is often better to take out a loan from a bank, but carry out the work on time, without expecting deeper damage to surfaces, cracks, etc.
- Study the websites and offers of companies and repair teams. Choose the best one according to your taste or reviews from friends or based on reviews on Internet resources. Contact them, hold a meeting and let them calculate the costs, issue the amount and calculate the time for the work. If everything is suitable, sign an agreement, which must indicate not only all the services that will be provided, but also include general estimates and stipulate in writing the conditions for what will happen if a failure or force majeure occurs.
- Clear the premises. Remove old items and furniture that needs to be replaced. Put away the equipment. Remove everything from the walls, from pictures to sconces, clocks and mirrors. Remove the fasteners and bolts yourself (so as not to pay repair crews).
- Create a schedule for repairs. If you are a responsible apartment owner. Plan to observe the stages and level of cosmetic, major or VIP repairs.
- Accept work from the crew. Your apartment should simply shine after the renovation. If this is not the case, do not be afraid to voice your complaints. It's your money and right. Discuss the points you don’t like, as they will remain in your home.
Apartment renovation on schedule - guarantee of meeting deadlines
The repair contract includes not only an estimate, but also a calendar schedule, which indicates the procedure and timing of the work. This allows customers to control the progress of repairs and always be aware of the situation at the site. And to find out in advance how long the alteration will take, you can use the online schedule on the Fundament website. It already includes all standard general construction and finishing measures, so to calculate the repair time you just need to indicate in the appropriate field the start date of work and the area of the apartment.
Psychological approach to apartment renovation
To implement this TOP 7 stages of preparation for repairs (which are listed above), you need to prepare psychologically and have:
- Determination. Stop being afraid and take the first step! Then the second and third. And then everything will go like clockwork.
- Interest. Even if you don't have enough money, there are things you can save on. For example, cleaning the apartment before renovation on your own. Or create some decorative elements yourself. Sometimes, if you have a little experience, you can do the rough work yourself. Although this requires specialized knowledge and skills.
- Logic. You'll have to evaluate what needs replacing now and what parts could last just fine for another year or two.
- Tendency to delegate and abstract. This will be very useful. There will be many advisers among relatives, friends and acquaintances. You will have to learn to “move away” from their opinions and trust yourself. That's the minimum. Or leave everything in the hands of professionals. In this case, you save several vital resources: money, time, nerves.
How to begin apartment renovation step by step
When planning to change your home, remember the sequence of renovations in the apartment
. We are ready to give you a checklist of professional solutions in this area:
- start from the entrance and from the periphery to the center (entrance door, windows, renovation of utilitarian premises, improvement of living rooms);
- rough finishing (if you bought an apartment in a new building, get ready to adjust or redo this area);
- clean repairs.
Some of these actions are described above.
And yet, let's repeat.
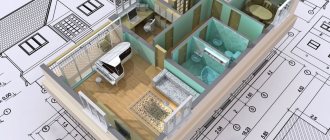
No. 1. Drafting
When a designer takes on your home, it will truly be transformed. But for this, a design project must be “born into the world.” And then, based on it, purchase building materials.
List of materials for apartment renovation
Before performing this action, it is better to look on the Internet and check the cost. But it’s better to call the points where, in your opinion, the best prices! So you will also have to spend your time and effort on saving and preparing!
To ensure the same cost, and sometimes even cheaper, check with the contractor whether he works directly with suppliers of building materials. If yes, order turnkey repairs! This option is a discount on the services of workers + the purchase of materials by them.
No. 2. Dismantling works
If you have a cosmetic renovation, it is enough to remove the equipment, take out the furniture, remove the wallpaper or flooring (depending on what will be changed). And with a capital one, you have to leave the apartment “bare”.
No. 3. Installation of communications and windows
Installation of doors, windows and communication systems is carried out at stage 3. Now is the time to lay electrical networks, install heating and hot water pipes. And also install sewerage and water supply systems.
No. 4. Rough finish
Essentially, this is the leveling of all surfaces. Often the walls are leveled first. Plus - they plaster, especially if the work is carried out in a brick house. This work is not carried out in a panel house.
If the ceiling is not suspended, then it should also be plastered.
No. 5. Finishing work
This is something you “have to live with” - painted/pasted walls, laid material on the floor, etc.
How to make a modern renovation in an apartment
Pre-finishing
After completing the rough finishing, you are probably asking the question: how long will the renovation last, and when will the apartment look like the picture in the design project? So far the changes are not very pleasing to the eye, and it seems that the final is far away. However, we can congratulate you, because you have already passed half the way! Pre-finishing takes approximately ¼ of the total time allotted for repairs. During it, every day you will see how the appearance of your home is transformed. All the rooms change dramatically, they become bright and already resemble a living space. As part of the pre-finishing process, a self-leveling floor is poured and the walls and ceiling are puttied. All work is carried out, with the exception of finishing.
Putty of walls and ceilings
At the pre-finishing stage, it is necessary to obtain perfectly smooth surfaces. After plastering, the walls and ceiling are leveled, but the smoothness necessary for applying the finishing coating is not ensured. At this stage, the surfaces are puttied and sanded. Puttying time depends on the selected finishing coat. This is due to the type of finishing coating planned on the wall or ceiling. If the wallpaper is then pasted, then things will go faster. If surfaces are being prepared for painting, work proceeds slower, because... a perfectly flat surface is required, which can be achieved with a large amount of applied material (putty) and more thorough sanding of the surface. In our apartment, chosen as an example, wallpaper will be used as a finishing coating on the walls and this stage will take us from 8 to 10 days.
Pouring self-leveling floor
Self-leveling floor is the final leveling of the floor. It is not always used. For example, when the floor screed is not poured due to the small thickness of the planned screed. Or when a rough screed is poured, without the use of beacons, and an absolutely flat surface is achieved by pouring the self-leveling floor. Self-leveling floors, poured in accordance with technology, are considered the best base for the subsequent installation of most types of floor coverings. At the end of the pouring, you will see a perfectly flat horizontal surface around the entire perimeter of the room, regardless of the base.
It's nice that filling doesn't take much time. If you ask, how many days will it take to work in our 72 m2 apartment? Then we will make you happy: it will only take 2 days, because... It’s quite possible to fill up to 30-40 m2 per day.
What determines the sequence of renovations in an apartment?
There is a special sequence of repairs in an old apartment
and new.
For example, there is nothing in housing from scratch. Therefore, all stages will be completed, but perhaps even without dismantling. There are essentially no old surfaces.
A new building usually has an entrance door, metal-plastic windows and quite decent (lately) rough finishing. In this case, it is worth assessing the level of work performed by the repair teams. And, if everything suits you, continue finishing. But most often, owners change the front door. This is a special sequence for renovating a new apartment
in a new building, when there is no need to invest in rough finishing.
In the secondary, it’s unlikely that any of the stages will have to be changed. Especially if a major renovation is planned. During cosmetic treatment, the sequence varies depending on the action plan. Also, changes may depend on whether the owners stay in the (2, 3 or 4-room apartment).
But in any case, wallpapering and fresh painting of the walls are carried out at the end of the repair, so that the dust from installing the ceiling or transforming it does not settle on the above-mentioned surface.
There are several practical tips and even life hacks from professionals that will allow you not to disrupt the sequence of renovations in your apartment:
- Include money in your spending plan/budget for removal of bulky and regular construction waste.
- Remove the film from new windows and doors, as well as the glass on them, after the repair work is completed.
- In advance, even before installation, you must know all the features of the shower cabin, bathtub, where and what “wet appliances” will be placed. This will allow the repair team not to “go astray from the action plan” and not to redo the drainage and connection points.
- In order not to destroy the plasterboard walls, electrical work should be carried out along with the installation of these surfaces.
- When gating is planned, only vertical grooves can be carried out in a panel house.
- If you want to build a wardrobe, water heater into plasterboard walls, or hang a bookshelf, TV or kitchen cabinet, immediately notify the craftsmen. Otherwise, the wall may not withstand it over time. In this case, in order not to disrupt the sequence of actions, they will first install the embedded materials, and then install the plasterboard wall. The same thing applies to plans for heavy curtains and plasterboard ceilings.
- In order not to disrupt the sequence of repairs, the “principle of simultaneity” often works. For example, when replacing doors. If they are removed and installed, then in all openings of the apartment at once.
- Sometimes wall decoration is not the final stage. This is the case when you need to varnish the floor material. That is, first they scrape the parquet, seal the cracks, cover it with a primer and work on the wall. And only at the final stage the floor surface is varnished.
Who controls the overhaul?
If in your home money for major repairs is accumulated in a special account of the regional operator, then the regional operator should control all the work. Indeed, according to Article 180 of the Housing Code of the Russian Federation, in this case the reoperator must become the customer for major repairs. In a situation where your home has a special account to which funds for major repairs are transferred, then all complaints about quality should be addressed to the management company, HOA or housing cooperative. That is, the organization that services your home.
Stages of apartment renovation with rough finishing
If rough finishing has already been done, remember: haste is a bad advisor. The level of task completion should be considered. If everything is in order, you can proceed to the next steps:
- Evaluate doors and windows. If necessary, replace them.
- Plaster, if necessary, the ceiling and walls.
- Paint or whitewash the ceiling.
- Carry out work on the flooring: lay boards or tiles.
- Treat the walls (whitewash, paint, wallpaper).
- Install permanent structures (kitchen furniture and built-in wardrobes).
- Install skirting boards.
If it is necessary to carry out rough repairs, work should be carried out without violating the sequence of stages:
- Take out everything old: from furniture to communications that need to be replaced.
- Floor screed. Leveling is the basis for a good floor covering. It can be wet or dry. The main thing is to choose the most suitable process. Because in the first option the drying process lasts at least 4 weeks, and in the second - only about 3 days.
- Alignment of walls. The correct wall geometry catches the eye of everyone: both owners and guests. Therefore, cement or gypsum based plaster should be in the hands of real professionals. The dry method of leveling walls is plasterboard. It is economical to use and allows installation in 24-48 hours.
- Working with the ceiling. At this stage there are also 2 types of alignment. When wet, drying time is a week. Before plastering, the ceiling is cleaned of dirt and dust. Then they prime. And only after that they level it out. The dry method is simply installing a suspended ceiling. The sequence is very simple: metal profile frame + drywall. Execution time – 1-2 days.
Therefore, it is possible to carry out rough repairs in a week, or in a month and a half.
Rough finishing and engineering
What is this with a not very glamorous name - rough work? The concept of rough finishing includes work related to leveling and preparing the main surfaces (floor, ceiling, walls) for their subsequent finishing, erecting partitions and plasterboard structures, forming doorways, laying plumbing pipes and electrical networks. This stage takes a fairly long period of time - from 50% or more of the total repair period. But due to its importance for the final result of the repair work, it cannot be reduced.
Rough finishing consists of the following stages.
Construction of interior partitions and formation of doorways
Additional interior partitions and doorways are mounted from brick, tongue-and-groove or foam block. Installation of partitions made of brick takes more time than construction of tongue-and-groove and foam block partitions. The brick is smaller in size and requires more mortar to lay it. On average, a partition with an area of up to 10 -12 m2 can be erected from brick in one day. Partitions with an area of up to 15-18 m2 are installed daily from tongue-and-groove or foam block. In an apartment with an area of 72 m2 (which we took as an example), we will build partitions from tongue-and-groove slabs, and their installation will take from 3 to 5 days.
Laying electrical networks;
Electrical wiring work includes gating walls, laying cables, and installing socket boxes. On average, work in our 72 m2 apartment will take from 4 to 5 days. The timing of electrical installation is directly affected by the method of laying electrical networks. They can be mounted in three different ways: open, hidden and combined.
- With the open installation method, the cable is laid in special boxes and cable channels. For fastening, staples and clips are used.
- With hidden installation, the wiring is located in the wall. The channel is pre-drilled. The cable is also installed in voids, ceilings, under floor coverings and behind drywall.
- The combined method combines open and hidden installation.
Filling the screed
Floor screed is used to level the floor during a major renovation of an apartment. For cement-sand screed, a solution of cement, sand, water and additives is used to ensure the strength and elasticity of the solution. For a thick layer, over 6 cm, expanded clay is additionally added to the mixture, which makes it easier to screed and reduces the cost of rigging. Reinforcing fibers and modifiers prevent cracks from appearing. The service life of such a screed is tens of years. The only disadvantage of cement-sand screed is the long drying time after pouring. The turnaround time for filling the floor in our example apartment is 4-6 days. After pouring, it is recommended not to start the next work for 2-3 days for the initial strength of the cement-sand mortar to gain strength. The full strength gain of the screed occurs after 28 days. But don’t be alarmed, this does not mean at all that work will not be carried out in your apartment or house for almost a month. In parallel with the drying of the floor screed, plumbing work is usually carried out, and if there is no high humidity in the apartment, you can begin pre-finishing.
If the apartment is larger than 120 m2, it makes sense to think about a semi-dry screed. The advantage of it is that it is done in an apartment in just one day. That is, it allows you to save at least a week in terms of volume and a little in cost. But let me remind you that this is only beneficial on an area over 120 m2. Otherwise, this type of floor leveling is not economically profitable.
Plastering walls and ceilings
During this work, an important parameter that affects the speed of work is the thickness of the plaster layer. The smaller the layer, the faster the work progresses, and accordingly, the faster the subsequent drying of the applied solution. And large layers, more than 3 cm thick, are recommended by manufacturers of building mixtures to be applied in two passes, in order to avoid shrinkage of the solution during drying. On average, walls and ceilings with an area of up to 12-15 m2 are plastered in 1 day. The apartment from our example with an area of 72 m2 will be plastered in 2-2.5 weeks.
Installation of plasterboard structures
Plasterboard structures are very popular when arranging modern housing. With the help of gypsum boards you can change the shape and size of the room, create an additional niche or arch. Most often, plasterboard structures are used to create suspended ceilings, for example, to create a multi-level structure in which lighting is located. Or to create decorative niches, projections, columns or pilasters on walls. These decorative elements are often used to disguise communications, lay electrical networks or ventilation ducts inside them. Installation of gypsum boards does not take much time. In our test apartment, 10 days were allotted for this work.
Sequence of major renovation of an apartment
When working with housing, professionals most often have to deal with major repairs. Often owners have no time for cosmetic repairs - this is the result.
Therefore, you need to know the sequence of work during a major renovation of an apartment.
:
- Planning. Preparatory work (removing garbage, equipment, removing chandeliers, mirrors and everything “extra”). As a result, there should be “bare” walls and floor.
- Dismantling of unnecessary structures and communications. If the renovation is cosmetic, then you need to remove the wallpaper and linoleum. If it’s major, there’s more work. This could be dismantling partitions, heating systems, plumbing, replacing a toilet, bathtub, shower, etc.
- Repair and installation of communication systems. At this stage, radiators are replaced, hoods are installed and air conditioners are installed. Updated electrical wiring is also an important type of service at this stage.
- Surface finishing. Usually the rule is this: it must be carried out from top to bottom, from the ceiling to the floor. But more often, pasting and painting the walls is done at the final stage. As for surface treatment, first they are leveled (see above), then plastered, then puttyed and opened, as necessary, with a primer. And then (optional) - paint, wallpaper. At the end, the baseboards are installed.
Important! When making repairs in a multi-room space, you should start from the remote rooms, completing the repairs closer to the front door. In this case, excess garbage is not spread around the apartment as much.
How does a major overhaul differ from a current one?
Current and major repairs are two types of repairs that differ in the methods of financing and the list of types of work. Current repairs are carried out by the organization that maintains your home. It is paid from funds collected for the maintenance of the common property of the house. A fund will be formed over the course of several years for major repairs. The overhaul is financed from this fund. In addition, the house may receive subsidies from the federal or regional budget.
As for the work, current repairs are precautionary in nature. According to the Rules for the Maintenance of Common Property of Apartment Buildings, the management organization must conduct inspections of the premises and, on their basis, draw up a work plan for routine repairs. During the overhaul, in-house utility networks and elevators are comprehensively restored or replaced, and restoration work is carried out on the facade and roof of the building.
Sequence of renovations in an old apartment
Often in the secondary market, your hands are more “free” regarding the creation of project documentation. Often, repairs are made first, and then the necessary documents are signed.
Important! We must remember that if unapproved changes are detected in the design or during repairs, you can get... a fine! And he's not small enough.
Some friends told us a story that a neighbor, due to increased audibility of sounds, filed a complaint against the residents upstairs. During the inspection by DEZ employees, it was discovered that there was simply no soundproofing layer in the above-mentioned apartment. People had to restore it. But after paying the fine.
The same goes for plumbing work. When carrying out such repairs, contact not only the repair teams, but also the housing office employees. After all, they are the ones who must have complete information about the central risers and other parts of the water supply system.
So we determine the sequence of repairs in the apartment from scratch
:
- Removal of old coatings.
- Change of double-glazed windows. After dismantling the old ones and installing new ones, they should be covered with thick plastic film. This helps prevent scratching and smudging during all types of services.
- Plastering. This procedure is not as simple as it seems. During the process, markings for the beacon profiles are carried out, the walls are treated with a primer, and the beacon profile is installed. And only then - covering the walls and slopes with plaster.
- Installation of electrical communications. We are talking about installing or replacing a heating system, laying or wiring electrical cables. Everything related to the Internet, telephone, alarm and TV is carried out at this stage. It is better if the wiring diagram is drawn in advance.
- Preparing the floor. First of all, we are talking about the screed. Also at this stage, a warm floor is installed or the surface is simply leveled.
- Door installation. Many teams like to install doors after changes have been made to the floor.
- Finishing work. There are variations here. For example, if you plan to whitewash and paint the ceiling, then do it first, and then finish the walls. If the plan is to install a suspended ceiling, then install it when the walls have already been finished.
- Installation of decor and small elements. We are talking about trims and sockets. Also at this stage the installation of skirting boards takes place. And in the kitchen and bathroom - small plumbing fixtures, faucets and various accessories.
Important! If this sequence is used as stages of turnkey apartment renovation
, then you should remember that real pros carry out the same steps throughout the room.