Ceramic tiles are the optimal material for finishing a bathroom due to their durability and reliability, as well as ease of maintenance. That is why almost every bathroom is tiled. But sometimes unpleasant situations occur, such as peeling or even destruction of one or more tiles. What to do in such situations when the tiles in the bathroom have come off, the reasons and methods for eliminating such a finishing defect are discussed in this article.
The problem of falling tiles
Despite the strength of the tiled finish, there are situations when some of its elements peel off or begin to buckle. The problematic element is identified by simply tapping on its surface: the sound will not be dull and monolithic, but ringing and hollow. This type of problem can have different scales - the technology for eliminating the integrity of the coating depends on them. If we are talking about 2-3 peeled tiles, then you can simply put them in place using one of the methods below.
Peeled tiles
However, there are more serious situations when a whole row of tiles begins to fall off (usually this happens on the walls). This occurs because the individual tiles are attached to each other using grout. Therefore, as soon as at least one element peels off, it begins to loosen the parts adjacent to it. This explains the importance of promptly eliminating the problem even on one tile, otherwise the entire cladding will have to be renewed. In addition, loose tiles can fall down and break, damaging plumbing fixtures or flooring along the way.
Replacing a defective area with a mirror
It so happens that the area with peeled tiles is at a height of 150-180 centimeters, then you can disguise it with a mirror.
Replacing with a mirror
- Level the base. If necessary, we carry out additional plastering. It is necessary to create a leveling layer so that the mirror and the wall are at the same level.
- After the plaster has dried, we proceed to sanding using sandpaper.
- Remaining dust must be removed from the surface with a brush.
- Apply primer.
- After the surface has dried, you can begin gluing the mirror. To do this, you need to apply silicone glue and, pressing lightly, glue it to the base. It is recommended to mark the area for the mirror in advance.
Advice! It is recommended to fix the mirror with masking tape while drying.
Why do tiles come off?
The reasons for peeling tile cladding vary. It is advisable to take them into account before starting finishing, which will make it possible to avoid problems in the future.
The following situations can cause tiles to fall off:
- The cladding technology has been violated. In order for the tiled finish to last as long as possible, all technological conditions must be carefully observed. This applies to the temperature conditions during operation, the correct preparation and placement of glue, maintaining the level, etc. For example, if the percentage of voids in the structure of the adhesive composition after it hardens exceeds 10%, then sooner or later such masonry will collapse.
- Poor base preparation. The strength of any finish is greatly influenced by the quality of base preparation. It should be strong, clean and even. If there are serious changes on the surface, the tile will gradually become loose. It is also important to ensure good adhesion of the base base. To do this, it is impregnated with special primers and thoroughly degreased. Surfaces made of wood materials deserve special attention. Their preparation must be carried out using special technology.
- Using low-quality glue. You should not experiment with cheap compounds. As a rule, this ends very badly. It is better to initially invest in proven tile adhesive, selected according to the operating conditions of the finish. As you work, you don’t need to skimp on spreading a layer of sufficient thickness.
- Violation of operating conditions. Most often, tiles fall off in the bathroom due to moisture, or in the hallway on the floor due to excessive mechanical stress. Rapid temperature changes also have a bad effect on the cladding. All these points must be taken into account and an adhesive with suitable characteristics must be selected.
- House shrinkage. Any new building will settle for some time. Therefore, experienced builders recommend not to rush with cladding in new houses.
Separation of a section of ceramic coating along with the solution from the base
The most likely cause of such destruction is an incorrectly selected primer mixture or no priming at all before laying the tiles. A common mistake when preparing the base is priming with concentrated latex, which forms a thin rubbery film on the surface that prevents adhesion to cement-based tile adhesives.
The separation of the laid tiles along with the mortar from the base can be caused by deformation of the base
The preserved finish is inspected and tapped to identify voids that are fraught with additional destruction of the cladding. If the area of the collapsed finish and existing voids in total exceeds 20% of the total area of the base, then the wall or floor cladding will have to be re-done in full, taking into account the mistakes made, since after partial repairs the destruction of the old tiles will most likely continue.
A tile has come off the wall, what should I do?
As a rule, tiles that peel off from the wall remain intact, so they can be glued back.
To restore the integrity of the cladding, proceed as follows:
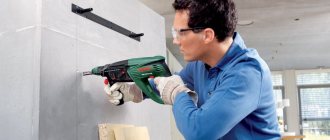
- Remove the element that has lost its strength from the wall. This must be done as carefully as possible so as not to catch the rest of the cladding. Usually, removing the grout between the joints is enough to do this. Depending on its strength, use a thin sharp knife or screwdriver. There is also a special tool on sale - a seam extender. It consists of a carbide blade and a handle: the roller on it ensures precise movement and safety for adjacent tiles. In cases where it is not possible to remove the tiles manually, an electric engraver comes to the rescue. In this case, you need to use a reinforced cutting attachment.
- Clean up the vacant space. It happens that the tiles still crack. In this case, it is necessary to carefully remove all the fragments from the niche formed in the cladding, being careful not to injure your hands or catch adjacent elements. The same goes for leftover hardened glue. The tool usually used is a chisel and a hard spatula of small thickness. It is advisable to pre-moisten a solution that is too dense. Upon completion of cleaning, the remaining debris from the niche is removed with a vacuum cleaner.
- Clean the removed tiles. You need to act as carefully as possible, because... tile is a rather fragile material. If the old adhesive is very strong, it is recommended to immerse the tiles in warm water overnight.
- Level the wall. The cleaned base is finished with a layer of putty or plaster. This must be done so that there is 5-6 mm of reserve left for the tile adhesive. After waiting for the base to dry, it is primed with a deep penetration acrylic compound.
- Apply adhesive mixture. It is most convenient to smear not the wall, but the fallen element. You can use the remains of the solution from the previous installation as glue (if the expiration date has not expired). If the remains have already deteriorated, then in order not to buy a whole package of glue for one tile, you can prepare the solution yourself. To do this, equal proportions of sand and cement are dissolved in water until a dough-like consistency is obtained. For additional strength, you can add a little PVA. The thickness of the layer should be such that the laid tile is flush with the rest of the cladding.
- Press the tile to the base. To achieve uniform distribution of the glue, use soft tapping with a mallet or rubber mallet on the outside of the tile. Residues that have come out at the seams are removed with a damp sponge. To make the seams even, there are special crosses. Instead, you can use simple matches, cutting off the sulfur heads on them.
- Fill the seams. This can be done one day after laying the tiles, after waiting for the glue to dry. Again, if there is no old grout left, you can use a homemade solution for this (the proportion of PVA is usually increased).
Unfortunately, it is not always possible to maintain the integrity of a detached element. That is why when purchasing facing material it is recommended to provide a small reserve. If a tile breaks and there is no spare one, you have to go to the store and select products of the same size (fortunately, they are standard). It should be mentioned that not all stores sell tiles individually.
You can also watch several videos on this topic:
Cladding repair technology
Let's look at several options for possible defects, as well as ways to eliminate them.
The tile fell out with the glue
The reason may be improper preparatory work. For example, remaining small particles of debris, an insufficient or absent primer layer, traces of whitewash, paint on the base can lead to deformation and peeling of tile products.
Came off with glue
Before you begin installing the finishing material, tap the entire coating to detect voids. If a dull sound is heard, such areas should be dismantled. If the total level of defects exceeds 20%, then it is recommended to completely dismantle the facing material.
Let's look at the stages of properly completed work:
- We dismantle defective areas.
- The dried adhesive must be removed and the base leveled so that during a new installation the tile carpet will lay smoothly and unobstructed.
- If you plan to install old products, they must be cleaned. To remove the remaining adhesive mixture, use a wire brush or grinder with a diamond blade. It is recommended to soak the product in water before processing. Cleaning is carried out by laying the tiles face down on a flat surface.
- It is always better to use new material, because during operation, defects invisible to the eye could appear, which subsequently form a new problem.
We proceed to the direct installation of the tile covering. The best option would be to use special tile adhesive. The process should be organized like this:
- First, we prime the area where the facing material will be installed. It is necessary to perform two treatments with intermediate drying for 40 minutes.
- If the differences in level are more than 1 centimeter, then it is better to carry out preliminary plastering. This is necessary to level the base.
- After the plaster, primed layer has dried, the adhesive solution is applied using a spatula or grater with a comb. Then we glue the product to the wall. Using oscillating movements, lightly press down to create a single surface. If the tiles do not fit well, use a rubber mallet.
- The entire tile carpet is installed in the same way.
Advice! When planting the facing material, ensure that the entire surface is even. To do this, use a building level. To ensure that the seams have the same dimensions, plastic crosses or other alignment systems are used.
After 2 hours, remove excess glue. To do this, you can use a knife or narrow spatula. It is recommended to grout the joints every other day.
The tiles on the floor have come off, what should I do?
Floor cladding experiences more intense operating loads than wall cladding. In this case, it is important not only to attach the fallen tile back, but also to eliminate the cause of the detachment.
The process of restoring the integrity of the tile finish on the floor depends on the type of problem:
- The tile peeled off along with the glue. This indicates a violation of the screed technology. Typical reasons are the use of too low a grade of mortar, lack of primer, or the appearance of cracks. In this case, carefully dismantle the peeled fragments and clean the screed. Any cracks found must be repaired. After drying, the floor is impregnated with liquid. After the primer has dried, the cleaned tiles are put back, maintaining the overall level. If it turns out that the screed is in very poor condition, you have to completely redo the cladding.
- The tile peeled off without glue. This happens when the adhesive mixture is not applied in sufficient volume. As a result, the grip is very weak. The reason may be a violation of the technology for preparing the mixture, or the lining was carried out at too low a temperature. You should also not discard the option of poor quality material. In such a situation, in places where the tiles have fallen off, you need to completely remove the old glue. After this, the surface is primed and the tiles are laid using a high-quality composition.
- Cracks appeared along the surface of the tiles with corners breaking off. This usually happens due to insufficient filling of the niche under the tile with glue. Later, when people begin to walk or move loads on the cladding, the tiles over the empty areas crack or break off. Even if only one tile is damaged so far, it is recommended to check the entire floor using the tapping method (this problem is usually complex). Damaged elements are removed, and new ones are installed in their place, now according to all the rules.
You can watch some useful videos about this:
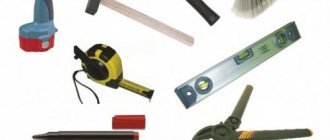
Selection of the necessary tools and materials
In addition to the selected adhesive composition, you need to prepare the following tools and materials:
- a hammer drill with a chisel attachment to remove glue residues;
- wide brush for applying primer;
- construction mixer;
- graters for applying tile adhesive (tooth size depends on the parameters of the tile);
- wide and narrow spatulas;
- rubber hammer;
- soft spatula for applying grout;
- foam sponges;
- tape measure, building level.
Rubber hammer for tiles.
Gluing tiles without dismantling
If the tile does not fall off, but just starts to “rustle” a little, you can try gluing it without dismantling it. For this purpose, polyurethane foam, silicone sealant, epoxy or mounting adhesive are usually used.
Operating procedure:
- Equip the peeled element with corner holes. To do this you will need a diamond drill and a hammer drill. The diameter of the hole depends on what kind of composition will be used. An 8 mm drill is used for mounting foam. In other cases, 4-5 mm will be enough (according to the size of the tube spout).
- Additionally, strengthen the tiles around each of the holes made. Wooden supports are used for this. This is done so that the expanding foam does not tear off the lining. When using other formulations, this operation can be skipped.
- Inject adhesive into the hole. The difficulty is that the dosage has to be done at random, because... It is impossible to visually trace the situation under the tiles. Therefore, until the foam completely hardens, the spacers must remain in place. As for glue and sealant, these compounds do not expand: they can be poured until the excess flows out of the hole. For materials that are too liquid, it is advisable to make plugs in advance to plug the holes.
After waiting for the glue to completely harden, the holes along the edges are sealed with grout, matching the color of the overall cladding.
Preparing for recovery
Before you begin, you need to carefully prepare the surface for applying glue. The first thing to do is remove the ceramic tiles if they have not completely fallen off. This must be done very carefully so as not to touch or crush the entire surface. After this, use a metal brush or grinder to remove all remaining adhesive. If the surface on which the tiles were previously laid is uneven, level it. All humps must be cut off, as they will interfere with the correct installation of the fragment in its place. If the base was not perfectly leveled before the previous installation, you can pour a thin layer (no more than 2 mm) of mortar before repair. This procedure will help smooth out uneven surfaces that may create voids.
Results
The most effective way to eliminate peeling on tile cladding is to do everything possible to prevent this from happening. To do this, it is necessary to exercise maximum care when choosing a suitable adhesive composition. The same applies to the implementation of tile laying technology: all recommendations regarding operating temperature and base preparation must be carefully followed. In cases where tile peeling does occur, use one of the above-described methods to eliminate the problem.
The tile has come off, what to do: step-by-step instructions with photos and videos
bathroom ceramic tiles tiles floors wall renovation
How to prevent peeling?
It is impossible to prevent tiles from peeling off from the wall after they have been laid without careful operation and avoidance of serious mechanical damage.
The integrity of the glued tiles is also affected by the quality of the tiling work performed. It is worth giving preference to high quality materials, selecting them in accordance with the operating conditions of the tile covering and observing the ceramic laying technology.
We must not forget about grouting joints and sealing joints between elements.
Modern adhesives for bathroom and kitchen tiles
Applying adhesive to tiles
These compositions for gluing tiles if they have fallen off are often used when installing a hidden plumbing hatch, but in this case the ceramics are placed on a wooden base, gluing with almost any available composition. For gluing to concrete, silicate glue is used, having previously treated it with silicate to improve adhesion. The result is a strong connection, but if you have loose ceramic tiles in an area of use, for example, near a door, then such repairs are only temporary.
Another affordable and reliable option is styrofoam glue. This is a mastic that has good binding ability to concrete. Perfect for the floor if you don’t want to use a radical method of repairing the wall with tile adhesive.
How long will it last?
The service life of tiles that have been correctly laid is not limited by time. The service life of the coating is reduced if the installation technology is violated, if materials with an expired shelf life were used.
In order for the cladding to last as long as possible, it is necessary to avoid installation errors and distribute the adhesive evenly over the entire surface, thereby eliminating the possibility of voids forming and deformation of the coating.
Way out of this situation
What should you do if a tile falls off? Glue the tile back! Of course, there are many conditions under which this is not possible, for example, the poor condition of the ceramics. However, in most cases the product is suitable for further use. Therefore, to restore the interior, it is necessary to thoroughly clean the surface where the tiles were attached. Then apply the adhesive and glue the product to the appropriate place.
Cutting the required piece of tile
This method is only applicable to tiles that are in excellent condition, otherwise they will need to be replaced. Although a nuisance may occur in the form of a missing element. Then you can play with contrast or add bright colors to the overall design. To do this, you should purchase several ceramic products and replace them with outdated tiles, which will significantly refresh the bathroom.
If for some reason it is impossible to glue the tiles or pick out others, then it is best to approach the problem in an original way. Try creating a mosaic design, i.e. crumble the ceramics, and then collect it and paste it into the old place, but already thoroughly crumbled. This procedure must be done carefully to eliminate the possibility of an unpresentable appearance.
To prevent repeated peeling, it is necessary to establish the cause of the defect and then eliminate it. In practice, this is relatively easy to achieve, but you still need to try. For example, voids can be identified by ordinary sound by tapping each element separately. Various irregularities are visible to the naked eye, as is crumbling mortar. The detected defective area will have to be remade conscientiously, otherwise problems cannot be avoided.