Drywall is a universal building material that is in great demand. With its help, the easiest way to create partitions in a house or to level the walls in an apartment. It is easy and convenient to work with, which is why it is often chosen by craftsmen during repairs to perform the work listed above. However, the material also has its own characteristics. One of them is its rather low strength, and therefore it is not so easy to hang anything on walls made of this material. But still possible. How to hang a cabinet on a plasterboard wall? Let's figure out how to solve this problem.
How to hang a cabinet on a plasterboard wall
Types and methods of fastening cabinets to plasterboard
Despite the fact that the plasterboard has gypsum inside, it is very loose and relatively soft. Simple methods using self-tapping screws will not allow you to securely attach the cabinet to it. It will require the use of special methods to achieve the desired result.
There are several ways to hang cabinets.
Ways to hang a cabinet on a plasterboard wall:
Mortgage beam
The “mortgage beam” method involves attaching wooden blocks to the supposed locations of kitchen cabinets before covering the walls. During subsequent installation, the load will be evenly distributed over the surface and the gypsum board sheet will easily withstand it. The timber in this case acts as a reliable base, which is firmly fixed to the wall being mounted.
Embedded elements are pre-installed into a wall or partition made of plasterboard.
The method is one of the most reliable options, as it can withstand a load of more than 80-110 kilograms. Using it, you don’t have to worry that over time the fasteners will become loose and the cabinets will move. The block is taken 8-10 centimeters wide. The thickness is selected according to the height of the profiles.
Use expert tips to complete the work.
The work is performed according to the following algorithm:
- The distance between the vertical profiles must be measured. In accordance with the obtained dimensions, sections of bars are sawed.
- The height of the preliminary hanging of the cabinet and the location of the bar are marked on the wall. They are placed between each VP.
- The timber sections are attached to selected places at 1-4 points.
- Afterwards, the distance from the floor to the center line of the beam is measured. (the cabinets are then hung using this value).
- After the sheathing, the cabinets are installed.
Horizontal bus
With this method, the question will no longer arise: how to hang kitchen cabinets on a plasterboard wall when it is already sheathed. Using a horizontal rail, the cabinets are hung at the same level.
The horizontal rail is mounted along the entire length of the wall where the cabinets are planned to be hung.
During operation, you will need an adjustable bracket. They must be installed on the side walls of the cabinet using self-tapping screws. This design can withstand a weight of 50-70 kilograms.
You can find frame elements under drywall using a magnet.
The work is performed according to the following algorithm:
- The height of the cabinets is measured. Markers are placed at this location. The distance from the hook bracket to the upper contour of the headset is measured. The resulting value is put down and a line is drawn.
- The total width of all cabinets is measured. The profile is cut to the same size.
- The tire is mounted on a plasterboard sheet along the previously marked line. Steps of 5-8 centimeters.
- The strength is checked and the cabinet is secured.
The tire is screwed to the rack profiles of the frame through the plasterboard.
Iron bars or strips can be used as tires.
Drywall dowels
This option is more suitable for installing several separate structures at different levels. It is better to choose a screw-on model of dowels made of plastic or metal for fastening. Metal and plastic have the same diameter, only the length is different.
It can be 2.5 centimeters or 3.2. Each fastener can support up to 10-15 kilograms of weight. The maximum weight of the cabinet that can be attached is no more than 20-25 kilograms.
Use good hardware to secure the cabinet.
The work is performed according to the following algorithm:
It is necessary to calculate and mark the mounting location where the storage structures will be located. Holes for planting are drilled with a drill. Dowels are inserted into the holes made. This can be done if you use a shaped screwdriver of the appropriate size. Twist to the end. The cabinet is attached to the wall. Using mounting loops, self-tapping screws with a wide head are screwed into dowels. If you show a little ingenuity, you can tighten the dowels even without preparing special holes
You just have to do this with extreme caution, as it may break or move into the wrong position.
Use special tools to secure cabinets.
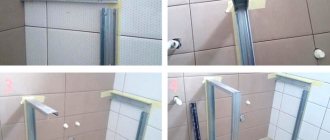
How to make embeds in drywall if it is already sewn to the frame
If the distance between the plasterboard and the main wall exceeds 6 centimeters, the question arises: how to hang kitchen cabinets on a plasterboard wall, and here the method of embedding mortgages into an already finished wall will come to the rescue, although it is the most expensive and sometimes requires significant effort, there are situations in which this is the only way to hang
cabinet on a plasterboard partition.
In order to install mortgages on an already sewn wall, you need the following:
- Take measurements and mark the wall, determine the places where the mortgages will be placed and correlate them by location so that they do not touch the steel guides of the plasterboard wall;
- Prepare embedded bars, small in size but sufficient to cope with the load;
- Using a jigsaw, cut out areas in the wall sufficient to allow the mortgages to be secured without interference;
- Fasten the mortgages securely enough, sew them up with the removed sections and putty the wall.
All is ready. Now you can completely safely attach furniture to the mortgages through drywall. Such a system will securely hold heavy furniture, and all possible cosmetic defects will be reliably hidden from view by the furniture itself.
If this option is not possible, use additional racks to support the furniture from below, or a system of cables to secure it to the ceiling. But these are already extreme measures, they greatly spoil the appearance of the finished work and it is better to avoid them where possible.
General design and arrangement of plasterboard walls
Drywall itself is quite fragile and brittle sheets that are very sensitive to external influences. You can even punch through such a wall with your fist, and a shelf that is not hung according to the rules can simply collapse a piece of plasterboard wall. How to hang a cabinet on a plasterboard wall and at the same time maintain its appearance without losing the reliability of the fastening:
- Look for mounting rails. Take a magnet on a string and run it along the wall. Find reinforced areas in the wall. It is better to carry out all fastenings in these places; they are reinforced and can bear a large load;
- Use special dowels and hardware designed for plasterboard walls. Only they can provide reliable fastening that can withstand high loads;
- If you need to hang kitchen cabinets on drywall, use embedded or anchor fasteners designed for increased load.
In no case limit yourself to a self-tapping screw - it may seem to you. That the fastening is reliable, but it is not. Such fasteners will not stay in the wall for long, and in addition to cosmetic damage to the wall itself, it can cause injuries simply by falling on someone’s head.
Features of drywall
Drywall is a material now known to everyone. It is made from compressed gypsum, and the word “cardboard” in the name is due to the presence of ordinary thin cardboard on one and the other side of the gypsum sheet. This is an absolutely safe and environmentally friendly material that helps maintain an optimal microclimate in any room, does not emit toxic substances into the air, is easy to use and is not flammable. It also has a good level of sound insulation, can bend if necessary (just moisten it with water), and can be painted and pasted over. Drywall is usually used during major renovations of premises to create arches, suspended ceilings, level walls and build partitions.
History of the appearance of gypsum boardsPhysical and technical characteristics of gypsum boards
Drywall also has its disadvantages, which limit the possibility of using the material in repairs and construction. Thus, it does not like high humidity and is picky about storage conditions. It should not be used for finishing ceilings if there is a risk of flooding of the apartment from above. This material is quite fragile and cannot be used as horizontal shelves.
There are different types of drywall
Table. Types and types of drywall.
| Type | Description |
| Wall or standard | This is ordinary drywall, the sheets of which are usually blue or gray in color. It does not contain any additives - it is pure gypsum. This is a universal material with a certain level of sound insulation, which is usually used for leveling walls and creating partitions. The humidity in the room where it is used should be no more than 70%, otherwise the material will begin to deteriorate and deform. |
| Moisture resistant | This drywall is green in color and, as the name implies, is highly resistant to moisture, namely, it contains special antiseptic additives that will prevent mold and mildew from developing. It can be used in rooms such as a bathroom, toilet, basement - that is, where air humidity is high. |
| Ceiling | This material is used to create suspended ceilings, which were very popular in Russia in the 90s and 2000s. This drywall is highly flexible and can be used to create a range of decorative designs. This property is due to its thickness being smaller than that of a standard sheet. The difference is about 3 mm. |
| Refractory | This type of drywall is gray in color and has certain markings. Typically used for creating and finishing fireplaces, stoves and chimneys, as well as in rooms that have special fire safety requirements. Gypsum contains certain fire-resistant additives. |
| Acoustic | This type of drywall has small holes on the surface, and on the reverse side there is a special fabric. This material is used to improve the acoustic properties of premises such as recording or concert halls, etc., that is, where increased sound insulation is required. |
| Arched | The best material option for creating complex and arched structures. These are very thin sheets that are easy to bend to the desired position. However, craftsmen advise buying it only if it is impossible to use the usual standard material, since such drywall contains fiberglass, which makes it difficult to cut and fix. Yes, and it costs more. |
Moisture-resistant drywall sheetsHow to cut drywall
No hangers
When creating a suspended ceiling, it is not recommended to skimp on hangers. Fastening without the use of hangers is often used when they want to install a frame on an uneven base; this temptation is especially great when working with wooden coverings.
As a result of such installation, the profile loses its mobility - due to shrinkage deformations, cracks may appear on the surface of the drywall. In addition, when rigidly fixed to the ceiling, the main advantages of a suspended structure are lost: the ability to level the surface, hide communications and additional insulation inside the ceiling.
Plasterboard ceilings are mounted on an anchor or direct suspension. Read more about installation methods in the article “Drywall - ceiling installation”.
Choosing the right fasteners
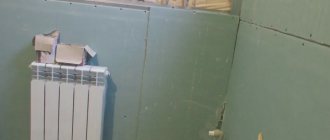
The walls are usually lined with plasterboard sheets, 10-12 millimeters thick. The advantages of this material include high strength and resistance to heavy loads. The wall cabinet, together with its items, sometimes weighs more than 70 kg. Therefore, to prevent the fastening from breaking out, it is necessary to make the correct calculations and select the appropriate fasteners, taking into account the results obtained.
The advantage of fastening without installing mortgages is the ability to mount the cabinet directly on a lined wall. In other words, if a major renovation is not carried out in the room, the walls will not be dismantled, this option is considered the most suitable.
Unfortunately, fasteners like this that can withstand a lot of weight are very rarely sold.
Therefore, it is very important to know exactly which mount is suitable for a particular case.
The combined method is used only if, under the cladding made, the width of the installed mortgage, in some places does not correspond to the location of the hinges installed on the furniture being mounted.
Of course, any person can easily attach any furniture to a wall covered with plasterboard sheets, without the help of professional workers. This type of work does not require special experience. In this case, you can do without specific knowledge. The most important thing is to strictly follow the instructions.
The advantages of drywall have been well studied, but it is still considered the newest building material. This is due to the fact that some of its characteristics have not been fully tested. Therefore, before starting to use this material, it is advisable to consult with specialists. They will suggest the best mounting method, taking into account individual requirements.
We must not forget that any drywall cannot remain in a room with high humidity for a long time. Therefore, it is not suitable for finishing a bathroom. Over time, it will swell, strength will disappear, plasticity will appear, and the material will become very soft.
Furniture Wardrobe
We attach light objects to drywall
Light items include shelves, paintings, jewelry and hanging clocks. Drywall is a soft material, so self-tapping screws are suitable for it, which independently make grooves in surfaces of low hardness. A regular Phillips screwdriver is suitable for screwing them in.
It would be best to mark in advance the mounting locations of the suspended element.
Then simply screw the item or hang it on the resulting hook.
For drywall, you need to use phosphated self-tapping screws with a large wide thread pitch.
The dowel itself must be screwed in very slowly and deliberately. He should not stitch through the wall or make himself a smooth groove in which there will be nothing to catch on. Control your force so that the dowel gently sinks into the thick drywall without breaking through the back wall.
This is very important, especially if the wall is not a facing wall, but a partition. The result is a plastic hole of a certain diameter
A self-tapping screw of slightly larger diameter is screwed directly into the hole. They usually come complete with dowels.
The result is a plastic hole of a certain diameter. A self-tapping screw of slightly larger diameter is screwed directly into the hole. They usually come complete with dowels.
Due to the polymer structure and dense large thread, the product holds much stronger.
For a wall cabinet you will need clear markings. It is best to draw with a pencil, using a ruler and compass. Dowels in the form of an umbrella have sliding legs, which increase the area and strength of the fastening. To fasten in this way, you need to drill a hole into which, with a slight stretch, the dowel can fit when folded.
Then you need to screw in the self-tapping screw until the supports rest against the walls of the hole.
Make sure that the dowel does not slip into the hollow part of the partition. You can also insert the dowel directly with the screw.
In addition to metal anchors, there is also a plastic expansion fastener for drywall, which is designated OLA 10/13, and can withstand a pull-out load of up to 25 kg.
Accurate markings are the key to a good design. Don't rely on the massive dimensions of the cabinet's hinges and panels. Better mark everything on the wall. Start by marking the location of one loop. Then, using a degree and a tape measure, measure the straight degree and add lines to each other.
Only after completing and marking the exact mounting positions can you begin drilling.Which mounts to choose: tips
To hang a cabinet on a plasterboard wall, choose the following fasteners:
- Plastic dowels - “butterfly”. Withstands a load of 24 kg. Light objects such as shelves, small paintings, small cabinets are hung on it.
- Metal adjustable dowel “Molly”. The principle of operation of the fastener is the same as that of the “butterfly”. It can withstand a load of 35 kg.
- Metal anchor. This fastener is used for hanging heavy chandeliers and heavy objects. It can withstand loads of up to 50 kg. Therefore, hanging a cabinet on it will not be difficult.
- Dowel Driva. Made from plastic (hanging 25 kg) and metal (holding 30 kg).
- "Harmut Knauf" - this mount can withstand 55 kg. At the same time, the plasterboard surface will remain the same flat.
Choosing fasteners for hanging a cabinet is a responsible matter. Not only the weight of the furniture is important here, you need to consider what will be put in it, and what the weight will be if the cabinet is full.
Before hanging the cabinet on the gypsum plasterboard surface, it is necessary to make precise horizontal markings. The weight of the filled furniture should be taken into account. The use of mortgages is the best option. If rearranging or updating furniture is done after repairs, then you need to select fasteners taking into account their withstand load.
How to hang heavy shelves
Using the usual method, attaching a heavy shelf to drywall (or any bulky accessory, decorative element, etc.) may not work, since the weight of the product will simply crumble the wall cladding material and spoil the overall picture and mood. But there is a special way for this: fastening the shelf through plasterboard to a metal frame profile using special fasteners.
A hole is drilled in the required place, through the drywall and the profile on which it is attached.
To find the metal frame profile on which the drywall is attached, you must use a magnet.
Next, a butterfly or Driva dowel is inserted into the hole through the profile (it all depends on the design) and the screw itself with the main fastening for the suspended element. Everything is clamped with a certain force so that the wall can withstand the pressure, and the finished fastener can withstand the weight of the suspended element of furniture or decor.
For heavy shelves, there is a special method, fixing the shelf through plasterboard to a metal frame profile, using special fasteners
Method 1: glue installation
For small shelves and photo stands, you can use an adhesive installation. To hang a shelf on drywall, you need to prepare a suitable adhesive in advance.
Then do the following:
- Marks are made on the wall surface to install the shelf.
- Then, according to the completed markings, a layer of glue is applied.
- A layer of glue is also applied to the back of the shelf.
- Now you need to wait a little and press the shelf against the wall (do not press it too tightly so as not to damage the drywall).
This method is simple, but the strength and reliability of this design is low.
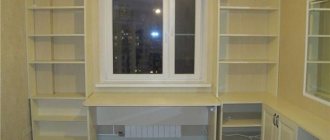
How to hang a massive cabinet on drywall
So, circumstances have developed in such a way that the kitchen wall must have a plasterboard wall panel, giving a perfectly flat surface. And it is on this wall panel that a massive cupboard should hang, in which a variety of dishes, jars of seasonings, and other kitchen utensils will be located.
Therefore, you need to choose one of several options - fix the cabinets with anchor bolts screwed directly into the concrete wall, or attach it through drywall to the frame or to the mortgage with long, strong self-tapping screws.
Usually cabinets are hung with screws through aluminum eyes; it is located high enough and these fastenings are not visible.
To do this, you must meet the following conditions:
- At the frame design stage, determine exactly where the cabinet support screws will be screwed. If this was unsuccessful, and you don’t want to remove the plasterboard sheets, then you can find the location of the frame elements using a magnet on a string.
- Installation of a frame using steel pipes of only rectangular cross-section (as opposed to the manufacture of suspended ceilings, decorative interior partitions or cabinets). The mounting screw should pierce both sides of such a rectangle.
- If the cabinet fastenings do not coincide with the locations of the frame or mortgage, then you can remove the mounting ear from the cabinet and screw it to a more suitable place.
- Screws should be screwed into drywall only after it is finished. The fact is that usually wall panels are finished with a decorative film, which gives them the appearance of a beautiful texture. Thus, you only need to hang the cabinet after the final finishing of the wall panel.
- Drywall is not a load-bearing material, so you can drill it in the right places wider than the diameter of the screw.
Thus, it is not recommended to attach massive structures to vertically standing drywall, because gypsum easily cracks and crumbles. The entire load must be borne by the material of the wall and frame. Therefore, the installation of plasterboard panels on the frame must be done, having previously provided for the entry points of load-bearing screws or anchor screws, and drilled holes for them. As a result, plasterboard will provide a beautiful and even wall, and the material of the frame, mortgage and concrete wall will provide strength for fastening the cabinet.
Technological embedded supports
A reliable solution for partitions is to insert reinforced metal profiles or brackets into the frame at the locations of the planned hanging points for cabinets. Accurate marking of such places will ensure high-quality installation of mortgages.
To enhance the rigidity of the frame, metal sheets are installed on top of the mortgages.
Wood spacer
Distance spacers (brackets, wooden beams) make it possible to perform fastenings at the stage of installation of gypsum plasterboard structures. The essence of the technique is that the cavity of the spacers corresponds to the attachment point. Successful implementation is possible with pre-designed locations of interior objects.
Wooden beams are used with a thickness equal to the width of the frame profiles so that they absorb the load without gaps. Installation is carried out with anchor hardware with a countersunk head to the wall or to the main partition. The edges of the bars are inserted into the profiles. Sometimes, for greater strength, the beams are also connected to each other. It is recommended to use coniferous wood with a thickness of 40 mm or more.
For heavier shelves
Let's look at how to attach shelves to drywall if the weight of the product is large enough. To fix a heavy shelf in drywall, you need to use a special method. It will be necessary to create a special design. First you need to fix the shelf into the profile of the plasterboard sheet. During installation you need to use special fasteners.
- Drill a hole: you should drill through the drywall and the profile under the sheathing.
- A magnet is used to find the location of the metal profile.
- Dowels are installed in the drilled holes.
- The structure is secured with screws (do not tighten too much).
Important: the product should only be mounted on a flat horizontal profile. Advantages of this method:
Advantages of this method:
- the structure can withstand heavy loads;
- fasteners must be selected individually for products of different weights and sizes.
The disadvantage of this design is the large amount of time required for installation. If heavy objects are placed on the shelf, the structure may come off.
Method 3: expansion and expansion dowels
Let's find out how to hang a shelf on drywall using special fasteners for drywall - expansion dowels. Let's look at the different types of dowels:
Dowel Butterfly.
| This is a lightweight fastening element consisting of 2 blades. It is installed in the hole. When the locking screw is tightened, its blades open and are pressed against the casing from the inside. | |
| Driva dowel. | It is a fastening element with a deep thread. It is screwed into the casing along a pre-made hole with a diameter of 5-6 mm. This dowel has spiral blades that open up inside the drywall layer when the screw is screwed in. |
| Dowel Fischer Pd. | Made of plastic, it is a sleeve with an enlarged end. When a screw is tightened, its end is pressed into the sleeve, opening it. In this case, the sleeve expands in the skin layer. |
| Molly fasteners. | Is the most popular type. It is fixed into a hole with a diameter of 8-10 mm. When screwing, the teeth located on its neck are stuck into the casing. |
These types of fasteners have one drawback - high cost. But considering that only a few fasteners are needed for operation, this minus is insignificant.
Method 4: Through Anchor
Let's look at how to attach shelves to drywall using a through anchor. Sometimes it happens that you need to screw a heavy shelf on which a fairly large load will be placed, but dowels cannot be used. This can happen if the gap between the wall and the plasterboard layer is too small, making it difficult to install the spacer sleeve. Then a through anchor is installed.
- Perform markings.
- Make a hole in the casing using a drill. Moreover, the diameter of this hole should be the same as that of the fastener. In order for the structure to be strong, dowels with a diameter of 8-12 mm or more should be used. A dowel with a large diameter will support the weight of the structure. The load on the edge of the hole in the drywall will be the least.
- Make a nest in the wall. You need to take a hammer drill and use a drill to make a nest in the load-bearing wall to install the anchor sleeve. The depth of this hole must be no less than the distance from the outer plane of the cladding to the main wall.
- An anchor sleeve made of metal or high-strength plastic is installed in the resulting socket. It is best to use an anchor with a brass sleeve.
- The sleeve is secured with a locking screw with a head. During installation, the sleeve opens, and the main load goes on the load-bearing wall. This creates a secure hold.
When creating a nest with a hammer drill and installing a shelf, the hole in the drywall will gradually increase. Therefore, the anchor must be installed in advance, then during finishing it will be possible to mask cracks or other defects.
What to do if you need to hang a kitchen on drywall that has already been finished
In an ideal world, everything is prepared in advance, builders know where and how the kitchen furniture will be located, and based on this they make embedments for drywall at the stage of wall installation. The mortgage is a block whose dimensions exactly correspond to the distance from the load-bearing wall to the plasterboard partition; it is located in the pier and attached to the main wall as securely as possible, in order to subsequently serve, in turn, as a support for installing furniture.
How to glue or attach a mirror to drywall?
However, not everyone knows what to do if you need to hang a kitchen on drywall that has already been finished, but for some reason there were no embeds in it. There is a way to make embeds in drywall (1), which has already been finished; we will talk about it later, since it is quite expensive and is used only if it is not possible to secure it in a more accessible way, namely with the help of anchors.
Fastening furniture with anchors is done as follows:
- Using a drywall crown, a hole is cut out at the site of future fastening;
- Using a perforator, a channel is made in the main wall, up to 10 cm deep, and a steel dowel is inserted into it;
- A steel anchor with a diameter of at least 8 millimeters is attached to the dowel. Using a smaller diameter is impossible, since it will not support the large weight of furniture structures;
- The part of the wall cut out with a crown is returned to its place and sealed with putty.
The main thing to remember is that this method, although quite simple to implement, is not suitable for structures in which the distance from the main wall to the plasterboard exceeds 6 centimeters.
For heavy products, you can always make embedding bars at the stage of wall installation or after
Other techniques
Also, when installing kitchen furniture, you can use other methods, but they are inferior in reliability to the above. They are resorted to in cases where, due to current circumstances, these methods become the only option to install a kitchen cabinet.
One of the common fastening methods is installation with dowels. In this case, the mounting location is chosen where the steel profile will pass.
It is not recommended to screw dowels directly into drywall, as they will not stick to this material. At the slightest load they will easily slip out. And this can happen immediately or some time later, depending on the weight of the cabinet’s contents. As a result, the sheet of drywall will be damaged. A very unpleasant surprise for the owner will be the fall of furniture after many hours of installation, especially if there are dishes in it. Sometimes not only cups and plates can suffer from this, but also the health of the person who can be seriously injured.
Also, a mounting strip can be used as a possible way to attach kitchen furniture. For greater reliability, it is recommended to attach it not only to drywall, but also to metal guides. The best option is when the plank is mounted to the main wall using long dowels.
Experienced builders often use another method, which, due to the difficulties in its implementation, is only available to professionals. Its essence is to suspend two galvanized cables with a cross-section of at least 4 mm from the ceiling. It is advisable to consider this option if the base is a concrete ceiling or it is possible to reach the load-bearing beams. Then one end of the cable is fixed to the beams with bolts, and the other to the hinges of the cabinet.
As mentioned above, this method of fastening is quite complex, but very effective. After hanging, the cabinet holds very firmly, but the entire installation process must be done correctly