In some cases it is necessary to place the film under the laminate:
- The foundation of the room is not sufficiently insulated from ground and atmospheric moisture; it can absorb it from the air and ground.
- The premises initially experience increased humidity due to the geographical location of the building or the characteristics of the room (basement, bathroom, kitchen).
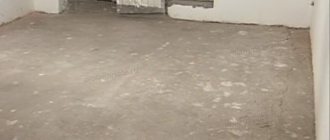
- The floor has a concrete base or a self-leveling mixture has been used.
The last factor is the most common, since laminate can only be laid on flat floors. Therefore, in most cases, a concrete or self-leveling screed is first installed.
Vapor barrier film under laminate - for warranty service
The inserts in the packages with the material happily announce that they provide a 10-25 year warranty. If you take a little time and find the manufacturer’s website on the Internet, you can find conditions that the obligations apply exclusively to damage to the panels due to wear. Moreover, coverage with scuffs along the edges of the boards, where, in general, the deterioration of the material begins, is not subject to warranty service.
It turns out that the warranty obligations of the Classen plant, for example, extend only to the surface of the laminated floor and not the entire surface. Not a word is said about the vapor barrier film; it is only mentioned that when laying the laminate, all the conditions described in the instructions must be observed. And the manual states that it is necessary to lay a waterproofing film with a thickness of 200 microns.
The use of film under the laminate to maintain the manufacturer's warranty is a complete fiction and is only one of the additional necessary conditions. It makes no sense to use a vapor barrier just for this purpose.
There are no cases known to me of warranty replacement of laminate by the manufacturer. During my career, I have never encountered flooring film on orders where old flooring was dismantled, including in new buildings.
In my apartment, one room is covered with laminate laid on a regular foam base. In the second room, a locking plug was laid directly on the concrete base of a multi-story building. The cork was once replaced after 3 years, this was due to wear on the surface from the legs of the sofa. Accordingly, I paid attention to the back of the coating - no problems were found.
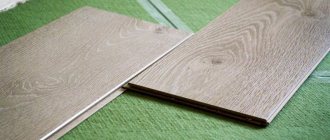
Types of substrates
Substrates are divided into three types:
- The polyethylene foam backing is made of polyethylene foam and contains a moisture-resistant membrane. A film with such a backing is not needed.
- The polystyrene backing is made in two versions: the more modern one - with a moisture-resistant layer, the traditional one - without it. Based on this, the film is either used or not.
- The cork substrate is made without waterproofing; it is necessary to use a film with it.
Laying of laminated floors is carried out in the sequence: film - substrate - laminated coating.
Why lay film under laminate?
The need to use a vapor barrier film for flooring under laminate is due to the fact that this decorative material is made of wood fiber raw materials. All installation instructions contain instructions for additional protection of the floors from moisture from below.
Moisture not only destroys the material and can cause it to warp, but also contributes to the spread of mold and unpleasant odors. To prevent this from happening, a film should be placed when installing the laminate.
If the panels swell due to moisture, the manufacturer has the right to cancel the warranty because proper lower water protection was not provided
Substrate functions
To protect against these harmful factors, underlay material is used. And here are the functions it performs.
- Leveling the base. There is debate about this function of the substrate on the Internet. Some claim that the substrate is not capable of hiding the unevenness of the base, while others claim that the substrate at least somewhat protects against defective areas of the concrete screed. It is worth noting that the substrate is an elastic material that follows the contours of the base, and the ability to protect against unevenness depends on the size of those very flaws in the preparatory work. If the concrete base is too uneven and has differences of more than 3 mm per square meter, then it is wrong to think that the substrate will solve everything.
- Knock protection. But the substrate can perform the following function well. Its shock-absorbing qualities are good, but the duration of this ability is short. Over time, the substrate will become greatly deformed and compacted, which will greatly deteriorate the quality of this layer.
- Moisture protection. Here everything directly depends on the type of material. Some representatives are good protectors from moisture, some easily let it through, and in such cases additional waterproofing is needed.
This is what moisture can do.
The protective functions of the substrate from the harmful trinity directly depend on the type of material. Even in the best case, if the underlay has waterproofing properties, it may not be well cushioned. And here you need to decide in whose favor to make a choice, besides, other indicators, for example, environmental friendliness, will be factors in the choice.
In addition to the above functions, the substrate performs a couple more of the following:
- thermal insulation. It protects the room from heat loss. The thermal insulation properties of the material are in demand because the laminate itself is a cold material, and the backing, even if only a little, will be able to retain heat and make the coating pleasant and cozy for the feet;
- soundproofing. Noise from children and vibrations from operating household appliances can cause a lot of headaches for neighbors. Therefore, the substrate is able to prevent the penetration of noise and dampen vibrations. This property also works in the opposite direction.
These two properties of the substrate material become selection factors that are not the first choice.
Laying the substrate: step-by-step instructions
The amount of substrate is calculated based on the length and width of the room, as well as the dimensions of the coating. It is recommended to purchase the product with a margin of 5-10% to eliminate material shortages due to inaccurate measurements.
Before laying the underlay under the laminate, it is necessary to level the floor and install waterproofing. The fewer irregularities, the thinner the base can be applied (2-3 mm). On the one hand, this is cheaper, and on the other hand, the floor covering will last longer.
Preparatory work can be done in several ways:
- Concrete-sand screed. This design is the most popular, smoothing out floor unevenness in the horizontal plane up to 80 mm. Filling is carried out according to the “beacons”, the base is mounted after the mixture has completely dried.
- Self-leveling floor. In this case, specialized stabilizing solutions are used, which include plasticizers. The mixture is well distributed over the floor and left to dry the residual moisture.
- Dry screed. This method involves leveling the floor by installing a frame of wooden beams, onto which sheets of plywood, fiberboard or gypsum fiber board are attached. The space inside is filled with a special dry backfill (most often expanded clay).
- Use of chipboard or plywood sheets. The fastest way to prepare flooring. The thickness of the leveling depends on the height of the particle boards.
After the preparatory work, laying the substrate under the laminate with your own hands is carried out using the following technology:
- Use a vacuum cleaner or broom to thoroughly clean the surface of small debris and dust. Otherwise, after installation of the entire structure, unpleasant creaking sounds will be heard.
- A primer is applied to the base prepared floor. The operation is performed 2-3 times with an interval of 3-4 hours. If the base floor is lined with plywood or chipboard, this step can be skipped.
- Install the waterproofing (after the primer has completely dried). All parts of the sheets must be carefully and carefully glued together so that there are no gaps.
- Then you will need to lay the underlay correctly. The sheet base is mounted in a checkerboard pattern, natural analogues are mounted at 45 degrees to the direction of the laminate boards, rolls are mounted transversely in relation to the future coating.
The material begins to be laid from the far corner of the room, continuing until the entire surface is covered. Adjacent sheets or ends of the roll are mounted end-to-end (without overlap) and carefully secured with tape.
To match the geometry of the room, rolls or sheets are cut to size using a square and a knife. The base, like the boards of the future floor, is placed under the door jamb, for which it is filed (if necessary).
Knowing how to correctly lay the underlay and laminate, anyone can handle the process, regardless of how laborious the procedure is. All stages must be approached responsibly. If everything is done correctly, the new floor will last for decades.
Recommendations and tips
When leveling a floor under a laminate using wood boards, the waterproofing film should be laid under this underlayment, and not on top. Moisture protection should be under the leveling layer of plywood or chipboard, but not on top of them.
Do not replace waterproofing with foam underlayment. The second is laid for sound insulation and to prevent creaking of laminate slats. It is not able to replace plastic film. Moreover, according to the rules, the soundproofing substrate must be laid end-to-end, and not overlapping. It is impossible to achieve the necessary insulation from condensation here.
How to properly install insulation
If the screed is less than six months old, then laminate flooring must not be laid on it without waterproofing. The full cycle of moisture release from concrete takes more than three weeks. Here, either wait at least a month, or spread plastic wrap. But if the laminate flooring is installed on top of old parquet, then, on the contrary, the moisture-proofing substrate should be abandoned. It is absolutely not needed here.
What is a vapor barrier?
Insulation is a film or foil material that prevents the smallest particles of water vapor from entering building materials. It also prevents moisture from condensing and damaging the flooring.
The vapor barrier under the laminate works in both directions: that is, it prevents moisture from being absorbed into the board from underneath, and in the event of a leak, it helps prevent flooding of the neighbors.
How is installation done?
Let's consider the main stages:
- The concrete floor is leveled using specialized mixtures.
- After drying, a vapor barrier is installed. As protection, you can use ordinary polyethylene film no thinner than 0.2 mm. Vapor barrier is installed over the entire area of the room. The film strips are overlapped by 200 mm, and the joints are carefully glued. The vapor barrier should also extend 100 mm onto the walls and be fixed there with adhesive tape. If this is not done, steam will seep through the cracks in the film (like from under the lid of a kettle) and have a detrimental effect on the floor covering.
- A soundproofing underlay under the laminate is laid on top of the vapor barrier.
- The laminate is directly installed on top of the substrate.
If plywood is used as a backing, a vapor barrier is still needed. Since this material is an excellent conductor of moisture and dampness.
Do you need a vapor barrier for laminate flooring in a wooden house?
Now there are many questions on the forums about the need for vapor barrier under laminate flooring in a wooden house. In such “living” houses there is a natural circulation of air and water vapor, since the wood is constantly “breathing”.
However, a wooden floor is usually located directly above the ground. This means that moisture evaporation from the ground will be absorbed into the boardwalk and then into the laminate. To avoid this, the floor is insulated and a hydro and vapor barrier is required.
Vapor barrier structure for laminate
For wooden floors on interfloor ceilings, vapor barriers are not always used. Above dry, warm rooms in a wooden house this may not be necessary.
A useful video on the topic of the article is below. Be sure to watch it.
We hope that the article was useful to you, we will be grateful if you share it on social networks with your friends.
Floor arrangement diagram
The modern design of flooring involves a multi-layered combination of building materials.
From bottom to top, the layers are arranged in the following order:
- plank cladding;
- waterproofing;
- insulation;
- logs;
- vapor barrier;
- substrate;
- flooring.
When laying laminate flooring, an underlay is used. This is considered a building code and is mandatory. The need to use film is considered separately for different types of substrate.
Underlay for laminate
DIY waterproofing under laminate
The technology of laying film on a screed is so simple that waterproofing a floor under a laminate with your own hands is possible even for a person without basic construction skills.
Laying film on a concrete floor
The film is spread over the entire surface of the room, extending 2-3 cm onto the walls along the entire perimeter. The rolls are rolled out with an overlap of 15-20 cm. The edge joints are glued together with tape. Sometimes a special mastic or a construction hair dryer is used (the film layers are fused over the overlap).
- Before starting insulation work, it is advisable to tape a plastic film with an area of at least 1 m2 to the surface of the screed. If condensation forms on it after the night, the room must be dried for 2-3 days.
- Using tape to hold the layers of film together is the most effective option. It’s simple, accessible to a novice builder, affordable in price, and the quality is not inferior to alternative options.
Waterproofing on wooden floors
Waterproofing under laminate on wooden floors is not carried out. There are two reasons:
- the film will certainly be damaged when attached to boards or joists of plywood with fiberboard or chipboard with self-tapping screws, namely they serve as a backing for the laminate on a wooden floor base;
- wood absorbs moisture well, as a result of which there can be no condensation on it, and, therefore, water protection is not needed.
It should be noted that among builders there is an alternative point of view - waterproofing the top of the screed when laying laminate flooring leads to early replacement of the floor. The rationale is this: when the air temperature in the apartment is above 20 degrees Celsius, the laminate begins to dry out due to a decrease in the level of humidity in the room and creaks.
The lamella locks break and do not hold the floor panels tightly together. There is no need to explain the end result - the flooring will have to be replaced before its intended service life. The absence of an insulating film does not allow some of the moisture to be transferred into the laminate from the screed, as a result of which its humidity does not change. The above situation is typical for winter (good heating) and summer, when it is very hot.
In spring and autumn, the situation is the other way around - high humidity in an apartment or house (no heating and nothing dries out) leads to swelling of thin sheets of lamellas. Hygroscopic concrete screed absorbs excess moisture and swelling does not occur.
Laminate structure
Laminate flooring consists of individual panels up to 1.5 meters long and 15-20 cm wide. The thickness of the laminate can vary depending on the type of room where it will be installed, and range from 6 to 12 mm. Laminate flooring is usually divided into service classes from 21 to 33. It is used in almost any room: from the bedroom to a restaurant or gym.
Laminate is attached in two ways: locking or using glue. Currently, the first option is predominantly used. There are tongues and grooves on the end sides of the panels, thanks to which the laid laminated coating looks smooth and monolithic. If you install the floor using glue, then the advantage of this method will be a strong fastening.
Laminate most often consists of 4 layers:
- The top protective layer is made of resin, which protects the floor from abrasion, the harmful effects of sunlight, and the penetration of dust and moisture into the structure.
- The decorative layer is represented by paper with an image of wood texture printed on it. If the top layer is damaged, the decorative part may receive significant damage, and the laminate itself may become unsuitable for further use.
- The main layer of laminate flooring is made of fiberboard or chipboard that has undergone high-temperature, high-pressure treatment. It has high strength and moisture resistance, but if moisture gets in from the end parts of the panels, it is likely to deteriorate, rendering the entire floor covering unusable.
- The bottom layer of the laminate is paper impregnated with resin. The bottom layer ensures the leveling of each laid panel and protection from moisture from the base of the floor. Due to the limited capabilities of this layer, additional degrees of protection for the subfloor are required.
To prepare for laying laminated flooring, steam and waterproofing of the subfloor is used.
About waterproofing under laminate
Since laminate is afraid of water, you definitely need to worry about waterproofing when laying it. Most craftsmen tend to lay a layer of plastic film under the coating, which will play a waterproofing role. But in general, waterproofing can be done in a different format.
Waterproofing laminate flooring is very important
Table. Types of waterproofing.
| Type of waterproofing | Description |
| Roll | In this case, various roll materials are used to create a waterproofing layer. They can be either polymer or bitumen-based. Usually it is enough to simply glue the pieces of the required size onto the base using glue, make sure that there are no unclosed seams, and the waterproofing is ready. It is recommended to add materials to the walls by approximately 15-20 cm. In this case, only the adhesive layer needs to be dried before starting further work. |
| Concrete | This type of waterproofing is prepared from cement and sand, sometimes with the addition of liquid glass. You should coat the base with this mixture, without missing a single centimeter of the surface, and also partially apply a layer of waterproofing to the walls (15-20 cm). It is best to apply in several layers, after which it is important to dry the surface thoroughly. |
| In this case, liquid bitumen or polymer compositions are used, which are applied to the base and lower parts of the walls. After the mixtures harden, a reliable protective layer is formed that will not allow moisture to pass through. |
Instructions for laying insulation under laminate
It is not difficult to insulate a laminate floor on a balcony or in a living room if you follow the instructions. Features of the work depend on the base material - wood or concrete.
How to insulate a wooden floor under laminate
Insulating a wooden floor under a laminate is easier if everything happens in a new house, since you can immediately begin the main work. In other cases, the algorithm is as follows:
- Dismantle the old covering. This measure can be dispensed with if the surface is smooth and durable.
- Inspect the logs. They may need to be replaced. Treatment with a protective agent is effective for the prevention of mold and mildew.
- Clean out the space. It is advisable to use a vacuum cleaner.
- Lay or pour thermal insulation material.
- Make waterproofing. If it consists of strips, lay it with an overlap of 15 cm.
- Make a subfloor using boards, fiberboard, chipboard or plywood.
If you need to install logs, then waterproofing should be laid before so that the surface is solid. Lay the film in two layers.
When used as insulation under laminate substrates, the operating algorithm is different. It is not necessary to dismantle the wooden flooring if it is relatively smooth, durable and free of traces of mold and mildew. Proceed like this:
- Inspect the subfloor.
- If necessary, level the surface and fill chips and crevices.
- Treat the wooden surface with an antiseptic.
- Install waterproofing. Apply the film in two layers and apply it to the walls to the level of the finishing coating.
- Lay the insulation, retreating from the walls by 1 cm.
How to insulate a concrete floor under laminate
There are two ways to insulate a laminate floor on a concrete floor - make a wooden frame or screed. The first option is more labor-intensive. The algorithm is like this:
- Lay a layer of vapor or waterproofing with an overlap of 10 cm on the wall. If several strips are used, overlap by 10-15 cm.
- Install wooden slats and secure with dowels. The distance between the frame elements is based on the size of the insulation. When using bulk materials, this parameter is not important.
- Treat the sheathing with an antiseptic.
- Spread or pour sealant. It should not protrude above the sheathing.
- Lay a waterproofing film.
- Make a subfloor from wood sheets or slabs.
- Lay out the backing.
- Lay laminate.
All joints and chips on the wooden base under the laminate must be puttied.
If you choose not a wooden frame, but a screed, then proceed as follows:
- Clean the surface.
- Make a leveling layer of cement and sand, wait until it dries completely.
- Lay a hydro- or vapor barrier.
- Lay insulation. When using bulk material, place a metal mesh on top - a reinforcing frame. In this case, there is no need to pre-level the floor.
- Install beacons.
- Fill the screed.
Floor insulation for concrete under laminate can be of different thicknesses. You need to focus on the evenness of the surface and the permissible height of the finished floor. The wooden frame significantly reduces the height of the room, and self-leveling mixtures create a minimal layer.
Laminate is sold in the form of planks, which are a multi-layer cake of a load-bearing wood base, a decorative coating and a protective layer on all sides. If these lamellas are produced with high quality and technology, then moisture is not too dangerous for them. They can be safely washed when cleaning the house.
Floor construction with waterproofing
It is even allowed to spill water on the floor in small quantities, the main thing is not to let it stagnate on the laminate. On top and bottom, each lamella is protected by films of resin, acrylic and melamine, which do not allow moisture to penetrate inside and reach the fiberboard base.
Problems with swelling of laminate planks arise when the protection is damaged and prolonged exposure to moisture from below. It is the second factor that waterproofing on the floor under the laminate is designed to combat. However, it should not be confused with a soundproofing substrate made of foamed polyethylene. These underlayment materials are designed for different purposes and are not interchangeable.
The waterproofing layer under the laminate must be laid:
- in the presence of gypsum or concrete screed, as well as on concrete floors;
- when laying cork or chipboard (fibreboard) underlayment;
- if on the floor below there are rooms with high humidity (bathrooms, kitchens, etc.);
- on the first floor, when there is a basement without heating underneath or a pile foundation without insulation along the base.
Waterproofing is unnecessary only when laying laminate flooring on a wooden floor or linoleum, which itself already serves as a moisture-proofing material. A separate point is with the underlying rough flooring made of wood boards. If you plan to attach fiberboard or chipboard to the base with self-tapping screws, then the waterproofing coating will be of little use. It will inevitably be damaged in such a situation.
A little about laminate
This type of flooring material is one of the most popular. It perfectly imitates expensive wooden floors, but at the same time it is relatively inexpensive, for which it is appreciated. You can now see this material in almost any home. Its installation is simple, but when laying it is important to follow a number of rules that will extend the life of the floors for as long as possible.
The laminate itself consists of fairly large (up to 1.5 m long and about 15-20 cm wide) planks called lamellas. But the thickness of each board may vary depending on the class of coating. So, it varies between 6-12 mm.
On a note! There are several classes of laminate, which are marked with numbers from 21 to 33. Depending on the density and strength, the material can be used for arranging floors in any premises, except perhaps industrial ones.
Each lamella is a multilayer element consisting of 4 layers:
- protective top , which can protect the coating from moisture;
- decorative , usually made of paper with a pattern printed on it that can imitate wood, stone and other types of floor coverings;
- main , which is made of fiberboard or chipboard and is load-bearing. It is this layer that ensures the strength of the coating, but at the same time is resistant to moisture;
- lower protective , which protects the material from the effects of negative factors from below.
Attention! Laminate is afraid of water - the main supporting layer can easily be damaged if the material gets seriously wet. That is why it is important to protect it at all costs from moisture.
During installation of the coating, the individual lamellas are fastened together thanks to a special locking system. This results in a smooth and monolithic coating. In some cases, an adhesive composition can be used during installation - then the base will be very strong, but it will not be possible to dismantle it without damaging the slats.
Laying laminate flooring is simple, and even a novice master can handle this task. However, it is important to follow a number of rules so that the material fits well and lasts a long time. Hydro- and vapor barrier deserve special attention.
When can you do without it?
- the laminate is laid over chipboard/fibreboard and attached to them with self-tapping screws - they will still cut through the waterproofing, so there is no point in laying it down;
- laminate flooring is installed in an apartment of an apartment building, not on the ground floor, where people live all year round and there is centralized heating (or other heat sources that work in cold weather);
- there is a wooden floor under the laminate - in this case, waterproofing is needed already under the wooden floor (because if moisture gets on the wood from below, the laminate will survive, but the wood underneath will rot).
A few words about vapor barrier and warranty
Laminate packages often indicate the warranty period of the coating, but few people know that it remains guaranteed only if the material is installed and used correctly. Thus, it is mandatory to use vapor and waterproofing materials to comply with all norms and rules for laying the material.
Stages of laying laminate
On a note! Most “warranty” parameters only apply to the appearance of the material. That is, only cases of scratches and chips will be recognized as warranty, and then only if the conditions for using the coating are met.
In order to comply with all warranty conditions, in any case you will have to use a film that provides hydro- and vapor barrier. Moreover, the waterproofing film must have a thickness of at least 200 microns.
Waterproofing the floor in an apartment
When is it necessary to use film under laminate?
There are cases when you need to use film under laminate, and we suggest considering all options.
- There are different situations. One specialist’s story: “There was a situation when a master went to a country house to measure something in the winter. The cottage that was built was of the summer type, the foundation stood on screw piles, but the screed was made of cement. And the customer asks - they need to lay laminate, and the master said that in such conditions it is impossible to lay the floor, since mold quickly begins to spread from below. The answer was that after the work of previous specialists, the cork substrate under the coating rotted and became covered with fungal colonies.
- It is difficult to say what guided the customers when they tried to re-lay the floor covering, stepping on the same rake. But a vapor barrier film would then prevent mold from getting onto the cork backing. But such a situation would act like a time bomb. The fact is that the presence of a large amount of moisture under the film and a complete lack of ventilation, in any case, could contribute to the appearance of fungus.
- An example story. Given - the apartment was flooded (completely), because the tap in the people's bathtub broke out and an accident occurred. The owners of the apartment were not at home, water leaked into the rooms below the floor. The disaster had to be stopped by turning off the water supply through the common riser. Having arrived at the address, we had to dismantle the laminate and coniferous underlay a week after the flood occurred. The lining had rotted and become covered in fungal colonies, even the concrete base had turned black. I had to dry the concrete screed for about a week before starting to lay the laminate flooring.
Would a vapor barrier film help in this case and how much? Let's say a black protective film of 0.02 cm is laid overlapping the walls, on top of each other and well taped with wide stationery-type tape, creating a trough shape. Naturally, it would not be possible to close all the cracks and gaps - they are located near heating pipes, in doorways, and the polyethylene can tear due to small pebbles. For this reason, we assume that polyethylene will only delay the entry of water into the screed for a certain time and further down to the neighbors.
Naturally, in the short term, for example, if a hose is tagged in time and has jumped out of a washing machine, a moisture barrier film will help, but no more.
Vapor barrier perforated film for laminate
Sometimes customers ask to lay a vapor barrier film that has perforations under the foam backing. You know, there is a deep meaning in this waterproofing. If the first floor of the building is well insulated and residual moisture enters the final layer on the subfloor, and the vapor insulation can dissipate this remaining moisture in measured doses. Remember that pine and cork substrates and teplex can by design handle a small amount of moisture, dissipating it within the personal structure. It is up to you to decide whether to lay vapor insulation under the laminate or not, and below is a brief table of the use of protective film.
| The need for vapor barrier film | Old concrete base | New cement screed | Wood base | Vacation home |
| synthetic backing | — | — | — | ? |
| Natural substrate | — | + | — | — |
Characteristics of protective film
- Protection from water and dirt . The sticker protects parquet and laminate flooring from water and dirt.
- Easy to stick and remove . The protective sticker does not leave traces of glue on the floor. It is easy to install and remove.
- Scratch protection . Protects parquet and laminate flooring from scratches when using a chair on wheels.
- Does not interfere with cleaning . The protective sticker sticks firmly to the floor and becomes invisible.
Clean, shiny floors are the basis for the comfort and beauty of your home. But nothing spoils a pleasant impression more than scratches and dirt. You can, of course, try to cover up the damage with carpets (which do not always fit into the interior and cause a lot of trouble with cleaning), or, what is even more difficult and expensive, replace the covering. But it’s much easier to avoid such problems in the first place. And now it is very easy to do this. It is to prevent scratches, dirt and any mechanical damage that a unique protective sticker was invented. You no longer have to worry about your heels scratching the parquet floor or your beloved cat deciding to sharpen its claws. Scratches from a chair on wheels or damage from rearranging furniture are no longer a concern - your floor will always be perfect thanks to the protective sticker.
The sticker not only prevents a variety of damage, but also protects against the effects of dirt, water and sand. The protective sticker makes cleaning the room much easier. No need to waste time on repairs - just replace the film, and your floor will be sparkling clean again. The decals are great for use in the area you need, whether it's a kitchen countertop, a pet feeding area, a rolling chair area, or an area near the front door. Another advantage of protective stickers is their simplicity and ease of use. They are easy to replace and suitable for parquet and laminate flooring. After removing the film, no traces remain on the surface.
The final stage: installation of skirting boards and thresholds
Installation of thresholds and baseboards, closing temperature gaps, completes the work of laying the laminate. Before installation, you need to remove the wedges that controlled the thickness of the gap. Skirting boards and thresholds are marked, cut out, and then fastened so as to completely close the gaps between the laminate and the wall. If a cable will pass under the baseboard, it should be pulled and secured in advance. Fastening is done using glue or self-tapping bolts. Some skirting boards are sold together with connecting fasteners.
Quality control of the finished floor is carried out using even slats or a building level.
When performing installation work, be careful not to drop hard or sharp objects onto the floor covering and avoid spilling any liquids.
Self-adhesive roll waterproofing
Recently, self-adhesive roll waterproofing, which is applied without the use of an open flame, has been gaining popularity.
This material has adhesive edges covered with a protective film.
The product is completely ready to use, which is very convenient.
The work process consists of laying the roll flat, peeling off the protective film and using adhesive edges to connect the subsequent strips.
All this is done easily and quickly.
Carrying out waterproofing work will ensure the durability of both the interfloor ceiling itself and the laminate.
Additional protection against moisture
Waterproofing device for laminate flooring.
It is recommended to perform several additional steps that will improve the protection of the laminate from the negative effects of moisture. To do this, lay a polyethylene film with a density of more than 50 microns on the main waterproofing. If the width of the film is not enough to cover the entire room, the canvases should be laid on top of each other with an overlap of 10-15 cm, and the seams should be taped. The film should spread along the walls to a height of 15 cm. Subsequently, after laying the laminate and installing the baseboards, the excess film should be trimmed with a knife.
After this, a substrate is placed on the film. For this you can use various materials. Polyethylene foam is the most popular, as it provides good insulation, dampens all vibrations and at the same time is economical. Cork is considered the best substrate, but it is more expensive than other types. The polyethylene foam joints are glued together with tape. This not only protects against moisture penetration, but also prevents the base from moving when laying the laminate, further increasing the impermeability of the laminate.
In addition, to protect the laminate from negative influences, it is recommended to treat the seams with a sealant. This procedure is especially relevant when using flooring in the kitchen. Thanks to this, water will not get into the joints of the panels. This, in turn, will prevent the laminate from swelling due to moisture.
Materials, substrates and films used for waterproofing
There is no need to think too much when creating the moisture-proofing layer in question. If floor screed can be done using several different technologies and materials, then it is recommended to protect the laminate flooring from moisture from below in only three ways.
Waterproofing materials
Waterproofing for laminate flooring can be done using:
- concrete mortar with liquid glass;
- polyethylene film;
- bitumen mastic.
The most commonly used polyethylene is 0.2 mm (200 microns) thick. Manufacturers usually recommend this kind of film to be placed under the laminate in their instructions. Plus, it is also the easiest to install. Working with liquid waterproofing materials is obviously more difficult.
Film waterproofing for floors
Functions of floor waterproofing
Waterproofing protects floors and laminate flooring from the damaging effects of water, increasing their durability even after the warranty period has expired.
In the absence of a protective layer, there is a high risk of water leaking to neighbors below, for example, when pouring screed or other work involving the use of liquid substances.
Filled and dried screed is also subject to the destructive effects of high humidity.
Moisture can appear either naturally, for example: temperature changes form condensation, or artificially - water is pouring on the floor, there are many flowers in the room, etc., all this creates an increase in humidity.
With constant high humidity, any material, including concrete, begins to slowly and systematically deteriorate.
From moisture, microcracks first form on the concrete, which grow every year, and as a result, the floor will have to be repaired again.
Even more damage is caused by high humidity laminate, which very quickly destroys it.
Moisture accumulates on the back side of the laminate and is absorbed into its base, causing swelling and deformation.
Laminate panels that are swollen from moisture cannot be repaired.
In addition, high humidity promotes the formation of black mold, which is very difficult to get rid of.
Therefore, to prevent such cases, it is necessary to waterproof the floor before laying the screed, before laying the laminate and before carrying out other similar work.
Waterproofing the floor reduces humidity in the environment and also guarantees a longer service life of the concrete screed and any floor covering.
NOTE
Before carrying out any work, be sure to level and clean the base from all kinds of unevenness, dust and dirt. After cleaning, the base must be primed.
There are several types of waterproofing:
- industrial film.
- liquid;
- bituminous;
Popular materials for waterproofing
You can install the laminate, observing the manufacturer’s requirements for waterproofing the screed, using two methods:
- use a substrate with a moisture-proof layer;
- waterproof the screed with specialized materials.
Substrate as a waterproofing layer
In the trade you can find 3 types of substrates that effectively protect the laminate from moisture without installing waterproofing:
- expanded polystyrene (trademark "Penoplex");
- polyethylene foam;
- bitumen-cork substrates (trade mark "TUPLEX").
Extruded polystyrene foam not only performs well as a shock absorber during floor operation, but also does not allow moisture to pass from the screed to the lamellas.
The big disadvantage is the high cost. Price 1 m2 - 165-180 rubles.
Polyethylene foam is the most popular material for laminate backing. The advantages include:
- holds heat well;
- does not allow water to pass through (100% insulation of the floor covering from condensate evaporation is achieved);
- resistant to microorganisms and rodents;
- low price.
This material also has serious disadvantages:
- releases harmful substances into the surrounding space;
- sags quickly during operation;
- accumulates static voltage.
The average price of 1 m2 is 14 rubles.
Attention: when laying polystyrene foam and polyethylene foam, the joints must be glued together with tape, and the material itself is placed 3-4 cm on the wall along the entire perimeter. After installing the floor, the protruding edges of the substrate are carefully trimmed, then covered with a plinth.
Bitumen cork is made from kraft paper impregnated with bitumen, on which a layer of cork chips is applied on top. Bitumen retains moisture well. However, complete sealing of the laminate from moisture from below is impossible. The junction of the wall and the substrate interferes. The problem is solved by additional waterproofing the places where the cork comes into contact with the wall.
There is one minus, but an important one. Very high price. Therefore, it is used only when laying expensive laminate flooring (the average price of 1 m 2 with a thickness of 30 mm is 250 rubles).
Film laying
If the laminate is laid on a concrete floor, then reliable waterproofing is indispensable. Concrete has the unpleasant property of absorbing moisture from the air and then releasing it back in the form of condensation. If the lamellas are laid directly on such a base, then they will begin to become damp from below. The result will be swelling of the planks and/or mold growth under the finished floor covering.
If the floor is wooden or parquet, then on the contrary there is no need to spread the film. Wood is a breathable material and regulates the humidity around itself; condensation does not form on it. Polyethylene on such a basis will only cause harm, creating a thermos effect that is completely unnecessary in this case.
Laying waterproofing and underlayment
The process of laying waterproofing from polyethylene film looks like this:
- The base is cleared of debris and stones that could damage the flooring material.
- Strips of polyethylene are spread overlapping 15–20 cm and overlapping the walls by 5–10 cm.
- The joints are glued with mounting tape or tape.
It's simple. Figuring out how to connect a boiler or connect a dishwasher is much more difficult. The main thing here is not to tear the film during installation and carefully glue the joints. It is extremely important that the final waterproofing layer is formed without holes or tears.
Step-by-step instructions for laying waterproofing film
Rules for applying rubber paint "AKTERM HydroStop"
Before applying mastic, it is important to make sure that the surface is dry, not prone to capillary rise of moisture, and has no traces of paint coatings, oils, grease and other substances that impede the quality adhesion of the waterproofing coating to the base.
Rubber paint must be applied at a temperature of no less than +7 °C and no more than +45 °C, the layer thickness should not exceed 1 mm, the consumption in this case is 1.15 kg per square meter. The drying time of the applied layer is 24-48 hours at t>+15°C, after which it is possible to apply the next layer of waterproofing crosswise in relation to the previous one.
The optimal thickness of the waterproofing layer is 2 mm. A correctly applied waterproofing layer is uniform, dense, without sagging. After the mastic has dried, you can install the heated floor, if planned, and lay the finishing floor covering.