Absolutely any concrete floor is suitable for laminate, because... The main requirement for proper installation of laminated products is a smooth and clean surface of the subfloor.
Compliance with this mandatory requirement will ensure high-quality installation of the flooring and its long-term use until the end of its warranty or even a longer period.
It’s not so difficult to make the floor clean; vacuum or sweep, wash, dry and you’re done.
It is much more difficult to level the floor under the laminate, especially if the floor is concrete.
Uneven concrete floor
Most modern buildings initially have a subfloor made of expanded clay concrete or other reinforced concrete structures with similar characteristics.
Such structures are essentially an interfloor ceiling, simultaneously performing two more joint functions: a ceiling for the lower floor and a floor for the upper floor.
The main tasks of such a floor are to separate floors from each other and to withstand the load from the weight of people, animals and things on it.
To perform these tasks, it is not at all necessary to produce a completely even interfloor floor suitable for laying laminate flooring.
In addition, the production of very even concrete slabs requires much more financial, energy and other costs.
In this regard, slabs intended for building houses are most often produced with some errors, expressed in protrusions, depressions, various inclusions, etc.
Also, during the repair work, various growths, blots, etc. may form on the surface of the subfloor, all of which interfere with the installation of the laminate.
In addition to the unevenness described above, the floor plane may have slopes.
Therefore, the floor under the laminate must be additionally leveled.
Conclusion
There are several ways to level the floor for laying laminated flooring. We looked at how to make a laminate screed with your own hands. For those who want to level the floors themselves using a screed, we have selected a video that will certainly help you carry out the work correctly.
If you need to buy SVP tile leveling systems in Moscow on the best terms, call or write to us! We will be glad to mutually beneficial cooperation. All products sold by us are made of ultra-durable plastic, which has excellent performance characteristics: it does not break and is surprisingly wear-resistant. Before sending the goods to your place, we conduct a thorough check of all products (so they are delivered to you with a complete absence of defects - breaks, paint scuffs, chips and others). Contact us, we will be glad to mutually beneficial cooperation! See you in touch!
Leveling a concrete floor
You can level a concrete floor in different ways, depending on the nature of the unevenness.
For example, large irregularities and sagging are knocked off with a chisel and hammer.
Small frozen grains and pebbles can be cut off with a regular spatula, sliding it over the surface.
Cracks and depressions in the concrete floor are covered with cement or similar mortars to prevent moisture from penetrating into them, which can destroy any concrete.
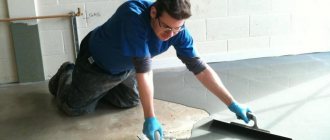
The final preparation for installing laminate flooring is leveling the base with a concrete screed.
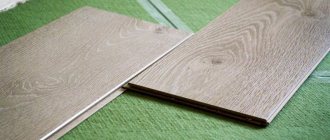
Laminate laying technology
Installation of laminate using the deck method (that is, attaching boards to each other) occurs as follows::
- The work starts from the walls. The first panel is placed in the direction of the ridge towards the wall, and the lock towards itself. Wedges are installed to create a gap between the wall and the panels.
- The second panel is connected to the first panel in the same way.
- You need to monitor the level of the panels and the longitudinal edge - everything should be at the same level.
- The joint along the shared edge is made by inserting the panel at an angle and pressing until it clicks.
- The locks at the ends are connected vertically or horizontally.
- In the first row, scraps of the last panel are mounted at the beginning of the second.
Laying the material in rows is done as follows::
- The ridge of the panels for the first row is cut off. They are mounted in the direction of the lock towards itself. This row does not have to be located against the wall.
- After joining the first and second rows, wedges are installed near the wall to create a gap that protects against deformation.
- All subsequent rows are installed in the same way.
Concrete screed
Floor screed is needed, first of all, in order to hide communications passing through it, if any.
This includes underfloor heating, electrical wiring, heating, water supply pipes, and in some cases sewerage.
The second purpose of a concrete screed is to level the base of the floor for finishing with a finishing material, in our case laminate.
Also, a concrete screed is used to generally bring the floor plane in all rooms of the room to the same level, taking into account the thickness of the laminated floor covering.
The concrete screed almost perfectly levels the surface of the concrete floor, which meets the requirements in the instructions for laying laminate flooring.
To ensure that all work on leveling the concrete floor is completed correctly, everything should be done according to the instructions.
Step-by-step instructions for pouring a concrete screed:
The air temperature in the room where it is planned to make the concrete screed should be at least plus 5 (five) degrees.
1) Calculate the amount of dry mixture; 2) If there are holes, cracks, etc. leading to the lower floor, we seal them so as not to flood the neighbors. 3) Clean the floor from dust, dirt, etc.; 4) Prime the surface; 5) Install guide beacons/planks (we will use them to level the floor); 6) Mix the solution; 7) Fill the floor evenly with concrete and smooth it using the rule.
And now we will describe each step in such detail that anyone can carry out this work independently.
NOTE
Pouring a concrete screed with long breaks increases the difference in consistency between the initial and subsequent mortars, which complicates their smooth connection with each other and increases the time of the entire work.
Therefore, if it is possible to fill the screed with a continuous process, then it is better to do so.
Substrate and penoplex
During installation work, it is important not to confuse penoplex and the substrate, which can be cork or polyethylene. The task of the latter is to prevent the penetration of noise and moisture.
The substrate itself is not capable of preventing the destruction of penoplex. This function is performed by the screed. Therefore, during installation work you should not deviate from the technologies developed by specialists.
It is important to adhere to the established rules and use all structural elements: penoplex, screed, substrate and laminate. In addition, it is forbidden to violate the order of laying the listed components.
Only if the technology is followed will it be possible to obtain a beautiful, reliable and warm floor that can last for many years. Otherwise, within six months, new repairs will be required to correct the mistakes made.
Calculating the amount of dry mixture
To calculate the amount of dry mixture, you need to know the thickness of the screed that we plan to make.
The main guideline for calculating the thickness of a concrete screed is the maximum difference in floor height in the plane.
In other words, you need to calculate the difference between the minimum and maximum floor heights.
To do this, using a level, draw a continuous horizontal line on the wall along the entire perimeter of the room at the same height, for example: 250mm, from the highest point of the floor base.
If you have a laser level, then use it.
Next, we measure the distance from this line to the lowest point of the base of the floor, for example, we got 350mm.
Thus, the difference in height of the base from the highest point to the lowest is 350-250 = 100 mm.
Those. In order for us to level the floor into one plane, we need to pour a 100mm thick screed at the lowest point.
In this case, at the highest point of the subfloor, the thickness of the screed will be equal to 0 (zero), i.e. there is no need to thicken the base.
To calculate the final thickness of the screed, take our 100mm and divide it in half, getting 50mm.
Those. In order to level the entire surface in one plane, the average thickness of the concrete screed, in our case, should be 50mm.
Next, we look at the consumption parameters on the packaging of the cement-sand mixture.
Let's assume that the packaging indicates the following consumption:
For 1 sq.m. with a screed thickness of 10mm, 22 kg of dry mixture is required.
Let's say our room is 20 sq.m., then we multiply 22 kg by 20 sq.m., and it turns out that to level the floor plane in the room we need 440 kg of dry mixture.
Divide 440 kg by 25 kg (the weight of each package) and we get 17.6 pieces, i.e. 18 packs of dry mix.
NOTE
If you are pouring a concrete screed for the first time in your life, then it makes sense to buy a dry mixture for floor screed with a reserve, just in case.
After we have calculated the required amount of dry mixture and purchased it, we begin to clean the surface of the base.
Functions
When a floor is screeded for subsequent laminate flooring, the filling layer performs several main functions at once:
- Leveling the base, which is the primary task of the prepared solution.
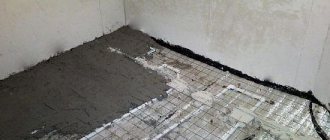
- Masking communications and pipes that could create an obstacle to the normal creation of the interior in the room. In addition, a water or electric heated floor system can be placed in the screed.
- The rough base becomes stronger and more reliable, able to withstand numerous external mechanical influences.
- Sound and heat insulation. In this case, you should provide and purchase the necessary materials for this.
- While walking, the load is created evenly on the floor. The same applies to arranged furniture and interior items. It will be able to withstand even heavy traffic without damaging the flooring itself that will be laid.
Cleaning the floor
To prepare the floor for pouring a concrete screed, it must be carefully cleaned of all foreign irregularities, dust and dirt, etc.
To do this, use a spatula, vacuum cleaner or broom.
It is advisable to clean the floor from oil stains, paint and other foreign substances; this can be done using a special sanding machine or regular sandpaper.
If this is not done, then the adhesion of the screed to the base in contaminated areas will be very weak or will not exist at all, i.e. this is fraught with detachment and corresponding consequences.
After the initial preparation of the base, the next step is to prime the subfloor.
Priming a concrete floor
Priming is a mandatory process that should not be neglected.
It is advisable to use a primer with deep penetration, because... it has more beneficial effect.
The primer should be applied with a brush, roller or brush, evenly distributing it over the entire floor area.
After treating the surface with a primer, we place beacons along which we will level the surface of the screed.
We install beacons
As beacons, you can use a special profile designed for plaster, drywall, etc., with a thickness of 0.4 mm, their price is about 40 rubles. a piece.
Installation of guide beacons is carried out along the length of the room over its entire area.
The profile is cut with ordinary metal scissors.
We install the first plank from the wall at a distance of 150-200mm.
We install the second, third and subsequent guides with each other at a distance of 1000-1100mm.
It is possible to install the guides at a greater distance from each other, but in this case the work will be more difficult.
The guide beacons can be secured in several ways:
- for a thick solution; - on wooden blocks; — on dowels plus dried cement mortar (dowels can be adjusted in height).
Having installed the guide beacons, we check with a level that they are horizontal in all directions.
After checking the horizontal position of the installed beacons, we fix them in place.
When attaching the guides to the solution, you should wait until it dries so that the beacons remain motionless.
The next step is to prepare the cement mortar for pouring the floor.
Floating base
To install sound insulation on a screed under a laminate floor, two technologies are used:
- “Floating screed”: soundproofing materials are placed between the screed and the subfloor. When using this technology, concrete floors and walls are isolated from the finished floor. Mineral wool, expanded clay or polystyrene are well suited as sound insulators, because they have an elastic structure, withstand heavy loads and absorb noise well.
- A “floating floor” is a soundproofing layer placed between the screed and the laminate. This is one way to level the floor. The technology for installing sound insulation is simple, but not all materials can effectively insulate an apartment from external noise.
Floating floor device
To improve sound insulation, it is not allowed to lay the material in 2 or more layers: constant dynamic loads to which the laminate is exposed during walking destroy the panel locks.
Mix the solution
First of all, you need to prepare a container in which the kneading will be done; for this purpose, you can use a regular bucket or basin.
In some cases, kneading is done directly on the floor; for this you need to have certain knowledge and skills.
You can mix the solution with any available device, for example: a shovel, trowel, a regular stick, etc.
But it is much easier, simpler and more convenient to work with a power tool, such as a concrete mixer or mixer.
If you do not have a special tool for kneading, you can use a regular drill by inserting the appropriate attachment into it.
The drill successfully copes with the loads that arise when mixing concrete.
The solution should be mixed strictly according to the instructions indicated on the packaging of the dry mixture, observing all proportions.
At the very beginning of mixing, low mixer speeds are needed so that everything does not fly apart in different directions; to do this, press the trigger lightly, then gradually the speed can be increased to full power.
We knead until all components are completely mixed to form a single creamy solution.
In some cases, a semi-dry screed is used, then the solution must be made thicker, reminiscent of cottage cheese.
NOTE
When pouring a thick layer of concrete screed, fiber or reinforcement is used to prevent it from cracking during the drying process and to increase strength.
Once the solution is ready, we begin pouring the screed.
Kinds
There are quite a few types of screeds, but the most common are three options::
- Sand-cement screed.
- Dry screed.
- Self-leveling screed.
All these types have different application technologies and different filling materials, but the result is achieved quite satisfactorily using any method. The criterion for choosing one or another option will be the thickness of the layer, the need to immerse communications or wiring screeds in the layer . In addition, different drying times of the layers can also serve as a determining criterion for selection.
Filling the screed
Filling the floor should begin from any corner of the room that is as far away from the entrance as possible.
Having poured the prepared mixture onto the floor, we carefully fill all the depressions and cracks with the solution to prevent the appearance of unevenness and voids.
Next, take a rule or half-rule and smooth the surface of the screed at the level of the guide strips.
The plane of the half-ter or rule should move along the guide profile as if on rails, while the leveling tool should be moved with uniform movement in three directions.
The movement of the rule should be carried out across the slats, according to the back and forth principle, i.e. to the right/left by 10-15 mm and pull towards yourself also carefully and smoothly by 5-7 mm.
Those. We carefully move the rule to the right/left, now in one direction, then in the other, at the same time shifting towards ourselves so that the excess solution moves from above to the space of the floor that is not yet filled with it, to our feet.
NOTE
Different batches of the solution may differ in consistency, which is why a wavy, convex joint sometimes forms at the places where they are connected.
To prevent this from happening, the places where different batches of the mixture come together should be smoothed out more thoroughly.
To make the floor surface as smooth as possible, we stretch the rule over one place several times to smooth out all the smallest irregularities.
If necessary, add solution to the resulting voids, and once again level everything with the rule.
When the concrete has set and you can already walk on the floor, but the screed is still somewhat damp, using a wide spatula you can easily cut off and clean up the lumps, pebbles, etc. that have formed on the surface of the floor, if you wait until the concrete has completely dried, then do this it will be very difficult.
Laying the covering
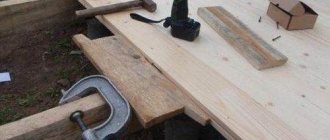
When installing a new floor or completely dismantling an existing one, a different technology is used. The level of the new floor is determined, a layer of waterproofing material is laid, and logs are laid. The joists must be carefully aligned and secured. Sheets of plywood, chipboard or other materials are laid on top of the joists, the joints are carefully primed, the sheets must be laid staggered, leaving a gap to the wall, due to possible deformations. The floor is ready for laying laminate.
It is advisable to lay a layer of foamed polyethylene on top of sheets of plywood or chipboard for shock absorption. Insulation of such a floor is possible using any insulation material, for example penoplex, by laying it between the joists.
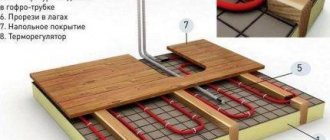
It is quite easy to make laminate-coated floors warm; for this, the following heating systems are used: water, electric and electric-water.
When laying laminate flooring without a screed, infrared films, water-heated flooring systems and cable mats for dry installation are used. It should be noted that for laminate flooring that is susceptible to rapid heating, heaters with a power of up to 100 - 130 W/m2 should be used.
In combination with laminate, flooring systems are used for “dry” installation.
Laying systems
The flooring system includes special slabs with grooves in which tubular heating elements are laid. The material of the mats is polystyrene or with a wooden base, fiberboard or OSB. Such a floor is installed quite simply: ready-made system elements with grooves cut into them are laid on a leveled subfloor. Plates connected to each other using a tenon inserted into a groove. Pipes are laid in the furrows. The pipes are connected to a source of hot water, then the covering is laid. Metal plates are used to improve heat transfer. The installation and operation costs of such a system are low.
One of the best options for heated floors in combination with laminate flooring is infrared. At low power, the coating is heated evenly, installation is not complicated, and heat transfer is high. Installation is carried out on a carefully leveled surface on which a layer of heat insulation is first applied.
Then the roll of film-heater is unwound, laid out in accordance with the plan, connections are made to the conductive busbars, and the wires are routed to the thermostat. A substrate is laid on top of the heater, preferably a synthetic material, then a laminate is laid. This heater has a significant drawback; the cost is $70 - $80 per square meter.
One of the latest developments for heating laminate floors is the XL Pipe electric-water floor heater. The advantage of the system is uniform heating. The system consists of a plastic pipe, inside of which a heating cable is located, the pipe is hermetically sealed. The pipe is filled with non-freezing liquid. Installation of the system is similar to installation of a water system, when ready-made system elements with grooves cut into them are laid on a leveled subfloor. The slabs are also attached to each other using a tongue and groove. The pipes are laid in furrows. The contacts are connected to the thermostat. The covering is being laid. Metal plates are used to improve heat transfer.
When installing a heated floor in combination with a laminate flooring, its low thermal conductivity must be taken into account. For such purposes, materials with increased density are used. The heaters used should have a power of up to 100-130 W/m2. To compensate for thermal expansion, the coating should not reach the wall by 0.5-1.0 cm.