An easy-to-install gypsum or cement-polymer self-leveling floor will allow you to independently level the surface of the concrete screed with optimal expenditure of working time and money. The technology is based on the use of environmentally impeccable self-leveling dry construction mixtures, characterized by ease of preparation, strength, hardening time and service life. But which self-leveling floor is better for a country house: gypsum or cement?
Features of gypsum-based self-leveling floor
Self-leveling flooring on a gypsum screed is a convenient, practical and one of the most budget-friendly finishing options. Almost anyone can cope with such work, since the basic rule is quite simple: you need to get a working solution, pour it onto a small area of the floor and level it with a needle roller.
To perform the work better and safer, it is necessary to take into account the following features:
- If the surface area is less than 9 m2, you can fill the entire floor at once and then quickly level it.
- In other cases, the area should be divided into several sections - for example, 18 m2 - 2 of 9 m2.
- You should always move from the far edge of the room towards the exit.
- The quality of work should be constantly monitored.
- While working, be sure to use a mask, gloves and goggles.
It is better to level one area of the surface in half an hour - otherwise the solution will dry out quickly
Calculations
To calculate the consumption of self-leveling mixture for installing a subfloor, you need to know:
- Room area;
- Thickness of the layer of mixture being poured;
- Density of the leveling mixture.
Before starting calculations, we assume that for filling 1 sq. m of base 1 mm thick requires 1 liter of water.
So, for example, if you need to level the floor in a room of 10 square meters. with a level layer thickness of 7 mm, 70 liters of water are required (1 l * 7 mm * 10 sq. m.).
Next, the density of the mixture is entered into the calculation, which must be indicated on the packaging. The amount of water obtained in the previous calculation must be adjusted to the actual density of the leveling mixture. If the density of the level is, for example, 1.4 kg/l, then the required amount of solution will be 1.4 * 70 = 98 liters.
It could be easier. On the packaging of the self-leveling mixture, the manufacturer indicates the consumption of the composition per 1 m2 of floor 1 mm thick. This value is multiplied by the area of the room and the thickness of the filling layer in mm. The result will be the consumption of the mixture for the entire room.
Composition of gypsum-based self-leveling floor
Classic gypsum consists of a hardened mixture of calcium sulfate and water: formula CaSO4 + 2H2O. This is the basis of a gypsum floor, however, along with the main component, there are other compounds in the composition that improve the properties and structure of the self-leveling floor:
- plasticizers to impart plasticity to the mass;
- pigments for painting;
- dry glue – connects plaster particles into a single whole;
- hardener - for quick drying;
- dry sand of fine fractions - filler.
Important! This mixture can only be stored in dry places without strong temperature changes. Gypsum should be used within the stated expiration date (usually no more than 12 months).
Video description
Making a 3D floor with a backing made of synthetic banner fabric with a pattern is shown in the video:
The second option, how to make a self-leveling floor with your own hands, is more complex: it requires multi-layer pouring with each layer drying for several days. If you immediately form a layer of the required thickness to completely cover the decorative composition, it will take even longer to dry.
The formation of layers for such a floor is carried out until the required thickness is achieved Source pol-inform.ru
The self-leveling floor can be used no earlier than 7-10 days after pouring.
Pros and cons of gypsum self-leveling floors
A review of the composition, material characteristics and reviews shows that gypsum-based self-leveling floors actually have several undeniable advantages:
- Uniform coverage over the entire area and volume. The smoothness is almost perfect, which allows you to lay any covering - laminate, parquet and others.
- You can also do the flooring yourself. Moreover, achieving smoothness is quite possible with the help of available tools - for example, a roller.
- There is no need to prepare the base - just apply a primer or even not touch the surface.
- The work goes very quickly - the surface hardens within 2 hours after the end of pouring.
- Gypsum mixture is a universal leveling composition. It can be used to eliminate defects and roughness of any size (3-100 mm).
- At the same time, a gypsum self-leveling floor is one of the most budget options, which will cost less than, for example, a polymer floor.
On the other hand, this option is not without some disadvantages:
- For example, gypsum flooring sets quickly. On the one hand, this is an advantage, but on the other hand, you need to work as quickly and accurately as possible, otherwise defects will arise.
- If there is constant high humidity in the room, this coating is definitely not suitable - it will quickly swell and become unusable.
- The filling expands during drying, which requires precise determination of the perimeter (with a small margin).
Warning! Gypsum always requires a topcoat (for example, using linoleum), since otherwise it quickly becomes dirty. In this case, it is not advisable to use a tile covering, since the gypsum floor does not adhere well to the glue.
A distinctive feature of gypsum flooring is its ideal smoothness and ease of pouring.
Let's sum it up!
Gypsum composition
- quite durable, but fragile material that produces dust.
For an inexpensive floor used in a dry room, the thickness of the fill can be within 30 mm. When choosing, take into account poor adhesion to cement-based tile adhesives. These disadvantages of gypsum casting are partially compensated by its relatively rapid hardening.
Cement-polymer
self-leveling floor is a more expensive material, characterized by excellent strength, ideal self-leveling properties, and a smooth, wear-resistant coating surface.
The composition is not picky about preparing the base, so it saves time and money by eliminating multi-layer priming.
Self-leveling floors can be used without problems in rooms with high humidity.
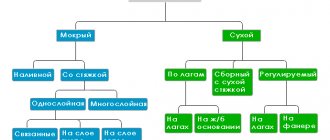
Which self-leveling floor is better - gypsum or cement?
Both self-leveling gypsum and cement floors have their advantages and disadvantages. Therefore, it is difficult to say unequivocally which one is better. It all depends on the specific operating conditions. For example, a cement floor is exceptionally frost-resistant, and gypsum cracks even at low subzero temperatures. A comparison of the characteristics of these types of coatings is presented in the table.
| Characteristic | cement floor | gypsum floor |
| mechanical strength | + | — |
| spreadability | — | + |
| drying speed | — | + |
| frost resistance | + | — |
| moisture resistance | + | — |
| surface evenness | — | + |
| environmental friendliness | — | + |
| price | higher | below |
| application range | small | big |
| installation of a heating system | possible | |
Comment! Cement cannot be poured in a warm layer, but gypsum offers much greater possibilities. Thanks to this, you can make a powerful self-leveling floor on a gypsum screed.
Gypsum flooring is well suited for home use, while cement flooring is suitable for office and industrial premises with heavy loads, temperature changes and other harmful influences.
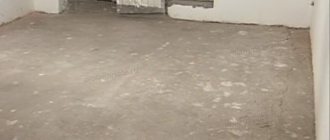
How to prepare the base for a self-leveling floor
The preparatory stage is important and often the longest, since before laying the floor it is necessary:
- Remove dust and other contaminants.
- Clean the floor from old stains (you will need a solvent for this).
- Seal cracks using quick-drying products (wood glue, sealant, etc.). If the crack is large, the compounds can be mixed with the same volume of sawdust.
- Treat the floor with putty and primer to get rid of the largest defects.
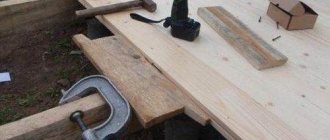
Further preparation depends on the surface material. For example, plank floors are subject to mandatory repair. As a rule, they are completely or partially dismantled, old floorboards are replaced, new flooring is laid and holes are filled. Only after this is it advisable to pour plaster.
Old plank floors need complete or partial replacement; the main requirement is to remove dirt and seal all cracks
Where is it used?
In addition to its main purpose, which we have just highlighted, it is sometimes permissible to use this kind of mixture for narrow purposes: removing dust, priming, improving the structure of the processing surface, and so on. It is worth saying that the short time period for drying the mixture is a great advantage. In a short period of time, cracks simply cannot occur, there is no shrinkage, and water does not penetrate into the base.
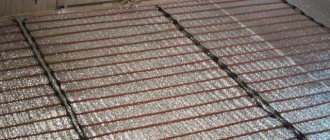
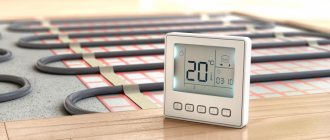
There is such a term as coarse leveler - this is a self-leveling mixture that allows you to organize a subfloor, even with a heated floor screed.
How to make a gypsum self-leveling floor with your own hands
Pouring and leveling plaster is not that difficult. After preparing the base, you need to stock up on several tools and materials:
- squeegee (spatula with teeth);
- benchmarks - beacons that allow you to mark important points on the surface;
- a needle roller is the main tool for work;
- paint shoes - special shoes with spikes;
- damper tape - a polyethylene strip that protects the screed from cracking;
- level for operation control;
- bucket for receiving the mixture;
- construction mixer.
The sequence of actions is as follows:
- Get the working mixture using a mixer (follow the instructions).
- Start pouring using a roller. First you need to move from the farthest edge to the exit.
- Gradually pour out the mixture and place beacons or visually monitor the process.
- Assess the evenness of the frozen surface using a level. If necessary, add a little more mixture and smooth with a roller.
Advice! For quick and high-quality application of the composition to the surface, it is recommended to use a self-leveling gypsum-based self-leveling floor. It contains gypsum, plasticizers, Portland cement and other components. This is the best option for amateurs: in this case it is very easy to get a smooth surface.
The main stages of floor pouring
Pouring the mixture - application technology
If the base is carefully prepared in compliance with all requirements, then the pouring process itself is not difficult for specialists with minimal experience in performing construction work. The main thing is to prepare the solution in volumes that you can fill in the period of time required for the composition to begin to set.
The work order is as follows:
- the mixture is poured onto the base floor along the beacons, focusing on the tape pasted along the perimeter;
- Although the mixture is self-leveling, it is leveled with a squeegee (in hard-to-reach places, a spatula is used);
- be sure to treat the surface of the poured floor with a needle roller (removes air from the mixture that got there during mixing);
- the surface is left until completely dry (the timing for each composition is indicated by the manufacturer on the packaging). This usually takes 2 - 6 hours (if the layer is not thick), you can walk on such a floor after 3 or more hours.
Despite the simplicity, not everyone feels ready to do this job themselves. PolyTek System LLC offers services for pouring cement self-leveling floors. The work is carried out by qualified specialists; materials of our own production are used for filling, the quality of which we are confident of. Provides a guarantee for the result, which is included in a separate clause in the contract.
Rules for caring for gypsum-based self-leveling floors
Caring for self-leveling floors is quite simple. If it is covered with linoleum or other covering, the maintenance rules are standard - regular wet cleaning. But if there is no such coverage, you must use other means:
- polishes (for cleaning after filling);
- cleaners (to remove grease stains, traces of glue);
- matte mastic (to restore appearance and create a protective film).
Attention! It is strictly forbidden to wash the gypsum surface with water, powders and other detergents. As a result, it will quickly swell, become dirty and gradually become unusable.
It is best to lay linoleum or other covering.