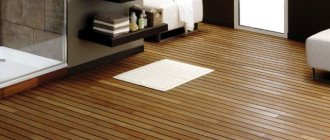
Have you decided to build a beautiful, warm and environmentally friendly home of your dreams? Then a rhetorical question will certainly arise: what kind of floors will there be in this residential building? Of course, it will be a floor made of edged boards - and there should be no objections here.
Today, there are many options for synthetic floor coverings - they all look very nice, are easy to use, etc.
Edged lumber - reliable and durable
However, a skillfully laid plank floor made from good quality edged material:
- first of all, it will advantageously decorate your new or completely renovated home;
- will make it feel warm, cozy and, most importantly, durable.
In addition, such a coating is easy to care for, and it can also be efficiently repaired in a short time.
What is a subfloor for?
The interior decoration of the entire house begins with the installation of the subfloor. It significantly extends the service life of decorative facing material and performs several functions:
- distributes the load from the coating;
- levels the surface;
- insulates the room (provides heat, noise and moisture insulation).
Making a wooden floor with your own hands
Edged lumber
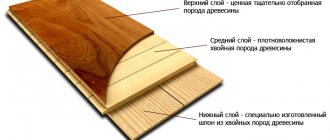
Flooring edged board is a material made (cut) from a log and sawn along the edges in such a way that no bark remains on its edges. The width of edged lumber is usually greater than twice the thickness. The range of applications in the construction market significantly exceeds consumer demand for an unedged analogue.
Today, the most popular wood species suitable for processing are:
- spruce: has a looser structure, but is endowed with increased thermal insulation properties, and is more often used in interior decoration;
- pine: most often used for the construction of frames (in floor and roof structures).
Based on the requirements of GOST 8486-86 “Lumber from coniferous trees,” which describes the requirements for the production of timber, lining and edged boards from pine, spruce and other types of coniferous wood, the material is divided into five grades:
- 1 - 4 grades (differ in quality and price);
- selected 5th grade.
GOST provides for all parameters of geometric dimensions, defects that occur both on the surface of the wood and on its edges. The material comes in a width of 85-130 mm, with a thickness of 25-45 mm.
Advice! In order for the edged floor board to serve you for a long time, you should choose it thicker. When purchasing, pay attention to ensure that there are as few knots and bark residues as possible.
What material to choose for the subfloor?
The installation of a subfloor under the finishing coating can occur simultaneously with effective insulation, sound insulation and installation of a heated floor.
To level the base for the final floor covering, the following is usually used:
GVL and GVLV
Homogeneous, solid sheets of gypsum fiber that are similar to classic drywall, but without the shell.
pros
- creates an even base for finishing;
- excellent heat and sound insulation;
- suitable for any finished floor (tiles, linoleum, parquet, laminate, carpet, etc.).
Minuses
- cannot be used on joists;
- For moisture protection, the slab needs to be treated with a special compound.
Moisture-resistant chipboard
Plates made of compressed sawdust mixed with moisture-resistant resin compositions.
pros
- High-density chipboard can withstand heavy loads;
- can be laid on backfill and on logs;
- heat and sound insulates.
Minuses
- It is advisable to use for dry rooms and under carpet, linoleum or parquet;
- For sound insulation it is necessary to cover it with technical cork.
DSP
Plate material made from a mixture of wood chips, cement and harmless chemical impurities.
pros
- high strength;
- not afraid of moisture and fire;
- environmentally friendly material;
- laid along the backfill and along the joists;
- Suitable for parquet and laminate.
Minuses
- Due to the difference in thickness at the joints of the slabs, additional sanding and puttying is required.
Moisture resistant plywood
Pressed sheets of wood veneer, glued together with a moisture-resistant compound.
pros
- high strength material;
- has different thickness;
- can be laid on logs or on a concrete base;
- suitable for parquet or laminate;
- insulates the room.
Minuses
- does not have soundproofing properties;
- the material is sensitive to temperature changes.
Fiberboard
Boards of larger wood chips glued together under pressure.
pros
- durable material;
- has precise dimensions;
- not afraid of moisture;
- sound and heat insulates;
- Suitable for parquet, carpet and linoleum.
Minuses
- contains toxic compounds.
Edged board
Classic solid wood with minimal processing.
pros
- affordable price;
- environmental friendliness;
- sound and heat insulation of the room;
- durability.
Minuses
- it is difficult to achieve an even and stable base;
- Only dry, smooth boards made of coniferous wood are suitable;
- must be treated with an antiseptic.
You will find simple rules for arranging a wooden floor from edged boards with your own hands here.
Advice! For a subfloor made from unedged boards, be sure to trim the wane and carefully align the side edges.
This way, your floor will not be affected by fungus over time and you will not spend extra effort sealing cracks.
Advantages of unedged boards
Usually the edges of the material are processed, although unsawn can be ordered. The main advantages of unedged boards are the following: a variety of shapes, low cost, and a wide range of tasks.
Also, we must not forget about the reliability of the material - natural wood can serve for a long time, with proper selection and installation.
Unedged boards are easy to process, which also increases its popularity in construction, especially in suburban areas.
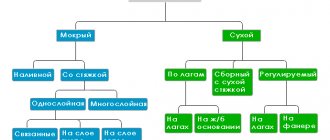
Subfloor technologies
Based on manufacturing features, subfloors are divided into:
Wet
- water-soluble floors (concrete, slag and gypsum concrete, cement-sand);
- self-leveling floors (cement, gypsum, cement-gypsum).
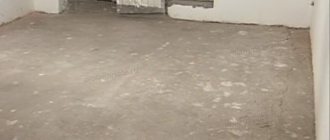
The screed is needed to correct level differences and dips. Using a screed, you can make a step at the border of different coatings or cover wires and pipes. Lay screeds only on the slab base. Any floor covering can be laid on a wet screed.
Advice! Do not level the concrete base slab or old screed with cement mortar, it will peel and crack. To level such a surface, use a polymer-cement mortar.
Dry
- floors on joists;
- floors lying on expanded clay backfill.
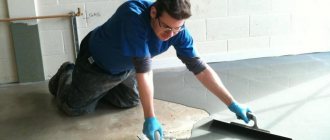
Laying nuances
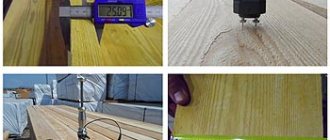
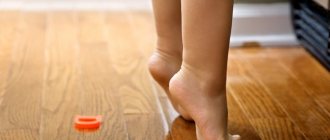
Before you begin installing the floorboard, it is necessary to check the compatibility of the connecting elements of the boards when purchasing. The absence of cracks and other damage and deformation is checked. You should also pay attention to the evenness of the boards themselves: they must be level in all planes. If the board is uneven, then it is quite difficult to straighten it.
The plank floor is installed last, after the ceiling and walls are completely ready. In this case, the floorboard should lie unloaded and unpacked in the room where the wooden flooring is planned for several days (3 - 5). This is necessary to adapt the material to the room climate.
Humidity indicators should be as follows: rooms - within 40-80%, floors - 12%. Ambient temperature - from 18 to 24°C. It is best to lay floorboards on joists, but remember that the joists will “eat up” the height of the room.
Stages of constructing a subfloor using joists:
You can lay the subfloor along the joists yourself. To level the surface of the future floor, use a frame made of bars (logs) with a section of 50x70 mm.
- Lay logs on the frame in 50 cm increments.
- Leave a gap near the walls (20-30 cm).
- Make a sheathing to secure plywood, OSB or boards.
- Lay mineral wool along the walls and cover with plinth.
- Treat plywood sheets with an antiseptic.
How to install floor joists correctly
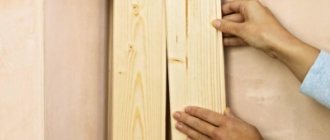
Choosing a quality product
The selection of unedged boards should be taken very seriously, as with any building material. First of all, pay attention to the knots - the fewer there are, the easier it will be to work with the material. If there are too many of them, the texture of the unedged board will deteriorate in the future.
Assess the shape of the board. Try to avoid rounded, arched materials - usually this is the most obvious sign of poor quality.
The same can be said about chips and cracks - they must be absent, otherwise the building material will not last for a long time.
Protecting wood from external influences is the key to the reliability of a country houseWood is a natural raw material and a wonderful material
All about wooden lining - quality assessment, advantages of use and characteristics of the finishing material
Take a closer look at the cross section - if there are signs of warping, it means that the storage conditions were violated. In the future, such material will deteriorate much faster. Next, you can view a photo of an acceptable unedged board to understand how to choose the right building material.
Stages of installing a subfloor on a concrete base:
In apartments with concrete floors, the joists under the subfloor are laid on a flat concrete base; a height difference of several centimeters is not allowed.
- Level the base - pour the screed, wait for the concrete to dry (1 month).
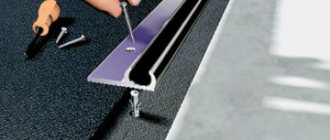
- Lay the waterproofing film overlapping on the concrete screed and seal the joints with tape.
- Make a lining of 2-4 mm thick polyethylene foam for sound insulation.
- Lay the logs, check the horizontal position, secure the logs to the floor using corners.
- Distribute the insulation between the joists with a gap of 2-3 cm for ventilation.
- Fasten the plywood sheet to the joists with self-tapping screws at 20 cm intervals.
Advice! Arrange the sheets in a checkerboard pattern so that the joints are not on the same line. Be sure to leave a gap of 2-3 cm between the wall and the subfloor.
Concrete screed on wooden floor
Experiments
A very interesting and very useful experiment was carried out by scientists from Great Britain at the Institute of Construction Research. The main subject of research was to identify the preservation time of certain types of wood in the natural environment. For example, how long will a block of wood placed in the ground retain its strength without additional protection? Such experiments are considered perhaps the most productive. The point was that every six months these bars were taken out of the ground and struck several times with a mallet. If the test sample did not pass the test, the time it remained in the ground before being broken was attributed to the so-called “wood life.” For clarity, here is a small table of these tests:
Here is a short list of wood species of interest, according to their lifespan in a real environment:
- Pine - on average 8 years of life;
- Spruce - 6.5 years;
- Larch - 10.5 years;
- Oak - 11 years;
- Beech - 3.6;
- Birch - 3.6;
- Aspen - 3.6.
In addition, in coniferous and deciduous species there are fundamental differences in the structure of the wood itself. The most useful is considered to be the resistance of conifers to damaging factors, such as insects. A high level of protection is provided by the natural resin content of coniferous wood. Whereas hardwood achieves this protection due to the hardness of the wood itself.
Stages of constructing a subfloor using expanded clay backfill:
For leveling, soundproofing and insulating the subfloor, fine and homogeneous expanded clay is used.
- Distribute the expanded clay over the area of the future floor and compact it thoroughly.
- Lay the sheets in two layers at their joints, spaced apart.
- Place the second layer of material on glue and tighten with self-tapping screws.
- Tap the subfloor slabs tightly together and fill the cracks.
- Leave a gap between the sheets near the wall and trim off the excess.
- Treat the floor with a water-repellent compound.
Dry screed for wooden floors
And after laying the subfloor, you can proceed to the finishing coating. By the way, we recommend that you read the articles on the topic of laying parquet, installing a floor from edged boards or assembling a floor from tongue and groove.
Production
To produce a wide unedged board, the second and third cutting of the trunk is sufficient. This part is used because it is considered low-grade - this is quite enough for our product.
The dimensions of the boards can vary from two to five centimeters in thickness, and from ten to twenty centimeters in width. The most common types of wood for the production of unedged boards are pine and spruce.
Even though the material is made from low-grade raw materials, you still need to carefully monitor production. For example, all the characteristics of an unedged board can be spoiled by an excessive number of branches.
It is also important to take into account storage conditions - each wood has its own temperature and humidity. Therefore, the manufacturer’s task is to approach the process competently and monitor it at every stage.
How and with what to fasten
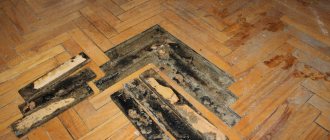
A few years ago, no discrepancies arose: the floorboard was nailed right through to the joists. Sometimes the cap was flattened and then driven deeper with a hammer - this was so that nothing could be seen. This can also be done today. And save money at the same time: nails are cheaper. But after some time, a large number of cracks appear in the plank floor. To get rid of them, the floor is dismantled, compacted, one or two boards are added to the wall - as it turns out. This is where self-tapping screws have an advantage: they are easier to dismantle and do not damage the wood. Try to get a nail with a flattened head without damaging the wood. No way. That’s why they are increasingly using self-tapping screws, although the option is ambiguous: nails are stronger, and the heads of self-tapping screws, especially hardened ones, often fly off.
Tongue or groove?
For hidden fastening, self-tapping screws are not fastened through the boards, but into a tenon or groove. You can do it right through, into the surface, but then the caps will need to be buried in the board, and the holes will need to be covered with putty. Even if the floor is painted, although this is done very rarely in bathhouses. If you take wood putty of the appropriate color and mix some wood dust from your boards into it, then even under a light varnish almost nothing will be visible.
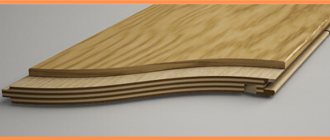
Tenon fastening. This is a hidden fastening, but only 1/3 of the thickness of the board is captured, besides, the boards are attached only from one edge, while the second can be raised
If the screws are screwed into the groove, then at an angle of about 60°. If it is in a tenon, then the angle is smaller - it can be almost perpendicular to the plane of the floor. The second option holds the board more securely (it grips ¾ of the thickness), although the “in the groove” method is more common.
In any case, you will first need to drill a hole for the head with a drill of a larger diameter and a hole for the self-tapping screw with a smaller one. This operation, although time-consuming, serves as a guarantee that the board will not burst.
Hidden fastening technology
The technology for hidden flooring is as follows: the first board is nailed tightly through. The second and subsequent ones are attached, beaten with wedges, or better yet, tightened with clamps so that there are no gaps anywhere. Then the fastener is screwed or driven into the groove or tenon at an angle. If the wood is dense, the screws are difficult to install. To make the process easier, the threads are lubricated with soap (it can be slightly moistened to make it easier to smear).
Advantages of fastening with a tenon: a large thickness of the board is grasped, and the angle is not so sharp
With this method of fastening, no nails or screws are visible. But there is one drawback: only one edge of the board is pulled to the joist. When humidity changes, shrinkage or movement of the foundation, another one may rise. The result is an uneven floor, and it creaks more often. Although, it’s never too late to drive a few nails or screw a few screws into the face.
Which screws to take
What screws should I use for flooring in a bathhouse? Preferably with a thread that does not start from the cap itself. It will be more secure to hold it this way. And it’s better to take unheated ones - they are stronger. For a bathhouse, galvanized ones are better - they won’t rust. The length of the screw depends on the thickness of the board: it should be 2.5 times longer. It seems that according to the parameters of the self-tapping screws, everything is fine. With nails everything is simpler: you need regular ones, but not screw or corrugated ones - it’s almost impossible to pull them out without damaging the wood.
It is better to take self-tapping screws with threads that do not start from the head itself
There is one secret inherited from our ancestors. It will allow you to use ordinary nails in a bathhouse, and they will not rust: they need to be boiled in drying oil. Once dry, you can use it. These nails were used to nail shingles onto roofs, and they did not rust for decades.
So: you need to decide on your own with the method of fastening and the choice of fasteners. There are different opinions, and they are all based on experience - your own or your ancestors. But it has long been known: how many people, so many opinions. Add your own. But remember that in a year or two the floor will have to be rebuilt. So for the first time you should fasten it with a minimum of nails or screws - as you decide. Then, once it has dried, it will be possible to permanently fix it.
Summarizing
Ready and painted according to your wishes, although covering it with varnish would be much preferable: the natural, unique pattern of the wood will remain visible. Nowadays, you can choose a varnish of any shade you like.
As you can see, the process of laying edged boards is not complicated and is quite feasible even for an inexperienced amateur craftsman. And the video in this article is ready to confirm all the information you read above!
Attention, TODAY only!
Type
Edged lumber
Flooring edged board is a material made (cut) from a log and sawn along the edges in such a way that no bark remains on its edges. The width of edged lumber is usually greater than twice the thickness. The range of applications in the construction market significantly exceeds consumer demand for an unedged analogue.
Today, the most popular wood species suitable for processing are:
- spruce: has a looser structure, but is endowed with increased thermal insulation properties, and is more often used in interior decoration;
- pine: most often used for the construction of frames (in floor and roof structures).
Based on the requirements of GOST 8486-86 “Lumber from coniferous trees,” which describes the requirements for the production of timber, lining and edged boards from pine, spruce and other types of coniferous wood, the material is divided into five grades:
- 1 – 4 grades (differ in quality and price);
- selected 5th grade.
GOST provides for all parameters of geometric dimensions, defects that occur both on the surface of the wood and on its edges. The material comes in a width of 85-130 mm, with a thickness of 25-45 mm.
Advice! In order for the edged floor board to serve you for a long time, you should choose it thicker. When purchasing, pay attention to ensure that there are as few knots and bark residues as possible.