For some reason, a tradition has become established in the process of carrying out renovation work in an apartment to part with the Soviet past: heating radiators, ceramic tiles, electrics, sinks, etc. But old cast iron bathtubs are not on this list. There are many reasons, but the main one is that modern means allow you to repair the bowl yourself, i.e. restore enamel at home.
There are several ways to repair a hot tub that you have loved for many years:
- insert insert;
- spray epoxy enamel from a can;
- fill the bathtub with acrylic.
A separate article is devoted to each of these methods. In this material we will talk about how to carry out repair work using self-leveling acrylic.
Advantages and disadvantages of the method
In any business there are both pros and cons. Repairing a bathtub with acrylic also has its strengths and weaknesses. Among the advantages:
- acrylic coating restores the bowl to any degree of damage: chips, rust, scratches;
- the work of reconstructing the enamel layer can be done by the apartment owner himself - there is nothing complicated in the technology;
- fluidity of the repair composition, which allows you to repair small cracks on the bottom or sides of plumbing fixtures;
- excellent adhesion to the bathtub material (cast iron, enamel);
- the opportunity to move away from white and use color to change the color of the coating, which transforms the bathroom, allowing designers to bring to life the most unusual ideas;
- speed of the process - a professional will need no more than 3 hours to restore the plumbing (this includes all preparatory work and applying acrylic to the surface of the bathtub). The “home handyman” will naturally need more time, but he can do it in a day;
- repairability of the coating - a similar composition (sold in a smaller package for repairs) can be used to repair scratches that appear.
Cast iron bath before renovation.
Renovated bath.
The applied coating greatly changes the characteristics of the cast iron bathtub. She has additional advantages :
- fast warming up;
- retaining heat for a long time - a fully filled bath gives off heat very slowly: in about half an hour, the water temperature drops by 1.0-1.5oC;
- the sound of drawing water disappears - the new coating absorbs noise from the flow of water;
- a smooth, pleasant surface appears upon contact;
- slipperiness disappears (wet bath enamel has caused more than one injury);
- ability to maintain shine almost all the time of use.
Disadvantages of the method:
- the coating has low resistance to mechanical damage: it can crack if a medium-heavy object accidentally falls into the bowl from a low height;
- a through cut or scratch to the cast iron leads to the coating peeling off from the base;
- Acrylic, unlike enamel, cannot hide factory defects in cast iron (convex and concave). They are clearly visible against the background of a shiny surface;
- a hot object or cigarette butt causes burn-through of the applied layer;
- difficult care: special detergents and soft cleaning materials are needed. Liquid substances containing alcohols, ammonia, chlorine, acids and alkalis, as well as powders and brushes lead to the appearance of yellowness and loss of shine;
- the restored bowl is afraid of hot water (85-90oC) - it softens and begins to flow to the bottom of the bath. Therefore, first you need to draw a little cold water and only then bring the bath to the desired temperature;
- You should not wash your hair immediately after dyeing your hair - even a small amount of dye can change the color of the coating.
Materials and tools
Restoring a bathtub with liquid acrylic requires the purchase of basic and auxiliary materials, as well as a set of tools. Materials you will need:
- liquid acrylic;
- degreaser (“White spirit”, “Thinner No. 646”, acetone, kerosene, etc.);
- rust converter (“Tsinkar”, “Ferum-3”);
- sandpaper P60 - 5 pcs.;
- masking tape (paper);
- scotch.
Tools and equipment needed:
- electric drill or screwdriver with a grinding attachment;
Electric drill with a special attachment for grinding.
- a small square or rectangular container for pouring acrylic (you can use a cut-off bottle of detergent);
When pouring acrylic, it is better to work with a small rectangular container.
- container for mixing acrylic components;
- wooden or plastic spatula for stirring the composition;
- metal spatula, about 10 cm wide, new, free of dirt and rust;
- rubber spatula - used to adjust the poured coating;
- construction knife for adhesive tape and masking tape;
- screwdrivers: Phillips and slotted - necessary for disassembling the siphon;
- gas key;
- soft rags for working with solvent and rust converter;
- a wide brush or roller, if you plan not to pour liquid acrylic, but to apply it with painting tools;
- tweezers from a cosmetic set for removing brush hairs or roller lint caught in the applied acrylic.
You also need to stock up on special clothing. You will need:
- headdress (scarf) - to prevent hair from getting on the treated surface;
- trousers with a shirt to protect the body from acrylic splashes. The substance is safe, but is washed off with great difficulty;
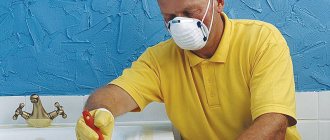
- respirator - necessary when carrying out grinding work (lots of fine dust);
- disposable gloves.
Toothpaste
The easiest way to remove shallow scratches on acrylic. Toothpaste polishes the surface due to the small abrasive particles it contains. The procedure is as follows:
- Apply a little (see photo) toothpaste to the scratches;
- Polish them with a sponge or rag;
- Rinse off any remaining paste;
- Repeat if necessary.
This amount of toothpaste is enough to remove such a large abrasion.
Which acrylic to choose
For high-quality restoration of bathtubs with liquid acrylic, you need to buy a two-component composition:
- base based on acrylates - sold in buckets weighing 3.4-3.5 kg;
- hardener (0.5 l) - gives the layer strength and accelerates the polymerization process of the composition.
Glasscryl.
All brands of acrylic enamels cost approximately the same - from 1375 to 1525 rubles. per bucket. Therefore, the choice should be made not according to the cost criterion, but according to who will do the repairs. If professional builders, then any brand will do: “Plastol”, “Stakril”, “Finnacril”, “TIKKURILA”, “Ekovanna”, “Standard”.
If you plan to update your plumbing with your own hands, it is better to use Stakryl - it hardens quickly. Preference should be given to the Plastol or TIKKURILA brands. All the nuances of choosing acrylic enamel are discussed in the article “How to choose acrylic for bathtub renovation.”
Flow calculation
Painting a bathtub with acrylic is one of the few types of repair work where there is no need to calculate the material requirements. Manufacturers pack acrylic components in containers, the volume of which allows you to restore the surface of a bowl with a standard length of 170 cm (3.4-3.5 kg).
If the font is slightly larger, you will have to buy two sets. Trying to get by with one bucket by adding a thinner to the composition does not bode well, since the consistency of the composition changes - it becomes more fluid. And this is a thinner film, which, firstly, will last several times less than the period declared by the manufacturer, and secondly, it will shine through, showing places where the enamel has been removed.
Preparatory work
Restoring a bathtub with acrylic consists of several stages:
- preparing the bowl;
- preparation of the repair composition (liquid acrylate and hardener are mixed);
- covering the bathtub with acrylic;
- drying the restored layer.
In turn, the preparatory work consists of several steps:
- bringing the bathroom into working order;
- cleaning (polishing) old enamel;
- washing of restored plumbing fixtures;
- dismantling the drain and overflow;
- degreasing and drying the bath;
- protection of walls and floors from acrylic drops.
Preparing the premises
During work, there should be nothing in the bathroom that could fall, spill, or leave a speck of dust or lint on the surface of the poured acrylic. Therefore, toothbrushes, towels, personal hygiene items, cosmetics and detergents are taken out. The curtain and the crossbar under it are removed.
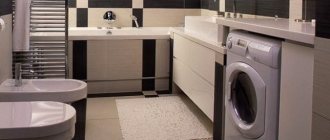
The washing machine and the sink cabinet are moved to a distance of 10 cm - they should not touch the side of the bowl.
The ventilation hole is sealed with paper and tape. This prevents dust from the hallway from entering the bathroom using natural draft, as well as the spread of enamel and rust particles to other rooms when it is necessary to sand off the rust and swollen enamel.
If the bathtub is located in a combined bathroom, all metering devices are covered with plastic wrap or newspapers using tape.
Plumbing cleaning
The acrylic coating must be applied to clean and dry cast iron or enamel. Therefore, peeled pieces of coating, accumulated dirt in microcracks, and rust are removed from the surface of the bowl. Dirt and peeling are removed manually or using a power tool: an electric drill with a grinding attachment or an angle grinder with an emery wheel.
Rusty areas can be polished until pure metal appears (to a shine), or they can be treated with a rust converter and then sanded with sandpaper.
Rusty areas are treated with anti-rust.
Manual work involves the difficulty of holding sandpaper in your hands. A special device for holding the abrasive or a wooden block of a suitable size around which the paper is wrapped can help.
Cleaning must be carried out over the entire surface of the sanitary ware, paying special attention to the bottom, transitions (bends) from the bottom to the walls of the font. Stripping should begin and end with circular movements.
Between them it is imperative to wedge horizontal passages with sandpaper. This technology allows you to remove dirt and rust, form irregularities on the surface up to 0.5 mm deep, which will provide additional adhesion of the acrylic to the bathtub.
Attention: there is no need to completely remove the factory enamel. But the previously applied bleaching layer is completely removed.
The cleaning work is considered completed if the inner surface and sides are clean and slightly rough, without chips or protruding factory enamel.
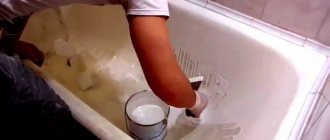
Bathtub washing
After cleaning is completed, the walls of the room and the walls of the bowl are very dusty, especially when using power tools. You can remove dirt with hot water from a shower hose. In this case, there is no need to dilute hot water with cold water - the hotter the streams, the better and faster the dust is washed off.
In this case, you need to wash everything: walls, washing machine, sink, faucet, floor, etc. After all, the slightest draft can raise a dust cloud and land it on plumbing fixtures treated with liquid acrylic. After this, the bath itself is washed with liquid detergents.
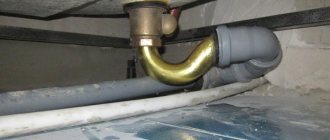
Removing the siphon and overflow
After completing the washing process, the drain and overflow are dismantled. The work is performed in the following sequence:
- close the taps on the mixer, and then, to be on the safe side, it is advisable to turn off the risers with cold and hot water for a while. If there are shut-off valves, it is better to turn them off. If this is not possible, then leaking taps in the bathroom are repaired;
- the shower hose is removed - not a single drop of water should fall into the bath until the acrylic has completely hardened;
- You need to dismantle the drain and overflow carefully - you will have to put it back. A container with a volume of up to 0.5 liters for flowing acrylic is placed under the drain hole. The elbow of the sewer pipe from which the drain is removed is plugged with a rag. Otherwise, it will be difficult to breathe in the room due to the stench from the sewer.
The drain is removed.
If the screw does not unscrew, you have to act roughly.
The overflow is removed.
Degreasing the bowl
The process of preparing to fill the bathtub with acrylic is completed by sealing deep chips with quick-drying automotive putty and removing grease. To do this, a rag or soft, lint-free cloth is soaked in acetone or white spirit. Wipe the sides, walls and bottom of the bowl with a dampened rag.
This operation allows not only to remove fat deposits, but also to collect dust and lint remaining after previous operations. After this, everything is wiped dry, first with a rag or sponge, and then with a dry and clean palm. You need to walk along the sides and walls with your hand, pushing all the excess to the bottom, and then all the dirt along the bottom is sent into the drain hole.
To be on the safe side, the bowl is additionally dried with a construction or household hair dryer.
Protecting the room from liquid acrylic
You can paint a bowl with acrylic using two technologies: the pouring method and using a brush. In both cases, it will not be possible to avoid drops of the substance getting on the floor and walls. They are removed with great difficulty. Therefore, it is easier to protect the area next to the bathroom with packing cardboard or newspapers and tape.
To prevent smudges from the sides, the floor is covered with overlapping newspapers. In this case, it is advisable to secure them with tape so that they do not move. The walls next to the bowl are covered with masking tape. The mixer is closed with a plastic bag.
The walls and screen are covered with plastic film.
The screen under the bathtub is also covered.
Features of cleaning bathtubs from silicone
To avoid damaging the bathtub coating, you need to choose a cleaning method suitable for acrylic, cast iron or enamel.
Acrylic
Acrylic requires delicate, regular care. A simple way to avoid damaging the product is to test on a small area whether the cleaning agent is suitable or not. Apply the cleaner for half an hour.
If roughness and other defects do not appear, the product is suitable.
Mechanical and chemical cleaning methods are suitable for acrylic Jacuzzis. Use a knife, pumice stone, or blade to remove the top layer of material, then scrub with a rough washcloth or soft brush.
Liquids that are highly effective are SanClean, PaniVanna, Triton, White - Spirit.
Cast iron
At the end of the procedure, yellow marks remain. They are easily washed with powder, dishwashing detergent, liquid and laundry soap. Acetic, citric, carboxylic acid, and baking soda remove stains forever.
Pour the granules onto a cloth, moisten it with water and rub the surface until the marks disappear.
Products made of cast iron are not afraid of damage. Can I use acrylic primer over old paint? During processing they are exposed to high temperatures, ensuring their durability.
Popular cleaning products are ideal for combating silicone.
Enameled
The enamel must not be cleaned with powders or metal brushes. They damage the coating, leaving huge scratches and dirty streaks. Cleaning products in the form of pastes and creams (Penta, Mellerud, Silicon-Entferner) will help you get rid of sealant.
Acrylic restoration technology
The instructions on how to cover a bathtub with acrylic have 3 sections:
- preparing the mixture;
- applying acrylic to the inner surface of plumbing fixtures;
- drying the coating.
Preparation of self-leveling acrylic
In order for the coating to be beautiful and last a long time, liquid acrylic must be prepared correctly. The difficulty lies in the fact that the composition is two-component, consisting of a base and a hardener, when mixed, the polymerization (hardening) process begins quite quickly. Therefore, the mixing algorithm is as follows:
- prepare a container for mixing the base with the hardener and a wooden or plastic stirring stick - the time from combining the hardener with the base to polarization is only 45-50 minutes. Therefore, you need to look for what to stir in advance;
- The base is poured from the packaging bucket into the mixing container. It is not advisable to scrape the residues from the walls and bottom. It is better to turn the container over and hold it at an angle of 45o above the container for several minutes - everything will drain by itself. Because the hardener has not yet been poured in, there is no need to be afraid of delays;
Attention: if the components are mixed in a factory container, the base is first mixed well, since with the hardener poured in it is quite difficult to lift thicker acrylic from the bottom of the bucket. This takes several important minutes, which may not be enough to complete the job.
- The hardener is poured into the base and stirring begins immediately;
- you need to mix the components manually or at very low speeds with a screwdriver - liquid acrylic splashes a lot;
- In the process of mixing acrylates with a hardener, you need to be especially careful when processing the walls of the container and the connecting joints between the wall and the bottom so that there is no base left there without the hardener.
“Plastol” is kneaded for 12 minutes, after which the composition should stand for 3 minutes, and then stir again for 3 minutes. “Stakryl” is mixed for 10 minutes, after which it is ready for use.
The result should be a substance that is absolutely homogeneous in consistency and fluid. Otherwise, there will be soft spots on the sides and walls of the bathtub (the base will not harden well).
The restorative composition can be tinted with special tinting additives developed for acrylic. There should not be a lot of them - 3 drops are enough. If this ratio is violated in the direction of increasing the volume of color, then acrylic loses mechanical strength and the level of adhesion to the surface being treated.
Important: it is strictly forbidden to add colors with a solvent - you will have to buy acrylic again.
Application of liquid acrylic
You can restore an old bathtub using the pouring method and using a paint brush.
Filling a bowl with acrylic
Restoring plumbing by pouring is carried out according to the following algorithm:
- the container with the mixed composition is placed on the bottom of the sanitary bowl - the risk of tipping over is reduced, and if it does happen, the spilled material can be partially collected, and part of it can be used to treat the bottom;
A container of acrylic is placed on the bottom of the bathtub. The drain hole is covered with a plastic cup.
- A little mixed acrylic is poured into a prepared small, rectangular container - it is more convenient to pour from it. It is better to do this above the bathtub - accidentally spilled paint does not disappear, but goes into use;
The acrylic is poured back into the working container.
- the composition is poured first of all onto the sides near the walls. This procedure prevents acrylic from getting on clothing when processing remote areas. The composition is poured slowly so that it begins to flow down the walls;
Work begins from the far side, where the repair composition is poured.
- Using a rubber spatula, remove excess composition in the corners. In this case, only the top layer is removed - the tool should not touch the base (enamel or cast iron) of the bowl. Removal is done by moving towards yourself so that the excess flows down the walls of the font to the bottom;
- Having completed the processing of the edges of the font adjacent to the walls, they proceed to pouring the composition onto the front side. A spatula will help to distribute the acrylic more evenly along the edge. Movements are also carried out towards yourself to close the outer side of the side. If you use only the pouring method, a large amount of paint will end up on the floor and there may not be enough enamel to finish the work;
Attention: as the repair composition is consumed, it is added.
The filling of the sides on the near wall is completed.
- After processing the top of the bowl, begin pouring the inner walls. They are covered in two passes. Start from the connection of the back of the bowl with the wall and go from left to right. You don’t have to skimp on the ingredients, because... the excess will end up at the bottom, where it will be used for processing. The first pass ends with painting the back. Here you need to apply more acrylic - the composition flows down it more slowly due to the fact that the back is not vertical, but sloping. During the first pass, the walls are not completely closed, but more than half closed. Therefore, the second approach (performed in the same way as the first) ensures their complete coverage;
Attention: to prevent acrylic from flowing into the drain hole, it must be regularly raked to the center with a spatula.
- the resulting bald spots are repaired with a spatula. Movements should be smooth, without pressure;
- In the same way, the coating is applied to the bottom of the sanitary ware. Here, as a rule, there is no need to pour anything - the acrylic that has flowed down from the walls is almost always enough to form a protective layer. However, the composition does not always lie in an even layer. You can level it with light movements of the spatula, driving the excess into the drain hole (there should be a container there if the work was carried out strictly according to the instructions). After this, use the corner of a spatula to draw a lattice along the bottom. After about 15 minutes it will tighten, forming an even coating.
Painting a bathtub with a brush or roller
You can also update your bathtub using a paint brush. The method is more complex: it requires applying 2 layers within 40-50 minutes, during which there is no hardening process. The work will also take longer to remove brush hairs from the painted surface. Otherwise there are many similarities:
- work begins with processing the far sides;
- continue on the near edge of the bathtub;
- after which they begin painting the walls. There is one passage, from top to bottom;
- The first stage ends with painting the bottom. After which a second layer of acrylic is applied.
After the work is completed, the lights in the bathroom are turned off, and the bathtub bowl is illuminated with a flashlight or smartphone. All irregularities will immediately become visible.
- If problem areas are detected, the applied layer is adjusted with a spatula. Work can only be performed before the polymerization of the composition begins. Otherwise, traces of the tool touching the acrylic will remain. Detected bubbles are removed with a light touch of the brush.
Remove bubbles with a plastic spatula.
Drying
The applied layer of paint must harden. This requires approximately 3 hours (the exact time is indicated on the packaging). However, this does not mean that the complete polymerization process is complete. For complete drying, you need from 72 to 96 hours, during which you cannot use the bath. The duration of the process mainly depends on the thickness of the applied layer. Naturally, the thicker it is, the longer the drying time.
During this process, experts do not recommend entering or simply opening the door to the bathroom, so as not to affect the chemical processes occurring inside the applied acrylic. It is believed that in this case the adhesion of the protective layer to the base of the bowl is stronger. In addition, dust along with hair, wool and splashes of water will not enter the room.
Work on the reconstruction of the enamel layer of the bathtub is being completed by installing a drain and overflow.
Important: do not clamp the connecting elements too tightly, as the acrylic may crack.
The hole for the drain grid is adjusted with sandpaper or a knife.
Recommendations for further coating care
For some reason, it is generally accepted that caring for acrylic applied using the pouring method should be gentle. In other words, it is dangerous to breathe into such a cup. In fact, the voiced point of view is erroneous - you can and should clean a bathtub in the same way as a new one made of acrylic.
Let us recall the main provisions:
- You can care for the surface not only with laundry soap, but also with special products: Sanox, Akrilan, Domestos, Cif, Cillit, Sarma, etc.;
- It is prohibited to use various powders and pastes with abrasives;
- Do not wash freshly dyed hair in the bathroom, use hairspray to fix hair, cut varnished nails, soak laundry, etc. — the acrylic layer may turn yellow or change color;
- To wash the surface you need to use soft sponges, which a good housewife always has in her kitchen. Different brushes and cleaners leave scratches;
- After taking a bath, you must rinse it. You need to wash it 1-2 times a week, depending on the frequency of water treatments.
If during operation a part of the coating swells or a through hole appears, it is necessary to take urgent measures and repair the defect. For this you will need:
- liquid detergent;
- lemon juice or 9% vinegar;
- fine grain sandpaper (P60);
- paste or emulsion substance for polishing (polish);
- foam sponge or soft cloth.
The repair process is simple:
- Damaged areas are washed with a soft cloth or sponge. Difficult stains are treated with lemon juice or table vinegar;
- scratches and holes are sanded with sandpaper. The swellings are cut off with a knife and cleaned in the same way;
- degreasing of damaged areas is carried out;
- scratches and cracks are repaired with polish, and liquid acrylic prepared for use is applied to the cut areas.
More details about caring for an acrylic bathtub are described in the article “Care for an acrylic bathtub”, which provides not only the rules for cleaning the bowl, but also ways to get rid of stains that appear from various sources of pollution.
How to apply sealants
And finally, I would like to answer a few questions from our readers:
- Can polyurethane bathroom sealant be used in a bathroom? Yes, of course, only you need to pay attention to the manufacturer and the technical characteristics of the sealant. Its properties will depend on this;
- Where can I read reviews of bathroom sealants? Well, we won’t engage in outright advertising, but you can look at reviews of sealants in any online store of similar products, where there are customer comments about a variety of products. By the way, these are the comments that can be trusted;
- Bathroom sealant price? It all depends on the quality you expect and your personal budget. The cost here can vary significantly, so it is very difficult to give an exact figure;
- What is “Moment” bathroom sealant? This is a silicone sealant that contains a certain amount of additional additives, as well as plasticizers and vulcanizers. We cannot say anything for sure about quality, since counterfeit goods often end up on the market. If you compare the properties and characteristics, then it is better to buy bathroom sealants that we described earlier;
- Which sealant to choose for an acrylic bathtub? Here we would pay attention not only to the most famous companies, but also to a popular, so to speak, product that is distinguished not only by its low price, but also by its good quality. This is a titanium silicone bathtub sealant that is well suited for acrylic bathtubs as well as PVC products. It is most often used to seal shower stalls.
Other coating restoration methods
You can also restore a cast iron bathtub using epoxy enamel and liners. Enamel is applied using almost the same technology as liquid acrylic. All operations must be carried out in the following sequence:
- clean the surface of the bowl with sandpaper manually or using an electric drill;
- It is advisable not to clean rusty areas, but to treat them with Zinkar;
- after 30 minutes, remove the rust converter using coarse sandpaper;
- polish the bowl with fine-grained sandpaper (P60);
- repair cracks or chips with car putty (otherwise the enamel layer will turn out uneven);
- wipe the surface to be restored with a rag or lint-free cloth soaked in acetone or white spirit (this is how the bowl is degreased);
- warm the bowl with hot water;
- After 8-12 minutes, drain the water and remove the siphon;
- Dry the old enamel with a hairdryer and then wipe it gently - there should be no speck of dust or lint on the surface;
- dilute the enamel according to the instructions printed on the package;
- apply the first layer with a brush;
- After 10 minutes, repeat the operation (if the enamel hardens, the work will be ruined).
Important: the consistency of the enamel allows you to work with a spray bottle. But experienced specialists do not recommend doing this, because... the use of spray nozzles leads to the appearance of bubbles and drips. They can be easily removed, but very quickly the enamel in these places will begin to peel off.
The technology for carrying out the work, as well as the pros and cons of the method, are discussed in detail in the material “Restoring a Bathtub with Enamel.”
You can also restore the original appearance of the bathtub using a liner. They are available in silicone, plastic and acrylic. Each of them has its own advantages and disadvantages. For example, a silicone liner may burst under the weight of a person bathing. Therefore, a separate work is devoted to the “bathtub in a bathtub” repair method, where all the nuances of the technology are discussed in detail (you can see it here).
Prevention is better than control
It is difficult to wash dried sealant off a bathtub, so follow specific rules for its application:
- apply a thin layer of sealant to the joint of surfaces;
- try not to apply silicone specifically to the bathroom and tiles;
- immediately after finishing the seam, lubricate it with gasoline and level it;
- remove the excess and you need to pay great attention to the sides of the bathtub - wipe off any not dried, dissolved sealant.
We suggest you read: How to remove chewing gum from pants
These measures will allow you to remove fresh sealant, which is much easier to do than fighting with dried-on sealant. Improper removal can become a source of black mold and depressurization of seams.
It will not hurt to familiarize yourself with industrial and folk methods of combating mold.
You can see how silicone is actually removed from a bathtub in this video review:
Larisa, April 12, 2021.