Among the numerous building materials, plywood should be highlighted. It can be used for a variety of purposes. Good workability determines that the material in question is often used in the independent manufacture of furniture, home decoration, carpentry and other purposes. The most common question is how to bend plywood.
Methods for obtaining bending of plywood
There are several of the most proven ways to bend plywood material.
However, with different options for obtaining a bend, some points need to be taken into account. In cases where an arch is required, plywood is chosen with a thickness of at least 10 mm. And this is already quite a thick puff pastry. From this we can conclude that the thinner the material, the easier it is to influence it, and, as a result, the plywood bends more easily. Today, there are three main methods for bending a plywood sheet:
- steaming;
- incision;
- gluing.
Each method is good and effective in its own way. But you can also use a combination, which will ultimately result in more rigid bent structures. Let's first try to analyze each of the three technologies.
Steaming plywood
In industrial production, the steaming method is often used to bend plywood. It consists of exposing the source material to steam, after which the plywood is placed in an installation where a press is applied to it. Under the influence of a special vice, the material is bent to the desired radius of curvature.
At home, it will be more difficult to carry out the steaming procedure. This will require the presence of very large containers in which water must boil. In this case, the plywood is simply fixed over the containers, and the steam itself will do its job.
An alternative to steaming is to soak the plywood sheet in water. You can use a bath for this. However, there are some nuances here too.
Firstly, the duration of soaking will directly depend on the thickness of the material, as well as on the direction in which the bend is required.
Secondly, the process of soaking plywood in warmer water will last much faster. So, for example, at a water temperature of up to 90-100 degrees, the soaking time can be 1.5-3 hours, at a water temperature of up to 60 degrees almost twice as long, in cool water (15-30 degrees) even longer - 15- 20 times.
When the steaming or soaking time has been maintained for as long as necessary, the plywood can be bent, but only across the grain. To do this, attach the workpiece to a template, fix it in the desired position and wait until the material dries completely. It will be much more effective to combine both methods.
Notching plywood
This method also helps to achieve the desired curvature of the sheet. Moreover, the thickness of the plywood can be from 15 to 20 mm. The bending method is as follows: in those places where bending is planned, small cuts are made using a cutter. The cuts must be a depth not exceeding half the thickness of the sheet, otherwise the material may simply break
It is also important that the cuts do not reach the dowel layer in the opposite direction
The width of the cuts on different sides of the plywood can be different. This allows you to get the following result: on one side the bending angle is smaller, on the other – larger. Using this technique, many people bend plywood to create the walls of a boat. And to fix the resulting shape, the plywood is clamped and a layer of veneer is glued on top.
In this case, the glue used is epoxy, although it is quite possible to use PVA glue.
Gluing parts
This method involves taking a thin sheet of plywood and cutting it into individual pieces. They make a pattern and use it to connect the elements to obtain the desired shape. To do this, epoxy glue is applied to the joining points, the parts are glued together and fixed. You can use clamps to clamp the gluing areas. The finished product should dry for about a day, after which it can be used. To prevent joints and irregularities from being visible on the workpiece, it is subjected to grinding.
Few people know that bending plywood is a very common operation in carpentry, and even fewer craftsmen are familiar with the correct technique. We propose to consider the features of this material and its behavior when bending, as well as the basic techniques and devices for bending plywood at home.
Step-by-step instructions and required materials
The most popular and reliable way to bend plywood is by steaming it. Its peculiarity is the possibility of application in industrial and home conditions. Therefore, this particular method is worth considering in more detail. However, it is necessary to use the bending method only if the sheet thickness does not exceed 4 mm.
For bending you will need the following materials and tools:
- plate;
- large diameter saucepan;
- rope, which has a high resistance to humidity and high temperatures;
- potholder;
- plywood.
After preparing the necessary tools, you should proceed directly to steaming the material for bending. To do this you need:
- Fill the pan with water so that it occupies half the volume and put on fire.
- It is necessary to lay plywood on top of the pan so that the area that is to be bent is in the very center of the pan above the water.
- It is necessary to place a lid on top of the sheet so that it covers the pan as much as possible.
- When the water boils, let it sit for 15 minutes, then remove the plywood from the pan.
- Bend the steamed plywood so that an angle of the required radius is formed.
- The ends of the sheet should be tied with a rope so as to maintain the resulting shape.
- If the first time it was not possible to give the sheet the required shape, you should place the plywood in a tightened form on the pan again and heat for the same time. Then continue bending and tightening the rope. Repeat the procedure until the desired bend angle is achieved.
- Leave the product taut until it is completely dry.
To ensure the bend area has the required roundness, it is additionally recommended to apply a round roller to the bend area. You can use a tin can or any other cylindrical object at hand as a roller.
Equipment
And so, to change the shape of a wooden blank and its final preparation before assembly, a number of installations are used. Bending, as mentioned above, is carried out using special presses, and finishing is done on a 5-axis woodworking center. The choice of this equipment is very wide, so we decided that in this case we should focus on the equipment that leading furniture companies use in their production. For example, the world famous IKEA.
The Swedish-Dutch company, as it turned out, works on Bulgarian machines. To produce radius products, its specialists use a high-frequency generator VChG-40 together with a hydraulic cold press VP-C 11/15
.
The first apparatus is designed to heat the adhesive layer when working with multi-layer workpieces. The installation is characterized by high productivity due to uniform heating of all layers (even if the product thickness exceeds 30 mm). The generator has smooth power adjustment depending on the production cycle. To achieve optimal values, the entire process is controlled by an ammeter and a thermostat.
After the high-frequency generator heats the workpiece to the required degree, the press for bent-glued products comes into play. Under high temperature conditions, it changes the shape of the part under pressure. There are different ways to accomplish this task. VP-C 11/15 performs crimping using the most common method - pneumatic chambers with the simultaneous use of special presses. By the way, Ikea’s choice in favor of this model is due to the whole range of its advantages over analogues. Firstly, the accuracy of the installation with a force of 100 tons is regulated by a pressure gauge with a timer. Secondly, the press makes little noise. Thirdly, the machine is reliable, has a long service life and complies with CE safety standards.
20-40 days after the molding work (namely, after this time, complete stabilization of the radius part occurs), the bent-glued product is subjected to finishing processing. This work is carried out on a five-axis woodworking center. The most suitable option is to install SPIN
- one of the latest developments of the Italian manufacturer of high-tech equipment PADE.
According to Italian experts, in just 224 seconds it can be used to solve a whole series of problems in a minimum amount of time. This includes profiling absolutely identical radius parts of any complexity, filing the ends into corners, drilling holes for dowels, filing to size in width, making a groove for a panel or glass, etc. In total, in one cycle you can get from 2 to 4 completely finished bent-glued parts
. ready to be assembled into a finished product.
In general, this machining center allows you to produce products with very high precision. Therefore, SPIN is ideal not only for large-scale production, but also for small-scale production of exclusive furniture elements.
Wood-laminated boards, which we know simply as plywood, have found their use in finishing and furniture production. They have one of the most unique properties; with their help you can create almost any bend. Due to this, it becomes possible to create unique aesthetic designs and effectively use the material.
Now let's talk about how exactly you can make bent plywood
in industrial plywood production and independently at home.
Floor putty under linoleum: types of compositions, application rules
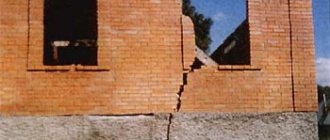
Puttying the base for laying linoleum is an extremely important procedure. If you refuse to do this, the floor covering will last a much shorter period of time and will quickly lose its original appearance during use. In order to carry out all the work properly, it is necessary to choose the right putty composition and follow the sequence of actions recommended by experts.
Features of the base for linoleum
When using linoleum coating as a finish, it is important to remember that it is quite demanding on the quality of the rough surface. It must certainly be smooth, without cracks, depressions or humps. If you ignore proper floor preparation, the flooring material will soon begin to wear out and lose its integrity and attractiveness. To avoid such troubles, in practice the base is puttied and a special layer is placed under the finishing coat.
Sealing of irregularities is allowed only on a high-quality basis with a small number of errors and a slight difference in level. If defects are observed en masse, then you will still have to make a self-leveling concrete screed, and then proceed with the installation of linoleum.
Types of putties
Based on the type of rough base (concrete or wood), the most suitable putty composition is selected. The joints between the panels also need to be processed. In addition to specific products designed for a specific material, there are universal ones. They can be applied to concrete and wooden surfaces.
Oil based
Typically, oil putties consist of drying oil, dyes, plasticizers, and other additives. They are ideal for wood because they contain natural ingredients. The main advantages of such funds include:
- excellent ductility;
- good adhesion to wooden substrates;
- economical consumption;
- Ease of use;
- intensive drying;
- environmental friendliness;
- relatively low price.
Oil formulations are sold ready-made: they do not need to be mixed the day before application. In addition to many advantages, such materials have serious disadvantages:
- poor adhesion with other paints;
- under heavy load on the floor they “fall out” of cracks;
- high sensitivity to excess moisture.
Important! Before applying oil putty to plywood or wooden floors, it is necessary to completely remove traces of the old finish from them.
Oil putty is a leveling composition in the form of a paste, which is characterized by a dense consistency and uniform application Source materik-m.ru
On wood
Used for leveling floors before laying linoleum, reconstructing wooden bases, and finishing boards. This product ideally seals cracks, fallen knots, and other defects on the surface.
Among the positive characteristics of this putty it is worth noting:
- Elasticity. Since wood periodically expands or contracts under the influence of ambient temperature, the putty must also be elastic. Otherwise it will soon fall off.
- Uniformity. It is unacceptable to use coarse-grained compounds on wooden surfaces. Sanding can lead to scratches, which will also have to be puttied later.
- High adhesion. For wood, it is important to use mixtures that have good adhesion.
- Environmental friendliness. If the putty composition contains toxic volatile substances, then when dried they can harm human health.
Wood putty has excellent antiseptic properties. This prevents mold from appearing on closed wooden floors and prevents rotting if water accidentally seeps through the linoleum covering.
Acrylic putty for wood is moisture resistant, it can withstand temperature changes and strong mechanical loads Source gidpokraske.ru
On concrete
There are seven types of such products: gypsum, cement, acrylic, lime, varnish, oil, glue. Moreover, it is quite easy to work with concrete foundations. Most importantly, after cleaning such surfaces, it is necessary to apply a layer of deep penetration primer, after adding a little sand to it. This will significantly improve the adhesion of the putty to the base and prevent it from being damaged in the event of heavy mechanical loads.
Compared to cement, gypsum has important advantages: it does not shrink and is affordable. Cement putty shrinks considerably, but, unlike gypsum mixture, it can be used in excessively damp rooms. The acrylic composition does not shrink at all, is moisture resistant, and is expensive.
The most suitable for concrete is epoxy putty. It adheres firmly to the base, is resistant to moisture, strengthens potholes, and perfectly fills even small cracks.
Waterproofing putty for concrete is characterized by high resistance to the external environment, mechanical compressive and tear strength Source pol-exp.com
Polymer
Contains plaster or latex. The gypsum mixture is excellent for sealing cracks between plywood sheets, restoring wooden floors, after which linoleum can be laid on them.
Latex putty is a great option, but it is difficult to work with. Once such a composition has set, it is no longer possible to change the surface. Therefore, it is important to seal the cracks properly the first time; it is unacceptable to leave errors.
Compared with gypsum, latex has the following advantages:
- more elastic;
- does not crumble after a while;
- eliminates even small cracks.
Among the disadvantages, it is worth noting the high cost, the inability to use in low temperatures.
Latex plaster is sold ready for use, so it does not require any additional mixing Source stroy-podskazka.ru
Quick drying
Nitro putty is produced using wood flour. It dries instantly and comes in a huge variety of shades.
Main advantages:
- high adhesion to wood surfaces;
- high-quality elimination of defects;
- the ability to process the base (polish);
- dries within ten minutes;
The solvent for nitro putty is ordinary acetone.
After drying, nitro putty shrinks slightly, but if necessary it can be reapplied Source vinnica.prom.ua
Each layer has its own approach
In a workshop, everything is, of course, simpler.
In fact, of course, the solution to the question of how to bend plywood is not calculated with precision down to the layer, but there is still a certain amount of truth in the title of the chapter. Let us explain: there are a number of difficulties when bending plywood, which are associated specifically with the structure of the material, as well as with the technological features of the bending process.
Namely:
- The thinner the plywood, the easier it is to work with. However, for the sake of objectivity, we must also take into account the fact that to construct, for example, arches, the plywood must be at least 10 mm thick, that is, you already need to bend a fairly serious puff (see also the article Do-it-yourself plywood arch - basic techniques) ;
- Initially, the veneer layers are located at different angles to each other precisely in order to increase the material’s resistance to bending;
- In workshops and special workshops, bending and the required curvature are achieved quite simply: the part is practically saturated with steam and then comes under the influence of a kind of vice, which bends it to the required radius of curvature.
All this is real, but there are two points that need to be taken into account:
- First, wood cools very quickly, this equally applies to plywood;
- Secondly, it is very difficult to achieve uniform heating of the entire part, so this type is suitable for small fragments with curves, most likely for the production of curved surfaces of furniture or other small products.
How to bend
The bend depends on the purpose of the fragment.
So, how to bend plywood without unnecessary hassle?
There are two main technologies:
- Ferry, (which has already been described);
- In the bathroom with hot water.
The second technology is much simpler; it allows you to calmly place the required fragment in a bathtub or other sufficiently large container and leave it in hot water for half an hour. The effect will be guaranteed, since the wood veneer softens under the influence of water and temperature, and the plywood part acquires the necessary elasticity.
Take a strip of plywood of the required thickness and soak it in the bathtub. Check the condition of the fragment every 5 minutes for bending; if after a certain time (within half an hour) the fragment bends normally, then this time is enough to soak the entire working fragment.
The softened part can be installed in a stationary place, attached with self-tapping screws and left until completely dry, this is if you are making a false column, a simple arch or other part that does not require additional complex structural inserts.
A few words about complex structures
Bending is a delicate matter.
Arch is different from arch, just like a curved design is different from another curved design. Often, home craftsmen resort to complex, combined solutions using overlay ornaments and other decorative elements. In this case, the entire structure is assembled into a single ensemble, and only then it is mounted and strengthened in a permanent place.
The material is soaked, bent as far as possible, then left to dry completely. Then everything is repeated again until the part acquires the intended curvature.
Attaching to templates.
There are several basic technologies for securing workpieces after soaking.
We will not repeat them all; we will focus only on the one that we consider the most acceptable for the following reasons:
- If you do not install the workpiece immediately in a stationary place, then you need an accurate, even bend and a combined solution;
- The maximum winning result can only be ensured by a pre-prepared blank or template;
- Fixing on the template is guaranteed to save you from the need to redo or correct the part.
In this case, we are talking specifically about fixing the fragment on the template until it dries completely. Making the template itself is quite simple; by the way, there are also a lot of manufacturing options.
Here is one of them:
- Take wooden slats with a length equal to the length of the part;
- Cut out several fragments from chipboard or wood (from 3 or more, depending on the length of the plywood sheet to be bent) and attach them to the slats;
- Attach the plywood layer to the finished frame with self-tapping screws and leave until completely dry.
About working with large sheets
Option with cuts.
Sometimes it becomes necessary to bend a large sheet of plywood with your own hands. This occurs when designing an arched vault of considerable length or another similar shape.
In this case, do the following:
How to work with large sheets and complex structures
Furniture with complex configurations involves bending at different degrees and radii within one strip or sheet. For such products, it is necessary to make a special template or frame from beams .
- The template is made from very hard plywood - parts are cut out of the sheet to exactly follow the bending profile. Since the elements are usually bent on both sides, 2 templates are made. Then they are connected with spacers so that the device is slightly narrower than the width of the future part. The template configuration can be anything.
- For more complex cases, a frame is made. It is a kind of stand, with fairly thick round blocks of wood fixed perpendicular to the plane. The bars are placed at the pressure points, but do not form an exact contour. At any time, additional jumpers can be installed here to clarify the shape of the future part.
When developing the frame, the type of clamping device is taken into account. Most often these are clamps . For the jaws of the clamps, holes are left on the plywood inserts, and the frame itself is reinforced with additional ribs to create the necessary tensile or pressing load. In simple cases, the sheet being bent can be secured with a cable or rope.
The most effective ways to bend plywood
For bending plywood, the most effective method is to use the method of increasing temperature and humidity. However, in some cases it is advisable to use the dry method of bending the material. When calculating the time and effort required to change the shape of the material, it should be taken into account that the thicker the sheet of plywood, the more difficult it will be to bend the sheet. Therefore, when choosing a bending method, you must first take into account the thickness of the sheet. There are several most effective methods for bending plywood yourself.
You can learn how to bend plywood correctly from the video:
Steaming
The steaming method is popular for changing the shape of plywood not only at home, but also in large-scale industries. In this case, a sheet of plywood is softened with steam, after which it is given the required shape. On a production scale, this method can be used for sheets of various thicknesses and sizes. You can bend only small sheets yourself using steam.
Steaming method
Technologically, the steaming process involves supplying steam directly to the sheet. In production, this process is performed using a special steam installation. At home, you just need to hold the leaf over a container of boiling water for some time. In case of high density of the material or low steaming efficiency, you can immerse the material in hot water.
Notching
If the plywood has a high density or large size, the steaming method at home will be difficult to use. In this case, you can use the cutting method. In those places where it is necessary to bend the sheet, cuts of a certain depth should be made. This indicator depends on the thickness of the sheet and should be no more than half of this value. If the cuts are too deep, the workpiece may simply break.
Notching plywood
The width of the cut is determined depending on the angle that should be obtained when bending the material. After making the necessary cuts, the sheet should be placed on a pre-made template, and a sheet of veneer should be glued onto it. After which it is recommended to leave the workpiece for at least a day so that it dries completely.
Gluing
A great way to bend plywood. It consists of cutting it completely and then gluing it together. In this case, it is also necessary to leave the workpiece for a day to dry completely. The advantage of this method is the ability to create clear geometric shapes. However, it is not possible to achieve perfect smoothness using gluing.
For this method, it is recommended to use synthetic or protein glue. At the same time, various types of glue can be used to glue sheets that will not be used for cladding. During gluing, the material must be strengthened using a channel.
Drying items takes at least a day
Features of the material
Plywood is a multi-layer board-type material. To make it, veneer sheets are used, which are laid crosswise and coated with a resin-based adhesive. The strength and durability of the material is ensured by the cross arrangement of veneers. This guarantees additional resistance to mechanical damage.
However, when it becomes necessary to bend the material, its strength becomes a disadvantage. But there are effective ways to bend plywood at home without damaging the material.
Reasons for using bending methods
Using the methods listed above, you can achieve any smooth shapes that will hold firmly after the workpiece dries. This way you can create arches in doorways and rounded corners between walls. But today, bending plywood sheets is especially widely used in furniture production.
This allows:
- Minimize the number of traumatic angles. This is especially true for rooms where children live. Since their restlessness often causes dangerous contacts with the corner surfaces of ordinary furniture.
- Increase the aesthetic significance of the interior. Because it is much more pleasant for the eye to observe smooth rather than sharp transitions. Sliding surfaces calm and improve your mood.
- Give greater solidity to the object and get rid of sometimes a huge number of fixing parts. This significantly enhances the strength and reliability of the structure.
Beautiful examples with streamlined lines and without fasteners
Gluing
Gluing plywood
To give plywood a curved look, a “pattern” piece is cut out of a thin sheet of plywood. It is laid on the sheet in such a way that the direction of the veneer alternates. As a result, the structure will have the necessary ductility and rigidity. Each layer of plywood is glued together with epoxy glue. To give the shape, the workpiece is clamped with clamps for one day. After drying, all irregularities and any exposed glue are removed from the part. Once completed, the workpiece is sanded.
Making a “slat” stool
Once everything you need is at hand, you can start making a stool with a unique and modern design. In common parlance, such a stool is called “slat” because it is assembled from slats.
Step 1. Draw a sketch of all the details of the future stool on a piece of whatman paper. This is not difficult, because there are only two types of parts.
Sketch of future details
Step 2. Carefully cut out the drawn shapes on whatman paper using scissors. It is not necessary to use whatman paper for work. The required parts can easily fit on A4 sheets.
Cut out templates
Step 3. Transfer the finished templates to a sheet of plywood and, using a simple pencil, trace them. The number of large parts is 2 pcs., and the number of thin parts is 1 pc. If the dimensions of the plywood sheet are small, then try to place the templates in such a way as to save space.
Transferring templates to plywood
Step 4. Once all the pieces are traced on the plywood, cut them out using a handsaw or electric jigsaw. Using an electrical appliance will significantly speed up the cutting process.
Stool parts are cut out
Prices for popular models of jigsaws
Jigsaw
Step 5. The finished elements for the future stool should look like in the photo. To ensure that the cut areas are smooth, they must be sanded after working with a jigsaw. For this purpose, use a grinder or regular sandpaper.
Ready-made elements for the future stool
Step 6. To make it more convenient to work with the crossbars, fold them together and secure them with clamps. This will speed up the sanding process. The finished surface should be perfectly flat and smooth after processing. If necessary, use a file (if the unevenness is too large).
The crossbars are secured with clamps
Elements after grinding
Step 7. Start assembling the parts. Before joining, apply a small amount of wood glue to the joints. It will increase the strength of the stool. When assembling, experts recommend using spacers and a rubber hammer.
Assembly of structural parts
Build process
Assembling the stool parts
Step 8. Make sure that all installed parts are at the same level. Only with maximum evenness will the finished structure look high quality. This is an important stage of work, so there is no need to rush when assembling plywood parts.
The slats must be at the same level
Step 9. The finished stool looks something like this. After assembly, sand the surface of the product with sandpaper and coat the whole thing with varnish. Once the stool is dry, it can be used. This stool looks quite fragile, but in reality it is not so.
Finished plywood stool
Another photo of the product
Once the stool is dry, it can be used
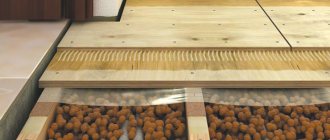
Preparing the base before leveling
The set of measures associated with preparing the surface before laying plywood depends on the base material. If it is concrete or cement screed, and the sheets are laid without lags or leveling pins (using the gluing method), then the following steps must be performed:
- Using a 200cm long strip, you need to measure the entire floor plane. Detected recesses with an area of more than 30 cm and a depth of 0.3 cm should be leveled with an adhesive solution.
- The same rod will help you find bumps and sagging. They should be leveled using a hammer drill or grinder.
- After the poured solution has completely dried, the surface is dust-free and primed.
Small cracks can be ignored if their location does not coincide with the seam between the plywood sheets. Otherwise, the cracks should be expanded, primed and sealed with putty or mortar.
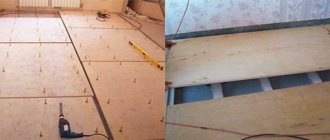
The sequence of leveling the floor, the device of which is made of floorboards:
- Eliminating squeaks. This phenomenon occurs for two reasons: first, a nail driven tightly into a joist rubs against the board when it bends under load; the second is that the edges of adjacent boards that are unreliably fixed or have lost their tongue and groove rub. To eliminate these phenomena, the boards are screwed to the joists with self-tapping screws, and the protruding nails are removed. The edges of the boards are milled and glued with wood glue.
- Warped floorboards have protrusions at the joints. They must be removed using a plane.
- The sheets should be laid out so that the seams between them do not overlap the seams between the boards.
When installing plywood sheets on joists or adjustable anchor studs, special attention must be paid to the strength of the base. Its evenness does not matter for these methods of constructing plywood.
In conclusion
An ordinary plywood sheet in skillful hands can turn into a real masterpiece. The only limit when working with this material is the author’s imagination, so you can make anything, from simple animal figurines to copies of world-famous architectural structures.
It is also important that the only tools you will need are a jigsaw and emery, so no special expenses are expected. The video in this article shows the process of making an original painting from plywood.
Author's text
I. Hardt
Some time ago, on one forum, a question was asked about processing the ends of plywood.
When color tinting plywood after varnishing the ends, due to the different absorbency of the veneer layers, after the second and even after the third applied layer, rough “bald spots” remain on the transverse layers of the veneer - layers that absorb the paint coating (hereinafter referred to as paintwork) more strongly. Even if you first pass the paintwork on the ends around the perimeter, then blow on the plane of the part on both sides, two layers per plane with intermediate sanding with an abrasive sponge - there are 4 layers of paintwork on each end. And still, “bald spots” remain in places, which worsen the aesthetic appearance of the product.
Previously, it was necessary to grind and re-coat the end separately several times. Now to solve this problem I use a mixture of putty with the addition of Kleiberit glue (or PVA) and water.
To prepare the mixture, I first add a little water to the putty to make it a little thinner, then add glue from a ratio of about 1:5 (glue, putty), mix and then add more water to bring the mixture to the state of liquid sour cream.
The resulting mixture is applied to the end with a hard brush across, and then along the end of the part.
The mixture fills all the pores and small defects of the internal layers of veneer (potholes, chips, interlayer voids), the transverse fibers are impregnated with glue and primed. The mixture dries quite quickly and is easily sanded with a medium-hard abrasive sponge with P120-P150 grit.
Next is painting. On the sample I used white polyurethane high-gloss varnish, since it was already thinned for painting the parts of the order. Applying paintwork with a spray gun, the first layer of primer (ends, plane, after drying the ends and the second plane)
after intermediate grinding with an abrasive sponge, a second layer is applied to the front plane (a third is obtained at the ends), if there is a need or the part is visible from two planes, then a second layer of paintwork is applied to the second side.
As we can see in the sample, the section of the end that we primed is already beautiful, but the section without primer requires sanding and at least one more coat of paintwork.
And the actual part itself: a view of the plane, two layers of paintwork with intermediate sanding.
This varnish has a very high solids, and two layers almost completely cover the grain pattern of the wood, turning the wood into plastic with a light texture.
Next, for example, a few photos with primed ends, coating; dark brown stain, colorless silky matte varnish in two layers.
Buy or make it yourself
There are many advantages of furniture (including stools) made by yourself. These include:
the ability to make a stool with a unique design. In furniture stores, the choice of models is limited, so you can only get a unique design that no one else has by making it yourself;
You can make truly unique stools
- saving money. When making a chair or other furniture, the material is chosen by the craftsman himself, so if plywood is used for this purpose, the finished product will be relatively inexpensive;
- gaining experience working with wood. Every day, template furniture is losing its popularity, and original designer products are gradually taking its place. Therefore, making chairs with your own hands is a unique opportunity to practice a new craft;
Design features of the stool
- ease of manufacture. For some people, the process of creating a stool from plywood may seem very complicated, but if you strictly follow the instructions and follow the recommendations, then even without special skills you can create a masterpiece in just a few hours;
- an opportunity to pleasantly surprise loved ones. Furniture made by yourself can be an excellent gift for a loved one. It is much more pleasant to receive such products, because they are made with your own hands.
Plywood stool - photo
Stools should match the style of the room
Styles
High-quality furniture plywood guarantees the production of interior items of different appearance
At the same time, it is not so important what type of material the stylish product was made from (bent, carved, layered). By skillfully working with any type of material, you can get beautiful designs that fit perfectly into a variety of interior styles.
Plywood chairs are relevant in the interior of classical and modern styles.
For example, country and eco approve of everything natural: floor and wall coverings, textiles, interior items. Plywood chairs of traditional shapes and colors will fit perfectly into the decor of this style. They can fit into the classics, even if the style prefers natural raw materials with imitation wood.
If the highest grade veneered plywood was used to create the chairs, decorated with various decorative details, plywood chairs have the right to decorate the interior of the vintage and baroque styles.
To successfully fit products into other interior compositions, you need to play up the color through painting, varnishing, and pasting with a special film
When purchasing, it is important to choose products that are designed in the desired colors, have the appropriate shape, decoration and texture. For any design specialist, working with plywood furniture will not be difficult.
Such products can harmoniously fit into any style, having a sense of taste and a special vision of style.