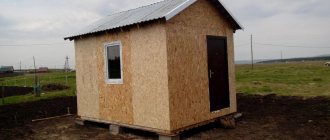
Cladding the ceiling space is not the most difficult thing. When attaching fiberboard sheets to the ceiling in a wooden house, it is quite possible to do without assistants, long leveling of the base and the purchase of expensive finishing and building materials and tools. Both permanent residences and summer country houses are suitable for cladding. And knowing the technology of work, it will not be difficult to cover the entire interior space of the room with material. You will get a perfectly smooth base for any finishing decoration.
When can a ceiling be lined with fiberboard?
First, let's figure out in what cases it is appropriate to finish the fiberboard ceiling in a wooden house.
This type of ceiling lining is used in the following cases:
- This wood sheet material can only be used in rooms with normal humidity. As a rule, such a ceiling is made in any living room, kitchen, hallway or toilet. But bathrooms, baths, saunas and swimming pools are suitable for these purposes.
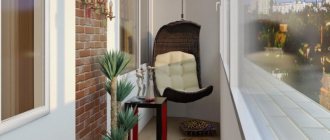
- The vapor permeability of wood boards is quite good, so they can be installed in rooms without heating, for example, on a glazed balcony or loggia, veranda. The material does not interfere with the natural ventilation of the base, does not deform or crack at low temperatures.
- Fiberboards can be used to line ceilings in a country house or in a country house for permanent or seasonal residence. The material improves the heat and sound insulation of rooms.
- This slab material weighs little, so it is suitable for installation in houses with dilapidated floors.
However, when choosing this finishing material, it is worth remembering that it is not environmentally friendly, because glue containing phenol is used to glue the fibers. In addition, it is not recommended to use fiberboard in rooms with an increased fire hazard.
Options in the interior
Suspended structures based on slats look great both in the interior of living rooms and kitchens. For greater attractiveness, wood coverings can be set off by decorative elements made of metal strips, giving the room a more austere look.
Light cork coverings are more suitable for bedrooms, creating a warm, cozy atmosphere in them. The color is chosen according to the taste of the apartment owner (the main thing is that it does not disturb the overall interior of the room).
Ceilings made of white cork can be installed with equal success in a simple office interior, as well as in a kitchen or in a children's playroom.
Plywood ceiling in a wooden house and apartment
The use of plywood sheets for lining the ceiling surface in a country house or in a wooden frame house can still be understood. The material is very durable and reliable, it can be used as a rough filing for the ceiling:
- Finishing the ceiling with plywood is done quite quickly, about half as fast as with popular plasterboard;
- The strength of plywood is enough to hold the insulation and vapor barrier of the ceiling.
The most important thing is the high quality of plywood veneer, unlike boards or lining, this is an almost finished semi-finished lining. After finishing the ceiling in a wooden house with plywood, you only need to make a little effort to apply decorative cladding, and you can forget about the problems of the ceiling for twenty years.
Pros and cons of plywood ceilings
Another thing is an apartment in which the ceiling has already been formed from slabs. There is a completely different logic and technology for forming the cladding. But even in an apartment version, it makes sense to use plywood sheets for cladding the ceiling in new multi-story “candles”.
Anyone who has ever dealt with renovations in new apartments knows how ceilings lined with plasterboard crack after shrinking, then cracks appear and material comes away from the frame. If you use fiberboard or a fairly thin plywood sheet, then the plywood ceiling, photo, turns out to be much more resistant to shrinkage load.
Plywood cladding can be pretty
A pleasant bonus will be the fact that applying decorative finishing to sanded birch or pine veneer is no more difficult than to apply a decorative finish to a plasterboard ceiling.
Of the negative aspects of using plywood for ceiling cladding, the two most important can be identified or noted:
- Firstly, plywood is very afraid of moisture; if water vapor accumulates in the ceiling space, then quite quickly the surface of the ceiling will swell in waves;
- Secondly, in its structure, the plywood sheet is a glued material, in the manufacture of which a variety of organic substances were actively used, including those containing phenol and toluene.
During operation, all these chemicals can be released into the atmosphere of an apartment or house, even through the decorative finishing of the ceiling.
Important! The environmental friendliness of plywood is determined by its phenolic number.
Some plywood models are additionally impregnated with bakelite varnishes to make it more water-resistant; such material can also be used as floor lining, but is not always suitable for ceilings.
Installation of plywood on the ceiling
High-quality plywood sheets that have been stored in a dry warehouse have very good flat surface geometry in a horizontal position, so, as a rule, there are no special problems with sheathing the ceiling in a wooden house. Lathing or leveling bars are pre-stuffed onto the ceiling. The plywood sheet itself is quite plastic, so it can be sewn directly onto the floor beams; in this case, the ideal ceiling geometry will not work.
It is very difficult to lay sheets of plywood on the ceiling alone
The sheathing slats have to be manually adjusted in thickness so that the supporting surface is in the same plane.
Advice! Most experts recommend stretching a film vapor barrier over a wooden lattice before laying plywood. In this case, the membrane cannot be secured with nails or staples; if possible, it is better to glue the material to the sheathing or secure it with double tape.
In a wooden house, sheets are laid on the ceiling with mandatory seam spacing, this allows you to compensate for unevenness and make the ceiling cladding more or less flat.
Lathing over vapor barrier
It is necessary to fasten plywood with self-tapping screws and pre-drill the hole. You can, of course, try to tighten the screw without drilling a hole, but in this case there is a risk of delamination and tearing off the last layer of veneer.
Of course, the level of plywood filing must be controlled, for example, using stretched paint cords or a laser device. In any case, after the material has been laid on the ceiling sheathing, individual joints and corners protruding from the general plane of the surface must be cleaned with a grinding machine. Depending on the chosen decorative finish, the seams can be left open or rubbed with a mixture of glue and wood dust.
How to finish a plywood ceiling
Once the plywood sheets have been laid on the sheathing, the seams caulked and cleaned, you can think about the appearance. There are quite a lot of finishing options. We must warn you right away that the most popular option, namely, painting with acrylic, water-based, latex alkyd paint in its pure form is not suitable.
No matter how carefully the plywood is prepared, there will still be seams through a fairly thin layer of paint and varnish, sometimes even at the places where the material is attached. If you want to use paint and varnish, it is best to treat the plywood with tinted oil or polyurethane varnish.
Coffered ceiling
The most successful finishing option is to stick paper lining wallpaper. This coating perfectly masks all the unevenness and roughness of the plywood ceiling, so it can be painted, covered with vinyl trellises, or glued with polystyrene or polyurethane tiles.
One of the most interesting finishing options is the coffered ceiling. If you lay sheets of plywood not in a staggered pattern, but in a checkered pattern, and then cover the joint lines with decorative beams, you will get a very nice design option, reminiscent of Provence or Country style.
Carved plywood ceiling
A relatively new method of decorative finishing of a plywood ceiling is the use of sheets with a carved pattern applied using a machine. Thanks to the high precision of milling, you can create drawings and entire compositions.
In addition to carving, a similar processing method is used for more complex mosaic sets, intarsia and marquetry, which were previously used in ceiling decoration only in very expensive interiors.
Stacked mosaic finishing option
Ceiling in a wooden house made of plywood: photo
It is clear that the quality of decorative finishing depends entirely on the capabilities of the customer and the imagination of the artist. Handmade work has always been very time-consuming and expensive, so most customers limit themselves to only small fragments of decoration using mosaic inserts and painting.
Style, design and ceiling decor
In a wooden house, the natural structure of wood is played out and preserved. The desired style is created by tinting or painting the wood. For the Provençal style, the logs are bleached and the ceiling is covered with pastel-colored materials. The chalet style is dominated by brown and sandy shades. The emphasis is on the ceiling beams. The simplicity and brutality of the loft is emphasized by raw beams, boards, timber. Properly selected decor emphasizes the design of the ceiling and the style direction of the room.
Decorative panels
Slabs made of solid oak, mahogany, and linden are produced with a smooth, carved surface. The standard thickness of wooden tiles is 1 cm, length - from 30 cm to a meter.
Expensive finishing can be replaced with three-layer panels. Spruce or pine panels are covered with a layer of valuable wood and glued together under high pressure. The appearance of the ceiling depends on the surface of the panel. Smooth cladding gives lightness, carved panels look more massive.
3D thermoplastic vinyl slabs imitate stucco, hammered metal, and carved wood. Inexpensive decor quite accurately reproduces the relief and texture of natural materials.
Textured coffered panels will add stylistic completeness to rooms in a classic style. They are mounted on a frame made of support beams with a box-like structure or ready-made blanks that need to be sawed and mounted. For the ceiling in a wooden house, caissons made of wood, MDF boards, and plasterboard are suitable.
Raised timber and beams
Imitation of supporting elements is made of wood, polyurethane foam, gypsum board. Plasterboard, wooden, and stretch ceilings are decorated with decorative elements.
False timber and beams perform various functions:
- serve as a communications box, a basis for the installation of lamps;
- zone rooms;
- change the visual perception of the room;
- emphasize the interior direction.
For Provence and country style, wooden beams are used to hide the wiring and grooves are made. Massive bars are attached to a wooden base using a through method using long self-tapping screws. If you need to expand the walls, the elements are placed perpendicularly. To visually increase the length, the beam is installed along the surface. Crossbars mounted like a lattice add volume and imitate a coffered ceiling. It is impossible to realize a rustic style, chalet, loft without beams. The desired color is given using varnish or paint. The aging effect with cracks and grooves is created with brushes.
Alfrey finish
Artistic painting copies carvings, gilding, stucco, stone inlay, and is applied to individual sections of the ceiling manually or using stencils. First, the master develops a sketch, determines the color scheme, and primes the surface. The false beams of a wooden ceiling can be given a patina. The result is the effect of wear and cracks in different directions. The polychrome painting method is used to decorate ceilings for interiors in the Provence style. The alfrey finish on the surface of the lining and solid wood looks extraordinary. Colored landscapes and rosettes are painted on beams and boards, and 3D pictures with imitation carvings are created on plywood.
Applying paint and varnish coatings to wooden ceilings
Paints and varnishes improve the aesthetics of wood and protect against rotting. Before applying paint and varnish, the surface is cleaned, treated with fine sandpaper, and primed. If you need to preserve or emphasize the texture of wood, use stain, varnish, and decorative azure.
Selection of paint and varnish coatings:
| Material | Effect | Peculiarities | |
| 1 | Stains | Strengthens the structure, does not create a film, colors the wood from the inside | Easier to control color and apply lightly pigmented stain |
| 2 | Lucky | Protect from dirt and ultraviolet radiation | Water-based formulations dry quickly and are odorless |
| 3 | Oils | Forms the thinnest protective film, enhances texture | Flaxseed oil has good water-repellent properties |
| 4 | Wax | Gives velvety, strengthens, protects from moisture | The soft mixture removes minor scratches. Hard wax is used for restoration |
| 5 | Drying oil | Forms a film that protects against rotting and insects | Used as a primer |
| 6 | Paints | Creates a glossy or matte finish | Alkyd and acrylic paints provide high hiding power |
What is fiberboard, its types
To have a complete understanding of the material with which you are going to decorate the ceiling of your house, let’s consider its characteristics.
The main material from which fiberboard boards are made is waste chips, such as sawdust, chips or even dust.
To obtain wood-based structures, all components must first be ground to the state of fibers using long-term heat and water treatment. After processing, these fibers are laid out like a kind of carpet, evenly and pressed.
Along with pressing, they are also dried. This creates a wood fiber system. In order for such a building material to have certain strength qualities and other useful characteristics, certain chemicals are added to it.
Typically, soft and hard wood fiber elements are produced. Fiberboard sheets belonging to the soft type have a density not exceeding 350 kg/sq. m. Their thickness is no more than 25 mm.
Due to their low density as well as high porosity, soft wood fiber devices are widely used in construction work that requires the use of indoor insulation.
Fiberboard has an excellent property: the material literally “breathes” and effectively repels any moisture.
These same parts have low thermal and sound conductivity. It is because of this that such options are used, as a rule, for insulating both floors and walls. In addition, there are fiberboard sheets that have latex added. They have very high water resistance, so they are often used for waterproofing or insulating the roof of a house.
There are also semi-solid slabs. Their density is 850 mg/sq.m. m, and the thickness is 12 mm or less. Semi-solid fiberboard sheets are used in the manufacture of cabinet furniture, in particular drawers or back walls of upholstered furniture or cabinets.
Solid slabs have a thickness of 6 mm, and their density is 800-1000 mg/sq. m. They have a fairly low level of porosity. This facilitates their use in the production of doors or furniture.
Solid sheets of fibreboard are produced with different markings.
The quality of these structures can be either first-class or second-class.
Superhard materials have a density of at least 950 mg/sq. m. Such fiberboards have the lowest porosity of all types of wood fiber types. These fiberboard sheets are perfect for flooring, as well as finishing work, including creating ceilings.
With their help, temporary buildings, partitions, boxes, and doors are created. Fiberboard with increased hardness is produced smooth on one side. These systems have increased strength just for use in various repair work.
Fiberboard sheets have many advantages, especially when compared with ordinary wood. Such parts do not deform from moisture, do not bend, and do not change their original shape throughout operation. If you varnish such slabs, their performance characteristics will increase many times.
Return to contents
Ceiling technology with wood fiber boards
Let's look at how to sheathe a fiberboard ceiling. The cladding process is divided into two important stages:
- Preliminary work. If you still have old finishing coatings on the ceiling, you must completely remove them to avoid the appearance of mold and unevenness. Woodlice or worm beetles can also be found in the remains of old material. All these uninvited guests will constantly multiply and create unsanitary conditions in the apartment. Therefore, before installing fiberboard, take the time to do the preparatory work to clean the surface of previous facing materials. Be sure to carry out work to disinfect the ceiling with antiseptics, even if, in your opinion, there are no prerequisites for the formation of mold or stains on the ceiling. You will especially appreciate the need for such preparatory construction work in the future, after you finish covering the fiberboard ceiling and completely cover the ceiling area with them, there will still be a small gap between the fiberboard slabs and the concrete floor, where there will be ideal conditions for the proliferation of pathogenic microflora. Therefore, you should not save money on disinfection.
- Installation of sheathing. All slabs are mounted on the sheathing. Sometimes a wooden base is used, and it is much easier to plan the location of the wooden beams on the floor and then mount them on the ceiling. When marking, create squares approximately one meter by one meter. Thus, the assembled frame can easily be checked for compliance with the size of the fiberboard sheet, making it much easier to fix it. We lay a sheet of fiberboard on top, level it and check that no waves are created on the surface. After this, we fix the material on a wooden frame.
- But most often they install building profiles for suspended ceilings. They best maintain a flat surface; it is quite easy to buy a solid profile up to 4 meters in size (thanks to this, there will be no bends along the entire length of the room). Also, the advantage of profiles for suspended ceilings is their low weight (read: “Finishing ceilings with your own hands: unusual ideas”).
So, you have completed the preparatory work and purchased fiberboard sheets. They must be placed on a flat surface and these sheets must be left in the room in which the fiberboard ceiling will be sheathed for about a day or two in order to equalize the temperature and humidity of the sheets with the microclimate in the room.
Types of decorative wall panels
Wood always remains a relevant material because it can store the energy and warmth of nature. Over time, it does not lose its attractive appearance, but absorbs time and ages gracefully. Wood is a malleable and easy-to-work material. Using wood, you can realize any fantasy and transform it into reality. This requires an idea, desire, time and basic specialist skills.
Important! Facing fiberboard panels allows you to solve many problems:
- To carry out installation work, no preliminary preparation of the wall surface is required, which means there is no need to work with cement and glue.
- Such panels are very easy to transport, disassemble and install. It's like a construction kit that even a non-professional specialist can easily assemble.
- Thanks to the finishing of walls with such panels, it is possible to hide all errors in the wall surface and communications. And the presence of a wide range of colors allows you to choose panels for any room.
On the modern market there is a huge assortment of different materials, with different sizes and shapes, representing an expanded range of colors and shades, decorated with a pattern or print. Each variety has its own individual performance characteristics and properties. Let's look at the main differences between vertical wall panels.
Slatted panels
They are long, fastened together with strips. The width of each panel varies between 10–30 cm, the length corresponds to 2.5 to 6 m, and the thickness ranges from 8 to 25 mm. Modern apartments have a ceiling height of 2.5 m, so the length of the product is enough to install vertical panels.
Such panels are characterized by a tongue-and-groove system, which allows for more convenient and easy installation, in which special brackets and clamps are used for fastening.
Sheet panels
They represent the largest modules in size. They are characterized by a uniform color or the presence of a pattern on the surface. In appearance, the panels are similar to hardboard sheets.
The most common sizes are 130x49 cm, 130x100 cm, 122x244 cm, 260x100 cm, 128x98 cm, 200x100 cm, 260x490 cm, 260x98 cm, thickness can vary from 3 to 6 mm. With a perfectly flat surface of the walls, the panels are perfectly glued directly to the wall. The positive aspect of this material is the high speed of installation.
Important! If there are errors in the wall, it is preferable to fasten sheet panels to the sheathing using nails.
Tile panels
They have a square shape. Thanks to them, designers have the opportunity to implement interesting decorative solutions. For square panels, or so-called tile panels, the installation principle is exactly the same as for typesetting panels. In this case, you can form a pattern by combining panels of different patterns or tiles of different colors.
Standard sizes of tile panels: 15x60 cm, 30x30 cm, 30x60 cm, 98x49 cm, 98x98 cm.
Additional nuances
Based on the base material and the applied top layer, wall panels are characterized by both resistance to high humidity and a negative reaction to it. That is why, when choosing a material for finishing fiberboard walls, it is necessary to study the properties of the material in detail.
Moisture-resistant wall panels are characterized by the presence of the following types:
- panels made of natural wood, which are coated with wax or some other special material;
- the base is made up of other materials, but on the front side there is a laminated film, which is painted in some color, although sometimes there are products laminated on both sides;
- plastic panels or panels that are covered with plastic.
Non-moisture resistant panels include:
- chipboard panels;
- MDF and fiberboard panels, not laminated models.
Advantages and disadvantages of the solution
How to assemble a slatted ceiling with your own hands: installation instructions
Real natural materials, as a rule, require very careful attention to themselves - stone can be scratched, wood can harbor pests, and it is also afraid of high humidity. The types of materials currently used to imitate such surfaces are free from all these disadvantages. In particular, slatted coatings will provide the opportunity to obtain such advantages as:
- They are not afraid of water
- Easy to assemble and install even with your own hands
- Do not require any special impregnations or other types of processing
- Do not support combustion
- Allows you to choose the texture and color of the material
- Masks the shortcomings of the base coating
- Allows the use of built-in lighting
- Does not require special preparation of the base plane
The only disadvantages include the fact that the walls will become a little lower due to the fact that a special base for attaching slats will be assembled on the ceiling, as well as a clear geometric pattern of the coating, made up of the joints of its individual fragments.
Peculiarities
A suspended ceiling is a type of suspended structure. At the same time, it will be faster to hem the ceiling than to install a suspension system. There is no need to build a bulky frame consisting of different elements.
When arranging this type of ceiling, the load-bearing structural elements are attached to the base base or beams if the filing is carried out in a wooden house. As a result, the load on the floor becomes less, and the amount of materials that can be used for decorative finishing increases.
Another advantage of a false ceiling is that it takes a little height away from the room. So, for example, lining with clapboard will reduce the height of the room by 3-4 cm, and a suspended ceiling made of gypsum plasterboard, mounted on a metal frame, will “eat up” at least 10 cm of the distance from the floor to the ceiling surface.
Components of the ceiling structure of a private house
To increase the space in a one-story wooden house, you can not cover the ceiling beams with finishing materials, but decorate with carvings, varnish and decorate with lighting in the form of hidden lighting. This is done with solid beams. If the building is old, then the beams will look the same, so it is better to hem the ceiling. But first, the beams are cleaned of mold and covered with protective impregnations.
In general, the basic layout of an interfloor or roof ceiling is identical:
- a floor made of boards in the form of flooring, if there is a second floor above;
- vapor barrier, which prevents warm air from escaping from the room, extends the service life of the roof;
- the insulation is installed if there is an unheated attic on top of the room;
- waterproofing is represented by a special membrane (film), which provides reliable protection of wood from moisture;
- the rough ceiling acts as a support for all layers and serves as the basis for the construction of the finishing (decorative) ceiling.
When the ceiling between the floors is ready, you can move on to the final finishing - hemming the ceilings.
Mounting methods
To fix it to the sheathing, you can use construction staples (if mounted on a wooden beam and using a construction stapler), nails or self-tapping screws. Please note that in the latter case, you need to countersink each “breakdown” (make a recess for the head). Methods of fastening to the ceiling depend on the density of the sheet. We remember that the denser the fiberboard sheet, the heavier it is, and, accordingly, the stronger the materials for fastening. Protruding iron from staples or nails must be carefully puttied, because over time these iron parts will rust and show through the paint or wallpaper.
Types of rack structures
Wooden slatted ceilings are modular types of structures that are installed in public institutions and in residential apartments, houses, and cottages. By type, rack structures are divided into two types: open and closed.
Open type ceilings
The main design difference lies in the method of installing the slats. In open structures, a gap is left between the elements during installation. It can be closed with special insert strips (plugs) or left free. The gaps are made of small width, five times smaller than the main strips, the plugs are made in various colors and textures. It depends on the chosen design, design and dimensions of the room. In low rooms, it is recommended to install caps so that the ceilings are not visible through the cracks. And in spacious and high halls, the free space will provide ventilation if the supply and exhaust diffusers are hidden behind the sheathing.
Open finish
Interstitial plugs decorate ceilings and add aesthetics. Sometimes they are made of a different material or a different color, with a mirror surface or a relief texture. The assortment is large, and its cost depends on the design of the ceiling. Open type ceilings are installed in large structures, commercial, entertainment or public institutions. On high floors, gaps between the slats are not noticeable.
Closed structures
When installing closed structures, the slats are mounted at the joint, forming a continuous plane and look like a continuous surface with no gaps between the slats. Closed structures are installed with low ceilings, and if it is necessary to install ventilation between the ceilings, it is recommended to use perforated slats. The elements can be the same from lining or from different-sized and multi-colored panels, which will create a structure that decorates an expensive interior, as in the photo below.
Combined
Recently, offers of combined structures have appeared on the suspended ceiling market, where wood is used as one of the materials. It looks interesting, creates a fresh, not boring interior, the combination of different materials makes the room original and unforgettable. This design consists of slats that differ in material, height and width. By choosing the texture of materials, you can create spectacular compositions. The photo shows a combined finish:
Combined slatted design
Disadvantages of fiberboard ceilings
- Moisture resistance: Although fiberboard can be used to install a ceiling in a bathroom or toilet, it will not withstand direct exposure to water. Therefore, if there is flooding from above (for example, a roof leak), the ceiling surface will be damaged and will have to be re-laid.
- Environmental friendliness: this point applies to old fiberboards purchased a long time ago and stored somewhere in your garage or in a storage room at the dacha. Their use is highly discouraged, since previously, at the stage of manufacturing the material for gluing fibers, not entirely safe substances were used, which over time were released into the surrounding space. Therefore, after finishing the surface with such slabs, there will be a specific and very unpleasant smell in the room. Now the technology for manufacturing fiberboard has changed a lot, and such harmful components are no longer present in modern materials, so they can be safely used in residential premises.
- Design: a ceiling finished only with fiberboard is unlikely to satisfy anyone, so it serves to form an internal layer that levels the surface, on top of which a decorative ceiling covering will be applied (for example, plastic tiles, wallpaper, paint or other finishing materials).
- Labor intensity: despite the fact that the material itself is very light and lifting it will not be difficult, sheathing the ceiling with it alone will be quite difficult. The sheets are very flexible, so during installation they must not only be aligned with other ceiling elements, but also constantly ensure that they do not sag, otherwise the surface will end up wavy. And we’ll look at how to avoid all this and get a smooth fiberboard ceiling later in the article.
Installation methods and tools
Before attaching the siding, it is worth choosing the necessary tool. To work you will need:
- perforator;
- screwdriver;
- roulette;
- pencil;
- hand saw;
- axe;
- metal scissors;
- hammer;
- building level.
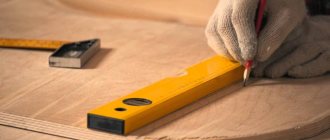
Work begins with the preparatory stage. The ceiling surface is cleaned of dirt and debris. After this, the general level of the ceilings is measured. The most convenient way to do this is with a laser level, but you can get by with a regular bubble tool. The resulting height is marked with marks on the sides of the walls. When the preparatory work is completed, they begin to build a subsystem for attaching the siding. It can be done in two variations.
Wooden sheathing
- Starting blocks are placed on two walls at the marked level. They are placed perpendicular to the exposed siding.
Important: install the bars exactly level! In places where the ceiling bulges, trim the wood with an ax. Place wood chips in holes and depressions
- Pull the “axial” between the two guides. It must pass through at least three points. The installed rope will mark the general level of the future surface.
- After tensioning the harness, attach the remaining bars parallel to the guides so that they do not touch the harness and are at a distance of 1 mm from the tensioned rope at all intersection points. The step between the bars is taken in the range from 35 to 45 cm.
- Install a “G” profile along the perimeter of the ceiling on a wooden structure. To secure it, additional spacer bars are placed between the guide and the board next to it.
- Measure the distance between the two edge moldings along the edge of the “ear” of the profile. This is the part of the molding without perforation that will remain visible after finishing. Add 1 cm to the resulting figure.
- According to the dimensions obtained, cut pieces of siding and begin laying it out from one of the walls perpendicular to the installed bars.
- It is best to fasten the siding with self-tapping screws without tension, slightly loosening the screw head.
- Most often, the last sheet of siding is cut not only in length, but also in width. The size is taken at two extreme points. From the beginning of the product lock to the edge of the edging molding.
There are several disadvantages to this design. Firstly, it is quite difficult to place spotlights under such a ceiling surface. Secondly, wood tends to absorb moisture, so a siding ceiling in a bathroom on a wooden frame is not installed. To install the ceiling in rooms with high moisture levels, another subsystem is used - made of metal profiles.
Metal carcass
Metal lathing is installed in bathrooms and kitchens. Or in the case when the general level of the ceilings needs to be lowered from the main surface to a distance of more than 5 cm. Installation of the siding itself and moldings under the metal subsystem is no different from installing the material on a wooden structure. The differences in installation lie in the alignment of the subsystem itself.
To install a suspended ceiling made of siding on a metal frame, you will additionally need:
- U-shaped profile;
- metal suspensions - “combs”.
First, hangers are installed under the metal profile. They are placed in increments of 40 cm under each profile stick. After this, the metal profile itself is installed. The technology is similar to installing wooden sheathing. First, they install two starting profiles and tighten the alignment, after which they install the remaining metal, adjusting the level of each stick along the stretched rope. The resulting structure is covered with edging molding and siding. Holes are cut for lighting and lamps are installed.
Hemming the ceiling with your own hands is easier than it seems. The main thing is to have minimal skill and tools. Do your work wisely and you will succeed. Good luck!
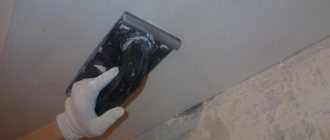
How to putty fiberboard before painting
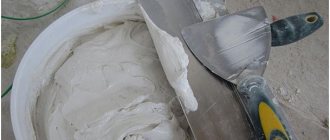
One slab for the ceiling is not enough, so you can’t do without puttying the joints. The process is simple: the seams are filled with putty, and reinforced tape is applied on top.
It is advisable to use alkyd putty - for elastic, springy fiberboard sheets it is suitable for its plasticity.
If there are few joints, you can use acrylic-silicone sealant.
The seams between the sheets can be puttied or covered with strips, including decorative ones.
You can embed inserts from another suitable material into the fiberboard ceiling.
Before finishing, carvings can be made on the fiberboard ceiling panels
How to hem a bathroom ceiling
The bathroom ceiling must meet the following requirements:
- be moisture resistant;
- be easy to care for;
- do not be afraid of sudden temperature changes;
- to look nice.
Most often, designs from:
- plastic panels that quickly assemble into a single plane, are easy to clean, and resistant to mold;
- metal slats. The coating will retain its original appearance for a long time. At the same time, the design is successfully combined with different types of lighting devices;
- drywall. To do this, choose gypsum boards marked moisture-resistant, and to paint the sheets use water-dispersed silicate or silicone paints.
Lining the ceiling will add aesthetics to the room, create and maintain a comfortable microclimate in the house throughout its service life. If you approach the work responsibly, purchase high-quality materials and carefully complete the finishing, the decorative false ceiling will last at least 10 years.
Finishing the ceiling in the bathroom: 10 most popular solutions.
Do-it-yourself fiberboard arch
One of the positive properties of fiberboard - the ability to bend, coupled with an even more excellent quality - the ability to hold its shape, allows this material to be actively used for the construction of arches.
The main conditions for a quality design:
- Accurate measurements of all details.
- Drawing up a drawing.
- Availability of good tools that will allow you to accurately cut out the necessary elements.
- Possibility of having an assistant during installation.
You can bend fiberboard with an arc so that it does not burst or have cracks if you first apply a thick layer of PVA glue to the surface. Once absorbed, it will give the fiberboard the necessary elasticity.
The entire frame should be cut out and assembled, for example, the legs (the base of the arch, its lower part) need to be on the floor. Then insert all the elements into the prepared opening.
It should go like this:
- cut the aluminum profile and bend it exactly to the shape of the fiberboard arc;
- make a frame from the profile around the entire opening;
- use a screwdriver to attach the fiberboard arch elements.
If the arch is being made as a rough material and it is intended to be further covered, painted, for example, then all joints must be glued together with reinforced mesh or construction tape. Now the finished arch can be decorated.
When the fiberboard is laminated, you need to cut out the parts very carefully and install them no less carefully. Otherwise, all the irregularities will be noticeable.
Fiberboard arches can decorate a space and hide the imperfections of a doorway. Moreover, such a design will cost minimal money, and it can be completed in record time.
Workflow Description
I will tell you about all the work in the order in which they were carried out. If the issue of covering the ceiling is relevant for you, then simply repeat all the steps, and even if you hold a screwdriver in your hands for the first time, you will be able to achieve an excellent result.
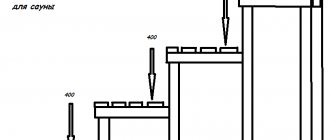
Lift construction
This design greatly simplifies life when covering the ceiling; I used to involve at least two assistants in the work. The work was carried out in difficult conditions: two people were holding a sheet of material on the ceiling, and I, with a hammer in my hands and a dozen nails in my mouth, tried to quickly nail the fiberboard so that the assistants’ hands would not become numb. Due to the rush, the quality of the work suffered, and a couple of times we dropped the sheet and damaged it.
To work slowly and ensure perfect quality, we will need to assemble a simple structure, the diagram of which is shown below. It consists of the following parts:
It is not difficult to assemble such a structure
- You need 4 longitudinal elements, the length of the two wall boards should be slightly less than the height of the room, and the length of the rising part for convenience is made another 3-5 cm shorter. The main requirement for boards is strength, but you shouldn’t take too thick lumber either, since the lift will weigh a lot;
- The width of the structure should be 20-30 cm less than the width of the sheets. This is necessary so that the material can be tapped on the sides without any interference. Based on this, transverse elements are cut, of which there can be 2-3 pieces, depending on the height of the system and the thickness of the boards used;
- The crossbars are screwed with self-tapping screws, after which the two sashes need to be connected to each other with hinges. Any options that are at hand will do; if you don’t have anything, then buy the cheapest products at a hardware store; they will cost you 100 rubles. It is best to screw the hinges with the same self-tapping screws.
In our case, the design also has a strap to tighten the doors when carrying and storing - the lift is used quite often
Main stage
Now that we have everything we need, we can begin work. Of course, it is assumed that all the preparatory operations have been completed - the ceiling is lined with a board, since we need a base on which our material will be attached.
The ceiling is prepared for covering and treated with an antiseptic composition
The workflow looks like this:
- First of all, you need to attach the lift in the required place; most often the work begins from the corner of the room, so it is placed there. Fixing the structure is very simple: screw in 4 self-tapping screws, this is quite enough to ensure reliability;
The lift is fixed using self-tapping screws - after that they are easy to unscrew and move the structure to another location
The lift is more suitable for wooden and gas silicate structures, since it is difficult to screw a self-tapping screw into concrete, and drilling a bunch of holes is not the best idea.
- Don’t forget to check how the lift works, it should rise and fall easily, the structural elements should not rest anywhere;
As I noted above, even a teenager can handle the design
- Now you need to prepare the sheet; if cutting is not needed, then this step can be skipped, but if you need to adjust the element, you will have to take measurements, and then apply markings to the fiberboard. Here you need to have a long level or a straight edge on hand in order to draw lines along which the sawing will subsequently be carried out;
Hardboard ceiling
For wooden houses, the best material is a special material based on fiberboards - hardboard. Essentially, this is the same fiberboard, but with a laminated surface on one side. It can be just a smooth surface, or a glued PVC film with the pattern and texture of stone, wood, or even imitation tiles.
Hardboard
The principle of laying hardboard is no different from finishing the ceiling using fiberboard. The only significant difference is that most customers perceive the fiberboard as a rough base, and prefer to cover the fiberboard ceiling in a wooden house only as a preparation for further finishing, for example, gluing wallpaper or film.
Conclusion
This technology can be used not only for fiberboard, but also for chipboard, plywood, oriented strand boards, plasterboard and other sheet materials. This method makes the work not only easier, but also safer, the main thing is to install the support securely.
Did you like the article? Subscribe to our Yandex.Zen channel
October 20, 2021
Ceiling installation, Ceiling finishing, Ceilings, Wooden ceilings, Ceiling structures
If you want to express gratitude, add a clarification or objection, or ask the author something, add a comment or say thank you!
Differences between vertical and horizontal cladding
Wood paneling gives the room a cozy feel. The larger the surface covered with wooden cladding, the more carefully it is necessary to select the wood. Planed boards can be attached horizontally or vertically directly to the wall and to a lattice of slats.
If the boards are placed vertically, horizontal slats with a cross section of 25x40 mm are attached to the wall at a distance of 500-800 mm from one another, and any irregularities found on the wall are leveled using wooden spacers. If the wall surface is covered with horizontal boards
, the slats are mounted vertically. The latter method has the advantage that an air gap remains between the sheathing and the wall. Holes are provided in the horizontal slats for air circulation or gaps are left.
How to hem a ceiling with insulation
Beam preparation
Before hemming the ceiling with the selected material, prepare the base base. And, if there are no difficulties with slab floors, then beams require a more careful approach:
- Furniture is removed from the premises and electrical wiring is turned off;
- remove the previous finish from the ceiling surface, knock down the plaster;
- dismantle the slatted sheathing, remove the insulation layer;
- beams are cleaned of debris and mold and treated with antiseptics.
The evenness of the beams is checked using a laser level. If there are differences, they are eliminated. If the ceiling is completely sewn up on the bottom side, it is leveled using a counter-lattice. To do this, use timber with a cross section of 40x60 mm or profiles for gypsum plasterboard. A vapor barrier layer is mounted on the bottom side of the beams, which is attached to a construction stapler. The film is overlapped.
The timber is secured to the beams in a transverse arrangement with self-tapping screws. To level the base, wooden jumpers are placed between the timber and the beams. If there are strong differences between the beams, special U-shaped brackets for gypsum boards are used.
Insulation 100-150 mm thick is laid in the space between the beams.
If the niches between the beams are not completely sewn up, then a wooden beam is secured on both sides of the load-bearing elements with self-tapping screws so that it is located at the same level as the beams. A vapor barrier is installed from the floor of the upper floor or attic. The cladding is fixed to the bars, and on the second floor a floor made of boards is laid.
Installation of the binder
When the preparatory stages are completed, the installation of hydro- and vapor barriers is completed, they proceed to the decorative cladding of the ceiling surface.
An accessible way for self-implementation would be filing with boards:
- First, measure and cut the boards to the required length. The cut is made with a jigsaw from the reverse side so that the edges are smooth;
- the board is screwed with self-tapping screws or nailed to the counter-lattice;
- if lining is used, it is fastened using the tongue-and-groove principle; plastic panels are also mounted;
- when the entire ceiling is covered, the seams between the walls and the cladding are covered with decorative skirting boards.
If plasterboard is used as cladding, then the frame is first installed. To do this, guide profiles are attached around the perimeter, and ceiling elements are fixed to the beams. The result is a sheathing to which the gypsum board sheets are attached. The main condition is that the joint of adjacent sheets falls on one profile.
The procedure for fixing a fiberboard sheet
First you need to fix the sheet according to the guide rails. To do this, the sheet must be lifted, pressed against the guide profiles and secured with several fasteners along the edges of the sheet. Important detail: this is a preliminary fixation. Therefore, do not use staples for this. Secure the sheets with long nails or thin screws that will protrude from the fiberboard. That is, do not completely hammer them in so that you can then pull them out painlessly. The sheet secured in this way is checked with a rope that is pulled across the entire room. If the sheet is unevenly attached, then it is relatively easy to pull out the nails and straighten it.
Now we move on to fixing the aligned sheet. To finally nail the sheet to the ceiling, you need to start from one edge in increments of 15 cm. In this way, we gradually go through the entire sheet, and there will be no bulges on the material.
Preparing to install slatted ceilings
You can assemble a conventional slatted ceiling structure yourself. More complex systems are best left to specialists.
Before installation, prepare the walls and ceiling - they must be smooth and clean. They also determine what will be between the rough ceiling and the slatted structure: cable ducts, ventilation ducts, pipes, fire-fighting devices. This determines what distance should be between the main ceiling and the slatted structure. It is also determined by the type of future lamps for slatted ceilings - built-in or suspended. For conventional pendant lighting fixtures, there is no need to make the inter-ceiling space too large, since it will only contain wires and fasteners. When using recessed lamps with incandescent lamps, the distance between the rough and slatted ceiling should be at least 13 centimeters, with halogen or LED lamps - at least 7 centimeters.
Expert advice
If it is planned to install spots in the slatted ceiling, then a hole is made in advance in the slats to the diameter of the lighting fixture. A wood router is used to drill the hole.
Be sure to lay electrical wires in plastic or metal cable ducts. The length of the stringer is selected according to the distance from one wall corner to another. This value should be 1 cm larger.
If you want to get a continuous one-piece coating, then choose slats with tongues and grooves. Decorative caps of different colors are available for sale. When choosing them, take into account the design of the room.