The condition of the ceiling surface depends on many factors, but it is close to ideal only after recent repairs. In all other cases, there are defects on the ceiling - the most visible base of the room - that homeowners strive to eliminate as quickly and efficiently as possible.
The main criterion for the quality of ceilings is their evenness, if you do not take into account some original finishing methods, for example, wooden beams. Only on a leveled base or by hiding the defective surface under a masking shell can a decorative or, at least, classic finishing of this structural element of the room be performed. Let's look at several of the most common ways to level a ceiling with your own hands, depending on the significance of its defects.
Technology of work execution
- Floor seams are usually sealed simultaneously with ceiling repairs, so it is more convenient to carry out the preparatory work as a complex. The old coating is removed from the ceiling: whitewash or water-based paint is moistened with water from a spray bottle, left for 10-15 minutes and removed with a wide spatula until the plaster is applied. If the ceiling is covered with a thick layer of putty, it is cleaned only in those places where it has poor adhesion. If there are traces of rust on the ceiling, they are removed with special compounds. The seams between the slabs are opened: the old putty and plaster that are poorly secured in the joints are removed. If necessary, you can use a hammer drill. After processing, the seam should have a U-shaped or slightly expanded inward shape so that the putty holds better. Remove dust from the resulting seam by sweeping it away with a brush and wiping it with a damp sponge.
Removing the old coating from the ceiling and preparing the seam
Inspect the resulting seam. If its width is more than 3 cm and its depth is small, it is sealed with polyurethane foam. To do this, lightly moisten the seam with clean water and apply foam from a balloon. Wait for it to expand and begin to harden, after which the excess is removed, cutting it off with a knife so that a triangular-shaped depression with a maximum depth of 0.5 cm is formed at the seam site. If the seam is deep and not wide, it must be sealed with polystyrene foam, polyethylene foam or any other elastic material. The seam is pre-treated with a deep penetration primer and dried well. The seal is secured using a moisture-resistant sealant; the surface of the concrete must be dry. The sealant is placed deep into the slab, and the seam on the outside is sealed with NTs grade cement mortar so that a small depression remains at the joint. The cement mortar is dried.
Removing old coating from the ceiling and preparing the seam
Sample of a putty seam with polyurethane foam inside
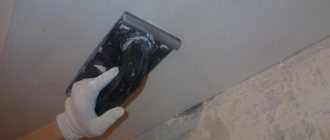
Putty for rust with residual elasticity, for example, latex, is applied to the prepared recess with hardened mounting foam or cement mortar. Level it flush with the surface of the slab. It is convenient to put putty into the seam using two spatulas: apply a sufficient amount of putty to the wide one, and put it into the seam with the narrow one, compacting and smoothing it inside the seam. After applying the putty to part of the seam, smooth it out with a wide spatula, removing excess.
The process of applying latex putty
The solution is dried for 24 hours and the joints are puttyed. Apply a layer of preliminary putty to the seam and adjacent surface of the floor slabs and glue sickle or paint mesh over it, pressing it into the layer of putty. Iron with a spatula along the direction of the seam. The width of the serpyanka or mesh must be at least 20 cm. Dry the putty and, after drying, level it with sandpaper. Apply another layer of preliminary putty with a finer grain to the entire ceiling, leveling it with a wide spatula. Dry and sandpaper. After this, a layer of smooth finishing putty is applied, dried, smoothed with fine sandpaper and painted.
After applying the putty, dry it for a day
If the floor slabs have a height difference of more than 1 cm, the ceiling will have to be plastered after sealing the seams. Plastering is done with a gypsum-based composition over a reinforcing painting mesh. The ceiling is treated with a special “concrete-contact” primer containing solid particles - it creates a rough layer on the surface of the slabs and facilitates the adhesion of the solution. The mesh is attached to a layer of plaster, carefully smoothing it out. After the plaster has completely dried for 2-3 days, you can begin to putty.
Ceiling plastering technology
The ceiling made in this way looks absolutely smooth, there is no destruction of the seams, and the resulting microcracks, due to the plasticity of the putty, remain invisible. However, this method is unacceptable for apartments in new buildings - the house will settle within three to four years, and the slabs will inevitably move. Therefore, for new houses it is better to use other types of ceiling finishing, for example, suspended ceilings.
Ceiling preparation
Before you pull out the ceiling, you need to do a good job of preparing it for repairs. The need for this stage is determined by the fact that the leveling solutions will experience a number of loads after hardening - and a properly prepared surface allows you to reduce these loads to a minimum.
If there is any covering on the ceiling, it must be completely removed. For example, whitewash should be thoroughly soaked in water and allowed to soak, and then cut off from the ceiling surface using a narrow spatula. To remove oil paint or enamel, you must first analyze the condition of the ceiling. You can simply tap a flat ceiling with a hammer and remove the paint only in those places where the plaster has begun to peel off.
If the ceiling has differences in height or deviations from the horizontal plane, then the paint will have to be removed from the entire surface of the ceiling. To cut, you will need a grinder with a metal disk. The paint will be cut off along with the plaster, and during the work it is also worth removing all noticeable unevenness in the coating. In addition, it is necessary to remove the damaged filling of the joints between the slabs by knocking it out with a hammer and chisel.
Preparatory stage
Before leveling a crooked ceiling, it is important to clean the manipulation area. The method is determined by the type of coating:
- Removal of water-based paint will be easier by pre-treating it with water and removing it with a metal spatula.
- It is possible to speed up the washing of whitewash by applying special compounds, soda ash or whitewash.
- Layers of persistent paint or enamel coatings are removed with an angle grinder with an abrasive attachment.
- Wallpaper is removed by moistening and then scraping with a spatula.
- To remove greasy stains, you should use soda ash or laundry soap.
- To remove rust, it is good to use hydrochloric, sulfuric or phosphoric acid. It is permissible to use anti-corrosion agents produced for the car.
- White or yellow stains caused by salt deposits can be removed with organic acids.
- To eliminate mold and mildew, you can purchase an antiseptic for concrete.
- Removal of dirt and soot is done with laundry soap or bleach.
The final stage of preparation is washing and priming the surface. These works are required when filling joints and sealing holes.
How to seal slab joints and rustications
When plastering a concrete ceiling made of reinforced concrete slabs, the main problem is sealing joints and rustications - recesses at the joints. They are sealed a few days before the general plastering of the ceiling begins - it is necessary for all the materials to “set”.
First, everything that comes out is removed from the joints. Then, with a brush, everything is cleaned of dust and sand. The prepared joints are coated with a primer. Most often they recommend “Betonokontakt”. This treatment significantly reduces the possibility of peeling off the applied plaster layer. If this option is not suitable for some reason, you can use any deep penetration impregnation, but the effect will not be the same.
Such seams on the ceiling are not uncommon.
After the impregnation has dried (24 hours from the date of application), the solution is applied. If a layer of more than 30-35 mm is required, it is better to apply it in two layers. Having laid the first one, a relief is formed on it with a notched trowel. A day later, when the solution dries, apply a second layer. It is already leveled with the ceiling.
With a large layer of plaster, the joints of the slabs are sometimes reinforced with a layer of painting compound. It is needed so that during seasonal movements of the slabs, cracks do not appear at the seam. It is unlikely that anyone will nail the mesh to the ceiling; it is usually simply attached to the composition. In this case, after applying the first layer of plaster, a strip of polymer plaster mesh is laid, a notched trowel is passed along it, deepening it into the solution and, at the same time, forming a relief for applying the second layer.
When applying plaster in two layers, a relief is formed on the first
Sometimes the rust (crack in the seam) is very deep and it is not possible to repair it with mortar. It is also pre-cleaned of crumbling parts and sand and treated with “Betonokontakt”. Afterwards there are two options:
- Seal with polyurethane foam. We put it a little, about 1/3 of the volume of the gap, having previously moistened the walls generously with water (needed for normal polymerization of the foam). We leave it for a day, after which we cut off the foam so that at least 1 cm of plaster fits into the seam. Afterwards, we prime and apply the plaster in two (or three) layers. Holding a can of foam near the ceiling is inconvenient; you can put a piece of hose on the “spout”
- Take a rag, moisten it with Betonokontak, and hammer it into the crack. Leave to sit, then plaster.
The question may also arise about how to seal the joints of the slabs on the ceiling. Usually one of the compositions with polymer additives is used, and you can also use a good tile adhesive. It also contains a considerable amount of polymers. They say that after such sealing the joints do not crack.
This is what a sealed seam on the ceiling looks like
How to level a defective concrete ceiling?
Leveling the ceiling with your own hands begins with sealing the rust. The gaps in the joints of the slabs are filled to the maximum depth with polyurethane foam, the excess of which, after curing, is cut off with a stationery knife, going 2-3 cm into the seam. A layer of basic cement-based leveling mixture is applied over the cut of the polyurethane foam. If the ceiling plane is flat and has no differences, then after the composition has cured in the sealed rusts, the ceiling is waterproofed, and then the finishing putty is applied with a gypsum-based composition, preferably with preliminary reinforcement over the seams with sickle tape.
The number of layers depends on the skill of the performer; usually two layers are applied - the second after the first has cured. Then the surface is sanded, cleaned of dust with a vacuum cleaner and coated with a primer.
If the ceiling slabs have differences in height, then the amount of leveling work increases significantly. In this case, the range of the magnitude of the differences is important, since the solution to the question of what exactly and what mixture to level the ceiling with depends on it.
You need to proceed from the fact that leveling ceilings using the wet method is carried out with differences in height up to 50 mm - a layer of plaster of even less thickness, made with violations of technology, poses a danger to life if it peels off and collapses.
Plastering ceilings with cement-sand mortar requires professional skills - applying freshly prepared mortar to the ceiling base and fixing it to it is difficult, and the slightest deviation from the recipe or the correct execution technique leads to the mixture falling. Therefore, taking on this work on your own without practical experience is a fool’s errand. And with differences in height up to 30 mm, leveling the ceiling with your own hands is quite possible - the characteristics of special mixtures based on cement or gypsum simplify this operation.
Marking the horizontal plane of the ceiling
Under the ceiling surface, a horizontal plane must be designated, to the level of which all base points must be lowered. To do this, first of all, determine the lowest corner of the ceiling. The easiest way to do this is with a laser level - the device is placed in the center of the room, leveled and, rotating it in a horizontal plane, one mark is made on the vertical corners of the walls of the room. Then measure the distances from these marks to the ceiling and select the smallest value - at this level the new ceiling plane should be located after leveling.
In the absence of a laser level, horizontal marks along the perimeter of the walls under the ceiling can be set using a transparent flexible hose with water - if you fill it with water, then, according to the law of communicating vessels, the liquid levels at the ends of the hose will be located at the same height.
Holes are drilled along the perimeter of the walls at the top and self-tapping screws are screwed in at 0.5 m increments, along which control cords are pulled along and across the room, forming the plane of the future ceiling.
Important! If any section of the ceiling surface is located below the level of the cords, then it must be cut off with a grinder with a cutting disc or all control cords must be lowered to the required amount.
Having the outline of the future area, measure the maximum thickness of the layer required to be applied to level the base. If this value is from 30 to 50 mm, then, as mentioned above, it is better to entrust this work to professionals who will plaster the ceilings with cement-sand mortar. If the layer does not exceed 30 mm, then you can level the ceiling in the apartment yourself using cement and gypsum mixtures.
Construction of control beacons
It is better to make a layer with a thickness of 20 to 30 mm from a cement-based mixture, laying it on a reinforcing steel mesh, fixed to the ceiling with staples or secured with self-tapping screws. The reinforcement will prevent the layer from collapsing even if it detaches from the base due to some factors.
Beacons are installed on top of the mesh - rows of cones made of cement mixture with a height equal to the distance to the cord in this place. After the cones have hardened, they are connected with the same mixture in such a way as to create even and smooth guides for the rule, which will remove excess of the subsequently applied composition.
The leveling composition prepared according to the instructions is applied to the base with a wide spatula, if necessary, in layers, after the mixture of the previous application has cured and dried. In this case, the surface of the previous layer must be “combed” before setting - run over it with a notched trowel to create a profile to which the next layer will adhere more firmly.
Important! You cannot speed up the curing and drying process of plaster or putty on the ceiling by creating a draft or increasing the temperature in the room.
After completely filling the gaps between the guides, excess plaster is removed by running the rule over a fresh, slightly set layer - the device is moved along the guides, pressing against them and at the same time performing movements in transverse directions. The sinks remaining after the rule are filled with the same solution and grouted.
Leveling the ceilings is completed by applying finishing putty - this is done in two or three layers with intermediate drying and removal of convex marks from the movements of the spatula. Then the surface is sanded with sandpaper secured to a flat block or a special holder. The sanded base is primed with one of the hydrophobic compounds, after which it dries, the surface is whitewashed or decorated with decorative tiles.
We use drywall
The level of the ceiling base is determined. For greater accuracy, you can use a laser or water level. Marks are applied to the walls with a pencil or a special marker.
According to the marks on the walls, a frame system of profiles is mounted. The design of the frame system depends on the chosen ceiling design and its complexity. Ceilings made of plasterboard or gypsum fiber can be simple, multi-level or combined (with tension, mirror or glass systems).
Particular attention should be paid to the technical characteristics of the system
The frame is sheathed with sheets of gypsum fiber or plasterboard. The resulting technological seams between the sheets are covered with a special putty for tightness. A sickle bandage is glued to these seams, then putty is applied again. After waiting for the putty to dry, sand it well.
A number of nuances that everyone should know
As we mentioned earlier, if you decide to line the ceiling with plasterboard or any other material, then in this case there is no need to think about how to putty the seams on the ceiling. However, this method of getting rid of ceiling unevenness is not highly reliable, so it is better to choose materials that are best suited for this type of work. Expanding cement, for example, is suitable.
Before sealing ceiling joints with cement, you will need to acquire the following materials:
- NTs grade cement is used for sealing deep joints. This material is capable of expanding during the process of its hardening, which leads to filling the entire space of the gap between the plates.
- To eliminate fairly wide seams, insulating materials with satisfactory density will be required. Quite often, polyurethane foam is used as such a material.
- Elastic, starting and finishing putty.
- Polyurethane foam will be necessary to eliminate wide cracks. This material adheres well to the primed base and, after expansion, can completely fill the gap.
If, after cleaning the surface, you find a very narrow and, at the same time, deep joint, then you will need to carry out a number of such actions. Having chosen a sealing material of suitable thickness, take the sealant and apply one layer of this composition to one of the sides of the seal. Next, such material is pushed into the gap between the plates with a spatula, and care is taken to ensure that there is room left for further filling with any mixture.
This is one of the methods for deciding how to seal the seam on the ceiling between the slabs. It is similar to the technology by which tiles are laid on an adhesive mortar, only in our case, expanding concrete is used. The cracks are closed with such a solution, with the obligatory leaving of small recesses, since the material we use has the property of expansion. In addition, decorative plaster will be applied at the end.
Coating the joint with elastic putty begins after the solution has completely hardened and the groove is prepared for the next finishing step. To carry out the above work, it is best to use not one spatula, but several, having a working surface of different widths. This will make the workflow easier to some extent.
A large spatula is needed for scooping up putty from the container, and a narrow one is used to remove the putty little by little from the large spatula and apply it to the seam being restored. Thanks to this process, it is possible to completely align all the cracks with our ceiling.
At the same time, do not forget about the timely removal of excess putty. Next, it is necessary to reinforce the working areas. At the final stage, after all the seams have been restored, it is strongly recommended to putty the entire ceiling to achieve maximum evenness of the entire surface.
Now we can assume that the question of how to seal the seam in the ceiling has been resolved. If all the work is carried out according to the technology specified by us, the ceiling will delight you for a very long time.
https://youtube.com/watch?v=v6UT7tJufkw
Types of ceiling bases
In modern housing construction, the most common are beam or beamless reinforced concrete floors, which can be of the following design:
- monolithic;
- prefabricated;
- prefabricated monolithic.
There are other technological solutions - arched brick, hipped, wooden and other structures, but homeowners are much less likely to encounter the problem of leveling such foundations.
Monolithic floors are made by pouring concrete into formwork with reinforcement installed locally - in the interfloor plane.
Prefabricated roof structures are made from ready-made reinforced concrete slabs (hollow or monolithic), mounted end-to-end on beams or load-bearing walls.
Prefabricated monolithic floors are a relatively new technology that consists of installing hollow aerated concrete blocks end-to-end between beams, on top of which cement mortar is poured, connecting the structure into one whole.
Each method has both certain advantages and disadvantages, which must subsequently be neutralized.
Where do the irregularities come from?
Irregularities can arise due to slabs that lie one higher and the other lower, deep seams are formed at the joints, and the horizontal plane of the future ceiling is disrupted. This problem is relevant for residents of Khrushchev.
In modern houses, monolithic concrete is often used instead of floor slabs. But even in this case, defects arise: seams, concrete sagging in places where the formwork sheets are joined, the formation of “sinks” on the ceiling surface or horizontal slopes due to unevenly aligned boards.
If you do not level the ceiling, the defects will be noticeable, and further finishing will only worsen the flaws.
We clean the entire ceiling from old putty and prime it
Yes, you will now have to start cleaning the rest of the surface. If you want the end result to be a smooth and decent ceiling, then don’t even dream that you can “patch it up” partially.
First, try using a spatula to dryly chip off the old putty. If it comes off well, then continue, step by step.
If she doesn’t want to lag behind, you will have to thoroughly moisten the ceiling with warm water and wait until the coating softens somewhat.
Don’t think that the putty will actually soften, it’s not whitewash. But still, it will become a little more pliable and it will be easier for you to deal with it.
After you complete this most disgusting and time-consuming process, pick up a wire brush and thoroughly scrub everything clean. And the ceiling surface and cracks.
Then dilute the primer in the same way as it is written on the package and thoroughly “walk” along the ceiling. In principle, the primer is already sold in liquid form and is diluted solely for the purpose of economy.
If you don’t want to save money, then you don’t even have to breed. After all, primer is very inexpensive.
When you complete this procedure, leave the ceiling for five to six hours to dry completely. There is no need to rush, even if the ceiling looks completely dry. Do not forget that the primer penetrates deep into the concrete and you simply cannot see that it is damp inside.
And this moisture will not allow the materials to “grab” well.
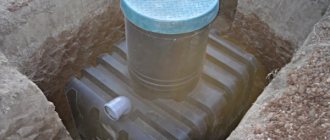
Seal a hole in the ceiling
Sometimes it happens that when cleaning a seam from old mortar, not just a narrow gap opens, but a large hole - a defect in the floor slab. In this case, this hole can be sealed in two ways.
Sometimes such a “surprise” may appear on the ceiling when cutting seams.
In any case, the first thing to do is to thoroughly clean the inside of the resulting hole. This process is best done with a narrow brush.
1. Having freed the inside of the hole from dirt, it should be well sprayed with primer. After waiting for the first layer to dry, you need to apply the second.
- Next, the hole is filled with foam.
- Then, after it dries and expands, the excess is cut off, and a cone is cut out from inside the hole, at the base the size of the hole and 40 ÷ 50 mm high.
- This cutout is necessary to secure the cement mortar in it, which is applied in the next step. It is leveled with a spatula and left until completely dry.
- Then putty is applied to the place where there was a hole and around it 50-70 mm, and a sickle mesh is glued onto it, which is pressed into the applied layer of mortar, smoothed out and left to dry.
- Further work proceeds in the same way as when sealing seams.
2. Another method of sealing differs from the first, and it is used if a large void is found in the ceiling.
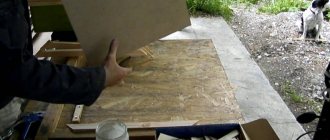
- In this case, you will need a piece of plywood (you can use laminate scraps) approximately 100 mm larger than the dimensions of the hole.
- Then, it is necessary to strengthen a wire grid in the hole, which must be secured to the sealant or cement mortar inside the hole. After the solution has dried, the wire must be securely fastened inside the opening. The grate will serve as reinforcement for the repair mortar, together with which they will create a kind of slab.
Filling a volumetric hole in the ceiling - approximate diagram
- The mixed concrete solution is laid out on the prepared plywood; it should be uniform and not overly thick.
- The plywood platform with the solution is lifted and pressed tightly against the hole so that the solution completely fills the remaining cavity. We will have to come up with a reliable support for this kind of formwork that will hold it until the repair composition dries completely. A thick branch, a block or a pyramid of a table and chairs is suitable for this.
- After the solution dries in the opening, you will get a perfectly flat ceiling surface.
- Next, you can begin work on tidying up the entire surface of the ceiling.
Video: sealing a volumetric hole in a floor slab
It should be noted that it is quite possible to update the joint between the plates yourself. But completely plastering the ceiling is quite a complex job, so it is better to entrust it to an experienced finishing craftsman. However, if you have the desire and confidence in your abilities, this is a completely doable task.
Method number 2. We install a suspended structure
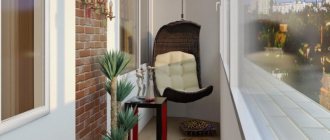
If you are lucky enough to become the owner of an apartment with high ceilings, then you can turn to modern design fashion technologies and construct a real installation in your apartment, hiding all the irregularities, deformations, beams and cracks under the suspended ceiling. This method not only allows you to remove all problem areas, especially pipes that cannot be dismantled, but also gives the room a sophisticated, sophisticated look.
Today there are a lot of wonderful projects that are pleasing to the eye using a suspended structure.
The first thing we need for this work is to prepare a project, a drawing, and, based on it, the required number of sheets of drywall, as well as sheet material (chipboard, plywood, aquapanel, etc.), screws and a screwdriver. To cut sheets of drywall, you will need a jigsaw and a tape measure for taking measurements.
We mark the frame of the future structure
In order for us not to be carried into the unknown distances of our imagination and not to spoil the work at the initial stage, it is necessary to mark the frame of the future suspended ceiling according to the principle of marking beacons.
Expert opinion
Kukushkin Anatoly Sergeevich
Repair specialist
Consider the thickness of the frame and retreat 5-10 cm from the protruding point. Don’t forget about built-in lighting if you plan to use it in your design. Under it you need to make cutouts on sheets of drywall.
We mark the guide profile along the entire perimeter of the walls. After you have figured out the marking of the guide profile, we proceed to marking the ceiling profile, which is done using a lathing onto which the plasterboard sheets are fixed. The structure is secured using hangers. And here we should dwell in more detail on the types of suspensions.
Suspensions can be straight or anchor. The former increase the thickness of the ceiling surface to 12 cm, the latter, including moving elements, are used to create complex structures, the thickness of which can vary from 10 to 25 cm depending on the shape of the ceiling relief.
We fasten the frame
- We arm ourselves with dowel nails or self-tapping screws and attach the guide profile to the wall with them. In this case, an important condition is to install hardware at a distance of 50 cm from each other. If we are dealing with loose foundations, then the placement of hardware is done at a distance of 25 cm from each other.
- After this part of the work is completed, it is necessary to mark the attachment points for the ceiling profiles. Having resolved this issue, we proceed to fastening the hangers, which are fixed to the base using dowel wedges.
- The next step is to support the ceiling profiles on opposite guides. This is the main profile. If the length of the profiles is not enough, simply connect two into one using a simple extension.
Do not attach the profiles too close to the walls, otherwise the base will deform due to temperature changes. The pitch of the profiles should be 120 cm, which is the same size as a sheet of drywall.
- Ceiling (load-bearing) profiles, pre-cut to the required size, are attached perpendicular to the main one. The step should be 50 cm.
- Every two ceiling profiles in a perpendicular direction are attached to each other with connectors, which in the construction world are called crabs. The entire structure is fixed using self-tapping screws.
Installation of drywall sheets and finishing touches
Installing the frame is the most labor-intensive process. Next, the frame is simply sheathed with sheets of plasterboard, and the main thing here is not to forget about the drawing and markings for lighting.
Also be careful that each new row is offset at a distance of half a plasterboard sheet.
After the frame is completely sheathed, you can begin the decorative part of the work. Typically, ceramic tiles, acrylic tiles (their advantage is light weight), foam tiles (their advantage is light weight and low price), or painting are used to cover drywall. Which method to choose is up to you.
Primer and reinforcement
Priming the surface is always the first step for those who are interested in leveling the ceiling. This will help secure the surface and rid it of residual dust. The adhesive properties of the plaster will not decrease.
Ceiling primer
However, a special reinforcing mesh should be used before starting work if the differences are 20 mm or more.
Painting, ordinary metal mesh and other types of material are available. The painting mesh is also called serpyanka. To fix it to the ceiling, use special glue. You can purchase material that initially has a self-adhesive layer. This solution would be appropriate for situations where the thickness of the plaster layer does not exceed 25-30 mm.
Serpyanka
Formation of beacons
Beacons help maintain a uniform level during plastering work. The installation step is usually made so that it is no more than the length of the rule (100 - 130 cm). Galvanized slats, wooden blocks or mortar can be used as beacons.
Before installation, the appropriate locations must be marked. For convenience, you can stretch strings in these places.
In the places where the beacons are attached, small piles of mortar are glued in increments of 30 cm. You need to use the composition of the mixture that will then be used to level the ceiling.
A galvanized profile or bars are glued onto the solution. You need to press in until the level of the beacon reaches the level of the mark.
If the solution itself serves as a beacon, then you need to lay it out in a long strip, and not pointwise. The correct installation is checked with a bubble level. This method is more difficult, since it is more difficult to form an even strip of solution.
Types of putty for ceiling work
There are two types of putties:
- starting;
- finishing.
The first is used to level out rough defects; it is laid in a thick layer. The second is intended for removing minor blemishes. Both types of putty are gypsum and cement. As mentioned above, it is better to purchase gypsum mixtures for finishing the ceiling with paint.
Regardless of the type and material of putty, they are prepared in the same way. To do this, simply add water to the dry mixture. But the proportions depend not only on the type, but also on the manufacturer of the putty, so you need to carefully read the instructions. After this, the resulting mass should be kneaded well. To do this, use construction mixers or a drill with a special attachment. Never mix using just your hands.
How to choose a leveling compound
When choosing a leveling composition, take into account the operating conditions of the room in which they plan to level the ceiling:
- Dry rooms. The use of putty mixtures on any basis, including gypsum, cement, polymer, will allow you to perform the work efficiently. It should be noted that cement ones are harder to apply and take longer to dry. At the same time, gypsum is more flexible, easy to sand, and dries in a short time. Polymer additives can improve the characteristics of materials.
- Wet rooms. It is not recommended to use gypsum, since hygroscopicity will provoke delamination of the monolith. For such premises, cement or polymer compositions are used.
- If it is not possible to independently mix the plaster composition from dry mixtures, you can purchase ready-to-use products. Preparation time will be reduced, but costs will almost double.
Examples of leveling compounds
It should be noted that at first a starting putty with large fractions is used. This will allow you to apply a layer of up to 50 mm in one pass without losing adhesion to the base surface. Finish the leveling with the finishing compound.
Main types of mixtures and their preparation
Do-it-yourself plastering is done by dissolving ready-made mixtures purchased in construction stores.
The choice of products is huge, so you need to know exactly which one is best to use so as not to provoke a collapse - yes, a poor-quality mixture or incorrectly applied plaster can simply move away from the wall.
This happens in case of a mistake, either immediately after application and drying, or after the wall is finished, which is typical when it freezes in winter.
To avoid such problems, you should study all possible types of plaster mixtures.
Gypsum and cement mortars are suitable for finishing walls, each of which, in addition to the main component, includes binders and secondary additives that perform one or another function. Mixtures in powder form are packaged in sealed bags, so their shelf life exceeds several years.
Gypsum mixture
It has a low cost, but at the same time a high adhesion rate. Adhesive properties are the degree of adhesion to the surface and rapid hardening.
Due to the presented indicators, this type of finishing is used to level ceilings. The composition of the gypsum mixture includes gypsum and fine sand. Sand makes it possible to achieve the most even, smooth surface, so these mixtures are used for finishing walls for painting or decorative treatment.
The advantages of the gypsum mixture are the following:
- the finished wall has good thermal insulation;
- gypsum can absorb excess liquid and then repel it;
- plaster is excellent for residential premises where a constant microclimate is maintained;
- gypsum mixture can prevent the spread of bacteria and fungi.
Gypsum-based plaster hardens quickly, so special substances are added to it to prolong this process.
Cement mixture
Its basis is cement, but for better adhesion and quality of installation, sand or crushed limestone is used.
Sand can be of a coarse fraction, it all depends on the amount of added limestone and cement in general.
It is not recommended to use cement due to its long hardening time - more than 2 weeks. But for bathrooms and other rooms where a constant microclimate cannot be maintained, cement mortar is indispensable.
Plastering walls can be done with other compounds that are easy to make yourself. The proportions of the mixtures are presented in the table.
| Type of plaster | Compound | Mixing proportions |
| Cement | Cement: sand | 1 : (2,5-4) |
| Cement-lime | Cement: lime paste: sand | 1 : (0,3-0,5) : (3-5) |
| Lime-gypsum | Lime paste: gypsum: sand | 1 : (0,3-1) : (2-3) |
| Cement-clay | Cement: clay: sand | 1 : 4 : 12 |
If there is no exact data on the proportions of mixing the main substances to create a certain type of plaster, it is better to purchase a ready-made package. Manufacturers always indicate the features and characteristics of their products.
The best prices for popular types of putty for walls and ceilings
If the master determines which putty is best for the ceiling, then you should pay attention to the following materials:
- Polymer mixtures
Weber-Vetonit grades LR or LR Plus(the average price for a bag weighing 20 kg is 630 rubles, excluding delivery). The fraction size is 0.3 mm, which allows you to obtain a smooth surface; the applied putty is ready for sanding after 12 hours. The mixtures are intended for interior work, the average consumption is 12 kg/m² with a layer of 10 mm.
- Cement mastic
"Terraco Hendicoat" All-Purpose, supplied in 25 kg buckets (price from 950 rubles). The material is intended for sealing cracks and leveling irregularities (layer thickness up to 2 mm).
- Gypsum finishing
Knauf "Rotband Finish"(the price of a bag weighing 25 kg starts from 385 rubles). The mixture contains polymer additives that increase resistance to water and cracking. Forms a smooth surface, the solution is classified as environmentally friendly. Manufacturer Knauf offers a special gypsum-based material Fugen for sealing joints between plasterboard sheets (price from 246 rubles for a paper bag weighing 10 kg).
The choice of finishing material remains with the owner of the apartment (residential building) or the craftsman performing the puttying of the ceilings. You should purchase the mixture with a reserve of 10-15% (for example, in case of defects or the need to seal detected cracks). Novice craftsmen can hide defects remaining due to low qualifications using a textured paint coating (for example, Roll & Kellenputz from the manufacturer Farbe).
Leveling the ceiling surface
To understand how smooth the ceiling surface is, they use different measuring instruments, but you can also use traditional methods. Who chooses what is a matter of habit.
1. Some craftsmen mark the ceiling with “beacons” - ordinary nails that are driven in in different places so that the heads are in the same (horizontal) plane.
A thread is pulled between the caps, along which the surface is leveled. The task is to seal the gaps between the thread and the ceiling. 2. Others level the ceiling with a water level, which works on the principle of communicating vessels. Two transparent test tubes with divisions (marks) are connected to each other by a hose.
Water is poured into the device and applied to different parts of the ceiling: if the plane is flat, then the water level in the test tubes is the same. If the ceiling is higher in some place, the water level in one of the test tubes will be lower. 3. There is another option when the ceiling surface is marked with a high-precision laser system. This is an automatic rotating laser that marks vertical and horizontal lines.
In any case, before marking the ceiling, it must be cleaned of the old coating (down to concrete) and only then repairs can begin.
And further. In order for the ceiling to be “in full view”, it is necessary to illuminate the room with spotlights, which are placed in the corners of the room. Then all the unevenness of the ceiling will be visible especially clearly.
Frameless cladding
Finishing with polymer tiles
This type of work allows you to create an excellent decorative surface and at the same time successfully hide minor defects in the ceiling. If the surface is fairly smooth, then the tiles are mounted with glue; in case of visible unevenness and imperfections, experts recommend using gypsum mortar.
Various types of ceiling coverings are used for finishing work:
- polymer tiles. The main advantage of the finishing material is the lightness of polystyrene, ease of installation and low cost. Professionals advise starting to install tiles from the center of the ceiling. Most often, a ceiling lamp is installed in this place. If there is no central chandelier in the room, the finishing material can be glued from any angle;
- gypsum tiles. This type of finishing is particularly aesthetically pleasing and safe. Designers use beautiful tiles made of snow-white gypsum when creating luxurious classic interiors. The artistic covering looks most advantageous in a spacious living room, bedroom or office.
By using unusual coffered ceilings when decorating ceilings, you can most successfully disguise all unevenness or visible surface defects.
Gypsum tiles for ceiling
Advantages and disadvantages of the selected ceiling leveling options
The main advantage of the first option is, of course, the relative cheapness of the work, the use of fewer materials and tools.
The disadvantage of this method is that it is labor intensive and dirty work associated with dust and various mixtures.
Suspended ceilings made of plasterboard or metal are more attractive in terms of modern design. They are able to hide the largest differences in the ceiling surface and require less time to complete.
The disadvantage of such ceilings is their higher cost, the presence of more tools and a lower ceiling height in the room. With this option, the room loses at least 5 cm in height.
The choice of repair method is up to you. Choose, count and get started.
Repair process
Any repair is preceded by preparatory work, including the selection of the necessary tools, available devices and protective equipment, the organization of lighting, and the purchase of necessary materials.
Work execution algorithm
After the applied primer has dried, we measure the gap between the PP and determine the materials that will be needed to seal it and their quantity. Next we do the following:
To fill the seam, you can use plaster based on either gypsum or cement. The finished solution should have a creamy consistency. If the gap is shallow and not wide, then the plaster can be applied in one layer (after wetting the groove with water). If the seam dimensions are larger, then we fill it in several stages. Moreover, we apply each subsequent layer only after the previous one has already dried.
On a note! To prepare the mixture, it is better to use tensile cement (NC). Of course, it is 20 percent more expensive than Portland cement, but it differs in that its use promotes rapid hardening and expansion of the concrete solution (thereby improving adhesion to the floor slab).
To seal a deep and wide seam, you can use polyurethane foam (it is applied to a pre-wetted surface in small portions), the excess of which, after hardening, is cut off with a construction knife. If the gap is narrow and shallow, then a polyethylene foam roller is suitable for sealing it. After the elastic materials have been laid in the seam, we lay a layer of plaster (for example, gypsum) on top of them.
Regardless of what materials you choose to seal the seam, the subsequent stages of work are identical:
We embed a painting fiberglass mesh (that is, serpyanka) into the still uncured plaster layer, the use of which prevents cracking of the material used after drying. We smooth out the reinforcing tape with a spatula so that a small depression remains in the sealed seam (this is necessary for better adhesion with subsequent decorative finishing).
On a note! To make laying the serpyanka easier, you can cut it into small pieces. They must be overlapped (its value is 10 mm).
- After 3 days (when the material placed in the gap has completely dried), we wipe the entire surface of the ceiling with a rag soaked in water. We are waiting 24 hours.
- Next, using a spatula (preferably a wide one), apply a layer of starting putty to the ceiling surface (its thickness is 2-3 mm). We leave it to dry.
- We level the ceiling surface using an abrasive material (having a medium grain) applied to a paper base (that is, “sandpaper”).
- Apply a layer of finishing (leveling) putty.
- After it has dried, we sand the surface of the ceiling using fine-grain sandpaper.
We are painting the ceiling.
Necessary tools and equipment
The ceiling is treated before painting using the following tools:
- safety glasses that will prevent small particles from getting into the eye;
- respirator to protect the throat and lungs from caustic dust;
- thick clothing that will protect you from getting washed-off whitewash on your skin;
- a stepladder or table on which you can stand confidently;
- poppet, roller with long and short handles;
- For hard-to-reach places, use a brush;
- construction mixer or regular drill with a mixing attachment;
- various spatulas;
- hammer;
- knife;
- rule;
- Master OK;
- water container;
- sandpaper for the ceiling for painting, a grouting sponge or sanding mesh.
Alternative ways to level the ceiling in an apartment or house
In addition to the methods described above for solving the question of how to level a ceiling with your own hands, there are other methods - there are many of them. There are exactly as many options for suspended ceilings as there are - Armstrong, Grilyato, rack systems, plastic PVC panels. It would take a relatively long time to list them, but you just need to understand that not every suspended ceiling is suitable for use in residential premises.
The best option for leveling floor slabs is suspended ceilings. It would be more accurate to say that they do not serve to level out, but to hide all existing flaws. If we talk about them and conduct a comparative analysis of the quality and cost of this type of ceiling finishing, then we can safely say that stretch ceilings with excellent quality are cheaper than plasterboard ceilings with their subsequent puttying and painting.
How to level ceilings in an apartment photo
In general, when approaching the question of how to level the ceiling, you need to take into account many factors and choose the necessary method based on them. This very choice can be influenced by literally everything, from the interior of the room to its technical features and, of course, the taste preferences of the owners of the living space.
Author of the article Alexander Kulikov
What is the need for repairs?
The need to repair concrete ceilings can be caused by anything. These include natural disasters, prolonged exposure to high humidity or vibration, and manufacturing defects when the thickness of the protective layer on the floor slabs is too small and the reinforcement is exposed. And in general, certain violations may also be committed during the construction of a building.
Damaged finish indicates the need for serious repairs
Possible defects
One way or another, over time, a concrete ceiling may acquire the following defects:
- Its overall structure is loosened, which entails a decrease in the strength of the stone;
- Destruction of the surface layer or its detachment from the reinforcement;
- The appearance of cavities, loose fragments and voids on the concrete surface;
- The formation of not only surface, but also through cracks;
- Corrosion of exposed embedded parts and reinforcement.
Note: When it comes to prefabricated slab floors, this list also includes such defects as the presence of joints, which can be quite wide, differences in the surface of adjacent slabs, as well as spalling of the sealing mortar from technological holes.
Other ways to level the ceiling
Modern technologies make it possible to level the ceiling in other ways. Suspended and stretch ceilings are in great demand. When wondering how to level the ceiling in an apartment, ordinary people choose one of these options.
Suspended ceiling
The technology for installing a suspended ceiling is the same as for installing plasterboard slabs:
- Suspensions are attached to the rough surface, which will support the frame made of metal profiles.
- Decorative panels are attached to metal profiles. They can be made of a variety of materials - metal, chipboard, polymer materials, mineral fibers.
The advantage of a suspended ceiling is that there is no need to level it with putty, like plasterboard. Also, subsequent decorative finishing is not required, since the finishing material is already attached to the frame. The disadvantage of such ceilings is their high cost.
The choice of finishing material depends on what functions you want to achieve in the end.
Therefore, pay attention to the following characteristics:
- breathability;
- soundproofing;
- thermal conductivity;
- moisture resistance.
It is worth remembering that suspended ceilings, like plasterboard, will reduce the height of the room by about 0.2 m.
Stretch ceiling
Such ceilings are an alternative and main competitor to suspended ceilings. An excellent option for getting a flat ceiling in a room. Installation of a stretch ceiling is possible only with special tools. If you are faced with the task of how to level the ceiling with your own hands, then this method is unlikely to work. Stretch ceiling installation technology:
- A baguette frame with a polyvinyl chloride sheet inserted into it is installed around the perimeter of the room.
- It is heated using a heat gun or hair dryer.
- When heated, the fabric sags. As it cools, it stretches, forming a perfectly flat surface.
The advantages of such a ceiling are quick and easy installation, a variety of colors and textures, and versatility of use. The disadvantages include the difficulty of self-installation.
The choice of color and texture of a stretch ceiling depends only on personal preferences and financial capabilities.
Leveling the ceiling with plastic tiles
Another way to level ceilings is to install strip or rectangular plastic tiles. The essence of the principle is the same - creating an additional shell below the ceiling that will hide defects in the load-bearing base.
The technology for laying tiles is similar to installing drywall:
- preparation of the base;
- frame installation;
- laying tiles.
In this case, the edges of the tiles are made with a locking device, eliminating the need to putty them after installation.
It is not difficult to cover an uneven ceiling with plastic tiles even on your own - by analogy with plasterboard, a frame is mounted, which is more conveniently made from wooden blocks - the tiles are attached to it with small nails driven into the underlayer.
The advantages of this method are that PVC tiles are not afraid of water, are easy to maintain on a daily basis and are available in a wide range of prices.