The issue of expanding the living space is often solved by constructing an additional extension, which, depending on the wishes of the owners of the house, can be a living room, an open veranda, a summer terrace, a boiler room or a bathroom. When arranging such premises, homeowners prefer frame structures that are easy to install and light in weight. In this case, the easiest way is to install such an extension to the house on screw piles. In addition, the homeowner is attracted to the cost savings when using this technology.
How to make a foundation
There are built-in and attached verandas.
- The built-in veranda is being built together with the house, so it is built on a common foundation.
- For the attached veranda, a separate foundation is made, maintaining a gap of 40 mm from the wall. If this is not taken into account, when the new foundation shrinks, the foundation of the house will collapse.
Selecting a base type
When planning the foundation, the seismicity of the soil, the total weight of the structure and other parameters are also taken into account. If mistakes are made at the planning stage, the extension may move away from the overall house.
To build a foundation, you can use the following materials:
- wooden, metal or concrete piles;
- concrete;
- stone;
- brick.
To build a frame extension to a house with your own hands, you can choose one of the following types of foundation:
- slab;
- tape;
- pile;
- columnar.
Typically, strip and column foundations are used for verandas in private houses.
Strip foundation
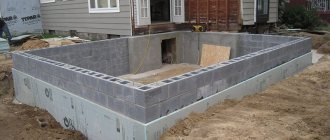
If the additional extension is heavy, you need to choose a strip foundation made of concrete. Do it as follows:
- The area where the trench will be dug is marked with twine, and it is secured in a taut position with pegs.
- They begin to dig a trench, cover its bottom with sand, then lay some crushed stone, which is compacted. They make formwork whose height is equal to the height of the base. Waterproofing is laid inside along the perimeter, and pre-prepared reinforcement is laid directly on the crushed stone.
- Prepare a concrete solution using proportions of 1:3:6 for cement, sand and crushed stone, respectively.
- The resulting mixture fills a third of the formwork and waits for it to harden. Next, fill the remaining volume. To compact concrete, a vibrator is used to remove remaining air. You can also periodically hit the formwork with a hammer.
- To ensure that the upper part is level, it is poured level and then covered with film. The surface must be wetted periodically to avoid possible cracks.
Columnar foundation
If you build a frame extension to your house with your own hands as a light veranda, you can save on the foundation and choose a columnar option. Not only concrete is suitable for it, but also brick, rubble stone or a combination of both.
The operating algorithm is as follows:
- They dig deep holes for the pillars, the distance between which is 60 cm. The shape of the holes is square, size - 50x50 cm.
- The bottom is covered with sand.
- A small layer of concrete is poured onto the sand and waited for it to set.
- Then brick pillars are erected. The masonry must be perfectly level, so it is checked by level.
- Concrete supports are made similarly to a strip foundation, but only in the form of pillars.
- When the structure has completely hardened, the formwork is dismantled and then waterproofed, for example, with roofing felt.
- If there are any voids left in the holes, they are filled with crushed stone and soil, and compacted tightly.
The optimal height of the posts is considered to be one that provides a distance of 30 cm from the ground to the finished floor.
Features of a frame-based extension
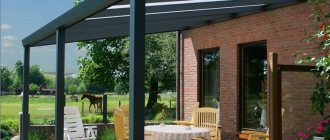
A veranda is most often added to private houses. Its design can only consist of a wooden frame, half-walls, supporting pillars on which the roof is supported, and flooring. Accordingly, such an extension without windows and doors.
But when building a veranda, some people want to get a full-fledged living space. In this case, walls are erected from floor to ceiling, doors and large window blocks are installed.
Regardless of which veranda (open or completely enclosed) the owners attach to their own home, the foundation of the building requires mandatory waterproofing.
If it is planned to equip a living room, kitchen or bathroom in an additional extension, then all surfaces are waterproofed and insulated. Communication systems are laid even before the construction of the foundation of the building.
A frame extension to a country brick residential building does not require the use of expensive building materials and the construction of a massive foundation base.
The technology for constructing such extensions is quite simple. There are two options for assembling structures: frame-panel and frame-frame. It is not difficult to create a frame project and accurately calculate its dimensions for the foundation. Therefore, owners of private houses, if desired, can do this themselves, saving on the services of a specialist.
Frame structures made of wood are lightweight, so they can even be used to add a second floor to a building. They will not create a significant load on the first floor.
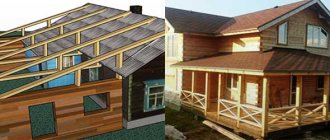
Roof
The roofing material is selected based on the financial capabilities of the homeowner. The optimal raw materials today are corrugated sheets or metal tiles. The cheapest material is slate sheets or roofing felt, but these materials are used only in non-residential premises
It is worth paying attention to the roofing material with which the general roof of the house is laid, so that there is no inconsistency, and in general, have a beautiful aesthetic appearance of the building
Construction begins with the installation of rafters, one end of which rests on a horizontal beam attached to the wall, and the other on the top frame. It is advisable to think about the angle of inclination at the design stage. The rafter legs must protrude beyond the wall by at least 30 cm.
Adviсe
Many owners of summer cottages and private houses who have encountered the process of doing a frame extension with their own hands leave their reviews, share secrets and give useful advice.
Pay attention to the correspondence of materials with the overall structure. If the house is wooden, then it is advisable to also construct the extension from wood
If the house is brick, then when finishing it is better to make brick cladding. Thus, the building will look harmonious. Consult with professionals or summer residents with extensive experience in construction to calculate the future extension. Don't skimp on materials.
From all of the above, it is clear that the construction of a frame extension is possible with your own hands without the involvement of specialists. The main thing is to have basic carpentry skills and a great desire to build.
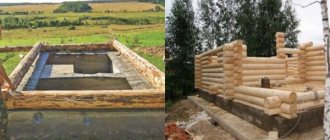
An example of the foundation of an extension on screw piles
Before starting work on laying the pile foundation of the extension, you need to know on what foundation the house is built. What is it for? Different types of foundations behave differently during operation. A strip foundation will settle less than a pile foundation or vice versa.
Extension on screw supports
Therefore, if the house and the extension have different types of foundations, then expansion joints are installed in the places where the structures of the house and the extension adjoin. That is, a small gap is left between the pile foundation grillage of the extension and the base of the house. Expansion joints are covered with strips, both outside and inside the house and extension. Otherwise, this is fraught with the appearance of cracks and destruction in places where the extension adjoins the house.
When the house and the extension stand on screw supports, the grillages of both structures, like the rest of the structure, are connected into a single whole.
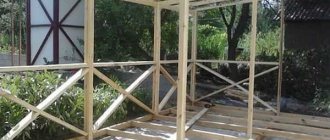
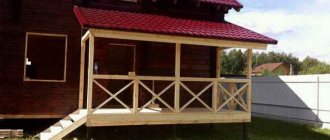
Construction process
So, a small house stands on screw supports, the developer decided to attach a veranda to it.
The support centers are located in the corners of the extension, under load-bearing walls and in centers of load concentration (for example, under a summer stove). Piles are placed in increments of 1.5-2 meters. In a site with installed supports, the verticality of subsequent piles is controlled.
After installing the supports in the design position, the tops of the piles are marked for cutting with a grinder to one level.
The depth of soil freezing reaches 0.7 m. Groundwater is located at a depth of 2 meters. Taking into account the small load from the weight of the extension structures, screw piles with a diameter of 100 mm, a length of 1200 mm with a sharp end and blades 60 mm wide are used.
The pile is screwed in by two workers using a pipe threaded through a hole in the top of the pile. If the process of immersing the support is difficult, then pieces of pipe of larger diameter are put on the ends of the lever. During rotation of the pile, it controls the verticality of its immersion. The supports must protrude at least 150 mm above the ground.
We recommend watching a video showing in detail the entire process of installing supports.
The support pipes are filled with concrete mixture. As the pile is filled with concrete, it is compacted with a pin in the form of a piece of smooth reinforcement or other available tools.
Grillage arrangement
To connect the supports with the grillage, a piece of metal pin with a thread at the end is immersed inside the pipe. After the concrete has hardened, they move on to constructing a grillage.
Often the grillage is made from wooden beams. Studs are threaded into the holes of the timber and secured with nuts. The upper structures of the extension are attached to the wooden grillage.
Watch the video on how to properly arrange a grillage with your own hands.
The supports of the support are formed depending on the structure of the grillage. If the grillage is made in the form of a frame from a channel or angle, then a metal plate is welded to the upper end of the support. The plate is positioned in such a way that there is play for centering the grillage elements.
The foundation on such supports is laid for light buildings. Stone, brickwork or precast concrete extensions require a foundation of a more powerful structure.
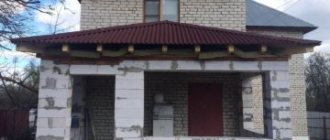
Construction of a brick veranda
Starting with the forcing of the walls, the process of constructing a brick veranda is somewhat different from the construction of a wooden terrace and consists of the following steps:
- The first step is to choose the type of masonry. The most popular are: spoon, in which the thickness of the walls will be 12 cm, pinned, with a wall thickness of 25 cm, and chain, with walls 38 cm thick.
- Next, at the edges of the base, on opposite sides of the foundation, a cord is attached along which the corner bricks are placed.
- The empty space formed in the corners between the bricks is filled with brickwork, fastening the elements with cement mortar.
- Using a laser level, the first row of masonry is carried out. In the future, the surface is also constantly checked with this device.
- Upon completion of the masonry, a reinforced belt is installed. To do this, formwork with a height of at least 7 cm is fixed on top of the brickwork. Anchor bolts are placed in the corners and reinforcement is laid. At the end, the entire structure is filled with cement mortar.
- After the concrete has hardened, the strapping is made using a beam with a cross-section of 100×100 mm.
The next stage will be the arrangement of the rafter system. If the veranda is intended to be used all year round, including in winter, it is recommended to lay it in 2 rows. Adding a veranda is a fairly reasonable decision for owners of private houses.
After all, such a building can not only expand the area of the room, but also give its appearance exclusivity. Moreover, a wide selection of designs and materials makes it possible to carry out the entire process independently, with your own hands, without requiring special construction skills.
In what cases is a pile-grillage foundation necessary?
If the heads of the supports are tied with an additional horizontal beam or grillage, such a foundation is called a pile-grillage foundation. It is made from rolled metal, wood, and reinforced concrete. Its purpose is to evenly distribute the weight of the building across all supports. It complicates and increases the cost of building a foundation, but makes it more reliable and durable.
A grillage is justified when building an extension on screw piles to a brick house, especially if the extension is also planned to be made of brick.
The technology for constructing frame houses provides for uniform distribution of the mass of the structure on the foundation, so the construction of a grillage is not necessary. Wooden houses and log houses have a similar scheme.
Advantages and disadvantages of pile construction
Installation of piles can be carried out manually.
An extension to a house on piles has a number of significant advantages over similar structures based on other types of foundations.
- Construction of the extension can be carried out at any time of the year.
- When arranging pile structures, there is no need for excavation work.
- The construction of pile extensions is carried out in a very short time.
- Extensions on stilts can be built on almost all types of soil. The only exceptions are rocky and coarse soils, as well as soil densely saturated with stones (crushed stone, pebbles, gravel).
- Precise adherence to the technology of laying a pile foundation ensures long-term and trouble-free operation of the extension.
The disadvantages of the design of a pile extension include the need to install an insulated base and the possibility of corrosion of metal pile supports.
How to make a foundation for an extension to a house - step-by-step diagram
Step 1: Selecting a Base
The new foundation must fully correspond to the type of the previous foundation. In addition, the load and soil type are taken into account. For example, if we are talking about a massive extension to a brick house, then it is necessary to lay a strip or make a pile foundation. But if the additional room is adjacent to a wooden dwelling, then it is possible to get by with a cheaper columnar option.
Step 2: Calculations
Regardless of whether you choose a rigid connection type or a separate foundation, the depth and width, as well as the dimensions of the foundation pillars, if any, should be the same as those of the foundation of the house. Determining these parameters is quite simple. It is necessary to dig a hole next to the wall of the house and measure the dimensions of the base.
If there should be no questions about how to measure the depth of the structure, then to measure the width, you should take a rod, bend one of its edges 90° and insert it in a horizontal position under the foundation. Then we turn the rod until its bent part rests on the reverse side. After this, you need to make a mark on the rod and pull it out. By measuring the distance from the hook to the mark, we know the width.
Step 3: Preparatory work
Before pouring the foundation for the extension, it is necessary to carry out preparatory work. If you decide to give preference to a rigid connection, then we dig a trench of the given dimensions and drill holes in the existing base. Moreover, their diameter must exceed the thickness of the reinforcement.
Metal rods should also be prepared. It is necessary to make a longitudinal slot at their end and insert a special wedging insert into it.
Step 4: Frame Formation
We drive the reinforcement with wedges into the prepared holes. The number of rods is taken at the rate of 20 pieces per square. In this way, the frame of the future foundation is formed. To ensure a reliable connection of the following parts, it is necessary to leave the edges of the reinforcement about 300 mm long, which will subsequently need to be welded.
Step 5: Installation of formwork
Now you will need wide wooden boards. We form the formwork of the given dimensions. We securely fix its walls with supports, earth, cinder blocks, etc. You can cover the inside of the formwork with polyethylene. The latter is especially true if you are pouring only part of the foundation and you will have to reuse these boards.
Step 6: Pouring the Mortar
We prepare a mixture of cement, sand, crushed stone and water
It is very important to keep the proportions correctly. For example, for M300 you can take 10 kg of cement, 30 kg of sand, 40 kg of crushed stone, mix everything well and fill with 40 liters of water
If the concrete is too dense, you should dilute it with liquid, but only add it in small parts so as not to spoil the solution. We pour concrete into the formwork and wait several days until it completely hardens. We moisten it periodically, otherwise cracks may appear.
Step 7: Formation of a columnar foundation
Making such a foundation is important when a lightweight extension is adjacent to a wooden house. We drill holes so that they are below the freezing level of the soil. We form a sand cushion and install fiberglass reinforcement.
This material has excellent properties and does not require additional treatment with waterproofing compounds. Formwork of specified dimensions is also formed and filled with concrete. This foundation for an extension is the easiest to implement, and everyone can create it with their own hands.
Step 8: Construction of a separate foundation
But when the number of storeys of the main and adjacent housing is different, then a separate foundation should be made in close proximity to the previous one. The distance between the two bases is from 2 to 5 cm, depending on the number of floors of the new room. The higher it is, the wider the seam is selected.
We fill this gap with heat-insulating materials or tow. Then a special decorative overlay is attached to the wall of the home
It is very important to correctly mark the base. To do this, we pull the cord onto the pegs around the perimeter of the future site and check whether the diagonals are equal
If a heaving type of soil predominates on the site, then the floor of the extension must be made so that it is not lower than the flooring of the main housing by the amount of possible deformations.
Design features of the roofing pie
Most often, roofs are made pitched. Moreover, they are more sloping than the roofs on the house. Creating a roofing pie on the veranda is carried out according to the same scheme as installing the roof of a regular house.
Continuous or intermittent sheathing is placed on the rafters, depending on the roofing covering
Only if you have an attic-type house, then you made a vapor barrier with one of the layers. In the veranda, vapor barrier is not needed, because the under-roof space will not be used. In addition, with high-quality insulation of walls and floors, a vapor barrier layer is contraindicated. After all, a couple needs to leave the room somewhere. And it will leak through the ceiling into the attic, and from there it will evaporate outside. To do this, it is worth laying a special super-diffusion membrane as a waterproofing layer, which does not let moisture in from the outside, but steam can pass freely from the inside. True, it is not used for steel and metal coatings, because they can rust from condensation. For metal tiles, a special condensate film is purchased.
The superdiffusion membrane consists of microscopic pores resembling funnels
Preliminary work
In order to determine the type and dimensions of the building’s foundation, a pit of 100×150 cm or 100×100 cm is dug near any wall. The strip foundation is measured in width and height. For columnar, the parameters of the pillars and the depth of their laying are important
This issue should be given sufficient attention, since marking the foundation is one of the most important stages
The size of the base is measured using a steel rod, the end of which is bent 90°. The rod is placed under the sole, placing the bent part strictly horizontally. By turning it, they detect the moment when the curved edge rests against the wall from the inside, and put a mark on the metal. The distance from the bend to the mark, measured after removing the rod, will correspond to the width of the tape.
At the time of pit development, the type of soil on the site is also determined. The data obtained will determine which foundation to choose.
If you have a design for an old house, no preliminary measurements are required. But you should definitely find out the geological characteristics. Careful planning at the initial stage of work, taking into account all the features of the area, will allow you to avoid mistakes.
After the analysis, you should decide what design the future foundation should have. There are several types of them:
- columnar;
- strip reinforced concrete;
- pile and pile-screw.
With rare exceptions, the extension has the same type of foundation as the house. This ensures the reliability of the entire structure.
Fastening the racks and lower trim
After the foundation is poured, it is given the opportunity to gain at least 50 percent strength. Generally, concrete or cement mortar is used in either case. After this, you can begin installing the frame. At least a couple of layers of waterproofing should be laid on top of the foundation. Roofing felt or roofing felt, folded in half, is used as waterproofing. It is acceptable to use other, more modern waterproofing materials, including in liquid form.
After this you can do this:
- First, the racks are secured, after which the harness is formed.
- First of all, the strapping is done, and then the racks are attached.
In the case of the first option, when pouring the foundation, special fasteners are poured in the places where the racks are installed. In the photo below you can see what these fastening elements are. It can also be a metal plate in the shape of the letter “P”; in this case, it is poured upside down, and it is better to weld a rod at the bottom of the plate. A stand is inserted inside this letter “P” and secured with screws or self-tapping screws. Naturally, before installing it, all holes for fasteners must be drilled, and the dimensions of the plate must correspond to the cross-sectional dimensions of the racks. It is permissible to fasten with ordinary nails, which will not affect the reliability of the entire structure.
How to attach posts to the foundation
After installing and fastening all the racks, the strapping bars are attached between them.
If another option is used, the strapping beam is first installed. If, at the stage of pouring concrete, the studs are bricked up at a certain step, the task is greatly simplified. In the places where the beam is attached, it is enough to drill holes, after which the beam is placed on the studs and securely tightened with nuts to the base. After this, they begin to install the racks, armed with one of the methods presented in the image below.
Options for attaching racks to strapping beams
In any case, it is better to use metal corners, which will make the structure stronger and more reliable, especially since these racks are loaded with a roof, and this is very important
Choosing the type of foundation for an extension
Experienced specialists strongly recommend that for the construction of an extension, use the same type of foundation that was used for the construction of the main building. This is due to the fact that different foundations react differently to contact with the soil and also react differently to shrinkage of the building.
Accordingly, if the main house is built on a strip foundation, and the extension is built on columnar piles, sooner or later the auxiliary structure will collapse. Thus, you should not skimp on things like connecting foundations under any circumstances.
If you plan to connect the building to the house, you can use different foundations. Most often we are talking about the following options:
Strip foundation
- make markings in parallel with the tracing at the site of construction of the base structure (this will require wooden pegs and an ordinary rope);
- dig a trench along the marking;
- secure the fittings;
- prepare a trench;
- fill in a sand cushion (approximately 100-120 mm) and carefully compact the bottom of the trench;
- lay a waterproofing film;
- install reinforcement structure;
- Fill the trench with a solution of cement and gravel.
The pouring of a strip foundation should be approached as responsibly as possible. It is better to do the work in several passes. One third of the trench is poured as the first layer, and after drying - one second. The technology, in principle, allows the use of foam blocks, but not in all cases.
After the cement-gravel layer has completely dried, the formwork is built. The formwork is filled to the brim with concrete. After laying, the concrete is pierced simultaneously in several places. This prevents the formation of air bubbles. After the concrete has completely dried, the formwork is removed.
And finally, just before the walls are erected, the almost complete structure is covered with a layer of waterproofing material. Most often, roofing felt, tar, liquid rubber or bitumen mastic are used for this purpose.
Columnar foundation
If your plans include building a house that is small in size and light in weight, the use of a columnar foundation is quite acceptable. It is usually made of either concrete or brick. For a medium-sized building, 6 support pillars are most often sufficient.
- dig a hole (depth below the soil freezing level);
- pour a sand cushion on the bottom;
- install metal (or fiberglass) fittings;
- treat the reinforcement with moisture-proofing material (for metal reinforcing bars);
- install formwork;
- fill the base with concrete.
Construction can begin immediately after the concrete has hardened. If there is a need to increase the height of the pillars, you can lay a brick on top of the concrete.
Foundation on screw piles
A foundation on screw piles is the simplest and most cost-effective type of foundation. Please understand that it is only designed for structures that are not too heavy, as it cannot support much weight. But if you are going to add a wooden veranda to your house, this option is quite suitable.
This type of foundation in most cases does not require the participation of specialists. Even a person who has no experience in construction is quite capable of screwing in screw piles with his own hands. It is probably for this reason that many people choose a foundation on screw piles.
If the foundation on stilts is installed correctly, it can last for a long period of time.
Installing window frames: step-by-step instructions
Diagram of a window on the veranda.
On the veranda, the window sill board is installed at a height of about 50 cm from the floor - this is lower than in a residential building. The space that remains between the window sill and the bottom trim must be covered with wood panels or covered with clapboard. The veranda is sheathed on the outside.
2dfcd3f0d66561831d540b84a561ddeb.jpe
025357c09ffa5921a295cba794212ab9.jpe
Window frames are installed between the window sill board and the top trim. The space that remains between the door and adjacent posts should be sewn up tightly. You can also make narrow bindings. The presence of narrow or wide frames and the dimensions of the windows on the veranda attached to a brick house determine the future appearance of the terrace from the outside.
In the extension, it is recommended to alternate windows with opening and fixed sashes. Single frames are sufficient, because... The veranda attached to the house is a summer and unheated room.
Window blocks are installed in the following order:
- the prepared block is inserted into the opening and fixed in the corners of the opening using wooden wedges;
- the window frame is attached with nails in several places;
- the gaps are filled with dry tow about ¾, and the remaining quarter is filled with tow soaked in a gypsum solution;
- Caulked gaps between the wall and the installed window frames are closed with wooden trim.
Foundation for a brick extension
In this case, strip reinforced concrete structures are most often used. In private housing construction, a monolithic model of such a foundation is more common; this allows you to complete a large amount of work yourself.
The work is performed in the following order:
The construction site is leveled and the future foundation is marked
In this case, special attention should be paid to marking right angles; you can check their correctness using the Pythagorean theorem. We set aside 3 m on one side of the corner, 4 m on the other, the diagonal between the resulting points should be 5 meters. After marking, you can begin excavation work, but it should be taken into account that the foundation of the extension to a brick house must be buried below the freezing level of the soil. A sand or crushed stone cushion is placed at the bottom of the dug trenches; its type and thickness must be determined depending on the type of soil
On average, it does not exceed 10-15 cm. If necessary, a rigid connection to the existing foundation or an expansion joint is arranged. The foundation structure is strengthened by a reinforcement cage. Usually it is a three-dimensional structure of 4 rods connected to each other by jumpers with a certain pitch. Formwork can only be installed for the part of the foundation that rises above the soil. In this case, it is necessary to control the verticality of its installation and the width of the foundation.
Pouring is carried out with a concrete mixture prepared in the following proportions 1:3:5 (cement, sand, crushed stone). The grade of cement must be at least 400, this will ensure the required strength of concrete. When pouring, you should carefully compact the concrete; this can be done by simply cutting off the reinforcement, but it is more effective to perform this process with a special deep-seated vibrator. In hot weather, the surface of the foundation will need to be watered several times during the hardening process, this will prevent cracking of the concrete.
Open area around the pool
A terrace in a private house is often located next to or around the pool. This is especially useful for pools made from large, prefabricated fiberglass tanks. In this case, the terrace performs two functions at once - it provides a comfortable place to relax near the water and hides unaesthetic details (the side of the container, pipes for supplying and draining water, aeration, cleaning devices, and so on).
The principles of arranging the structure are the same as in previous cases: screw piles as a foundation, a cellular frame as a support for the flooring. In this case, the frame is made of metal; wooden elements near water require too serious and expensive protection from moisture
The installation process is discussed in more detail in the video below, but there are some nuances that are worth paying attention to:
- such large containers must be concreted, and the first row of piles (located closest to the side of the pool) may not be screw, but ordinary - installed in concrete;
- the metal frame is necessarily protected from corrosion, galvanized screw piles and stainless steel fasteners are used;
- the frame is positioned so that the flooring hangs over the water and at the same time it is possible to line the vertical fragments of the platform;
- For flooring, a special material is used - the so-called deck board (decking). It can be natural wood with special processing (usually larch), a composite material or pure polymer. A special feature of the board is its increased resistance to moisture and textured surface;
- Built-in lighting fixtures can be mounted flush with the sheathing in the decking.
Popular articles 40 options for implementing Russian style in the interior
It is also possible to install a deck below the edge of the pool, if this edge is properly designed.
For bowls of complex shape, the flooring is also usually made with a curved contour.
If the pool bowl is not completely buried in the ground, the terrace flooring is elevated, creating a kind of podium.
Drawing up a plan and calculating the foundation
The construction of a pile foundation begins with the calculation of the foundation, selection of supporting screw piles, and planning of work.
- Draw a plan for the extension linked to the house on a scale where the locations of the centers of the piles are marked. They are installed in the corners, under load-bearing partitions, then intermediate supports are built in increments of 1.5-2 m.
- Depending on the depth of soil freezing, groundwater level, weight of the entire structure, and soil conditions, the standard size of the piles is selected. When assessing the weight of an extension, the weight of all materials, roofing with snow, furniture, and people who will be in the extension are taken into account. The total supporting area is determined by dividing the total weight of the structure by the bearing capacity of the soil. In the calculations, a safety factor of 1.4 should be taken into account. The total support area is divided by the number of planned supports.
- Then, according to GOST, the standard size of the pile with the nearest larger supporting area is selected. It is worth increasing the number of supports if there is a large difference between the calculated and standard support area. An unreasonably large area of all supports will lead to an inflated cost of the foundation.
Types of attached verandas
Attached verandas can have many varieties depending on:
- location - corner, end, facade;
- degrees of closure - open (the best option for relaxation in the warm season) and closed (allows use all year round, as additional space);
- design features - built-in (single foundation with the house) and attached (on a separate foundation);
- shapes - oval, round, rectangular, square, polygonal.
At the same time, square and rectangular shapes are the simplest to implement, but the implementation of rounded and curved structures is best left to professionals.
It is recommended to use the initial construction material (for example, if the house was built of brick, the veranda should also be made of it). However, it is also possible to combine different materials, taking into account their harmonious combination. Did you know? According to the teachings of Feng Shui, any source of water (fountain, small artificial pond, etc.) should be visible from the resting areas in the house, which includes the veranda. This will provide the owner of the house with wealth and prosperity.
Pile foundation construction technology
The first step is to choose a veranda project and draw its plan, deciding on the exact dimensions. After drawing up the drawing, you can already calculate the amount and weight of materials needed to mount the piles. You should also take into account the quality of the soil and the depth of water, the level of soil freezing. After this, you need to select the correct parameters and number of pile pipes, taking into account that their distance from each other can be 1.5–3 m.
The easiest way is to build an open veranda from wooden beams with your own hands. Snow loads by region can be found in the Building Code under Loads and Impacts. For example, in St. Petersburg, for every 1 m² of roof there is up to 180 kg of snow mass.
Required materials and tools
When constructing a summer veranda on a pile-screw foundation, you need to purchase the following materials:
- sand;
- crushed stone;
- cement;
- screw piles;
- wooden beams for joists and roof (100×50 mm);
- beams for grillage (metal, concrete or wood);
- boards;
- nails, screws;
- varnish or paint for wood;
- roofing material (selected in accordance with the roof of the main building).
For a light wooden veranda, it is better to use a profiled crown beam with a cross-section of at least 150×150 mm as a grillage. In addition to the above materials, it is necessary to treat the piles with anti-corrosion agents, for example, bitumen.
You should stock up on the following tools:
- shovel;
- collar for twisting;
- welding machine;
- deep compactor for concrete mixture;
- an angle grinder with cutting wheels (grinder);
- hammer;
- saw;
- screwdriver;
- tape measure;
- plumb line;
- level (regular and hydraulic);
- pegs and rope.
Gates for manual screwing are sold already with rods.
Preparatory work
First you need to clear the area where the extension is planned. Then you need to dismantle the porch and blind area. The soil under the screw foundation can simply be leveled with a shovel. After this, using pegs and rope, mark the perimeter of the veranda. Next, the installation sites for the piles are marked and small holes are dug in them for ease of screwing.
How to screw in screw piles
The procedure for installing screw piles is as follows:
- The rod tube is inserted into the hole with a blade and screwed in with a collar. It is best when this procedure is performed by two people. At the beginning of screwing in, it is necessary to constantly check the vertical position of the piles with a plumb line and correct it if necessary. If there is a slight deviation, the piles are cut, making the ends level. Usually 20–30 cm of pipe is left on the surface (depending on the height of the base).
- When all the piles are installed at the required depth, marks for the grillage are made using a hydraulic level at the above-ground ends.
- The rods are cut with an angle grinder at the marked level.
- Concrete is poured into the pile cavities and immediately compacted with a compactor.
- A steel rod is inserted into the middle of the cement mixture (this is necessary for a veranda with a wooden grillage). Then the lower crown beam is attached to it.
- The pipe is covered with a head and welded.
- Waterproofing is attached to the top.
When determining the parameters of the veranda adjacent to the wall of the house, a line is drawn. When applying it, take into account the thickness of the lumber that is laid on top.
Installation of grillage and floor
Along the boundaries of the extension, a crown beam is laid on the piles. If the veranda is of significant size, then the beams are hammered inside the perimeter and then tied. There, using a corner and screws, the logs are attached at intervals of 50–60 cm around the perimeter of the structure. At the bottom you can make a base from siding or slabs. Then vertical posts are installed in the corners, to which the canopy or roof will be attached. A flooring is made from boards across the joists. It is recommended to fill the voids between them with gravel.
Lastly, install the veranda fencing
Its foundation may settle slightly, so the structure must be independent. A gap of 2-3 cm is made between the veranda and the wall, which is filled with insulation (for example, mineral wool). A foundation made of screw piles for the veranda of a private house can be installed independently, without carrying out excavation work and waiting for the concrete to harden. This significantly reduces the time and finances for constructing an extension.
Floor and staircase installation
The terrace floor is best laid as a single plank covering. The boards are placed on the logs, embedded between the 1st and 2nd crowns of the trim below. Joists and floorboards must be treated with an antiseptic and covered with paint. The upper step of the porch acts as a continuation of the floor.
After completing the construction of the extension, it is recommended to place the entrance door and stairs under the roof of the veranda. You can make a separate canopy. The extended top step is placed at the same level as the veranda floor. Elements of a straight wooden staircase are usually attached to 2 side strings, which are located at an angle.
https://youtube.com/watch?v=qz7VGEEF1os
The board used as the bottom step is placed on the ground. Its ends should fit closely to the bowstrings and be attached to them with nails. Next is the installation of inserts, cut according to the template and following the contour of the side board. They also need to be attached to the bowstrings. A central support board and riser are installed between them.
e0e6fcfaf8808038f1c08ecac2f397a6.jpePossible mistakes
Completing and redesigning an existing structure is always more difficult than building from scratch, so it is worth once again paying attention to possible errors in the process of constructing a frame extension. The first and main thing is that many inexperienced builders rely on factory processing of all lumber
However, this is incorrect; before assembly, all frame elements must be thoroughly dried and treated with fire-retardant impregnations. Window frames and doors must be installed strictly level and secured to already installed vertical posts, that is, the dimensions of all openings must be specified
Construction of frame walls
Timber is used to construct the walls of a frame extension. Vertical posts and beams are made from it. First, the main frame of the walls is assembled in a horizontal position, and then it is erected vertically.
Installation rules:
- Determine the lower beams of the strapping and make a cut on them every 50 cm for vertical beams.
- Install the racks into the grooves and secure them with special screws and corners.
- Assemble the upper beams for strapping.
- They fasten the veranda together with the house using vertical beams.
- Anchor bolts are used to secure the veranda posts to the house.
- The resulting veranda frame is immediately sheathed on the outside with boards, plywood or OSB to increase the rigidity of the structure.
- Next, the frame is insulated, the roof is built and secured, and then doors and windows are installed.
Useful: What are cold bridges in construction and how to eliminate them yourself
Where to begin installing an extension to a brick house with your own hands.
First, you definitely need to check your foundation for strength. If it is already old, then perhaps you are better off spending all the money from the extension on strengthening and restoring it. If everything is in order, follow a simple rule - it is better to do everything as if it were part of the house in the past.
So you want to use the same pad, the same foundation, the same materials if possible. Next, you must definitely draw up a work plan on paper, and then check all your drawings on the ground. Measure how much space you need, what your extension will roughly look like on the ground, etc.
The most important thing at the very early stage of work, planning, is to think about how all the communications will be laid out, how to include this building in the residential premises of the BTI at the legislative level, etc. Perhaps you will lose the desire to create an additional room, and you will consider quickly constructing a summer kitchen, or an outbuilding.
Interior arrangement of the veranda
The last final stage is the interior arrangement of the room. When creating its design, the general wishes of the owners, the size of the extension, and the general style of the house are taken into account. With the right approach, this part of the house can be made as comfortable and cozy as possible. As finishing materials, preference should be given to wear-resistant materials. If the room will be heated, you can paste wallpaper on the walls, paint them or cover them with wall panels.
Laminate, linoleum, parquet boards are laid on the floor. When arranging furniture, it is not recommended to clutter up the free space. It is better to place it near blank walls. It is practical to use folding furniture in such rooms - it will help save free space.
In conclusion, I would like to note that an attached veranda can give owners additional living space. Here you can organize a wonderful recreation area. By decorating the windows with beautiful plants, you will turn the extension into a beautiful and cozy part of your home.
Foundation rules
Extension to the house
- In the process of joining two foundations, you cannot dig up the entire perimeter at the same time if it is more than 3 meters. This will make the building less stable.
- When the structure is located on a concrete slab, another slab is poured nearby. Similar ones are attached to a pile, strip or column foundation. The difference in characteristics will create excessive stress on the existing foundation, which will lead to greater shrinkage and sometimes collapse of the entire structure.
- The depth of the foundation for the extension is necessarily planned to be somewhat less than for the main building. This creates space for future shrinkage.
- Further work is carried out only after the poured concrete has settled. This usually takes about six months.
- Coupling can be done in the following ways:
- Separate installation and subsequent formation of an expansion joint;
- Rigid connection with laying of general reinforcement.
To correctly pour the foundation for an extension, you need an error-free calculation. The choice of communication method depends on the type of land in the area. The dimensions of the attached structure also influence this.
Which floor to choose for an extension
If the foundation is of a strip type, you can choose any floor (wooden, concrete) for the frame extension. If it is columnar, then it is only wooden.
Let's consider both cases:
- Concrete . After pouring the foundation, 30-35 cm of soil is selected inside the concrete rectangle. Next, sand is poured into this mini-pit, and crushed stone or expanded clay is poured on top. The thickness of the layer is 20 cm. A reinforced lattice is installed on top of this pillow and a full-fledged screed is poured. A completely flat surface is achieved, after which tiles, laminate or wood are laid on top.
- Wood. Install massive floor beams on top of the waterproofing, connecting them to the foundation with anchors or other fasteners. Next, logs are stuffed onto the beams, they are insulated, and the flooring is laid on top.
It is recommended to pre-treat wooden structures with an antiseptic to prevent decomposition.
Hard connection
This method is used in the following cases:
- on non-heaving and slightly heaving soils;
- if there is a shallow strip foundation, the base part of which forms a single whole with it;
- when the shrinkage of the building is predictable;
- when building an extension of several floors under one roof with the main house.
Where to start connecting tape samples:
- A ditch is dug to the required size. A layer of sand is poured onto the bottom to ensure stability.
- Holes are drilled in the foundation. Each next row is drilled offset from the previous one.
- Metal rods with a longitudinal slot at the end are driven into the holes, into which wedging wooden inserts are inserted.
- Using protruding sections of reinforcement, the foundation for the extension is formed.
- After the frame is ready, concrete is poured.
- Further work can continue only after the structure has settled. This standard is observed for all filling options.
A slab foundation is connected in this way only if its thickness is more than 400 mm. The possibility remains the same when the slab protrudes beyond the base of the house. The protrusion must be more than 300 mm. The reinforcement is stripped and welded to the metal frame of the base of the extension. Such protrusions are often found in buildings made of foam blocks.
Building an extension on a pile-screw foundation with your own hands
The junctions between the main building and the extension are equipped with separating material
When starting work on laying a pile foundation, it is necessary to check on what foundation the main structure stands, since different types of foundations sag differently during operation. If the main building is not built on a pile foundation, an expansion joint must be provided in the places where an extension on a pile-screw foundation adjoins it.
If the house and the extension are installed on pile foundations, the grillages of both foundations are connected to each other into a single whole. When constructing light frame extensions, the role of a grillage may well be played by a wooden profiled beam.
Preparatory work
If space allows, the piles for the extension can be screwed in using construction equipment
Before you begin to independently construct a pile-foundation foundation for an extension, you need to carry out a number of preparatory measures:
- thoroughly clean the work area;
- remove the blind area arranged along the wall to which the extension will adjoin;
- mark the construction site by driving pegs where the corners of the extension will be located;
- string a construction cord (string) along the perimeter of the future structure;
- calculate the required number of screw piles, taking into account that the maximum distance between two adjacent supports should not exceed three meters;
- in places where it is planned to install screw piles, drill or manually dig shallow pits.
Preliminary preparation of the site will allow you to imagine the actual dimensions of the extension and evaluate the correctness of the calculations.
Installation of screw piles
Leveling piles horizontally using a wooden beam
The installation of screw piles begins from the walls of the main building. In this case, the distance from the wall to the first row of supports should be 0.5 m. Initially, all piles are installed in prepared pits and covered with earth. Only after this they begin to screw them into the ground.
To facilitate the work, it is necessary to prepare a lever with which to screw the piles into the ground. As a rule, a long metal pipe is sufficient for this. Screwing in the support may require the participation of two, and sometimes 4 people. In this case, one of them must, using a building level, control the correct installation of the piles.
After all the supports are screwed into solid ground, they are cut at the same level. The height of their protruding parts must be at least 150 mm.
The correct installation of screw piles is determined by:
the depth of immersion of the tip below the soil freezing level - this is especially important when constructing a pile foundation on unreliable soils; coincidence of the cut ends of the piles horizontally; vertical evenness of piles.
Features of connecting the foundations of the house and the extension to each other
The grillages of the building and the extension are not rigidly connected, as uneven shrinkage is possible
If the house, like the extension, stands on a pile foundation, their grillages are rigidly connected to each other, provided that the buildings stand on solid ground. Otherwise, the foundations may become skewed due to their uneven settlement.
If the types of foundations are different, they are connected through an expansion joint. To do this, the pile foundation of the extension is placed as close as possible to the foundation of the main building, and the distance between them is filled with hydro- and heat-insulating materials. The seam created in this way will allow the new base to “play” during settlement without damaging the foundation.
Construction of an extension
The construction of the extension can begin immediately after the installation of the pile-foundation foundation. In this case, bricks, logs, SIP panels and other materials are used. However, the best option is when the extension to a frame house on screw piles is made of the same materials as the main structure.
Conditions for using screw piles
Which screw supports need to be used in a particular case are determined by analyzing the data obtained as a result of geological surveys in the area of the proposed construction of the extension. Particular attention is paid to the depth of groundwater, soil freezing, and weak heaving soils.
The thickness of the dense layer of soil in the places where screw piles are installed is of no small importance.
It is not possible to drive screw piles into rocky and/or rocky soil.
How to make a columnar foundation
If you decide to build a small extension for a wooden house, then a foundation on pillars will be a good option. Wells for support pillars are arranged in such a way that they are located below the freezing point of the ground. Then a sand cushion is formed and a reinforcement frame made of fiberglass material is installed. It has good properties and does not require additional waterproofing treatment.
Using the same principle, formwork of the required dimensions is formed and filled with concrete mixture. The base of an extension on such piles, connected to a strip foundation, is considered simple to implement; it can be poured independently.
Installation of cross beams
Now we have a reliable foundation, we need to attach the main beams of the veranda base to the pillars. This process can be done in different ways; if you want greater reliability, then make grooves and insert the prepared beams.
Next, a base of beams is laid out, and a moisture-resistant heat-insulating material, for example, a basalt or fiberglass slab, is mounted on it.
A sheet of foam plastic is placed on top, then boards are attached - this will be the floor of the veranda. During the finishing work, you can lay linoleum, lay out tiles or install a heated floor.
Then the beams are installed and fastened, after which the areas for the windows are fixed and the excess material can be cut out with a chainsaw. Windows are easy to install yourself or you can call on professionals for help.