and receive painting as a gift. Until the end of the promotion:
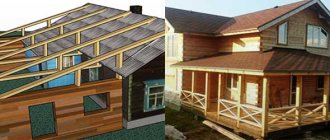
EXTENSION TO A HOUSE MADE OF FOAM BLOCKS
Foam block is a reliable and durable building material that is extremely popular among developers. Foam blocks are light in weight and have the correct shape, so they are easy to build with and it is not difficult to erect a structure of any size and shape, including a two-story one.
They do not create a large load on the foundation, so for an extension it is not necessary to build a foundation that is costly and time-consuming. In addition, for the same reason, foam blocks are acceptable for use in loose and viscous soils. In terms of construction speed, foam block walls are comparable to frame walls.
An extension to a house made of foam blocks practically does not shrink and has no cracks that need to be additionally insulated. This is a solid, warm and durable structure, with a service life of at least 50 years. Like wood, this material “breathes”, which provides a pleasant microclimate in winter and summer.
The price of foam blocks is moderate, so such extensions are always inexpensive. Our company will help you build and finish the extension. We will make it the way you imagined! At your disposal are dozens of ready-made projects that are already posted on the site - closed, with a veranda, two-story, blind. You can make changes to any of them so that you end up with the building of your dreams!
Building with pleasure is real! Do you need an extension to your house made of foam blocks, but where to start is unclear? Are you delaying the construction process because you understand how much trouble it will bring?
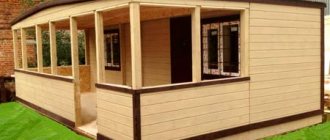
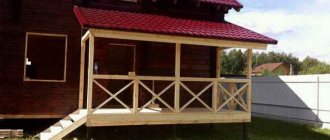
We at DachaMaster provide our customers with comfortable construction: we support the project at all stages - we develop drawings, create estimates, build, perform rough and fine finishing. There is no need to look for contractors, delve into the nuances of construction, selection and delivery of materials, look for where to find equipment, overpay when each successive contractor demolishes the work of the previous one and begins to redo it; You get a ready-made room that you can immediately use; the extension can be built in any part of the house, on any soil and at any time of the year - we always know what to do; the cost of services is transparent and inexpensive - you will always know how much you paid for a particular service and will never overpay. Call to find out how much it costs extension or place an order! 8 8 (929) 611-24-50 Reliable extension of a veranda to a house made of foam blocks Construction of a foundation for a veranda Construction of walls from foam concrete blocks Extension to a house: additional points Features of adding a veranda from foam blocks to a wooden house The house is built, the plot is in order, but everything is something is still missing. Every owner dreams of a cozy veranda or terrace where they can relax after a hard day, sit and drink tea with the whole family. Most often, at the stage of building a house, they forget about it or there is simply not enough money for its construction.
To realize this dream, it is enough to make an extension. You can choose any material to build a veranda. This can be brick, timber, aerated concrete blocks and other materials. Adding a veranda to a house made of foam blocks would be the most suitable option. The veranda is a great place to relax and gather the whole family over a cup of tea in warm weather. Foam concrete blocks are a fairly new material.
They have a low cost. In addition, these blocks are light and easy to construct. To build an extension from foam blocks you do not need to have special skills. They are easy to saw, in addition, foam concrete does not absorb moisture, so it is perfect for external walls. Before you start adding a veranda, you need to collect some information about the main building: Scheme of adding a veranda to the house.
dimensions and type of foundation; condition of the walls; condition of the roof; soil properties. In addition, you need to think about the design of the extension itself. Will it look like a summer terrace, or will it be a covered veranda? As with any construction, you first need to decide on the size and layout of the future extension. You also need to answer the following questions: Is there a need to dismantle the existing roof or some of its elements? What will be the method of connecting the extension and the main building? How will the veranda be entered: a separate entrance or through rooms inside the main building? After answering all these questions and After collecting information about the house, you can begin construction.
Construction of a foundation for a veranda
Construction of the foundation for the veranda.
So, the veranda project has been chosen, you can start laying the foundation. You should examine the foundation of the house; for this you need to make a pit measuring about 1x1 m.
The depth of such a hole should be such that the base of the foundation of the old building is visible. It must be remembered that the foundation of the extension should be, if possible, the same type and depth as that of the main building. Otherwise, it is necessary to arrange an expansion joint.
Depending on the foundation of the old building, you can choose a columnar or strip type of foundation for the extension. The construction of a strip foundation is carried out by pouring concrete. The columnar foundation is made of brick. The latter will require less financial and labor costs.
After receiving information about the quality of the soil, you can begin digging a pit for the extension. Its depth should not be greater than the depth of the foundation of the main building. After installing the foundation, it should be covered with waterproofing.
Return to contents
Calculation of the number of blocks
At the design stage, a sketch of the extension is drawn up, taking into account the installation of holes for supplying communications (if any). The number of required products is determined based on the area of the building structures and the masonry scheme; when erecting them from two rows, it is doubled. Most often, the dimensions of walls and openings are adjusted to the parameters of the foam block; U-shaped varieties are used for lintels over windows and doors.
The thickness of the masonry joints is taken into account when installing on cement mortar (10-20 mm, depending on the experience of the mason); when installing on a special glue, it is neglected. The recommended minimum supply of blocks upon purchase is 5%.
Construction technology step by step
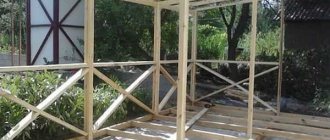
Work begins with determining the type of foundation and assessing the strength. The height of the extension should be 2-3 cm below the main roof; the roof is not tied. At the design stage, the location of the future passage into the foam block house is marked; ideally, it coincides with an existing one or with a window opening, in which case the impact on the structure will be minimal.
One of two methods of tying the foundation is chosen: rigid, with the connection of metal rods to the old reinforced frame, and with the help of an expansion joint - a layer of heat-insulating materials 5-6 cm thick. The second is considered universal; in addition to its simple design, it is suitable for operating the structure on heaving soils. Further work is carried out in the following sequence:
1. Marking the site with mandatory check of diagonals, excavation work.
2. Construction of the foundation.
It is easier to install a columnar base, but most experts advise choosing the same type as the house itself, ideally with the same depth. The latter, together with confirmation of the completion of the shrinkage process and when building on non-heaving soils, is a necessary condition for performing a rigid connection. Important nuances include the use of high-quality concrete for pouring, high requirements for the reinforced frame, control and tapping of the top edge using a building level.
3. Waterproofing of the base, the first row is laid exclusively on a cement-sand mortar distributed over rolled or coating materials.
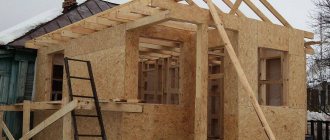
4. Construction of walls: starting from the corner, with laying metal in the grooves every 3-5 rows and filling the voids with glue, with mandatory checking and correction of deviations in level. It is advisable to attach a structure with matching rows to the house; with a common wall, it is fixed with brackets.
The glue is spread on both the horizontal and side ends; voids are not allowed. Special U-shaped blocks are best suited for forming openings, but it should be remembered that they are considered reliable and are allowed for a window or passage width of 1.75 m, no more. The stage ends with the installation of the armored belt; it is laid along the entire perimeter of the load-bearing walls made of foam concrete.
5. Installation of flooring: wooden for a small extension or slab of light grade concrete.
In the first case, the upper edge of the walls is protected from moisture; all elements must be treated with compounds against fungus and fire. This stage is started no earlier than the strength of the concrete poured into the reinforced belt.6. Laying light roofing materials: ondulin, metal or bitumen tiles. Unlike the foundation and walls, the roof is never connected to the structures of the main house; you can attach it with a slight slope and 2-3 cm lower or re-cover the roof section of an already in use building. The second option is considered the most reliable, but requires special skills or the involvement of specialists.
The main condition is to eliminate the slightest risk of leakage or accumulation of moisture at the joint.7. Finishing work: plastering with vapor-permeable and weather-resistant grades or installation of ventilated facades. Wall insulation is used if you want to build a bathhouse or an object with similar moisture loads from foam concrete; in addition, it is required when laying blocks on cement-sand mortar due to the high thickness of the seams
During masonry work and reinforcement, it is important to clean the rows from dust, this will reduce glue consumption. To eliminate the risk of moisture absorption, the products are lightly moistened with water.
Construction of walls from foam concrete blocks
Scheme of constructing a veranda wall from foam concrete blocks.
First of all, you need to think about how to connect the wall of the main building with the newly erected wall. This can be done using metal brackets or fittings.
The construction of walls made of foam blocks (also brick and aerated concrete) must begin from the corners. For this, light solutions or special adhesive mixtures are used.
The surface of the block is smooth, which allows you to apply the solution in a thin layer. To improve adhesion, it is necessary to moisten the lower part of the foam block with water. The thickness of the seam of the first row of blocks should not be more than 3 cm.
Next, the verticality of the masonry is checked by level. Deviations can be leveled out with mortar by increasing or decreasing the thickness of the seam. Unevenness in masonry can always be removed with a grinding tool.
When building a veranda from foam blocks, it is necessary to follow the dressing rules. The second row of blocks needs to be shifted 10-15 cm relative to the first. This will make the structure more durable.
Return to contents
Finishing the extension
Light cement-based mineral plasters are ideal for finishing a veranda made of block materials. Their main difference from traditional mixtures is the type of sand used: instead of quartz, a light perlite filler is added to the composition.
Thanks to this, the finishing layer puts less load on the walls and has a high degree of vapor permeability and heat retention. Experts also recommend using this particular type of plaster, as it is quite resistant to cracks and other mechanical damage.
Important! During finishing, it is very important to maintain a constant temperature regime and not allow the finishing layer to dry out or freeze. Otherwise, cracks will quickly appear on the surface of the walls.
There is a certain order for finishing walls with a mineral mixture:
- Clean the surface of the wall from dirt, level it using a mixture for laying blocks.
- Use a float and brush to remove uneven surfaces after the reinforcing mortar has dried.
- Apply the bottom layer of plaster using a float.
- Lay out the plaster mesh, straighten it and press it into the uncured mortar.
- Apply a second layer of plaster to the wall and smooth it with a trowel. Wait for the wall to dry.
- Apply a final thin layer of finish and level it with a float, giving the surface the desired structure.
- After the facade has completely dried, paint it with special paint for external work.
Extension to the house: additional points
Scheme of a veranda roof made of metal tiles.
Laying window and door lintels. For window and door lintels when building a veranda from foam concrete blocks, special U-shaped blocks are used.
They are lightweight, which makes it possible to avoid lifting equipment. In addition, such blocks make it possible to make openings longer than 1.75 m. For the lintel, it is necessary to install U-shaped foam blocks and formwork made of metal profiles and wooden beams.
Then reinforcement is installed into the groove of the block. The last step in installing the lintel will be filling the block with heavy concrete, which should be carefully compacted and leveled with the rest of the blocks. Installation of a reinforced belt. U-shaped foam blocks are also used to construct a reinforced belt.
Most often, the reinforcement is adopted with a diameter of 1 cm. Its ends are attached to the wall of the main building. The reinforced belt is designed to protect the walls from destruction and cracking.
Its installation occurs in the same way as the installation of lintels. Roof installation. The final stage of adding a veranda to the house is installing the roof. It can be made either single or double slope.
A pitched roof requires less financial investment, but this roof structure is cooler. In order to decide on the type of roof, it is best to contact specialists. In addition, it is better to insulate the finished roof, this will reduce heat loss.
Return to contents
Features of adding a veranda made of foam blocks to a wooden house
Based on materials from the site: https://ostroymaterialah.ru
The veranda in the house performs several important functions at once. Firstly, it protects the front door and hallway from rain and snow. Secondly, this light extension gives the building a harmonious and complete appearance.
And thirdly, the veranda is a very convenient place for summer outdoor recreation. A structure of this type must, of course, be built in compliance with certain technologies. Further in the article we will look into all the details of how to attach a veranda to the house correctly.
Work plan
Before you start building a veranda, you should definitely draw up a project.
It must include drawings of the structure from the two facades, as well as its plan from above. Of course, you must first make all the necessary calculations. This work is carried out guided by the following recommendations:
The foundation of the veranda should lie at the same depth as that of the house itself. If this condition is not met, in the spring the extension will simply move away from the wall. The roof of the veranda should be flatter than that of the main building. The walls of the veranda, like its foundation, are not rigidly connected to similar structures of the house.
These two structures have different weights, and therefore they will shrink differently. The gaps between the walls of the house and the veranda are closed in different ways, depending on the material used in construction. The dimensions of the veranda should not exceed 1/3 of the area of the house itself. Otherwise, this light extension will look ugly in the overall exterior of the building. It is best to choose the same material for the veranda that the building itself is made of.
This rule is especially true for houses assembled from timber or logs. A foam block or brick extension next to such structures will not look very nice. In this case, it is better to build a panel or log veranda.
The correct answer to the question of how to attach a veranda to a house (photos of beautiful and durable structures of this type can be seen on the page) - durable and comfortable - also lies in the selection of high-quality materials for it. Despite the fact that the structure is small and not as important as the residential building itself, it should be erected thoroughly, adhering to all recommendations.
Where to begin
Many owners of private houses ask the same question: “I want to make an extension to the house, where to start?”
You need to start by figuring out what size the building will be. We also need to decide what material we will build from.
If the main house is wooden, it is also better to build the extension from wood. If the main structure is stone, it would be more logical to choose brick or concrete blocks for the extension.
But there will be nothing terrible if you make an extension to a stone building from wood, and to a wooden one from brick. It will look normal and correct. There are many examples of such buildings.
Record the dimensions of the future extension on paper: make a drawing. It's not as difficult as it seems. It is necessary to draw a plan, that is, a top view of the structure and several sections - what the structures will look like if they are cut vertically. It will be useful to make drawings of individual joints of structural parts. Enter the dimensions.
A basic drawing is necessary for any construction. Having completed it on paper, you will already see what you will get as a result of construction.
Often masters of their craft say that they imagine everything in their heads and do not need drawings. This may be true, but there is a risk that you will still miss something, and then you will need to redo some of the work.
Possible options for the location of the extension relative to the main building.
We choose the location for the construction of the extension on the side where there are no windows. Usually the door to the house is inside the extension. That is, when leaving the house, we find ourselves in the outbuilding, and from the outbuilding we enter the plot. In this case, the extension serves as a veranda or entryway. This option is the simplest and most economical, but other schemes are also possible.
Pouring the foundation
When answering the question of how to attach a veranda to a house, first of all you should decide on the type of foundation for it. The foundation for such a light extension is usually made of columnar or strip. The choice of a specific variety depends on what materials are used to build the extension.
For panel and cobblestone construction, an inexpensive columnar one is also perfect. A strip structure should be erected under brick and foam block verandas. The order of work in this case will be as follows:
- A trench is dug under the foundation, the depth of which should be slightly lower than the concrete base of the house foundation strip. A layer of sand is poured onto its bottom (to the level of the base) with compaction. Formwork from boards is installed on the sides of the trench. Wooden blocks 5 cm thick are laid on its bottom. A reinforcement frame is installed on them, knitted from a 12 mm rod. Then everything is filled with a concrete mixture (cement x sand x crushed stone in a ratio of 1: 3: 4).
The question of how to properly attach a veranda to a house also comes down to constructing a reliable foundation. Therefore, it is impossible to deviate from the technology described above.
The concrete mixture for the foundation of the veranda should be of high quality, and the reinforcement should be knitted from a fairly thick rod. The formwork is removed a day or two after pouring. After another 25-26 days, you can begin waterproofing the tape and building walls.
Video description
A veranda is considered a closed building, which is a continuation of the house with a common roof. The structure can be with solid walls or partial glazing. A veranda is usually added to a finished house to increase its usable area.
Covered terrace attached to the houseSource obustroeno.com
What elements does an open terrace consist of?
If you order the construction of an open terrace from a construction organization, the kit will include the following elements:
- Terrace posts made of wood with a diameter of 10x10 cm. They are installed at a distance of 1.3–2 m.
- Elements for constructing a foundation: pillars, piles.
- Wooden railings, balusters with carved trim.
- Roofing material of the selected color: corrugated sheet, metal tile, ondulin
- The floorboard is tongue-and-groove or planed.
At your request, any additional elements can be included in the package, for example, balusters are replaced with a continuous clapboard fencing.
An open terrace made of wood attached to a brick house. Source pinterest.com
What elements does a closed veranda consist of?
Unlike open structures, closed verandas have walls. When ordering the construction of a closed veranda, the kit includes the following elements:
- Posts for mounting a frame made of boards 4x10 cm, jibs 4x10 cm.
- Thermal insulating material KNAUF, layer thickness 5 cm.
- Grooved floorboards 3.6–5 cm thick.
- Lining for external finishing.
- Entrance door with a set of fittings.
- Roofing material.
The kit for buildings with glazing is complemented by wooden or plastic windows with fittings.
Enclosed verandaSource stroyvsadu.ru
Extension to a cobblestone house
Well, the foundation is poured. What's next?
And then you can start building the walls. The technology of this process depends on the material chosen for assembly. First, let's figure out how to attach a veranda to a house made of timber.
This option will be an excellent solution for a wooden building. Cobblestone and log houses with such verandas look very beautiful. However, wood is a capricious material, and when using it, it is imperative to adhere to the prescribed technology.
First of all, you will need to choose the right timber itself. It is better if it is “winter”. This material cracks much less and shrinks less.
After the foundation is waterproofed with two layers of roofing material on bitumen mastic, you can begin laying the first crown.
It is attached to the base of the house using anchor bolts cast into the foundation. Next, the joists are installed under the floor. Then the walls are assembled, connecting the beams at the corners using the “half-tree” method.
If the veranda to the timber house is intended to be closed, the laying of the material continues up to the roof. If it is open - to the required height. In the latter case, at the next stage, racks are installed in the corners, which are best mounted on galvanized metal corners.
Is the material suitable for the extension?
It often happens that the time comes to expand the existing living space by building additional rooms. The extension can serve as a bedroom, bathroom or other additional premises.
relevant in the following cases
- if the house itself is built of timber;
- if the house is made of wood;
- if the new premises meet all the standards and do not block communications or other important elements of the house.
There are also cases when constructing an extension would be impractical.
For example, if the future structure is too large, and its construction will entail a violation of standards. According to the standards, the distance from the house to the fence and other buildings, as well as the points of the septic tank, water intake or gas tank, has certain standards. If the new extension violates the norms, then it is better not to build the structure or make it smaller.
If the extension completely changes the design of the house, then this will entail a change in the rights of the owners. This factor must be taken into account if the home owners have shares in the property. It is not advisable to build an extension if there are no plans to formalize it legally.
Brick structures
Next, let's look at how to attach a veranda to a house made of brick or concrete. Of course, a light wooden veranda will fit well into the exterior of such a building.
However, a solid house will look much more solid with a brick extension of this type. It is not too difficult to build such a veranda yourself. The masonry mortar is prepared as follows: mix three shovels of sand and one of cement in some container and fill it all with water in such an amount to form a plastic mortar.
The laying of pillars is carried out with bandaging of seams, using plumb lines and orders. The thickness of the joints between bricks should be about 0.8-1 cm.
Long metal rods should be poured into the foundation at the location of the pillars (under the roof). The masonry is carried out around them using the one and a half brick method. The space in the center is filled with concrete.
The question of how to attach a veranda to a brick house also comes down to the construction of a reliable parapet.
Its assembly begins after the supporting pillars are ready. When assembling the parapet, a good solution would be to use some original masonry method. For example, with the installation of bricks at an angle of 45 degrees. The parapet can also be made of wood or a spectacular forged one can be installed.
Consumables and tools
What supplies and tools will be needed to build the extension:
- Container, shovel, mixer for mixing solutions (cement-sand, as well as glue).
- Tools for marking (construction cord, rulers (square), tape measure, levels, pencil).
- Hacksaw for cutting blocks.
- Trowel for tile work (with teeth).
- Rubber hammer, foam concrete plane, brushes for moistening the concrete surface, trowel.
- Cement, sand, gravel (up to 15 mm), running water, plasticizers for preparing cement mortar, pouring the foundation and backfilling the sinuses.
- Wall chaser for making grooves.
- Dry construction adhesive.
- Reinforcement in the form of steel rods or reinforced mesh.
- Materials for formwork for lintels and the formation of a concrete ring.
When performing masonry work, it is important to correctly fill joints and apply mixtures
It is especially worth paying close attention to the laying of the first tier of blocks
Foam block buildings
This is also a good material for constructing a veranda.
Lightness, like wood, and durability, like brick, are its main advantages. Most often, closed structures are built from foam blocks. The only difference between such a veranda and an ordinary extension is its very large windows.
However, purely technologically, masonry from this material is somewhat more complicated than from brick. So, let's see how to attach a veranda to a house made of foam blocks. In this case, laying begins from the corners.
When using foam blocks, moorings must be installed. If even the slightest distortion is allowed during the masonry process, cracks may subsequently appear along the fragile walls due to the stresses arising in them. Each subsequent row is shifted by 10-15 cm relative to the previous one.
When laying, not a cement mixture is used, but a special adhesive solution. Only the first row of blocks is laid on cement. After the walls are built almost to the very top, an insulated armored belt should be installed on them.
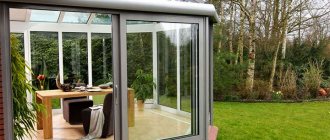
Glazing
Glazing of the veranda is done in different ways: using metal-plastic, polycarbonate, PVC film, aluminum profile, wood. These days, the most popular are plastic windows.
The advantages of this choice include:
- guaranteed long service life;
- frost resistance;
- dustproof;
- the double-glazed window has good sound insulation;
- do not deform under the influence of sunlight;
- waterproof - unlike wood, they do not absorb moisture;
- do not require painting, antibacterial or anti-corrosion impregnation;
- ease of care;
- easy to install.
Among the disadvantages, it should be noted that plastic is not a natural material; some types of it can release toxic substances. When purchasing a double-glazed window, you should ask the selling party for a certificate for the product, which indicates the hazard class. If the plastic is not of very high quality, over time it may lose its shine and become dull.
Pure plastic is weak and may not withstand the weight of glass, so metal-plastic bags are more often used for glazing. This structure is heavy and requires a load-bearing support. Non-reinforced plastic is used on lightweight structures; it has thin, non-tempered glass. Such windows are fragile and dangerous.
To install metal-plastic windows, wooden beams (100 by 150 mm) are suitable as supports. During the installation of double-glazed windows, special fasteners are used to connect the structure to the end of the frame. The resulting cracks are sealed with polyurethane foam.
The same rules apply when glazing the veranda ceiling, if necessary. The ceiling frame must be strong to hold metal-plastic bags, so it is easier to use polycarbonate. Sometimes they provide ceiling windows, which looks original. For ventilation using ceiling structures, a remote control is usually provided.
Plastic windows retain heat well and are suitable for winter verandas equipped with a fireplace or other heating means. Due to the nature of their manufacturing, metal-plastic structures cannot be too large. If you need floor-to-ceiling windows, you should select other materials (wood, aluminum).
Glazing of the veranda can be partial or panoramic. In the first case, windows are not installed on all walls. This is a cheaper option, but the extension will not be light enough. If the windows from the rooms face the veranda, the rooms will remain poorly lit. Panoramic glazing touches all external walls, sometimes even the ceiling. This extension receives the maximum amount of natural light.
Opening methods
Depending on the method of opening the frames, you can choose any suitable glazing.
- The swing option is the most popular. The package consists of two or three parts, and only one or two parts can swing open, while the central one remains motionless. The ability to open a window increases the cost of the design, so not every section is ordered movable.
- Sliding frames move on special skids in one or different directions. Each section overlaps the other when offset. This design is good for small verandas, as it does not take up much space.
Joining walls
Thus, we have figured out how to attach a veranda to a house using materials such as brick, foam blocks and timber.
However, the owners of suburban areas who decide to build such a structure will definitely have a question about how to properly join the walls. As already mentioned, the house and the veranda are not immediately firmly connected due to shrinkage. It is best to simply foam the gaps between the foam block or brick wall and the house.
You can also use special movable fasteners with grooves. If the veranda was built from wood, the gaps are usually covered with vertical beams. In most cases, a tarred board is laid between the foundations of the veranda and the house.
Features of insulation
Features of insulation
Insulation of a building is one of the most important factors for a comfortable stay in it in the future. In fact, all the nuances concerning the insulation of a frame extension completely coincide with the insulation features of full-fledged houses built using frame technology. For insulation, you can use a variety of materials, both traditional and more modern: ecowool, sawdust, basalt mineral slabs, extruded polystyrene foam and much more. From the point of view of speed and ease of installation work, perhaps, mineral slab insulation is optimal. Such insulation must be tightly laid between the frame posts in several layers, but without kinks or pinches, which over time can lead to the formation of “cold bridges”
An important feature during the work is the need to shift the joints between the slabs relative to each other in adjacent layers. This principle must be observed not only when insulating walls, but also ceilings and floors
Roof
The question of how to attach a veranda to a house also comes down to how to properly assemble its roof.
This structure is usually covered with a pitched roof. The racks are attached to the crowns of the cobblestone walls on one side. Next, the rafters are laid.
If the walls are brick, they can be fixed to ordinary corners, having first assembled the Mauerlat. If the building is made of cobblestones, it is better to use special “sled” fasteners. The fact is that cobblestone verandas shrink very strongly due to the drying of the wood.
The next step in assembling the roof should be waterproofing. To protect the tree from moisture, a plastic film is mounted on the rafters with a slight sag. Then the sheathing is filled and the roof itself is assembled.
Floors
At the final stage of construction, the floors are installed in the veranda (they can be assembled before laying the walls). If the structure is completely open, a decking board should be used to assemble them. This material is not at all afraid of moisture.
If this option seems too expensive to the home owners, you can take a regular edged board. However, in this case, when assembling the floor, it is worth leaving small gaps (2 mm) between the boards. Water that gets inside the veranda will go into them.
Well, we hope we have answered the question in sufficient detail about how to attach a veranda to a house with your own hands.
This matter is actually not particularly difficult. The most important thing is to adhere to the required technologies, and then you will get a beautiful, high-quality, reliable and durable summer extension to your house. Reliable extension of a veranda to a house made of foam blocks. Construction of a foundation for a veranda. Construction of walls from foam concrete blocks. Extension to a house: additional points. Features of adding a veranda from foam blocks to a wooden house. built, the garden plot is in order, but still something is missing. Every owner dreams of a cozy veranda or terrace where they can relax after a hard day, sit and drink tea with the whole family. Most often, at the stage of building a house, they forget about it or there is simply not enough money for its construction.
To realize this dream, it is enough to make an extension. You can choose any material to build a veranda. This can be brick, timber, aerated concrete blocks and other materials. Adding a veranda to a house made of foam blocks would be the most suitable option. The veranda is a great place to relax and gather the whole family over a cup of tea in warm weather. Foam concrete blocks are a fairly new material.
They have a low cost. In addition, these blocks are light and easy to construct. To build an extension from foam blocks you do not need to have special skills. They are easy to saw, in addition, foam concrete does not absorb moisture, so it is perfect for external walls. Before you start adding a veranda, you need to collect some information about the main building: Scheme of adding a veranda to the house.
dimensions and type of foundation; condition of the walls; condition of the roof; soil properties. In addition, you need to think about the design of the extension itself. Will it look like a summer terrace, or will it be a covered veranda? As with any construction, you first need to decide on the size and layout of the future extension. You also need to answer the following questions: Is there a need to dismantle the existing roof or some of its elements? What will be the method of connecting the extension and the main building? How will the veranda be entered: a separate entrance or through rooms inside the main building? After answering all these questions and After collecting information about the house, you can begin construction.
Advantages of foam concrete for construction
A veranda made of foam blocks, insulated with foam plastic, is an excellent solution for many reasons. Such an extension can be used in a variety of ways, as it will be reliably insulated from cold, wind and precipitation. Insulation will allow you to maintain a comfortable temperature all year round.
Why should you choose foam concrete for construction? This is a material made from natural ingredients: cement, sand and water; in addition, the mixture acquires special properties thanks to special foam. Due to its porous structure, the foam concrete block has some very important advantages:
- Good thermal insulation and noise insulation qualities. Foam concrete will create a quiet and cozy room that will be comfortable both in winter and in summer.
- Correct geometric dimensions. The foam block is larger in size than a brick, in addition, it has a completely flat surface. This speeds up and simplifies masonry, and even people far from the construction industry can handle it.
- Strength combined with relatively low weight. Foam blocks have been used in low-rise construction for a long time, they have proven their effectiveness. With their help, you can build a reliable structure that will last for many years.
Knowing how to build a veranda from foam blocks, you can save on the work of professionals, and the materials themselves will be inexpensive. Often construction is carried out from the remains of blocks after a large construction. One of the few disadvantages of this material is its low decorative qualities, so the veranda will have to be additionally finished.
Design of a veranda made of foam blocks and construction of a foundation
A veranda made of foam blocks with your own hands is most often built on a strip foundation, which must be correctly attached to an existing foundation. The choice of connection depends on whether the extension was originally planned and when the main building was built. If the construction of a veranda was included in the project, both the house and the extension are built on a common monolithic foundation, which is a single concrete strip along the perimeter of the structures. It is possible to build a veranda on a strip foundation made of foam blocks, for example brand D1200.
If the house was first built, and then the question of creating a veranda arose, two options for attaching the foundations are possible:
- If the house was built a long time ago, and the main shrinkage processes have been completed, then a rigid fastening can be used. It is created using metal pins that are inserted into drilled holes in an existing base.
- If the house itself was recently completed, a rigid grip is unacceptable. The processes of settlement of the building and veranda will continue, and they may proceed unevenly, which will lead to the appearance of cracks. In this case, an expansion joint is laid between them: for this purpose, a wooden shield can be used, which is laid between the foundations and filled with concrete.
They are then tied to the new reinforcement cage and it is poured with concrete. As a result, the new foundation will become a full part of the overall foundation of the house.
The foundation is built in the same way as a regular strip foundation. A trench is dug along the perimeter of the building, into which special reinforcement with a diameter of at least 10 mm is installed, formwork is installed, and the trench is filled with concrete.
To ensure that there are no voids in the foundation, the space in the frame is pierced with sticks, or you can use a special construction vibrator to compact the mortar. The poured concrete base must be completely dry, which may take several weeks. The formwork is disassembled, after which you can proceed to the construction of walls.
Construction of a foundation for a veranda
Construction of the foundation for the veranda.
So, the veranda project has been chosen, you can start laying the foundation. You should examine the foundation of the house; for this you need to make a pit measuring about 1x1 m.
The depth of such a hole should be such that the base of the foundation of the old building is visible. It must be remembered that the foundation of the extension should be, if possible, the same type and depth as that of the main building. Otherwise, it is necessary to arrange an expansion joint.
Depending on the foundation of the old building, you can choose a columnar or strip type of foundation for the extension. The construction of a strip foundation is carried out by pouring concrete. The columnar foundation is made of brick. The latter will require less financial and labor costs.
After receiving information about the quality of the soil, you can begin digging a pit for the extension. Its depth should not be greater than the depth of the foundation of the main building. After installing the foundation, it should be covered with waterproofing.
Return to contents
Construction of walls from foam concrete blocks
Scheme of constructing a veranda wall from foam concrete blocks.
First of all, you need to think about how to connect the wall of the main building with the newly erected wall. This can be done using metal brackets or fittings.
The construction of walls made of foam blocks (also brick and aerated concrete) must begin from the corners. For this, light solutions or special adhesive mixtures are used.
The surface of the block is smooth, which allows you to apply the solution in a thin layer. To improve adhesion, it is necessary to moisten the lower part of the foam block with water. The thickness of the seam of the first row of blocks should not be more than 3 cm.
Next, the verticality of the masonry is checked by level. Deviations can be leveled out with mortar by increasing or decreasing the thickness of the seam. Unevenness in masonry can always be removed with a grinding tool.
When building a veranda from foam blocks, it is necessary to follow the dressing rules. The second row of blocks needs to be shifted 10-15 cm relative to the first. This will make the structure more durable.
Return to contents
Why foam block
Foam concrete as a building material
Foam concrete blocks are almost ideal building materials, this is especially true for those cases when a house is built independently, with your own hands. Foam concrete blocks are lightweight and easy to process; for example, they can be easily sawed with a regular hacksaw. Also, their installation does not require special skills, unlike laying bricks.
Foam concrete material is quite easily delivered to those settlements that are considered inaccessible. Comparing foam concrete and other similar building materials, we can highlight higher strength qualities, as well as relatively low cost .
When comparing foam concrete and gas silicate blocks, attention is drawn to the fact that their environmental, fire-resistant, heat and sound insulation parameters are almost at the same level.
But gas silicate blocks have a very porous structure, and therefore higher water absorption. Also, compared to foam concrete blocks, the frost resistance of gas silicate is low, so it is most often used for internal partitions.
The properties of foam concrete and its brand are determined by the density of foam concrete. The best heat and sound insulation qualities are for the material whose density is lower, but with increasing density, its strength increases.
When choosing a brand of foam concrete, it is worth deciding what the purpose of the material is. For load-bearing walls, in the case of building a two-story house, it is worth choosing stronger ones, which are structural or thermal structural. Well, in the case when the question of how much it costs to build a bathhouse from foam blocks is being decided, then you can settle on heat-insulating blocks.
Extension to the house: additional points
Scheme of a veranda roof made of metal tiles.
Laying window and door lintels. For window and door lintels when building a veranda from foam concrete blocks, special U-shaped blocks are used.
They are lightweight, which makes it possible to avoid lifting equipment. In addition, such blocks make it possible to make openings longer than 1.75 m. For the lintel, it is necessary to install U-shaped foam blocks and formwork made of metal profiles and wooden beams.
Then reinforcement is installed into the groove of the block. The last step in installing the lintel will be filling the block with heavy concrete, which should be carefully compacted and leveled with the rest of the blocks. Installation of a reinforced belt. U-shaped foam blocks are also used to construct a reinforced belt.
Most often, the reinforcement is adopted with a diameter of 1 cm. Its ends are attached to the wall of the main building. The reinforced belt is designed to protect the walls from destruction and cracking.
Its installation occurs in the same way as the installation of lintels. Roof installation. The final stage of adding a veranda to the house is installing the roof. It can be made either single or double slope.
A pitched roof requires less financial investment, but this roof structure is cooler. In order to decide on the type of roof, it is best to contact specialists. In addition, it is better to insulate the finished roof, this will reduce heat loss.
Return to contents