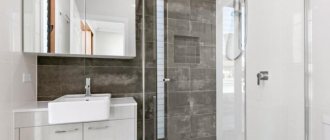
Wanting to make their bathroom more neat and convenient, many people decide to hide the water and sewer pipes when carrying out renovations. The best way to do this without transferring communications and with a minimum of dust is to build a box for pipes in the bathroom. You can assemble a plumbing box with your own hands; there are several options available for this.
Plasterboard box
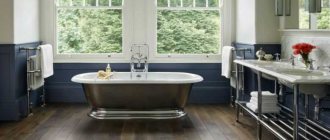
The most common option for hiding pipes is to assemble a box from moisture-resistant plasterboard. This is due to the fact that ceramic tiles, which are most often used to decorate bathrooms, can then be glued onto the drywall. Let's consider the main stages of constructing a gypsum plasterboard box.
Stage 1: marking
Before starting to assemble the frame, markings are made at the installation site of the box. The initial mark is placed at a distance of 30–50 mm from the most protruding element of communications.
The frame stand is located at a distance of at least 3 cm from pipes and other communication units.
Next, using a level, a vertical line is drawn along the surface of the wall, indicating the line of fastening of the frame. A similar mark is placed on the other wall, as well as in areas where horizontal pipes are closed.
Note! It is advisable to select the size of the box for tiling in such a way that whole tiles are used to cover all protruding parts. In addition to saving tiles, this allows you to create a neat and complete cladding.
Stage 2: frame construction
Assembly of the frame begins with the installation of a guide profile, which is attached to the walls with dowels along the marking lines. The step between the attachment points is 20–30 cm. The guide profile is also attached to the ceiling and floor to form the angle of the frame and install the front pillar. To ensure that the corners of the frame below and above are located in the same plane, first the guide profile is attached at right angles to the ceiling. Then a plumb line is tied to it and a point is marked on the floor where the lower corner of the frame should be located.
A rack profile is screwed to the guide profiles located on the floor and ceiling with self-tapping screws, which is fixed with 3-4 horizontal jumpers for additional mounting rigidity.
Note! Reinforcing jumpers are mounted taking into account the future location of inspection hatches that provide access to valves and meters.
After assembling the vertical part of the frame, if there are horizontal pipes for them, the frame is assembled according to a similar scheme:
- A guide profile is attached to the wall and floor, which sets the dimensions of the future box.
- The front frame element is attached to the guides using jumpers cut from the rack profile.
All jumpers are also installed taking into account the location of the sewer outlet for connecting the toilet, inspection hatches and shut-off valves.
Stage 3: framing the frame
The finished frame is sheathed with moisture-resistant plasterboard, cut into pieces of the required size. GKLV is cut with a sharp knife: first, the cardboard is cut along the line on one side (with a slight penetration into the gypsum core), then the sheet is broken along the cut line and the cardboard is cut on the second side. The sheathing is fastened to the frame using black self-tapping screws in increments of 15–20 cm. The place where the inspection hatch will be installed is not covered with plasterboard or a hole is then cut out.
Note! It is advisable that at this stage the inspection hatch has already been selected by type and size and purchased so that you can immediately try it on for a tight fit.
Types of hatches used for plasterboard boxes:
- Plastic hatches. They can be hinged, folding or sliding.
Plastic flap. - Push-type invisible hatches are installed before the cladding is completed and are fastened with self-tapping screws to the metal frame of the box.
Hidden push hatch. - A tile hatch with magnets is a popular design, which, if made independently, is cheaper than self-extending models.
Magnetic tiles are one of the types of hidden hatches
Stage 4: finishing
Before finishing the box, it is necessary to prepare it, this is done in the following sequence:
- All seams between the drywall are opened with a knife, then, along with the corners and other edges, they are sanded.
- The seams are filled with putty, and sickle tape is glued on top.
- The corners are also treated with a putty mixture and glued with sickle tape.
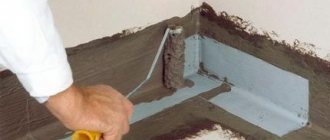
- After the putty has dried, the box is treated with a primer in two passes, with a break for each layer to dry.
A plasterboard box is most often faced with ceramic tiles: a continuous layer of tile adhesive is applied to the back side of the tile, which is smoothed with a notched trowel. The tile is applied to the drywall and pressed, then the next one is glued. Having completed the installation, the seams are rubbed using the usual technology, and the corners are covered with decorative elements of a color suitable for the finish.
Read more about laying tiles on drywall here.
Material requirements
If you decide to hide pipes, the material must be chosen at the planning stage, and you must be guided not only by its aesthetic qualities. The bathroom is a wet room, that is, a room with water supply and wet processes. Here, temperature and humidity change periodically, so materials for the box are selected based on the following characteristics:
- Moisture resistance. A basic requirement for any materials intended for use in the bathroom. The design of the box should not be deformed in an environment of elevated temperatures and aggressive household chemicals, and the surface should not absorb water.
- Corrosion resistance. Condensation often accumulates on the pipes, and warm steam fills the entire volume of the room. The frame and fasteners of the structure should also not be afraid of moisture and elevated temperatures.
- Decorative. The correct design fits into the design of the room and matches the rest of the decoration. Since most often the walls are finished with tiles, choose a material suitable for cladding.
Decorating a box with tiles Source o-vannoy.ru
- Compact, ergonomic. Bathrooms rarely boast dimensions. The less space the structure takes up, the more convenient it is to use, and this directly depends on the material of the frame and the walls of the box. A metal profile or wooden slats are used for the frame.
- Budgeting. Not only the cost of the material is important, but also the possibility of self-installation. Inviting specialists results in higher repair costs.
- During operation, the following requirements are imposed on the box:
- Strength, wear resistance. Resistance to mechanical loads is important, especially if the structure has moving parts.
- Easy care. Cleaning the surface from dirt should not take much time. A good material is one that can withstand standard (household) cleaning agents.
- Environmental friendliness. For installation, materials are selected that will not emit substances toxic to health. The outer layer of the finish must be sufficiently resistant to mold.
- Access to content. A wise decision would be to provide a small hatch that provides access to fittings and metering devices.
And no pipes Source knaufmag.pl
See also: Catalog of companies that specialize in redevelopment of country houses of any complexity
Ready-made solutions for DIY installation ↑
After counting the points where it is necessary to install rotary wells, the type of container is selected. Manufacturers offer a sufficient number of ready-made structures of different sizes. The main materials from which sewage tanks are made:
Reinforced concrete.
Fiberglass.
Polypropylene, polyethylene.
Polypropylene rotary wells
For home sewage systems, rotary wells are made from composite and polymer materials. Designs of different configurations, with the possibility of selecting a finished product with full preparation for pipe routing.
Holes for tapping are made in sizes equal to standard pipe diameters
If the container is intended for both inspection and repair, select a tank with a larger diameter. The height of finished products varies. In non-standard conditions, prefabricated plastic structures with fasteners for installing rings are used.
Polyethylene wells are multilayer products made using seamless technology. The material is sealed, but quite soft: in hard rocks with a lot of stones, an empty tank can deform under soil pressure.
Factory rotary wells with splitters
Polypropylene wells are highly durable and can be installed in any conditions. The construction is welded. The walls are made with stiffeners.
Plastic container with a sealed hatch
Fiberglass products are used when working at great depths, in complex rocks, and in soils with high year-round groundwater levels. Heavy-duty walls can withstand increased loads. Such wells are installed at the junctions of branches of central sewer mains.
Composite Swivel Tank
Advantages of polymer products:
Low price.
Light weight.
Easy to transport and install.
Finished rings made of reinforced concrete are installed as reinforced rotary control wells. Products with particularly low wall permeability are chosen - such concrete does not allow groundwater to pass into the container.
Standard ring sizes
Structures of varying levels of complexity are assembled from reinforced concrete parts. Main parts for assembling a rotary well:
A plate up to 20 cm thick to protect the wiring. Select the product according to the turning diameter.
Rings: factory products with locks are connected to each other until the required height is achieved. When ordering individually, manufacturers can make holes for the entry and exit of pipes according to the drawing.
Necks and ceilings with lids. The neck is equipped with a ladder and a hatch cover.
Parts for assembling a reinforced concrete tank
Why don't builders hide pipes?
The bathroom is rich in all kinds of communications. Sewage pipes, hot and cold water supply, as well as additions in the form of a heated towel rail or heating system are on public display here.
This “openness” is not accidental. Even if the room is spacious enough and the layout allows, builders leave most of the pipes in sight. The reason lies in building codes that directly prohibit the hidden installation of pipes connected by certain types of fittings. For such devices, easy access in case of problems occurs.
Another reason for open installation is the formation of condensation on metal pipes with cold water. Only air constantly circulating around the pipe can effectively remove condensate.
That is why in the bathroom you can see pipes anywhere on the wall, in a corner or in a niche. They can be vertical or horizontal, running under the ceiling or near the floor. A separate class of pipes that need to be hidden are products of different diameters coming from plumbing equipment, as well as toilets with installation.
Not every pipe needs to be hidden Source izhevsk.ru
What determines the success of your work?
Any business requires certain skills, abilities, tools and knowledge, but repair or installation often depends on how the workers laid the tiles, the age of the repair or finishing, as well as the materials used, for example, the adhesive composition. If the previous repairs were done efficiently, then removing such tiles will be quite difficult; it is not easy to work with old tiles, because over time they deteriorate and may burst during installation. In any case, you will need to carefully prepare and try.
To completely remove all the old and unnecessary tiles, as mentioned above, you need to have a hammer drill that will help you quickly split all the material, but if you need to save the tiles or drywall, or remove only a part, you will need more gentle tools.
Types of designs
There are many ways to disguise unsightly communications. Making a box that simultaneously performs a protective and decorative function is the most sound solution. The task is implemented in different ways; The most common configurations are:
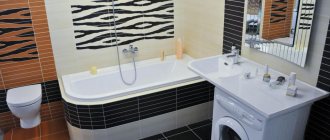
- In the form of a cabinet. It is chosen if it is necessary to hide a riser or other vertical system and leave free access to communications. Shelves help to rationally use the interior space.
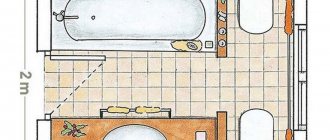
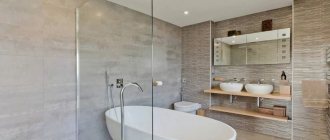
- In the form of a partition. A convenient option for a large bathroom, all communications of which are located on one wall; Also suitable for wall-hung toilets. The pipes are separated by a wall-sized partition; The area of the room is slightly reduced. The bathroom looks neat, and behind the partition there is enough space to organize the storage of a variety of things.
- In a compact design. The box is constructed directly around the pipes. This option is used more often than others, as it does not clutter up the space, looks neat and is quickly made. Suitable for all types of systems, including those adjacent to the ceiling (floor).
Corner design with inspection hatch Source cleanipedia.com
Ease
If you decide to do the repairs yourself, it is worth considering that the materials should be lightweight. This will eliminate the need to use additional labor and assemble formwork from heavy raw materials.
For example, strong steel frames are necessary for attaching mirror or marble panels.
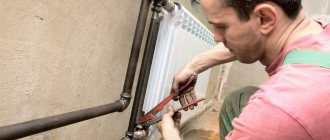
Installation features
Before starting work, check the condition of the pipes. The main attention is paid to connections, especially if they are threaded; detected defects are eliminated.
Then the dimensions of the future structure are measured, taking into account that the distance between the pipes and the walls of the box cannot be made less than 3 cm. The pipe box is installed in the following sequence:
- A metal profile (wooden slats) is fixed to the walls. If wooden blocks are used, they are treated with a moisture-repellent compound.
- The front face stand is mounted.
- The metal structure is attached to the floor and ceiling. If the frame is high (exceeds 1.5 m), additional horizontal lintels are provided.
- The selected material is cut to size. The parts are secured to the frame with small self-tapping screws.
- It is highly desirable that the box has a technical hole for a hatch. If a leak occurs, you can easily fix it.
- If necessary, finishing work is carried out. Drywall, MDF and plywood can be painted or tiled. Plastic panels are beautiful in themselves and do not need additional finishing.
Making the frame Source design-homes.ru
What you will need
- Ceiling profile PP 60x27x0.6/3 meters Knauf.
- Sheet of plasterboard.
- Mounting adhesive T-Rex or similar.
- Isover stone wool, Rockwool Acoustic Butts.
- Metal frame screws for plasterboard.
- Knife for cutting drywall.
- Cordless drill.
- Caulk gun.
- Tesa double sided tape.
- Paint brush 10 cm wide.
- Primer Vetonit md-16.
- Adhesive for gluing ceramic tiles.
- Crosses for aligning seams in ceramic tiles.
- Grout for seams.
- Drywall saw WORKPRO 152 mm
It is cut like this, using a sharp knife to carefully cut off the grout seam. Next, use a hand saw to cut through the drywall along the seam. Carefully remove the cut out part.
If you can remove the cut out part along with the tile, it is very good. In our case, this did not work out. I had to remove the tiles from the drywall.
Now that there is enough space to replace the risers, the plumbers get to work.
After the sewer riser has been replaced, we begin sealing. This is the picture after replacing the pipes.
In order to reduce the noise from the pipes, we lay Isover stone wool at 100 mm.
The next step is to prepare the metal profile racks. Let's make sure that nothing interferes with the back side of the drywall since we need to glue the metal profile around the perimeter of the hole.
In our case, on the one hand, we were lucky because the joint between the tiles fell exactly in the center of the metal profile. We need to glue the metal profile in only three places.
As a metal profile we use a guide profile PN-6 66x40 for plasterboard with a width of 66 mm. A wider profile can also be used. But I don’t recommend using anything less than 66 mm.
We prepare the profile by cutting off the required length. We check that the profile is easily suitable for gluing to the back of the drywall.
Glue strips of double-sided Tesa tape to the profile. Pieces of approximately 10 cm. Leave a distance of approximately 40 cm between the tape.
Let's prepare the mounting adhesive. I used T-Rex from Soudal. Ideal glue for such work.
Apply assembly glue along one edge of the frame between double-sided tape, apply the glue liberally and along the entire length of the frame.
Remove the protective film from the double-sided tape. Gently press the profile in the middle of the cut edge of the drywall.
We perform the same operation around the entire perimeter of our cut hole.
Now we leave the whole thing until it dries completely. Approximately 6 hours.
After drying, prepare a piece of drywall. Let me note an important point: we make drywall 1 cm smaller in both height and width.
After the drywall was installed, we were left with special voids around the edges. We also fill them with mounting glue. This way the drywall will also stick together.
Remove excess glue using a spatula.
Leave until completely dry.
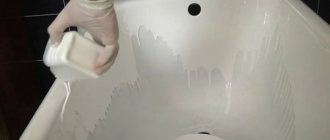
After drying, we got a single whole. Now, if this is a shower room, it is necessary to restore the waterproofing, I wrote about this in the article How to properly waterproof a shower room. If waterproofing is not necessary, for example, as in our case, when a sealed shower cabin is installed, we apply a layer of primer.
I use Vetonit MD-16 primer.
Using a wide brush, carefully apply the primer.
After the soil has dried, you can begin laying ceramic tiles.
The tiles are glued in a simple way; we apply glue with a notched trowel with a groove depth of 6 mm over the entire area of the drywall. Next, we simply glue the whole tiles, maintaining the distances for the seams using tile crosses. After the tiles have dried, remove the crosses and grout the seams with Ceresit CE 40 Aquastatic grout.
You may be interested in the following publications.
What to make a camouflage box from
With a successful choice of shape and material, the design of the box in the bathroom will become an organic (or, if necessary, spectacular) detail of the interior. Installation of the box is something like a small redevelopment, so the material is chosen based on the characteristics of the functioning of the pipes.
Popular materials include moisture-resistant plasterboard, PVC panels, decorative MDF board or moisture-resistant plywood. There is also an alternative to pipe insulation in the form of blinds or roller shutters.
Moisture-resistant drywall (GKLV)
There are several types of plasterboard sheets (GKL) on the market; A moisture-resistant type of material labeled GKLV is suitable for the bathroom. Sheets suitable for finishing plumbing units can be easily recognized by their characteristic green color. They are additionally impregnated with antifungal agents, which is a definite plus for wet rooms.
GKLV sheets are suitable both for creating standard rectangular shapes and for producing radius surfaces. True, to obtain a curved shape, special skills will be required.
Box with hatch made of gypsum boards Source stroyfora.ru
When choosing drywall, you must remember the following features:
- Plasterboard sheets weigh more than MDF boards or plastic panels, so installation will require more effort.
- Experts recommend additionally treating the slabs with a moisture-proofing compound. This will increase the structure’s resistance to moisture and extend its service life.
- A collapsible structure made of sheets will not work. Therefore, a hatch must be provided in the box, which will provide quick access to the meter and valves.
- If pipes with hot water (water supply or heating system) are hidden in the box, several holes are provided in the upper part of the structure. They will allow warm air to penetrate the room.
- Drywall is not a finishing material. It can be decorated with the same finish that was used for the bathroom walls, or you can choose a different material. Most often, the panels are sheathed with tiles, but other types of decoration are also used: moisture-resistant wallpaper, paint (preferably latex-based), decorative plaster.
Finishing with tiles Source berizon.ru
Plastic panels
Often the box is made of plastic panels. They have an attractive appearance and are available in a wide range of colors. You can always choose a shade that matches your bathroom design. In addition to aesthetics, plastic has the following undoubted advantages:
- The panels belong to budget finishing materials.
- They have a minimum thickness, so they do not hide the area; This is convenient for a small bathroom.
- PVC panels are waterproof and therefore easy to clean: just wipe the dirty surface with a damp cloth.
- Plastic is a durable material. It is quite flexible, durable and resistant to mechanical damage.
- Plastic panels are easy to install and, importantly, repair. The damaged part is replaced with a new one without destroying the structure.
Design of a small bathroom with hidden pipes Source assets.kemmler.de
Waterproof plywood
In the manufacture of moisture-resistant varieties of plywood, special glue is used; They are also treated with a compound that increases moisture resistance. Materials with the following markings are suitable for the bathroom:
- FC (moisture resistant). The veneers are glued with urea glue, which allows the material to be used in interior decoration.
- FSF (high moisture resistance). Resin phenol-formaldehyde glue is used in production, so the material is characterized by high water resistance. Additional advantages are mechanical strength and special wear resistance. In residential premises, material with an emission class not exceeding E1 is used.
The main disadvantage of waterproof plywood is its high cost. For this reason, it is used less frequently than other materials.
Paint or wallpaper is suitable for finishing a plywood box Source bezkovrov.com
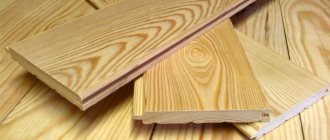
Wood boards
Popular materials in the construction industry: particle boards (chipboards), fibreboards (fibreboard or MDF) oriented strand OSB. They are often used to create a box, focusing on the relatively low cost.
The problem is that their technical properties are not designed for continuous use in a damp room. The surface tends to absorb water vapor, so the service life of wood boards in the bathroom does not exceed 10 years. To increase durability, the surface is painted or varnished.
Both wooden beams and metal profiles are suitable for the manufacture of a supporting structure; To fix the plates, use ordinary self-tapping screws. The finished box needs further finishing. If you used a laminated MDF board, you can refuse decoration.
MDF with tile imitation Source sense-life.com
Types of utility wiring
Before designing the wiring, you should become familiar with what types of such structures exist. There are only three of them. Moreover, one, with pass-through sockets, is practically not used. Therefore, we will not consider it.
Type #1. Serial type wiring
To implement this, taps are made from the cold and hot water supply risers leading to the first consumer. Pipes are laid from it to the second and further. Each water collection point is equipped with a tee, to one of the outlets of which the consumer is connected.
Overall this is a very simple scheme. It can only be used where the number of water consumers is small.
This is due to the fact that if several water collection points are activated simultaneously, the pressure in them will weaken and may be insufficient for the correct operation of the equipment. This is the main disadvantage of series wiring.
However, for apartments with one bathroom and a small amount of plumbing used, this may be the best option. A significant drawback of the system is the inability to turn off one of the plumbing fixtures for replacement or repair.
Serial wiring is extremely simple to implement, but not very convenient to use. However, for small bathrooms this solution may be quite acceptable.
There are many more advantages to sequential wiring. First of all, it is simplicity in design and installation. There will be no complex schemes here, everything is done very simply.
In addition, such wiring is considered the most economical option. The consumption of pipes and other elements will be significantly lower than in other systems, and installation costs are also minimal.
Even a novice plumber can handle the design and subsequent installation of sequential, otherwise tee, wiring
Type #2. Collector type of wiring
The collector type scheme involves connecting each of the consumers to the main line. For this, a special element is used, which is called a collector - a device that distributes water flows.
In a more complex version, and this is best, each collector outlet is equipped with a shut-off valve. Collector-type wiring can be considered the most convenient option to use. There are several reasons for this.
Firstly, the absence of pressure drops in the system. All consumers receive equally good water pressure, even if all water points operate simultaneously.
If the pressure in the system of an apartment or private house is too low for some reason, you can temporarily limit the water supply to one of the consumers, for example, to the toilet, thereby increasing the pressure for others.
The collector type of wiring is more convenient to use than the serial type. In this case, a separate line goes to each consumer, which guarantees no problems with pressure. However, such a system turns out to be more complex in design and installation.
Secondly, the ability to disconnect plumbing fixtures from the water supply if they need replacement or repair.
Thirdly, reliability. In fact, a single pipe goes to each consumer, without any connections or other elements. A leak can only appear in the collector area or near the device itself. Here it will be very easy to find. For this reason, pipes with manifold wiring can be safely installed using a hidden method.
Fourthly, ease of use. If there is a problem with a plumbing fixture and a leak appears, for example, at a faucet, you do not need to crawl under the sink. It is enough to close the shut-off valve on the manifold leading to the faulty device and wait for the specialists to arrive.
Even a woman or child unfamiliar with plumbing can do this. At the same time, all other equipment will work properly.
Professionals recommend using manifolds with shut-off valves for installation in water supply systems. With their help, if necessary, you can easily stop the water supply to a branch or plumbing fixture in need of repair.
However, collector wiring also has some disadvantages. First of all, it will cost the owner more than a sequential circuit. This is due to the fact that it will be necessary to lay a branch to each consumer. This will take a lot more material.
In addition, the installation of manifolds and shut-off valves will be required if the distributors are not equipped with them. And the circuit itself will be much more complicated than a sequential one.
Hatches
Plumbing hatches on the box provide access to equipment. Their size and number depend on the dimensions of the structure and the number of devices being serviced. Based on the method of opening, hatches can be classified as those that swing open, tilt, move to the side, or slide out in response to pressure.
The hatch can stand out from the surrounding background or blend into it. Camouflage is possible by using the same material for the box and the manhole cover.
A homemade hatch is made from plasterboard sheet. The basis is a profile frame on which a piece of drywall is fixed; The selected finishing material is glued on top. Use a vacuum handle, with suction cups, or a regular one, for which a hole is drilled.
If a plasterboard box is covered with tiles, this practical material is also used for the inspection hatch, gluing it to a sheet of chipboard or plywood. Magnets are attached to the inside, which are attracted to the metal frame and ensure the correct position of the door. There are factory steel hatches, but they do not fit into every interior. In addition, due to their weight, they are not suitable for installation on a box made of PVC panels.
Disguised inspection hatch Source remont-ekspert.ru
Creating a door in the toilet behind the toilet: simple and useful
The construction of a cabinet behind the toilet is considered a multifunctional solution to the problem. Communications are securely hidden, while access to them is open, and household supplies can be stored in the locker. First you need to make a frame out of wood.
Hinges should be installed on the frame itself, on which the door will be hung. To protect against moisture, the wood is coated with varnish and paint. And the appearance of such a device is quite nice. You can make a screen for pipes under the cabinet.
Screen hardware features:
- The screen should fit snugly against the walls;
- Openings are provided for water supply;
- The screen should be easy to remove and put back in.
The material for the cabinet can be chipboard, plywood, or plasterboard. To build the doors, you need to take the necessary measurements. Then a blank is cut out from the required material and inserted into a niche. Then they cut out the screen.
Recommendations
Installing a box in a bathroom requires caution and compliance with the following recommendations:
- Before installing the box, they check not only the tightness of the joints and the stability of the valves and meters, but also the correct functioning of communications, for example, a sufficient slope of the pipes.
- If the frame of the box is made of wooden beams, it is worth additionally impregnating it with a protective composition. The same procedure will be useful for wood boards.
- At the measurement stage, it is useful to take into account the location of household appliances in order to avoid unnecessary problems in the future.
Toilet with a box system Source mykaleidoscope.ru
Advice from professionals
Plumbers and builders give the following recommendations for masking pipes:
- When hiding the risers, markings begin from the floor.
- Installing a door or forming an inspection hole is mandatory.
- Any material used for cladding is impregnated with an antifungal solution. This will prevent mold from forming.
- Wooden structures are not recommended for installation in the bathroom. This frame is suitable for a toilet.
- The cabinet for pipes cannot be assembled from chipboard, which absorbs moisture. The material swells and begins to crumble.
- Vertical parts are installed at a distance of no more than 30 cm. This gives the structure rigidity.
- Closely located pipes are not sutured separately. It is recommended to build a single structure.
The walls should not come into contact with communications. The minimum distance is 3 cm.
Briefly about the main thing
The pipe box in the bathroom is an important component of the comfort and aesthetics of the room. It is made from materials that can resist fluctuations in temperature and humidity. More often than others, structures are built from plasterboard with ceramic tile cladding; options made from plastic panels are popular. There is growing interest in using roller shutters, but they do not fit into every design.
When choosing a suitable option, pay attention to the final cost of the project and its compliance with the dimensions of the room. Part of the design is an inspection hatch necessary for access to metering devices and fittings. They try to make it invisible, for which they use the same material as in the rest of the decoration.
Ratings 0
Removing tiles
How to carefully remove tiles from drywall without damaging them? The task is actually serious, because much will depend on how well the installation of these tiles was carried out at the time.
You can lay tiles on drywall, but how can you remove them later without damaging the base?
Personal experience
I will describe my experience in dismantling old tiles from the surface of plasterboard, which I encountered during renovations in one of the apartments.
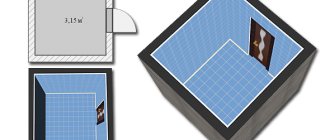
So, the customer at one time divided the combined bathroom into a separate toilet and bathtub. The solution turned out to be effective in the sense that the family was quite large, and using a shared bathroom was inconvenient.
This is what the partition between the toilet and the bathroom looked like:
Not much funding was allocated for the construction of the partition, so the craftsmen raised it from moisture-resistant plasterboard and covered it with ceramic tiles. The structure served for about eight years, after which the owner of the apartment decided to make repairs.
We were faced with the task of dismantling without damaging the tiles and, accordingly, the plasterboard partition (the owner wanted to use the tiles for cladding in the dacha). Yes, this is not an easy undertaking, because the tiles are attached to the cardboard layer of gypsum plasterboard, which means there is a high probability that this layer will be damaged.
Task
So, you are faced with the task of demolishing the partition of the plumbing cabin. Before making such a decision, you should definitely make sure that a plumbing cabin is installed in your apartment. The demolition of its partition certainly does not require preliminary approvals, but it does require informing the housing inspectorate about the completed redevelopment, with all that it implies - an act of acceptance of work and an act of waterproofing. These acts are needed to make changes to the BTI.
plumbing cabin
the septum is damaged
If your apartment does not have a bathroom, but you want to remove the partition between the bathroom and toilet, you need to:
Make sure at the documentary level that the partition is not load-bearing. To do this, you need to get a BTI plan and see how the partition is drawn on the plan. All non-load-bearing partitions should be drawn in thin lines;
If the BTI plan did not give anything, measure and calculate the thickness of the partition. In a panel house, the load-bearing wall should be thicker than 120 mm. Measurements of wall thickness should be carried out after cleaning the wall of finishing materials and sound insulation (if any);
If you have any doubts, it is best to seek advice from the housing inspectorate of your city (district).
The following tips may help you:
- Load-bearing walls in a panel house have standard widths - 140, 160, 180 and 200 mm.
- Partitions in brick houses can have a thickness of 80 - 100 mm or made of brick 120 - 250 mm. The load-bearing wall of a brick house can be 380, 500 and 640 mm wide.
- In monolithic houses, most likely there are no load-bearing walls inside the apartment, but there may be options.
Read: Dismantling of a plumbing cabin with a pallet and side
Plastic panels (PVC)
The essence of finishing a bathroom with plastic panels is no different from the same work with drywall.
It is also necessary to construct formwork; the panels are attached with self-tapping screws along the edge, which are then covered with a decorative corner (it is usually glued with silicone).
The simplest way is decor
When the budget does not include repair costs, and the pipes in the toilet are quite annoying, you can get by with minimal expenses. We are talking about decorating visible parts of the pipeline.
This method can be a real salvation when the head of the family, instead of repairing, chooses other ways to spend his leisure time - for example, fishing or basketball with friends. Moreover, both women and men can handle decoration. The main thing is to have inspiration.
Remarkable imagination and free time on a day off will help turn your thoughtful office into a realistic jungle
Depending on preferences and mood, the pipeline can be disguised as anything - turned into a tree, into an animal, or decorated with beautiful decorative elements.
Main types of decoration:
- stick a film with a suitable pattern over the pipes;
- paint with waterproof paint to match the color of the walls in the toilet room;
- depict a unique pattern or reproduce a birch trunk, oak bark or other material using paints;
- use decorative stones, beads, chains, twine and other elements used for needlework.
The simplest and most convenient option is to paint the pipes with paint that harmoniously matches the color of the walls. Or stick a film with a pattern.
Image gallery
Photo from
Decorative paint, shells, beads
The pipe can be turned into a giraffe
Make a birch tree from a pipe in the toilet
Unique pattern on pipes
It is important here that the material can withstand a humid environment and high temperature if hot water enters the apartment through one of the pipes.
For the toilet room it is better to use water-based paint, choosing the most favorable shade that can harmoniously fit into the overall style of the room
The decorating method is also great for hiding pipes in the kitchen or bathroom. In addition to decorating pipes in these rooms, you can use other methods of covering communications.
We also recommend that you familiarize yourself with the best options for masking gas pipes, used by resourceful owners.
Decoration
A creative approach to decorating communications is the most financially accessible method of hiding them.
- Winding with jute (the end of the thread must be fixed or secured with silicone).
- Cover the pipe with a cardboard tube, and then cover it with moisture-resistant self-adhesive film “like wood” or another texture.
As can be seen from the above methods, the process of upgrading a bathroom and hiding pipes and other unsightly elements is not work that requires large financial or labor costs.
By following these simple instructions, you can make your interior modern and attractive, without the help of expensive construction teams.