A thermostat or thermostat is a must-have for any warm home. It’s practically impossible to do without it, because this is the thing that controls and measures the temperature of both the floor itself and the air in the room. On the Internet you can find many photos of thermostats for heated floors.
The thermostat can be installed either in each room separately, or one for the whole house. It all depends on whether you need the same temperature everywhere or different in each place.
True, there are multi-channel models, where one device has several separate regulators at once. These thermostats can monitor multiple areas at once and change them individually.
Device functions
The thermostat performs the following functions:
- Switches the floor heating on and off, depending on whether you need to increase or decrease the current air temperature.
- Changing the heating intensity, as well as managing the economical mode.
- Complete shutdown/turn on of the system at a user-specified time.
Caleo 520
Photo: https://market.yandex.ru
The Caleo 520 thermostat is equipped with touch controls. It has a display that shows the heating temperature. Note the low power of the device, the presence of backlighting and a keypad lock. The manufacturer has taken care of the simplicity of settings and ease of use of its product. The operating temperature range of the device is 0…+40ºС. The thermostat communicates with the heated floor through a wired connection.
Thermostat Caleo 520
Advantages:
- touch control
- low power consumption
- reasonable price
- stylish design
Flaws:
- loud relay clicks
Types of floor heating thermostats
Nowadays there are many models and varieties of heated floor thermostats on the market. In general terms they can be divided into several types:
Thermostat with energy saving function. The bottom line is that when there are no people in the room, the thermostat will simply lower the air temperature by a few degrees, and when they return, it will increase it back.
Thermostat with programmable timer. The timer allows you to configure the time periods during which a specific command will be executed. For example, in the morning the temperature is 25 degrees, in the evening up to 30, and at night turn off the heating altogether.
Smart thermostat with programming function. A little similar to the previous one, but still different. It allows you to set special operating modes with alternating commands.
Thermostat with limiter. Allows you to set a maximum temperature value that cannot be exceeded. Very useful in rooms where the temperature should not exceed a certain temperature.
Warmly bright
First, let's talk about the most common problems with floor heating sensors, which at first glance may seem insoluble.
Problem 1.
The
heated floor worked great until
the remote floor temperature sensor
failed . How to diagnose sensor failure can be found in our article How to check a heated floor: measuring the resistance of the temperature sensor. When trying to replace the sensor, it was discovered that it was impossible to remove it, because... the sensor turned out to be simply walled up in the floor or squeezed into the same pipe as the cold end of the heating cable.
Problem 2. The warm floor does not heat well, because... the thermostat turns it off before the floor has time to heat up to a comfortable temperature
. The sensor is probably installed incorrectly here too and lies too close to the heating cable.
Problem 3. They completely forgot to install the temperature sensor, and the tiler had already laid the tiles.
Is it possible to do something in all these cases, which, unfortunately, happen quite often, without resorting to redoing the entire floor? Below are a couple of possible solutions to these problems. To choose the best one, we recommend that you contact our specialists. Find out the cost of replacing a thermostat and look at reviews and photos of repairs in the Heated Floor Repair section.
Solution 1. Using a thermostat in air temperature control mode or power regulator mode.
The simplest solution would be to use a thermostat with a built-in air temperature sensor, which will turn off the heating cable when the air warms up to the set temperature. If you have just such a thermostat and this mode of operation suits you, you are in luck! But what should you do if you want to use a heated floor not to heat the room, but only to heat the floor to a comfortable temperature? In this case, manufacturers of underfloor heating systems recommend using thermostats with the so-called. power regulator mode. The desired power is set in the range 0-100% (the most comfortable value can be selected experimentally). The thermostat will operate in this mode as a timer. For example, when set to 80%, for 10 minutes it will supply power to the heating cable for 8 minutes, but not for 2 minutes.
The OCD4 programmable thermostat (OJ Electronics, Denmark) can operate in both of these modes and is recommended for purchase if this solution suits you.
If you need a more budget-friendly solution, we recommend paying attention to the simple, but stylish and modern thermostat terneo s (DS Electronics) with touch control and terneo st (DS Electronics) with mechanical control, which, in the absence of a temperature sensor, automatically operate in timer mode (adjustment load) described above.
Solution 2. Use a thermostat that supports various types of sensors.
This solution is suitable for you if the thermostat has failed, but the temperature sensor is working properly. Some thermostat models, such as the terneo sx programmable thermostat with WiFi or the terneo pro programmable thermostat, support various types of third-party sensors. More information on how to check the serviceability of the sensor can be found in the article How to check a heated floor: measuring the resistance of the temperature sensor.
Is your underfloor heating broken? We'll fix it! Enter your contact information in the feedback form or call tel. 309-7-123 from 9:30 to 21:30 any day, seven days a week!
You may also be interested in: Heated floor repairInstallation of heated floors
Which floor thermostat is better to choose?
The large number of models on the market makes purchasing the right device difficult. Plus, not all of them are of high quality and will last at least the stated warranty period. Therefore, when choosing a thermostat, you should pay attention to some parameters.
Specifications:
- By operating principle: mechanical thermostat or electronic?
- Is the temperature sensor external or built into the floor?
VAILLANT VRT 250
Photo: https://market.yandex.ru
A device that automatically regulates the air temperature in the room, the readings of which you will see on a large graphic display. Equipped with a weekly programming function with the ability to set a specific temperature for each day of the week or divided into two blocks: one can be set for weekdays, the other for weekends.
Vaillant Room temperature controller VRT 250 0020182066
Advantages:
- Possibility of programming for a week
- no connection to 220V network required for operation
- There is a frost protection function
Flaws:
- not detected
Power
A fairly important parameter on which the quality of heating depends. It shows what power of the heated floor the thermostat is designed for.
To achieve good long-term operation, you need to take a thermostat with a power that exceeds the power of the heated floor by about 15-20%. Larger rooms may require multiple thermostats.
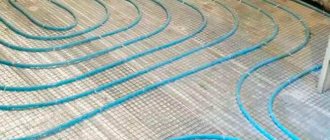
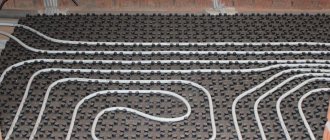
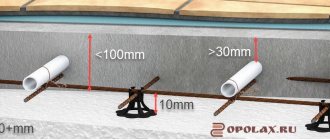
Design and purpose of a temperature sensor
The temperature sensor is an important element for ensuring high-quality operation of heated floors.
From it, data is sent to the thermostat, which regulates the temperature by increasing or decreasing the power. Thanks to this, you can set comfortable temperature levels in the room, prevent overheating and damage to the floor covering, and significantly reduce energy costs.
The temperature sensor is simple: two wires connected to a thermocouple - two wires connected at one end. Actually, they are the unit for measuring temperature indicators.
Before pouring the screed, the functionality of the heated floor and the temperature sensor itself is checked. To do this, the resistance of each part is measured. The system works if the difference between the indicators and the values in the technical passport is no more than 10 percent.
Features and Benefits
If you do not install thermostats, it is impossible to control the temperature of the heated floor. This is dangerous due to overheating of the device and the creation of an emergency situation. If we talk about the advantages of sensors, we need to consider: the device operates with or without electricity. The advantages of a mechanical regulator include low price and energy independence. The disadvantages include a relatively short period of operation and increased inertia.
The electric device allows you to set the exact temperature and can be controlled remotely. But such a device costs more.
Even more expensive is a programmable device that also runs on electricity. Cunning electronics guard the safety of the home: when the set temperature is reached, the thermostat turns off the heating. Moreover, he can program connection and shutdown for the required time, which saves electricity while people are away from the apartment.
There are options for temperature controllers that are equipped with an external IR sensor. It is able to detect the temperature of the floor covering. The device is powered by a battery and is attached to the wall using Velcro.
Thermostat installation method
According to the installation method, devices can be divided into:
- Invoices. They simply hang on the wall in the house.
- Built-in. To install such a thermostat, you need to do a lot of work: punch out grooves for the wires, cut out a place to mount the unit, then install everything and put it in order.
There are also those that connect to the distribution panel.
Connection
Connecting a temperature sensor is a multi-step process that requires care and attention.
When making a connection, it is important to follow all the steps, but before that you need to do the preparatory work:
- First of all, it is necessary to de-energize the network.
- A protective disconnecting device and a circuit breaker must be fixed in the distribution box on the DIN rail. The devices are similar in appearance, but their operating principles are different. If the insulation breaks and a “breakdown” forms on the wall, the protective disconnecting device will turn off the voltage, and the main purpose of the breaker is to disconnect the network in the event of a short circuit.
- A three-cable cable must be laid from the location of the junction box to the location where the controller is installed.
Connecting wires:
- black: to the intermediate circuit breaker (from below), from it to the RCD (from below) and then to the input circuit breaker;
- blue: to the RCD (bottom), then to the block with neutral wires;
- yellow with a green stripe - to the earth bus.
The wires to the thermostat must be connected in accordance with the diagram outlined in the instructions.
Each device has a standard block with 6 terminals. Each connector has a mark with its own meaning:
- L: “phase wire” from the network;
- N: “neutral” wire from the network;
- L1: “phase wire” to the thermal circuit;
- L1: “phase wire” to the thermal circuit;
- PE: grounding bus.
Economical thermostat
Energy savings depend entirely on the type of appliance used.
- How to install electrical wiring in a wooden house
Urgent entry into a construction SRO
Gasoline power plants
This problem completely disappears when heated floors are used in a small room where losses can be neglected.
Another thing is the use of thermostats in large office and special rooms, where, in addition to a special operating schedule, good efficiency of the device is also required. This is where the difference in savings is very significant and plays an important role.
In general, one thing that can be said about this is that it is better to use programmable thermostats; they can provide savings of up to 70%, while simple ones can only save up to 30%.
That's all, now you can figure out for yourself which floor thermostat is best for you.
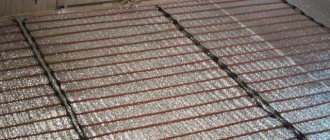
Step-by-step installation instructions
For the thermostat to work and accurately determine the temperature, it is not enough to choose it correctly; it is also important to install the device correctly. Installation usually does not cause problems, but we decided to clearly explain this.
Regardless of which regulator you decide to install, you should start by choosing a location for it. It should be convenient to use. It is necessary to calculate so that the device is located close to the sockets and doors, the height from the floor is 1.5 meters. It cannot be mounted near a window.
Usually, the thermostat kit includes instructions that you need to read.
Sequencing:
- Before starting work, the installation site is de-energized;
- the wires from the heated floor must already be connected to the socket box;
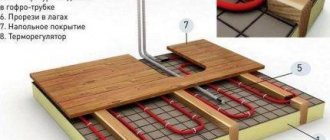
- then the sensor is installed - it is placed in a corrugation, one end is brought out into the socket box, and the second is located between the heaters (cable or infrared film floor plates);
- insulation is removed from the floor wires - 6 cm;
- the cable screens are connected to the yellow-green wire, then everything is placed in the socket box;
- the top panel of the thermostat is removed - you need to insert a straight screwdriver into the groove from below, pressing the lid will snap off;
- the floor wires are connected to the required terminals of the regulator according to the diagram;
- the wires are carefully bent, the device is inserted into the socket;
- the frame is installed and the top panel is attached.
The floor heating thermostat is connected, all that remains is to check its operation.
Setting up the thermostat
All steps for setting up the thermostat are described in the operating manual. If the model is not programmable, then you just need to set the required heating level with a switch.
Setting up a programmable thermostat is more complicated and requires following a certain sequence:
- Sets the day of the week and current time.
- Checks which temperature sensor is turned on. Usually this is a floor sensor, but if there are several of them, it is recommended to turn on both.
- Selectable from the “menu”: “Morning”, “Night”, “At Home”, “Away from Home”. The time and temperature are adjusted, then the set values are confirmed.
You can program the controller so that the heated floor will heat up during the day and turn off at night.
It is clear that effective operation of a heated floor without a thermostat is not possible. It's up to you to decide which model to choose. However, you should take into account the characteristics of a heated floor so as not to purchase a fancy, expensive model for a heating system that will work well with a simple device.
Sources
- https://ProDatchik.ru/vidy/datchik-temperatury-teplogo-pola/
- https://savesys.ru/umnyiy-dom/datchiki/datchik-na-teplyj-pol.html
- https://TrubaNet.ru/teplyjj-pol/kakoy-termoregulyator-dlya-teplogo-pola-vybrat.html
- https://obzor-expert.com/termoregulyator-dlya-teplogo-pola-kakoj-luchshe-vybrat-top-11-luchshih-modelej/
What do you think of this article?
Photo of a thermostat for heated floors
Connection diagram for a pass-through switch: operating principle and installation options for a special type of switch- How to select and install an electrical distribution panel - tips for assembling and installing the main elements yourself
Types of distribution boxes for electrical wiring - design, installation and rules for laying electrical cables
Which cable ties to choose: types, types, characteristics, application features and rules of useHow to choose the best doorbell: the best wired and wireless systems and features of their application
Which power cable is better to choose - rating of the best manufacturers of 2018, installation and application features
Teplolux MCS 350
Photo: https://market.yandex.ru
First of all, Teplolux MCS 350 is a thermostat for water heated floors, sometimes it is used in electrical systems. Up to 32 units can be connected simultaneously to a single home network. For comfortable control, they are integrated into the Smart Home system and subsequently controlled on the LCD display. Additionally, you can install an application on your smartphone to control the device remotely via Wi-Fi. The controller can communicate with 2 sensors, even if they are from other manufacturers. Energy savings reach 75%, this is facilitated by programming the work schedule.
Thermoregulator Teplolux MCS 350
Advantages:
- remote control
- work with water/electric heated floors
- ease of installation
- programming 24/7
- high efficiency
- automatic key lock
Flaws:
- inaccurate interaction with the application
Varieties
Temperature regulators are divided into:
- purpose:
- Indoor;
- Weather.
- mounting method:
- Wall-mounted;
- Mounted on DIN rail.
- functioning:
- Central regulation (allows you to control the temperature of the entire facility from one place);
- Wireless control (used when there is no possibility of laying a cable).
- type of government:
- Mechanical (resistant to voltage surges and not affected by electronic failures);
- Electromechanical (equipped with automatic heating);
- Digital (wide range of settings and modes).
- number of channels:
- Single-channel (used to automatically adjust and maintain temperature values at a certain level, they have smaller dimensions and weight);
- Multichannel (focused on controlling the temperature of a group of temperature sensors).
Comparison of models
We have combined all the thermostat models discussed above into a summary table.
| Model | Dimensions | Load | Temperature range | Adjustment step | Nutrition | Control |
| Danfoss | 75 x 75 x 27.5 mm | 660 W | from +0 to +40 °C | 0.5 °C | 230 V | sensory |
| Eberle RTR-E 3563 | 85 x 85 x 25 mm | 3500 W | from +5 to +30 °C | 1 °C | 220 V | mechanical |
| Ballu BMT-2 | 83 x 83 x 83 mm | 3500 W | from +5 to +30 °C | 1 °C | 230 V | manual |
| Caleo 920 | 65 x 13 x 9 mm | 3500 W | from +0 to +40 °C | 0.5 °C | 220 - 230 V | electronic |
| Varmel RTC 70.26 | 86 x 86 x 50 mm | 3600 W | from +5 to +40 °C | 1 °C | 230 V | manual |
| REXANT R200 | 86 x 86 x 40 mm | 3500 W | from +5 to +60 °C | 0.5 °C | 230 V | electronic |
| Terneo RZ | 124 x 87 x 58 mm | 3000 W | from +5 to +35 °C | 0.5 °C | 230V | electronic |
DEVI Touch
Photo: https://market.yandex.ru
DEVI Touch can withstand high load (3680 W) and is compatible with sensors from other manufacturers. The thermostat is equipped with a microprocessor control unit and a large touch display. The operating temperature range is from +5 to +45ºС. There are modern options: frost protection, indoor absence, open window detection function.
DEVI Touch thermostat
Advantages:
- bright screen
- clear setup
- long wires
- rich equipment
Flaws:
- little information in the instructions
Enjoy the shopping!
#Top 10
Read us first - add the site to your favorite sources.
Add a comment
{"commentics_url":"\/\/express-novosti.ru\/comments\/","page_id":1172335,"enabled_country":false,"enabled_state":false,"state_id":0,"enabled_upload": false,"maximum_upload_amount":3,"maximum_upload_size":5,"maximum_upload_total":5,"securimage":true,"securimage_url":"\/\/express-novosti.ru\/comments\/3rdparty\/securimage\ /securimage_show.php?namespace=cmtx_1172335″,”lang_error_file_num”:”\u041c\u0430\u043a\u0441\u0438\u043c\u0443\u043c %d \u0444\u0430\u0439\u043b\u043e\ u0432\u043c\u043e\ u0436\u0435\u0442 \u0431\u044b\u0442\u044c \u0437\u0430\u0433\u0440\u0443\u0436\u0435\u043d\u043e.","lang_error_file_size":"\u041f\u043e \u0436\u0430\u043b\ u0443\u0439\u0441\u0442\u0430, \u0437\u0430\u0433\u0440\u0443\u0437\u0438\u0442\u0435 \u0444\u0430\u0439\u043b \u0440\u0430\ u0437\u043c\u0435\u0440\u043e \u043c \u043d\u0435 \u0431\u043e\u043b\u0435\u0435 %d MB.","lang_error_file_total":"\u041e\u0431\u0449\u0438\u0439 \u0440\u0430\u0437\u043 c\u0435\u0440\ u0432\u0441\u0435\u0445 \u0444\u0430\u0439\u043b\u043e\u0432 \u0434\u043e\u043b\u0436\u0435\u043d \u0431\u044b\u0442\u044c \ u043d\u0435\u0431\u043e\u043b\ u0435\u0435 %d MB.","lang_error_file_type":"\u041c\u043e\u0436\u043d\u043e \u0437\u0430\u0433\u0440\u0443\u0436\u0430\u0442\u044c \u0442\u0 43e\u043b\u044c ""lang_text_loading":" u0437\u043a\u0430 ..","lang_placeholder_state":"\u0420\u0435\u0433\u0438\u043e\u043d","lang_text_country_first":"\u0421\u043d\u0430\u0447\u0430\u043b\u0430 \u0432\u044b\u04 31\u0435 \u0440\u0438\u0442\u0435 \u0441\u0442\u0440\u0430\u043d\u0443″,”lang_button_submit”:”\u0414\u043e\u0431\u0430\u0432\u0438\u0442\u04 4c","lang_button_preview":" \u041f\u0440\u0435\u0434\u0432\u0430\u0440\u0438\u0442\u0435\u043b\u044c\u043d\u044b\u0439 \u043f\u0440\u043e\u0441\u043c\u 043e\u0442\u0440″,”lang_button_remove ":"\u0423\u0434\u0430\u043b\u0438\u0442\u044c","lang_button_processing":"\u041f\u043e\u0434\u043e\u0436\u0434\u0438\u0442\u0435..."}
Tips for choosing
Before purchasing, we suggest that you familiarize yourself with the main criteria for choosing thermostats:
- Type. There are mechanical, electromechanical and digital. They are selected based on the future purpose and operating conditions.
- Maximum load. It is taken into account depending on the number of heaters in your heating system.
- Size. There are compact, large and large.
- Temperature range. Different models support temperatures from -60 to 1200 °C.