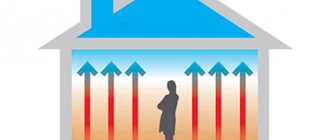
Today, porcelain stoneware in the construction market is considered a popular material for finishing floors, especially among cottage owners. After all, the interior of a room with this flooring looks modern and aesthetically pleasing.
Porcelain tile is a durable man-made finishing product that comes in tiles of different sizes and textures. It is made from kaolin or illite clay - the main component, under high pressure.
The formed forms are fired at a temperature of about 1300 degrees.
Granite differs from ceramic tiles in the technological process; processing occurs at significantly higher temperatures.
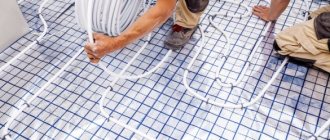
Infrared floors
The systems are presented on the market in 2 models:
- Film IR – membrane rolls with stripes;
- Carbon IR – rods connected by cords.
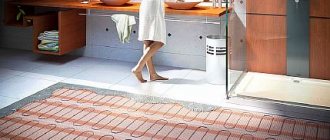
The infrared film heating method occurs thanks to elements embedded in laminated carbon film. IR conductive strips are protected from moisture. This allows you to create a system in the kitchen by placing it under a wooden floor, PVC covering or plywood. The device is connected to the power source via a thermostat. The IR floor membrane evenly emits heat, providing a comfortable temperature in the kitchen or living rooms. The film lasts up to 17 years. Price from 570 rub./sq.m.
Carbon infrared flooring is produced in the form of mats with rods fixed on a film with a special composition – polyethylene terephthalate. Parallel connection of heating elements ensures constant operation of the system. Price - 1550 rub/sq.m. 18 year warranty.
Advantages of IR systems:
- Warm floors under tiles can be easily installed on any surface: PVC, wood, concrete, plywood;
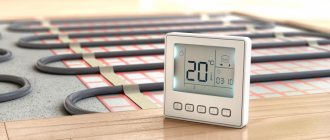
- Temperature can be easily adjusted;
- Atmospheric humidity is maintained in the room, the air does not dry out;
- Ions with a negative charge have a beneficial effect on humans;
- Hermetic insulation and double braided wires allow the use of heated floors under tiles in the living room, kitchen, and in rooms with high humidity.
IR warm floor under tiles and its disadvantages:
- The integrity of the coating is easily damaged;
- If safety rules are not followed, a fire may occur. It is better not to place it under a wooden floor or plywood.
Which electric floor to choose must be decided individually.
It is better to proceed from the technical characteristics: radiation force, convection, thermal conductivity. When buying a kitchen floor for plywood, PVC or wood coverings, you should carefully calculate the power of the system. It is better to make a choice in favor of well-known manufacturers.
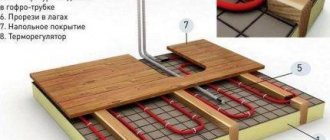
Installation is carried out in the following sequence:
- It is necessary to make grooves on the wall for the thermostat wires;
- Clean or vacuum the floor, make recesses on it for the corrugated pipe with the sensor, place it in the groove;
- Place the mat and carefully secure it with tape on both sides;
- After connecting the wires and elements, monitor the electrical resistance of the sensor and the mat;
- Fill the surface with 6 mm cement mortar;
- Attach the thermostat to the wall with your own hands;
- Apply tile adhesive;
- Laying tiles on a warm floor.
Suitable decorative coverings include: laminate, parquet, linoleum, mineral coatings. The ideal option is PVC tiles laid on a cable floor.
Option 1. The floor level is raised by 35-50 mm, heating cable into the screed
If it is possible to fill a screed with a thickness of 35-50mm, you can use a heating cable as a warm floor. Its main advantage is that by changing the laying step, you can set any capacity per square meter. heated area, so it can be used both as a comfortable floor heating system and as additional or complete heating of the room. And the use of special thermal insulation under the heating cable will reduce heat loss to a minimum, reducing energy costs and increasing the efficiency of the floor heating system.
Required conditions:
- If the thickness of the screed is more than 50 mm, there will be weak heating of the surface and increased energy consumption; if less than 30 mm, there will be an alternation of warm and cold zones (thermal “zebra”).
- The cement-sand screed should not have sharp stones or air pockets, so as not to damage the heating cable and prevent it from overheating.
- The heating cable must be securely fastened and the cable turns must not move when pouring the cement screed. Displacement of cable turns can lead to uneven heating of the surface - “thermal zebra”, and in some cases, even to overheating and failure of the cable if the minimum distance between turns is not observed (less than 40 mm).
This is interesting: The technology of laying warm electric floors - we tell you in detail
Laying heated floors under porcelain tiles: tips and secrets
How to choose an electric heated floor for tiles
Today, building materials such as porcelain stoneware are gaining popularity among owners of their own homes for installing flooring. It is convenient and practical and corresponds to all modern fashion trends, but it has one drawback - low temperature.
A solution to this problem has been found and it is represented by the “warm floor” system. Such a system allows you to heat the room with the ability to regulate this process, but everything looks beautiful in the photo, but what are the nuances of installing such a system in practice. The article will discuss how to install a heated floor under porcelain stoneware and achieve its maximum efficiency.
We will consider the process starting from the moment when the house has only a primary floor.
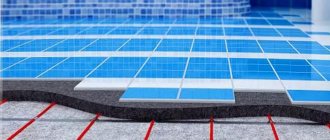
Next, to achieve maximum efficiency of the heated floor, it is recommended to install porcelain stoneware on the following layers of materials:
- screed or primary floor;
- heat-reflecting material (Izolon);
- thermal film;
- polyethylene film;
- drywall;
- tile adhesive with a layer of 1 cm;
- porcelain stoneware
Laying a heated floor under porcelain tiles
At the stage of laying the layers described above, it is worth thinking about installing a system of heating elements. This procedure is carried out in the presence of at least a heat-insulating layer on which the heating elements will be located, and it is also permissible to use a special heat-reflecting layer that enhances the heating effect by redirecting the thermal energy directly into the room.
When installing a heated floor under porcelain tiles, which type is better to choose, there is no difference, since there is only one condition: the material laid on top of the heating elements must be specified immediately, since not all of them can be disassembled and repair work carried out.
Porcelain stoneware is considered one of those materials that is very difficult to remove and repair work underneath it will be very expensive. As soon as the integrity of the wiring in the entire “warm floor” system is checked and the tests confirm the ability of the house’s electrical wiring to withstand the additional load, installation can be carried out and the elements can be connected in a static manner.
It is important to remember that the heating elements should not touch the hydro- and thermal insulation
Porcelain stoneware base
The primary floor will not be the only layer of such density, since to install porcelain stoneware it will be necessary to pour a cement screed over the film of the heating system located on top. A replacement for such a layer can be sheet material such as plasterboard.
The screed should be cement-sand, and it is worth remembering that cement will cause additional cooling of the coating, and sand will have the opposite effect. A special metal mesh is laid under it, which increases the adhesion of the layers, but in the case when an infrared heated floor is used under porcelain stoneware, it is better to abandon it, because the conductivity of electric current through it is very high and a short circuit is inevitable (for more details: “How to lay an infrared heated floor under tiles - installation instructions"). The screed should be between 5 and 7 centimeters thick in order for ideal heat transfer parameters to be maintained and the porcelain tiles to heat up quickly.
Laying porcelain stoneware slabs
The prepared surface will be ready for laying tiles. It is worth taking care in advance to purchase adhesive for heated floors under porcelain tiles, since this is a specific composition that has sufficient resistance to high temperatures and does not dry out when heated.
Glue for porcelain tiles is applied to the heated floor in a thin layer, dries within 24 hours, and in 72 hours the tiles will be perfectly connected to the floor, and then all that remains is to carry out the beauty work: grouting joints, washing out tiles, etc., so that There is no shame in bringing guests or taking pre-sale photos. If you use high-quality grout, the floor will be additionally protected from moisture penetration into the cracks between the tiles.
Practice shows that installing a “warm floor” system under porcelain stoneware is as easy as shelling pears, and any person with minimal construction skills can carry out such work. At the same time, the effect of the system is such that the room will immediately become comfortable and cozy.
Choosing tile adhesive
Among the features of such a material as porcelain stoneware, one can note the complete absence of water absorption, which plays a big role in the choice of tile adhesive for heated floors. Due to this feature, the selected adhesive should provide an increased level of adhesion. Therefore, it is extremely undesirable to use a standard cement composition.
In addition, before choosing an adhesive for laying a heated floor, you need to familiarize yourself with its characteristics, in addition, carefully analyze future operating conditions. Accordingly, in the presence of large loads, a composition with a high level of stability is needed. It is also necessary to take into account the temperature regime, which is acceptable for certain types of glue.
Well, now let’s move on directly to how to lay porcelain tiles on tiles or floors.
Instructions for using glue on heated floors
How to lay tiles on the floor in a toilet, characteristics of tiles, tools for work and how to lay tiles with your own hands correctly
Initial data: the room has a warm floor with a water heating system, a cement-concrete screed is made on top. There are no defects that require mandatory elimination before laying artificial stone.
To carry out the work, you will need to buy glue for porcelain tiles, a deep penetration primer for concrete surfaces, a notched trowel, a construction ladle and trowel, a container for preparing the solution and an electric mixer. To cut tiles you need a tile cutter, the distance between the seams is set using plastic crosses, the position of the surface is checked with a bubble level. Use a rubber hammer to move the tiles. The primer is applied with a roller or brush.
Step 1: Prepare the surface. Carefully remove all construction dust; it is advisable to vacuum the screed. To increase the strength of the surface and improve the adhesion of the adhesive, the base should be coated with a special primer.
Garbage collection
Surface dust removal
Apply a primer to the screed; it is recommended to mix it before use; due to long-term storage, delamination may occur. The primer is applied with a brush or roller to a completely dry base. How to check humidity? Very simply, cover a small area of the floor with plastic wrap at night. If traces of condensation are found on it in the morning, the floor should still be dried.
Applying primer
Carefully ensure that the primer covers the entire surface of the screed without gaps; remember that the adhesion performance of the adhesive significantly depends on this. The manufacturer guarantees the values indicated on the packaging only if the recommended technology for using the composition is fully followed. If the surface of the screed absorbs the primer too quickly, the operation will have to be repeated. Further work can be started only after the primer has completely dried.
Step 2. According to the instructions, prepare glue for porcelain tiles. Pour water into the container, add dry glue with a construction ladle and thoroughly mix all the ingredients with a mixer. The percentage is indicated on the bag.
Adhesive for porcelain tiles
Step 3. Prepare porcelain tiles for installation. To increase the adhesion of tile adhesive and tiles, the back side should be coated with water with added primer. The amount of primer is in the range of 10–20%; due to this operation, the quality and reliability of installation significantly increases. Coat the tiles with a small brush, and place the finished ones vertically in a free space. You can cook 10 pieces at a time. and more. The specific quantity depends on their size and the productivity of the tiler.
Step 4. Using a trowel, spread the prepared glue onto the surface of the screed and level it using a notched trowel. Do not try to immediately apply the composition to a large area; if you have little practical experience in laying tiles, then the width of the applied adhesive should be equal to the width of the tile.
Applying glue to the floor, leveling the layer with a notched trowel
Step 5. Apply a thin layer of glue to the surface of the porcelain stoneware and level it.
Step 6. Immediately after laying the tiles, level them vertically and horizontally; they should lie strictly in the same plane as those previously laid.
Laying tiles and checking their position
The best way to level tiles is to use wedges (Tile Leveling System)
Equal gaps between them are made using plastic crosses. At least two crosses must be used on each edge; this is the only way to prevent distortions. The position of the tiles is leveled with a rubber mallet; if there is none, then hit the protruding places with your fist. The final check is done with a level, but remember that its length should allow you to simultaneously control at least two adjacent tiles. Apply the level in at least two directions; the more, the more accurate the results will be. After 1–1.5 hours, installed crosses can be removed and reused on new rows.
Checking the position of porcelain tiles and adjusting with a mallet
The wedges are removed with a mallet after the glue has dried.
Tile Leveling System (TLS)
If trimming is necessary, take accurate measurements, but do not forget to leave a gap between the flooring and the walls. Small gaps will later be covered with baseboards. Grouting of joints is done only after the glue has completely dried, the time is indicated on the packaging.
Preparing the base
The better the base is prepared, the longer the floor covering will last. This aspect should be given due attention. The base is cleaned of dirt, primed and given time to dry. The concrete base is poured and leveled with a screed (a self-leveling mixture is ideal for this purpose), which is an ideal accumulator of thermal energy. The stage of preparing the foundation is quite important, because Porcelain stoneware places high demands on it. Laying is done on a dry base, because Porcelain stoneware does not absorb moisture.
Before you begin installing porcelain tiles, you should warm up the floor and turn it off. You can warm up the coating after work only after the adhesive solution has completely dried (10-14 days).
Installation features
Which adhesive to choose for porcelain tiles
Installation of an electrical cable includes the following nuances:
- floor screed not less than 3 cm;
- the base of the floor has insulation;
- the presence of reinforced metal mesh on the insulation;
- A plasticizer is required in the screed.
When choosing which heated floor to put under porcelain tiles, you should consider an electric mat as one of the options. The system consists of thin wire fibers up to 3.5 mm, placed in a certain way on a polymer sheet. Advantages of electric mats:
- quick installation;
- the path is simply rolled out and fixed, you can immediately lay tiles on top;
- a thick screed is not needed;
- the installation process is economical;
- no need to lay out the wire yourself, it is already built into the mesh;
- installation can be performed by anyone;
- the mat is suitable for any room;
- the floor height will rise by a maximum of 1.5 cm;
- starting from the 2nd floor, insulation under the mat is not required.
Taking into account all the nuances and expert advice regarding what type of underfloor heating is needed for porcelain stoneware, you can also consider the option of a thin electrical wire that can be laid out in the required increments. The master performing the work will always tell you how to do the work correctly. This alternative version of a heated floor will retain all the advantages and quality indicators of an electric mat.
Infrared heated floors are definitely not suitable for porcelain stoneware. Because the tiles are mounted on mortar. And the system is an electric film that is mounted without the use of fixers. This system is suitable for laminate, parquet or linoleum.
Because Since infrared heated floors work using carbon paste applied to a thin plastic plate, which is exposed to an alkaline environment, it is absolutely not suitable for heating rooms with tiles. The system can last for some time, but only until the aggressive alkaline environment spoils the plastic base. The same situation can arise if you use adhesive for heated floors under porcelain tiles.
In general, infrared heated floors have the shortest service life. Let's consider reviews of heated floors for porcelain tiles and expert advice.
Main types
Types of electric heated floors:
- with electric cable;
- electric mat;
- infrared heated floor.
Each type has its own nuances in connection and operation.
Floor heating using a cable is preferable, since it is quite easy to install. Installation can be done in a floor screed or in tile adhesive. Even a non-professional can handle it. Manufacturers of heating systems provide a guarantee for the operation of the equipment even if the installation is carried out independently by the buyer. The system is connected to the electrical network. Sellers in specialized stores will advise you on how to choose a heated floor for porcelain tiles. It is also worth asking for advice from professional builders.
Builders and apartment owners leave the most positive reviews of the electric heating field under porcelain tiles.
Floor heating using an electric cable is the most commonly used. In addition, it is one of the most sought after. The essence of its work is to heat the nichrome alloy using electric current. Nichrome is most often used in the heated core of the system. Each individual heating branch has protective shells that protect the floor surface from overheating and current access, and also preserves the integrity of the core in case of possible mechanical damage.
The cross-sectional thickness of the cable is 7 mm. It comes with one or two cores. The two-core cable is equipped at the ends with a coupling and a wire that connects to the network. Professionals choose a two-core system, and today single-core cables are almost never used. This choice is due to ease of operation and installation, since the less popular electric heating does not have an end coupling and is more difficult to install.
You may be interested in: Foundation pillow: dimensions, characteristics, requirements and standards
Water heated floor
A water heated floor is a metal-plastic heating pipe that is passed under porcelain stoneware. One of the advantages of this option is its low cost, since an additional water heating pipe can be easily connected to the central heating of the house.
The disadvantages of a water system include poor regulation of heat supply, which depends only on the amount of water simultaneously circulating through the system and the likelihood of cracks in the pipe, which can lead to big trouble - flooding of the lower floors with water from the system, and to repair the pipe you will have to remove all porcelain tiles .
Getting ready to lay porcelain tiles - what is required for the work, leveling the base
Laying porcelain tiles with your own hands requires preparation. At this stage, the required amount of tiles, glue, and grout is calculated. To the amount of tiles obtained in accordance with the area of the room, 8-12% is added for trimming and other errors.
Porcelain tiles can be laid seamlessly, but this will require rectified material, with ideal geometry and very expensive.
Tools and consumables are being prepared:
The floor tiles themselves may also need preparation - sometimes the material comes with a protective wax or paraffin coating. Wax can be removed with a soap solution, and paraffin can be removed with a spatula.
The base for installation must also be prepared, since significant differences in height will not be eliminated with the adhesive mixture. Poor quality concrete floors are leveled with self-leveling mixtures. After drying, the new screed is primed and then cleaned.
The surface must be dry and clean before installing porcelain stoneware.
Making a water heated floor
Step 1. The rough base is thoroughly cleaned. Debris is removed and dust is removed using a construction vacuum cleaner.
Preparing the subfloor
Step 2. A layer of waterproofing material is laid. Individual strips of waterproofing are connected to each other using tape. Insulation is laid on the surface. If the waterproofing is under the screed, then it does not need to be re-installed.
Laying insulation
Step 3. The insulation boards are fixed to the floor using special “fungi”, holes for which are drilled with a powerful drill or hammer drill.
Drilling holes for "fungi"
Insulation boards are attached to the floor
Step 4. A reinforcing mesh is laid on the surface of the insulation and secured using “fungi”. The mesh is laid with an overlap in 1 cell, and the individual webs are fastened to each other using plastic clamps.
Connecting reinforcing mesh sheets
Drilling holes for fasteners
Fixing the reinforcing mesh
Step 5. A manifold is installed to which the water floor pipes will be connected. The collectors are wall mounted.
Installed floor heating collector
Step 6. A special compensation tape is attached to the wall along the floor to compensate for the thermal expansion of the screed.
Compensation tape
Step 7. In accordance with the laying diagram, the pipe for the heating circuit is laid on the reinforcing mesh and secured to it using plastic clamps.
Laying pipes for a heated floor circuit
Heated floor pipe circuit length calculator
Step 8. The pipes are connected to the manifold. Before pouring the screeds, they are filled with water.
Connecting pipes to the collector
Step 9. Beacons are installed on the floor. Beacons are leveled using a construction laser level
It is important to remember that the thickness of the screed, starting from the level of the pipes, should not be less than 4 cm
Beacons installed
Step 10. The cement screed is poured in accordance with all the rules. After it has completely dried (about 28 days), the selected floor covering can be laid on the floor. You cannot turn on the heated floor until the screed is completely dry.
The screed is poured
Video - Installation of water heated floor
Warm water flooring cannot be installed in all rooms. For example, in old houses the load on the heating system due to it can be very high, and the housing and communal services organization may prohibit connecting the system. However, in new buildings there is usually a separate tap for connecting such a system and there will be no problems with organizing heating. Also, a water floor can be installed in cottage-type houses. And you will have to choose the coating according to your taste.
Preparatory work
Laying porcelain tiles on the floor with your own hands is not complete without having a number of devices and tools on hand to make the work easier. The tiles are durable and will be difficult to cut with a regular tile cutter if necessary. What basic tools will you need:
- level;
- tile cutter;
- Bulgarian;
- spatulas in the set;
- container for mixing the solution;
- construction mixer;
- tile adhesive;
- perforator;
- Diamond core bits when drilling round holes in tiles.
There are different options for laying porcelain stoneware. If the floor is rough and without a base, then it is necessary:
- clean the coating from dirt and debris;
- align the logs horizontally and pour expanded clay between them to the top;
- fasten the boards with self-tapping screws, leaving gaps of up to 10 mm;
- lay a waterproofing layer.
Fastening the board with self-tapping screws
Next option:
- lay a metal mesh and secure it with self-tapping screws;
- set beacons;
- pour the cement screed, leveling the floor horizontally using a level;
- lay moisture-resistant gypsum fiber or plywood sheets and secure them to the joists with self-tapping screws;
- seal seams, sand;
- apply a layer of primer.
If there is a plywood base, we will use polyurethane-based glue.
Application area
Thanks to the rather beautiful and rich appearance of porcelain stoneware tiles, you can radically change the look of the room. The material is used as flooring for floors in rooms at home or outdoors. They often decorate balconies, terraces, and gazebos.
Outside in the summer, it is most pleasant to walk along a porcelain stoneware path or terrace. The thing is that the properties of the material are such that it always remains cool.
Considering the properties of the material and its strength indicators, the floor should be covered only with porcelain stoneware, and the walls should be covered with ceramic tiles.
The cost of durable facing material is much higher than the cost of fragile tiles. Despite the limited color palette, porcelain tiles will last longer than floor tiles. When renovating an apartment or house, you need to set your priorities correctly.
Characteristics of porcelain stoneware
Porcelain tiles are made from slip. Its composition includes white clay, plasticizers, quartz, which provides hardness to the material, feldspar; makes porcelain tiles resistant to chemicals.
The facing material has a number of positive characteristics:
- hardness, strength, abrasion resistance;
- does not collapse under the influence of moisture;
- does not deform due to temperature changes;
- withstands high mechanical loads;
- has high thermal conductivity;
- attractive appearance; choose the material depending on the design of the room.
Any tile is suitable for underfloor heating. There are no special varieties for heated floors, so the cladding is chosen depending on the overall design of the room and the structure of the material.
- The tile should not slip. For the floor, porcelain stoneware with a rough, matte surface is preferable.
- Size 30*30 cm or 60*60 cm.
- For living rooms, choose tiles with a thickness of 15 mm. For rooms with low loads, 5 mm cladding is suitable.
Technical porcelain tiles are well suited for a hall or a room on the 1st floor. It can be laid on any “warm floor”. It is inexpensive and very durable.
Tiles with a matte surface are suitable for the bathroom, kitchen, and toilet. It can be combined with gloss; This is lappatted cladding. You can consider sanitary porcelain tiles. It is not slippery and has a glossy finish.
PVC tiles and other materials
For a warm water floor, important conditions are good thermal conductivity of the finishing floor covering and ease of use during further operation. For these purposes, it is possible to use any coating:
- Ceramic tiles are widely used, have high energy intensity and to warm up to a comfortable temperature requires a long time or a powerful heat source, which is formed by reducing the technical distance between the loops of water pipes.
Ceramic tiles
- Laminate – represents a compacted structure with good thermal permeability. Allowed for installation in conjunction with a water heated floor system only after the concrete screed has dried. The reason is the design feature of the material, the upper part of which has water-repellent properties, and the lower part is hygroscopic. Allowing the screed to dry out will lead to steam emissions, which will cause deformation of the lamellas, which will lead to the need to replace damaged elements.
Laminate
- Practice shows that the use of standard linoleum coverings is a losing option for floor coverings for heated floors. Despite the good thermal conductivity properties, operation at comfortable temperatures leads to softening of the material and fatal discoloration.
Linoleum
- The use of natural wood flooring (parquet, floorboards) is not considered the best option. The material has poor thermal conductivity properties: use at elevated temperatures will lead to disruption of the structure and cracking of the surface.
Wooden floor
Experts in the installation of water heated floors consider PVC tiles to be a winning option. Vinyl tiles are a material with a whole set of positive qualities necessary for the finishing floor covering of a water-heated floor:
- comfortable use without changing the shape and structure of the material at temperatures not exceeding eighty degrees (floor heating up to forty-five degrees);
- high heat conductivity;
- various types of tiles are combined with almost all types of rough covering;
- can be installed without the use of special tools;
- provides stable sound insulation from the noise of working fluid flowing in the pipes;
- the high safety margin of the tiles is guaranteed by the production technology;
- an assortment of colors and textures, including anti-slip coating;
- fastening is provided in three options: self-adhesive, locking connection and supplied glue;
- affordable price.
PVC tiles
Properties of ceramic tiles
The thermal conductivity of ceramic tiles varies from 0.2 to 0.8, which is significantly less than stone, but higher than other coatings. This difference in thermal conductivity of different tiles is due to the different porosity of the materials used by different manufacturers; Porosity depends on how the tiles are made.
In addition to thermal conductivity, it is sometimes important to take into account the surface roughness or, in other words, the depth of the tile relief. Because rough tiles transfer less (and sometimes much less) heat to the foot standing on it than smooth ones
Well, this is understandable: on a rough surface we touch the tile not with the entire surface of the foot, but as if with separate points:
By the way, there is also the opposite effect: when the floor is turned off in the summer, your feet will be less cold on the rough tiles.
So, the tiles conduct heat well when underfloor heating is running. On the other hand, when the heating is turned off in the summer, standing on the tiles barefoot is uncomfortable, so you need to look for some way out or compromise, as was written about in the article about the properties of floor coverings.
Installation of tiles on heated floors
The “warm floor” heating system for all floor covering options is composed of the following elements:
- thermal insulation material at the bottom of the structure to direct heat and cut off cold surfaces;
- specialized pipes for coolant;
- mesh for reinforcement and pipe fastening components;
- concrete screed;
- PVC tiles for flooring.
Preliminary calculations are made for the placement of heating pipe circuits. Their number is limited by the power of the heating boiler to warm a certain volume of liquid. One circuit - no more than twenty-five linear meters of heating pipe.
It is recommended to carry out work in the following sequence:
- A layer of thermal insulation is laid over the surface of the rough coating, and a damper tape is used to compensate for the thermal expansion of concrete.
- For fastening pipes - guides. In a simple version, it is enough to lay the reinforcing mesh and fasten the pipes with clamps every twenty to twenty-five centimeters. The fastener should fix the pipe, leaving room for thermal expansion.
- Installation of pipes near the walls is carried out at a distance of 70 mm.
- The order of laying the pipes involves leading the ends to the distribution manifold.
- After laying the pipes, they check the tightness and bring the temperature of the liquid to 20 - 25 degrees, pour the screed.
- After the finishing screed has dried, they begin to prepare and lay PVC tiles.
- The surface of the screed is thoroughly cleaned of dirt, defects are eliminated, and dust is removed.
- Leave the tiles in the room at room temperature for at least 12 hours so that they take on dimensions and straighten out.
- Tiles with a locking fastening system and a self-adhesive base will not be difficult to install. Mount from the far corner of the room with a ledge of each row by 1/3 or 1/2 of the slats. At the same time, the protrusions of the following tiles are inserted into the grooves of the locks without excessive effort. Self-adhesive tiles are straightened during the laying process to allow air to escape under the product and for strong adhesion of the coating.
- Tiles that are supposed to be installed using adhesive require careful selection taking into account operating temperature conditions.
Laying option
Having familiarized themselves with the conditions and requirements for the installation of a water-based “warm floor” system, the owners of the premises can easily choose the appropriate material for the floor covering from an aesthetic point of view and practical application in order to solve the issue of energy saving. It is of interest to install a heated floor system under PVC tiles. The initial costs of purchasing equipment and carrying out installation work will more than pay for themselves in a short time.
One of the methods of laying the finishing floor covering from PVC tiles is shown in the video below.
Laying PVC tiles
Choosing a design – beautiful and non-staining
It should also be taken into account that porcelain tiles are available in a variety of design solutions. Here, the appropriate option must be chosen taking into account the overall style of the room. Traditional design options include:
Wood-look porcelain tiles for the kitchen are chosen so that the floor appears traditionally massive, but at the same time is practical. And this is a very reasonable decision, because today you can find very naturalistic tiles that look as much like wood as possible. In addition, such a floor will be organically combined with laminate or parquet boards in other rooms and the hallway.
In addition, porcelain stoneware may differ in texture. Thus, the natural (matte) coating is not processed after firing, so it has increased wear resistance.
And when glazed floor tiles are made, the matte surface of the porcelain stoneware is cut off and lightened in a special way.
Porcelain tiles for floors are not much inferior to ceramic ones in terms of standard size variations. The most popular formats are: 30x30 cm, 40x40 cm and 60x60 cm. But you can choose both very large tiles (120x80 cm) and very small ones (5x5 cm).
Laying porcelain tiles on a heated floor
It’s unlikely that anyone likes to walk barefoot on porcelain tiles. Quite natural, it’s cold. However, why not, if only you turn cold tiles into warm ones by laying them on a heated floor. In fact, laying porcelain tiles on heated floors is no different from the ordinary installation process. However, as elsewhere, there are certain points on which both the durability of the resulting coating and its performance depend. These are the ones we will consider to keep your floor warm for many years.
Things to remember:
First, let's check if the underfloor heating system is working. To do this, it is enough to measure the resistance of the heating cable www.optcable.ru - the difference should not be higher or lower than specified, by more than 5 percent. We will set the temperature in the room intended for installation to the temperature recommended by the adhesive manufacturer. We will check whether we have a sufficient supply of consumables and their compatibility. In addition to the porcelain tiles themselves, you also need an adhesive mixture (which can be used for heated floors, this needs to be clarified), a grouting compound, sealant, spacers, etc. Let's clean the surface of the tile from the technical wax applied to it for protection. Typically, wax is easy to clean with regular warm water and detergent.
Laying the tiles:
- Let's prepare the glue:
It's simple: pour the contents of the package into a bowl with clean water and mix until smooth. The resulting lump-free solution must be kept for 5 minutes and mixed again.
- Let's apply glue:
It is necessary to apply tile adhesive on top of the laid heated floor so that the adhesive composition fills all the cells of the mat. The glue must be applied, then level the surface with a small spatula (first smooth, then serrated). The sizes of the teeth are selected based on direct correspondence to the sizes of the tiles. When applying the adhesive composition, you need to remember that the thinner the adhesive layer, the less shrinkage there will be. The layer that is applied to the surface area must be equal to or slightly exceed the thickness of the cable so as to completely hide it.
- Actually, we lay the tiles:
Laying the tiles must be done no later than 10 minutes after applying the adhesive to the floor surface. You need to lay the porcelain tiles on the adhesive and press it a little. To maintain this distance there are special spacers. If there is glue in the grooves, it should be removed with a damp sponge. After this, you should wait until it dries and rub the seams.
Step-by-step instruction
So, let's start with the installation itself.
- First of all, mix the adhesive mixture and then apply it to the surface. First we level it with an even spatula, then with a notched spatula.
- Next, lay the tiles on edge and level them. Please note that it is necessary to check in all positions.
- The next step is to also adapt the subsequent tiles. But they already need to be moved a little away from the previous ones, leaving a small gap. For this purpose, special crosses or systems for laying tiles are usually used.
- Each new laid tile must be checked with a level. Within the next 10 minutes after installation, you can still correct it and adjust its position.
In addition, controlling the voids between the seams becomes a fairly important factor, as this can lead to cracking of the tile itself. Speaking about the timing of control, we can say that the glue itself usually dries within a day, while the full strength of the coating occurs only after three days.
Necessary tool
To carry out the work of laying porcelain tiles on a heated floor, we will need the following tools:
- Measuring instruments (ruler or tape measure) as well as a building level.
- Grinder and tile cutter.
- A container for water and also for mixing glue.
- Rubber trowel.
- Set of spatulas for working with tiles.
- Marker.
- Construction mixer or drill with appropriate attachment.